door lock CHRYSLER PACIFICA HYBRID 2017 2.G Owner's Manual
[x] Cancel search | Manufacturer: CHRYSLER, Model Year: 2017, Model line: PACIFICA HYBRID, Model: CHRYSLER PACIFICA HYBRID 2017 2.GPages: 592, PDF Size: 6.73 MB
Page 68 of 592
NOTE:
•To open the Hands-Free Sliding Doors requires a valid
Passive Entry key fob within 5 ft (1.5 m) of the door
handle. If a valid Passive Entry key fob is not within 5 ft
(1.5 m), the door will not respond to any kicks.
• The Hands-Free Sliding Door will only operate when the
transmission is in Park.
• If anything obstructs the Hands-Free sliding doors while
it is opening, the sliding doors will automatically reverse
to the closed position, provided it meets sufficient
resistance.
• If the power sliding doors encounters multiple obstruc-
tions within the same cycle, the system will automati-
cally stop.
The Hands-Free Sliding Doors feature may be turned off
through Uconnect Settings. Refer to “Uconnect Settings” in
“Multimedia” for further information. The Hands-Free
Sliding Doors feature should be turned off during Jacking,
Tire Changing, and Vehicle Service.Safe Lock — If Equipped
To provide a safer environment for small children riding in
the rear seats, the second row sliding door switches may be
overridden by pushing the Sliding Doors Power OFF
button, located in the front overhead console.
When Power OFF is selected, the power sliding side doors
may not be opened or closed by pushing the buttons
located on the B-Pillar trim panels, just in front of the
sliding doors. Even when ’Power OFF’ is selected the
passive Entry buttons on the outside door handle still
works to power your sliding door open or closed.
The Power OFF LED, in the overhead console, will be lit
when the handles are manual and the buttons just inside
the sliding doors are disabled.
To enable power to the handles and buttons, when the
overhead console Power OFF LED is lit, push the Sliding
Doors Power OFF button, located in the front overhead
console.
66 GETTING TO KNOW YOUR VEHICLE
Page 69 of 592
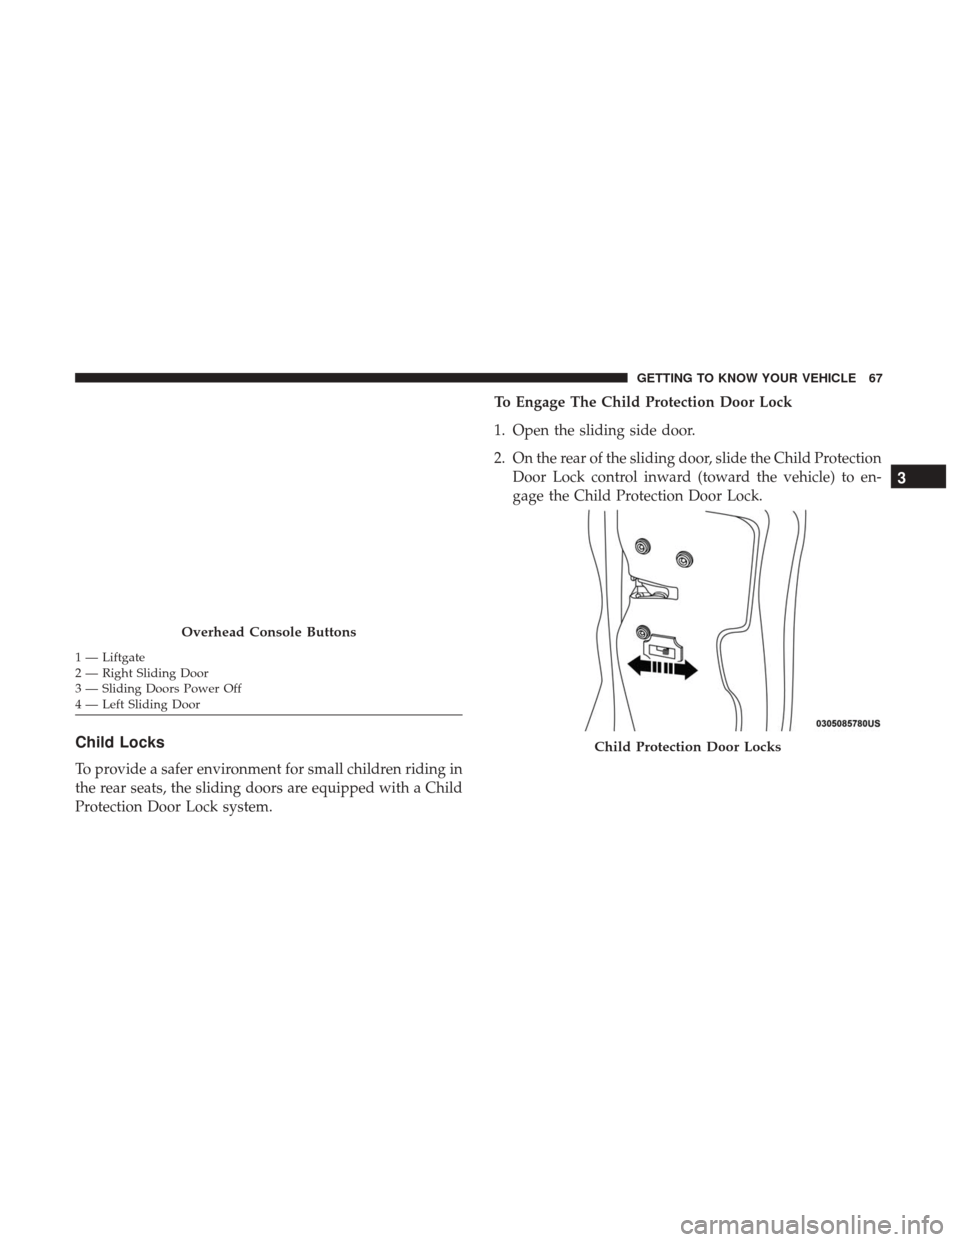
Child Locks
To provide a safer environment for small children riding in
the rear seats, the sliding doors are equipped with a Child
Protection Door Lock system.To Engage The Child Protection Door Lock
1. Open the sliding side door.
2. On the rear of the sliding door, slide the Child Protection
Door Lock control inward (toward the vehicle) to en-
gage the Child Protection Door Lock.
Overhead Console Buttons
1 — Liftgate
2 — Right Sliding Door
3 — Sliding Doors Power Off
4 — Left Sliding Door
Child Protection Door Locks
3
GETTING TO KNOW YOUR VEHICLE 67
Page 70 of 592
3. Repeat Steps 1 and 2 on the opposite sliding door.
NOTE:
•After engaging (or disengaging) the Child Protection
Door Lock, always test the inside door handle with the
sliding door closed to make certain the Child Protection
Door Lock is in the desired position. The inside door
handle will not open the sliding door when the Child
Protection Door Lock is engaged.
• The power sliding door will operate from the switch
located just inside the sliding door, regardless of the
Child Protection Door Lock lever position. To avoid
unintentional operation of the power sliding door
from the rear seats, push the sliding door power Off
button, located in the overhead console, to engage Safe
Lock. When the overhead console power OFF LED is lit,
the sliding door may not be power opened or closed by
pushing the buttons just inside the sliding doors or
pulling on the handles.WARNING!
Avoid trapping anyone in the vehicle in a collision.
Remember that the sliding doors cannot be opened
from the inside door handle when the Child Protection
Door Locks are engaged.
To Disengage The Child Protection Door Lock
1. Open the sliding side door.
2. Slide the Child Protection Door Lock control outward (away from the vehicle) to disengage the Child Protec-
tion Door Lock.
3. Repeat Steps 1 and 2 on the opposite sliding door.
NOTE:
• After disengaging (or engaging) the Child Protection
Door Lock, always test the inside door handle with the
sliding door closed to make certain the Child Protection
Door Lock is in the desired position. The inside door
handle will open the sliding door when the Child
Protection Door Lock is disengaged.
68 GETTING TO KNOW YOUR VEHICLE
Page 101 of 592
To operate the courtesy lights, push either the driver ’s or
passenger light switch.
NOTE:
•Before exiting the vehicle, make sure that the interior
lights are turned off. This will prevent the battery from
discharging once the doors are closed.
• If a light is left on, it will automatically be turned off
approximately 10 minutes after the ignition is in the
STOP/OFF position.
Rear Courtesy/Reading Lights — If Equipped
Located above the rear passengers are courtesy/reading
lights. The lights turn on when a front door, a sliding door
or the liftgate is opened. If your vehicle is equipped with
remote keyless entry the lights will also turn on when the
unlock button on the key fob is pushed.
The courtesy lights also function as reading lights. Push the
lens to turn these lights on while inside the vehicle. Push
the lens a second time to turn each light off.
Courtesy Light Switches
Reading Lights
3
GETTING TO KNOW YOUR VEHICLE 99
Page 122 of 592
WINDOWS
Power Windows
Driver Power Window Controls
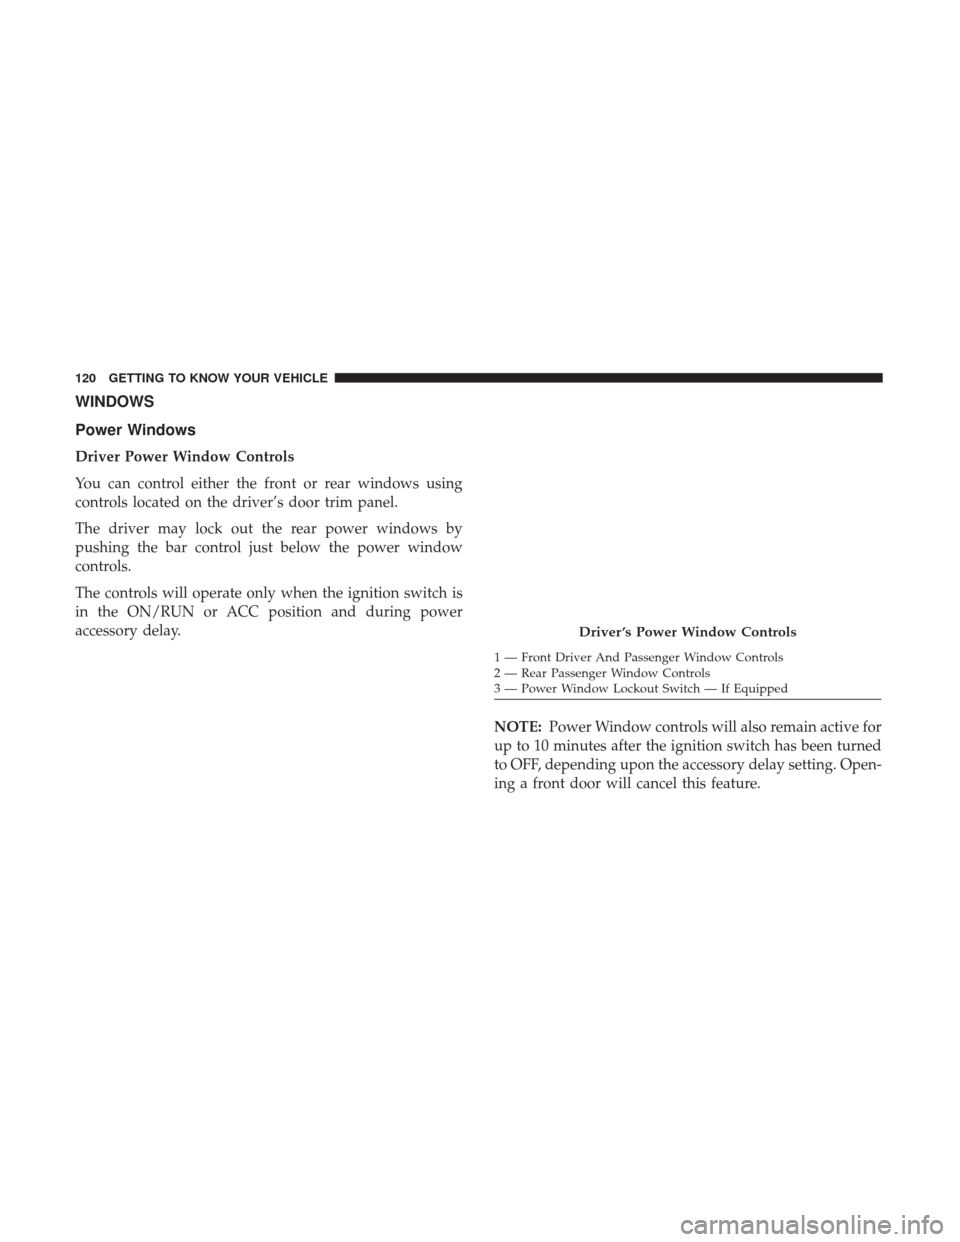
You can control either the front or rear windows using
controls located on the driver’s door trim panel.
The driver may lock out the rear power windows by
pushing the bar control just below the power window
controls.
The controls will operate only when the ignition switch is
in the ON/RUN or ACC position and during power
accessory delay.NOTE:Power Window controls will also remain active for
up to 10 minutes after the ignition switch has been turned
to OFF, depending upon the accessory delay setting. Open-
ing a front door will cancel this feature.
Driver ’s Power Window Controls
1 — Front Driver And Passenger Window Controls
2 — Rear Passenger Window Controls
3 — Power Window Lockout Switch — If Equipped
120 GETTING TO KNOW YOUR VEHICLE
Page 123 of 592
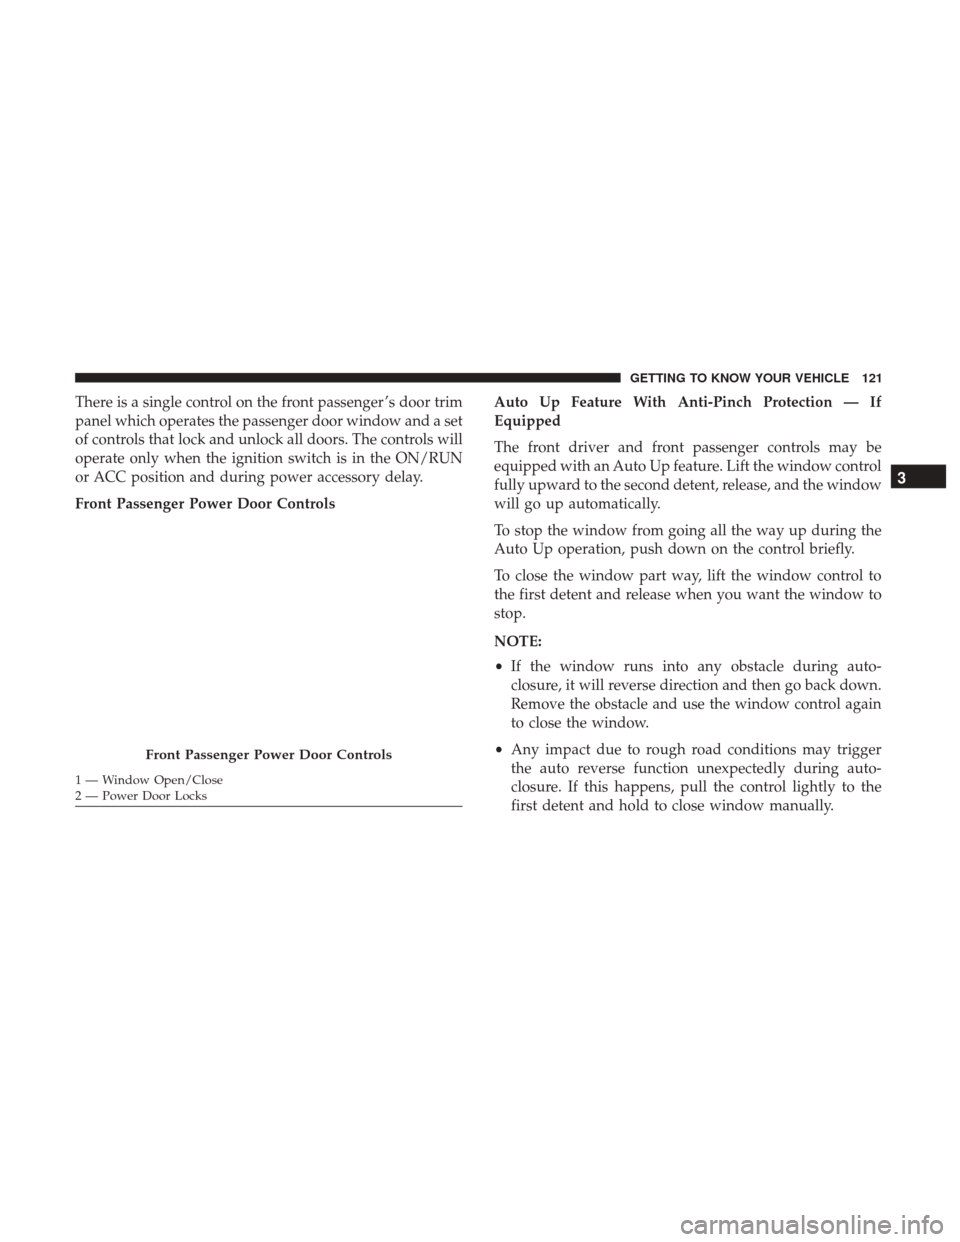
There is a single control on the front passenger ’s door trim
panel which operates the passenger door window and a set
of controls that lock and unlock all doors. The controls will
operate only when the ignition switch is in the ON/RUN
or ACC position and during power accessory delay.
Front Passenger Power Door ControlsAuto Up Feature With Anti-Pinch Protection — If
Equipped
The front driver and front passenger controls may be
equipped with an Auto Up feature. Lift the window control
fully upward to the second detent, release, and the window
will go up automatically.
To stop the window from going all the way up during the
Auto Up operation, push down on the control briefly.
To close the window part way, lift the window control to
the first detent and release when you want the window to
stop.
NOTE:
•
If the window runs into any obstacle during auto-
closure, it will reverse direction and then go back down.
Remove the obstacle and use the window control again
to close the window.
• Any impact due to rough road conditions may trigger
the auto reverse function unexpectedly during auto-
closure. If this happens, pull the control lightly to the
first detent and hold to close window manually.
Front Passenger Power Door Controls
1 — Window Open/Close
2 — Power Door Locks
3
GETTING TO KNOW YOUR VEHICLE 121
Page 124 of 592
WARNING!
There is no anti-pinch protection when the window is
almost closed. To avoid personal injury be sure to clear
your arms, hands, fingers and all objects from the
window path before closing.
Auto Up Reset — If Equipped
To reactivate the Auto Up feature, perform the following
steps after vehicle power is restored:
1. Pull the window control up to close the window com- pletely and continue to hold the control up for an
additional two seconds after the window is closed.
2. Push the window control down firmly to the second detent to open the window completely and continue to
hold the control down for an additional two seconds
after the window is fully open.
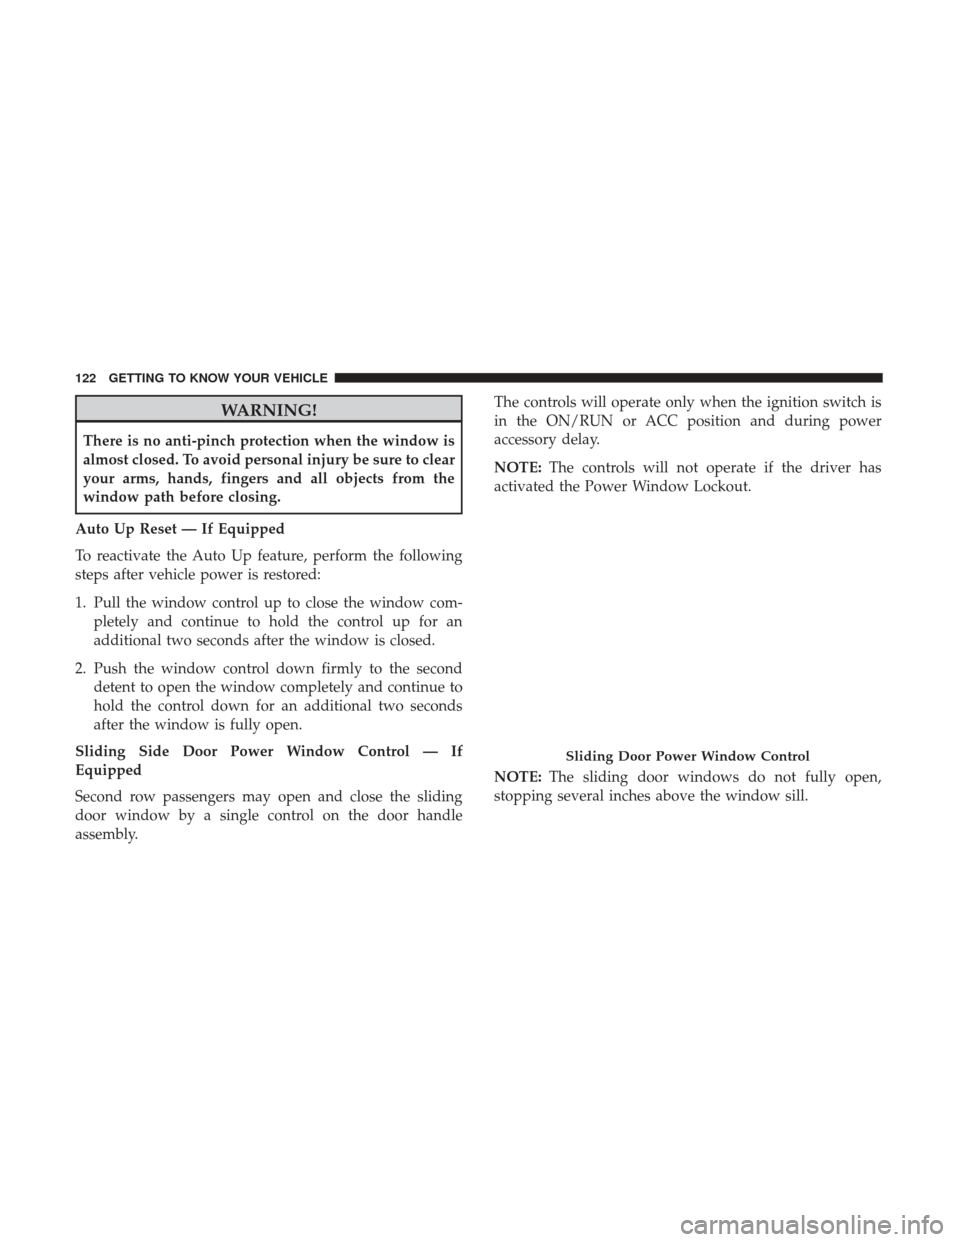
Sliding Side Door Power Window Control — If
Equipped
Second row passengers may open and close the sliding
door window by a single control on the door handle
assembly. The controls will operate only when the ignition switch is
in the ON/RUN or ACC position and during power
accessory delay.
NOTE:
The controls will not operate if the driver has
activated the Power Window Lockout.
NOTE: The sliding door windows do not fully open,
stopping several inches above the window sill.
Sliding Door Power Window Control
122 GETTING TO KNOW YOUR VEHICLE
Page 128 of 592
and stop automatically. This is called “Express Close”.
During Express Close operation, any other actuation of the
switch will stop the shade.
NOTE:If the sunroof is open, the shade will close to the
half-open position. Pushing the shade close button again
will automatically close both the sunroof and shade com-
pletely.
Closing Power Shade — Manual Mode
To close the shade, push and hold the switch in the forward
position. Any release of the switch will stop the movement
and the shade will remain in a partially closed condition
until the switch is pushed again.
Pinch Protect Feature
This feature will detect an obstruction in the opening of the
sunroof during Express Close operation. If an obstruction
in the path of the sunroof is detected, the sunroof will
automatically retract. Remove the obstruction if this oc-
curs.
NOTE: If three consecutive sunroof close attempts result in
Pinch Protect reversals, Pinch Protect will disable and the
sunroof must be closed in Manual Mode.
Sunroof Maintenance
Use only a non-abrasive cleaner and a soft cloth to clean the
glass panel.
Ignition Off Operation
The power sunroof switch will remain active for up to
approximately ten minutes after the ignition switch is
turned to the OFF/LOCK position. Opening either front
door will cancel this feature.
NOTE: Ignition Off time is programmable through the
Uconnect System. Refer to “Uconnect Settings” in “Multi-
media” for further information.
HOOD
Opening
The hood release lever (to open the primary latch) and
safety latch (to open the secondary latch) must be released
to open the hood.
1. Pull the hood release lever located under the driver ’s side of the instrument panel.
126 GETTING TO KNOW YOUR VEHICLE
Page 131 of 592
The key fob and the overhead console button will release
the liftgate when the liftgate is locked. The outside handle
requires the liftgate to be unlocked. If the vehicle is
equipped with Passive Entry, pulling the outside handle
will unlock and release the liftgate, with a valid Passive
Entry key fob within 5 ft (1.5 m) of the liftgate.
NOTE:If 1st Press of key fob Unlocks “All Doors” is
programmed in Uconnect Settings, all doors will unlock
with a Passive Entry handle activation. If 1st Press of key
fob Unlocks “Driver Door” is programmed in Uconnect
Settings, the liftgate will only unlock with handle activa-
tion.Closing
To Close The Vehicle
Grasp the liftgate closing handle and initiate lowering the
liftgate. Release the handle when the liftgate takes over the
closing effort.
To Lock The Vehicle
With a valid Passive Entry key fob within 5 ft (1.5 m) of the
liftgate, pushing the passive entry lock button located to
the right of the outside handle will lock the vehicle.
WARNING!
• Driving with the liftgate open can allow poisonous
exhaust gases into your vehicle. You and your pas-
sengers could be injured by these fumes. Keep the
liftgate closed when you are operating the vehicle.
• If you are required to drive with the liftgate open,
make sure that all windows are closed, and the
climate control blower switch is set at high speed. Do
not use the recirculation mode.
Unlock Liftgate Using Passive Entry
3
GETTING TO KNOW YOUR VEHICLE 129
Page 133 of 592
The key fob and the overhead console button will operate
the liftgate when the liftgate is locked. The outside handle
requires the liftgate to be unlocked. If the vehicle is
equipped with Passive Entry, depressing the touch pad on
the outside handle or Hands-Free Liftgate foot activation
(if equipped) will unlock and open the liftgate, with a valid
Passive Entry key fob within 5 ft (1.5 m) of the liftgate
handle.
NOTE:
•To open the liftgate, the Hands-Free Liftgate foot activa-
tion (if equipped) requires a valid Passive Entry key fob
within 5 ft (1.5 m) of the door handle.
• If 1st Press of key fob Unlocks “All Doors” is pro-
grammed in Uconnect Settings, all doors will unlock
with a Passive Entry hands-free activation. If 1st Press of
key fob Unlocks “Driver Door” is programmed in
Uconnect Settings, the liftgate will only unlock with
hands-free activation. Refer to “Uconnect Settings” in
“Multimedia” for further information.
• Tones are sounded and the turn signals are flashed with
liftgate movements. These alerts can be turned on or off
in Uconnect Settings. Refer to “Uconnect Settings” in
“Multimedia” for further information. To Close The Liftgate
The liftgate can also be closed using the Rear Interior
Power Liftgate button (If Equipped), located in the upper
left trim in the liftgate opening.
Lock The Vehicle
With a valid Passive Entry key fob within 5 ft (1.5 m) of the
liftgate, pushing the passive entry lock button located to
the right of the outside handle will lock the vehicle.
Rear Interior Power Liftgate Switch
3
GETTING TO KNOW YOUR VEHICLE 131