coolant CHRYSLER PACIFICA HYBRID 2018 Owners Manual
[x] Cancel search | Manufacturer: CHRYSLER, Model Year: 2018, Model line: PACIFICA HYBRID, Model: CHRYSLER PACIFICA HYBRID 2018Pages: 614, PDF Size: 7.08 MB
Page 120 of 614
Operating Tips
NOTE:Refer to the chart at the end of this section for
suggested control settings for various weather conditions.
Summer Operation
The engine cooling system must be protected with a
high-quality antifreeze coolant to provide proper corrosion
protection and to protect against engine overheating. OAT
coolant (conforming to MS.90032) with deionized, or dis-
tilled water for proper corrosion protection is recom-
mended.
Winter Operation
To ensure the best possible heater and defroster perfor-
mance, make sure the engine cooling system is functioning
properly and the proper amount, type, and concentration
of coolant is used. Use of the Air Recirculation mode
during Winter months is not recommended, because it may
cause window fogging.
Vacation/Storage
Before you store your vehicle, or keep it out of service (i.e.,
vacation) for two weeks or more, run the air conditioning
system at idle for about five minutes, in fresh air with the blower setting on high. This will ensure adequate system
lubrication to minimize the possibility of compressor dam-
age when the system is started again.
Window Fogging
Vehicle windows tend to fog on the inside in mild, rainy,
and/or humid weather. To clear the windows, select De-
frost or Mix mode and increase the front blower speed. Do
not use the Recirculation mode without A/C for long
periods, as fogging may occur.
CAUTION!
Failure to follow these cautions can cause damage to
the heating elements:
•
Use care when washing the inside of the rear win-
dow. Do not use abrasive window cleaners on the
interior surface of the window. Use a soft cloth and a
mild washing solution, wiping parallel to the heat-
ing elements. Labels can be peeled off after soaking
with warm water.
• Do not use scrapers, sharp instruments, or abrasive
window cleaners on the interior surface of the win-
dow.
• Keep all objects a safe distance from the window.
118 GETTING TO KNOW YOUR VEHICLE
Page 166 of 614
Instrument Cluster Display Menu Items
NOTE:The Instrument Cluster Display menu items dis-
play in the center of the instrument cluster. Menu items
may vary depending on your vehicle features.
Speedometer
Push and release the upordown arrow button until
Speedometer is highlighted in the instrument cluster dis-
play. Push and release the OKbutton to toggle between
MPH and km/h.
Vehicle Info
Push and release the upordown arrow button until
Vehicle Info is highlighted in the instrument cluster dis-
play. Push the leftorright arrow button to scroll through
the following information submenus:
• Tire Pressure
• If tire pressure is OKfor all tires, a vehicle ICON is
displayed with tire pressure values in each corner of the
ICON.
• If one or more tires have low pressure, “Inflate Tire To
XX” is displayed with the vehicle ICON, and the tire
pressure values in each corner of the ICON with the
pressure value of the low tire displayed in a different
color than the other tire pressure value. •
If the Tire Pressure system requires service, “Service Tire
Pressure System” is displayed.
• Tire PSI is an information only function and cannot be
reset.
• Refer to “Tire Pressure Monitoring System (TPMS)”
under “Safety” for further information.
• Coolant Temperature
Displays the actual coolant temperature.
• Oil Temperature
Displays the actual oil temperature.
• Oil Pressure
Displays the actual oil pressure.
• Battery Voltage
Displays the actual battery voltage.
• Engine Hours — If Equipped
Displays the number of hours of engine operation.
164 GETTING TO KNOW YOUR INSTRUMENT PANEL
Page 176 of 614
The vehicle should have service performed, and the brake
fluid level checked.
If brake failure is indicated, immediate repair is necessary.
WARNING!
Driving a vehicle with the red brake light on is
dangerous. Part of the brake system may have failed. It
will take longer to stop the vehicle. You could have a
collision. Have the vehicle checked immediately.
Vehicles equipped with the Anti-Lock Brake System (ABS)
are also equipped with Electronic Brake Force Distribution
(EBD). In the event of an EBD failure, the Brake Warning
Light will turn on along with the ABS Light. Immediate
repair to the ABS system is required.
Operation of the Brake Warning Light can be checked by
turning the ignition switch from the OFF position to the
ON/RUN position. The light should illuminate for ap-
proximately two seconds. The light should then turn off
unless the parking brake is applied or a brake fault is
detected. If the light does not illuminate, have the light
inspected by your authorized dealer. The light also will turn on when the parking brake is
applied with the ignition switch in the ON/RUN position.
NOTE:
This light shows only that the parking brake is
applied. It does not show the degree of brake application.
— Battery Charge Warning Light
This light illuminates when the 12 volt battery is not
charging properly. If it stays on while the vehicle is
running, there may be a malfunction with the charging
system. Contact your authorized dealer as soon as possible.
This indicates a possible problem with the electrical system
or a related component.
— Engine Coolant Temperature Warning Light
This light warns of an overheated engine condition. If the
engine coolant temperature is too high, this indicator will
illuminate and a single chime will sound. If the tempera-
ture reaches the upper limit, a continuous chime will be
sound for four minutes or until the engine is able to cool:
whichever comes first.
If the light turns on while driving, safely pull over and stop
the vehicle. If the A/C system is on, turn it off. Also, shift
the transmission into NEUTRAL and idle the vehicle. If the
temperature reading does not return to normal, turn the
174 GETTING TO KNOW YOUR INSTRUMENT PANEL
Page 276 of 614
WARNING!(Continued)
•ONLY use the passenger ’s side floor mat on the
passenger ’s side floor area.
• ALWAYS make sure objects cannot fall or slide into
the driver ’s side floor area when the vehicle is
moving. Objects can become trapped under accelera-
tor, brake, or clutch pedals and could cause a loss of
vehicle control.
• NEVER place any objects under the floor mat (e.g.,
towels, keys, etc.). These objects could change the
position of the floor mat and may cause interference
with the accelerator, brake, or clutch pedals.
• If the vehicle carpet has been removed and re-
installed, always properly attach carpet to the floor
and check the floor mat fasteners are secure to the
vehicle carpet. Fully depress each pedal to check for
interference with the accelerator, brake, or clutch
pedals then re-install the floor mats.
• It is recommended to only use mild soap and water
to clean your floor mats. After cleaning, always check
your floor mat has been properly installed and is
secured to your vehicle using the floor mat fasteners
by lightly pulling mat.
Periodic Safety Checks You Should Make Outside
The Vehicle
Tires
Examine tires for excessive tread wear and uneven wear
patterns. Check for stones, nails, glass, or other objects
lodged in the tread or sidewall. Inspect the tread for cuts
and cracks. Inspect sidewalls for cuts, cracks, and bulges.
Check the wheel nuts for tightness. Check the tires (includ-
ing spare) for proper cold inflation pressure.
Lights
Have someone observe the operation of brake lights and
exterior lights while you work the controls. Check turn
signal and high beam indicator lights on the instrument
panel.
Door Latches
Check for proper closing, latching, and locking.
Fluid Leaks
Check area under the vehicle after overnight parking for
fuel, coolant, oil, or other fluid leaks. Also, if gasoline
fumes are detected or if fuel, or brake fluid leaks are
suspected. The cause should be located and corrected
immediately.
274 SAFETY
Page 394 of 614
Underhood Fuses
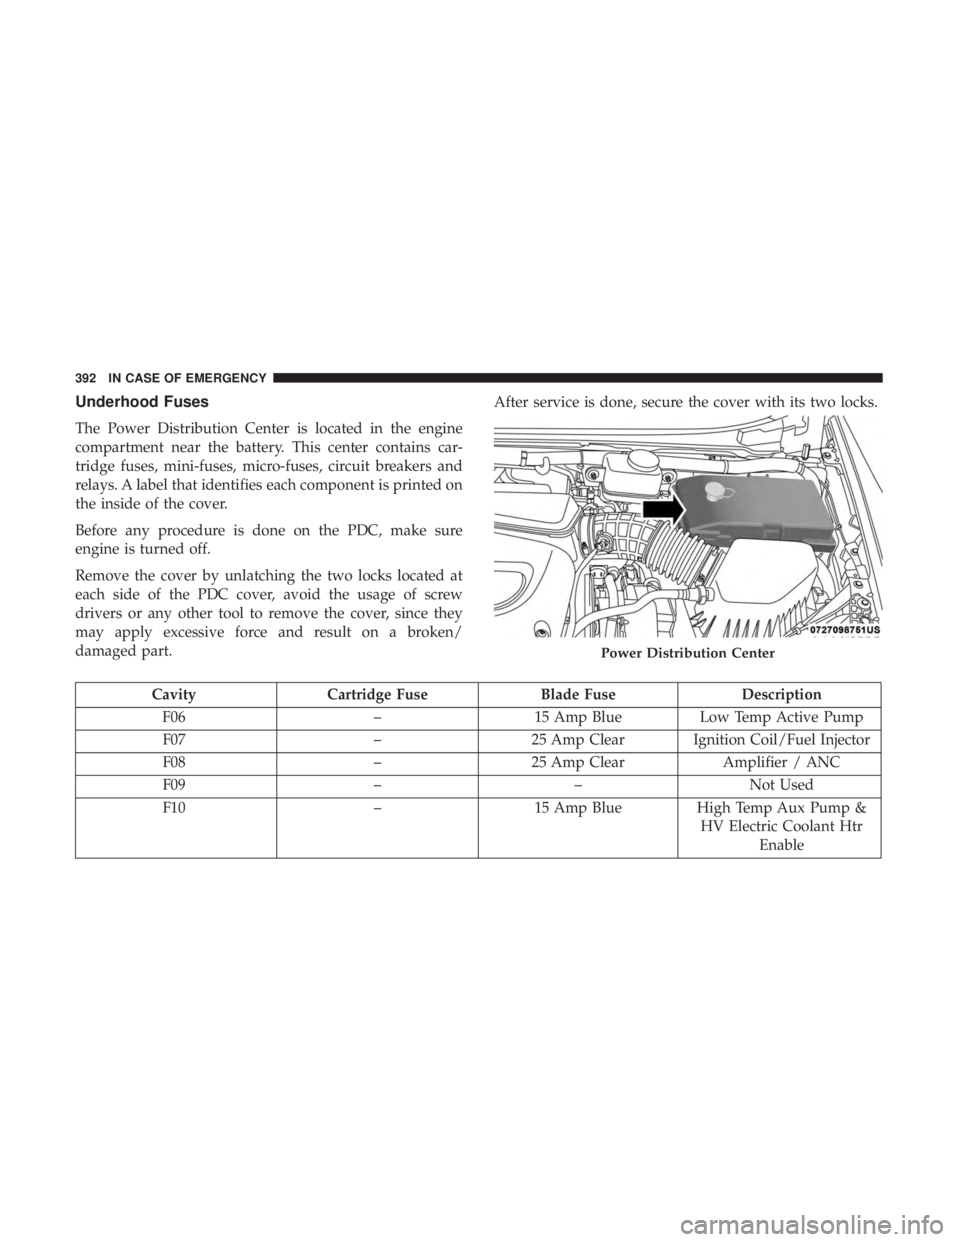
The Power Distribution Center is located in the engine
compartment near the battery. This center contains car-
tridge fuses, mini-fuses, micro-fuses, circuit breakers and
relays. A label that identifies each component is printed on
the inside of the cover.
Before any procedure is done on the PDC, make sure
engine is turned off.
Remove the cover by unlatching the two locks located at
each side of the PDC cover, avoid the usage of screw
drivers or any other tool to remove the cover, since they
may apply excessive force and result on a broken/
damaged part.After service is done, secure the cover with its two locks.
Cavity
Cartridge Fuse Blade FuseDescription
F06 –15 Amp Blue Low Temp Active Pump
F07 –25 Amp Clear Ignition Coil/Fuel Injector
F08 –25 Amp Clear Amplifier / ANC
F09 ––Not Used
F10 –15 Amp Blue High Temp Aux Pump &
HV Electric Coolant Htr Enable
Power Distribution Center
392 IN CASE OF EMERGENCY
Page 398 of 614
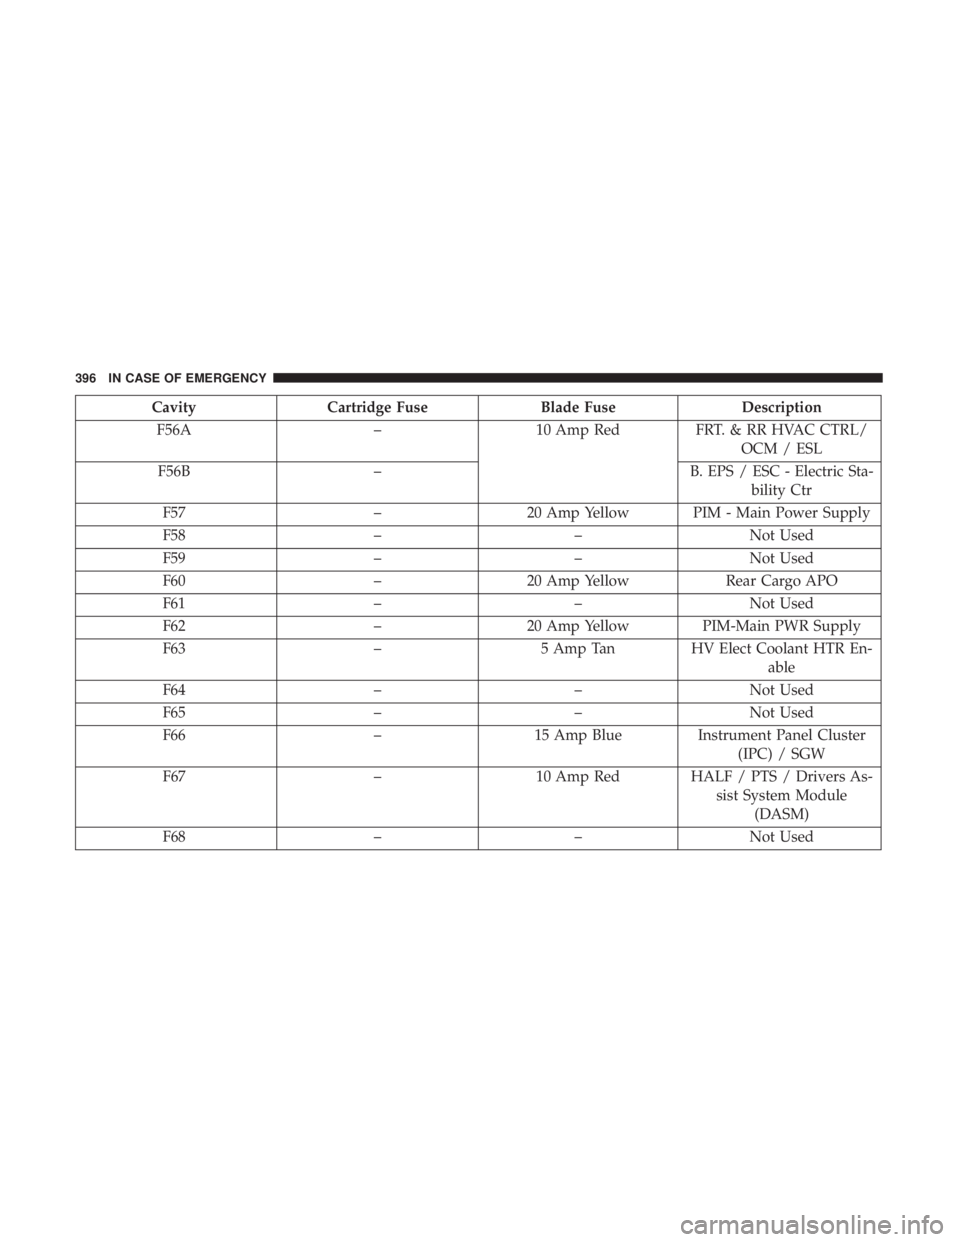
CavityCartridge Fuse Blade FuseDescription
F56A –10 Amp RedFRT. & RR HVAC CTRL/
OCM / ESL
F56B – B. EPS / ESC - Electric Sta-
bility Ctr
F57 –20 Amp Yellow PIM - Main Power Supply
F58 ––Not Used
F59 ––Not Used
F60 –20 Amp Yellow Rear Cargo APO
F61 ––Not Used
F62 –20 Amp Yellow PIM-Main PWR Supply
F63 –5 Amp TanHV Elect Coolant HTR En-
able
F64 ––Not Used
F65 ––Not Used
F66 –15 Amp Blue Instrument Panel Cluster
(IPC) / SGW
F67 –10 Amp Red HALF / PTS / Drivers As-
sist System Module(DASM)
F68 ––Not Used
396 IN CASE OF EMERGENCY
Page 425 of 614
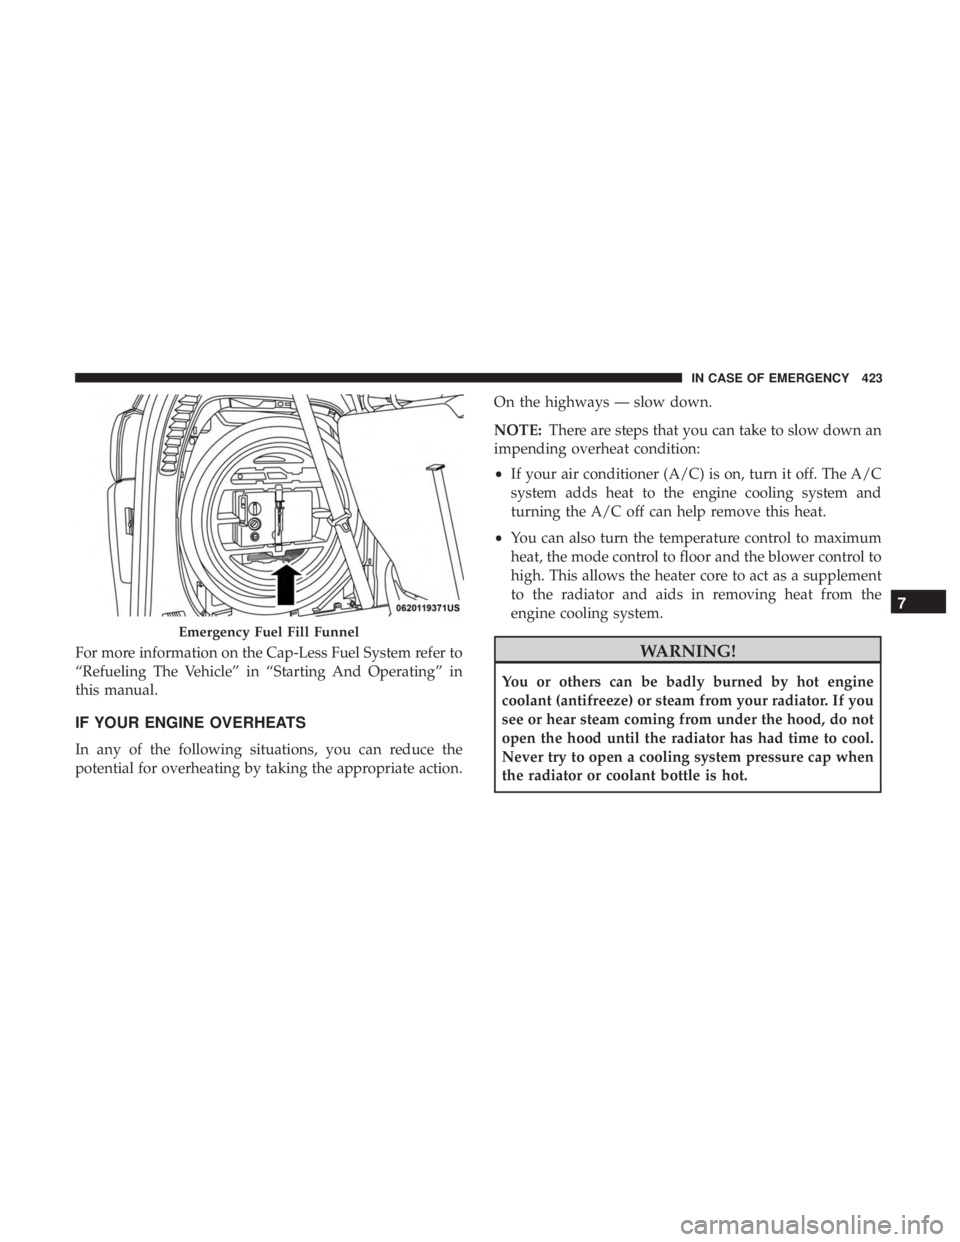
For more information on the Cap-Less Fuel System refer to
“Refueling The Vehicle” in “Starting And Operating” in
this manual.
IF YOUR ENGINE OVERHEATS
In any of the following situations, you can reduce the
potential for overheating by taking the appropriate action.On the highways — slow down.
NOTE:
There are steps that you can take to slow down an
impending overheat condition:
• If your air conditioner (A/C) is on, turn it off. The A/C
system adds heat to the engine cooling system and
turning the A/C off can help remove this heat.
• You can also turn the temperature control to maximum
heat, the mode control to floor and the blower control to
high. This allows the heater core to act as a supplement
to the radiator and aids in removing heat from the
engine cooling system.
WARNING!
You or others can be badly burned by hot engine
coolant (antifreeze) or steam from your radiator. If you
see or hear steam coming from under the hood, do not
open the hood until the radiator has had time to cool.
Never try to open a cooling system pressure cap when
the radiator or coolant bottle is hot.
Emergency Fuel Fill Funnel
7
IN CASE OF EMERGENCY 423
Page 434 of 614
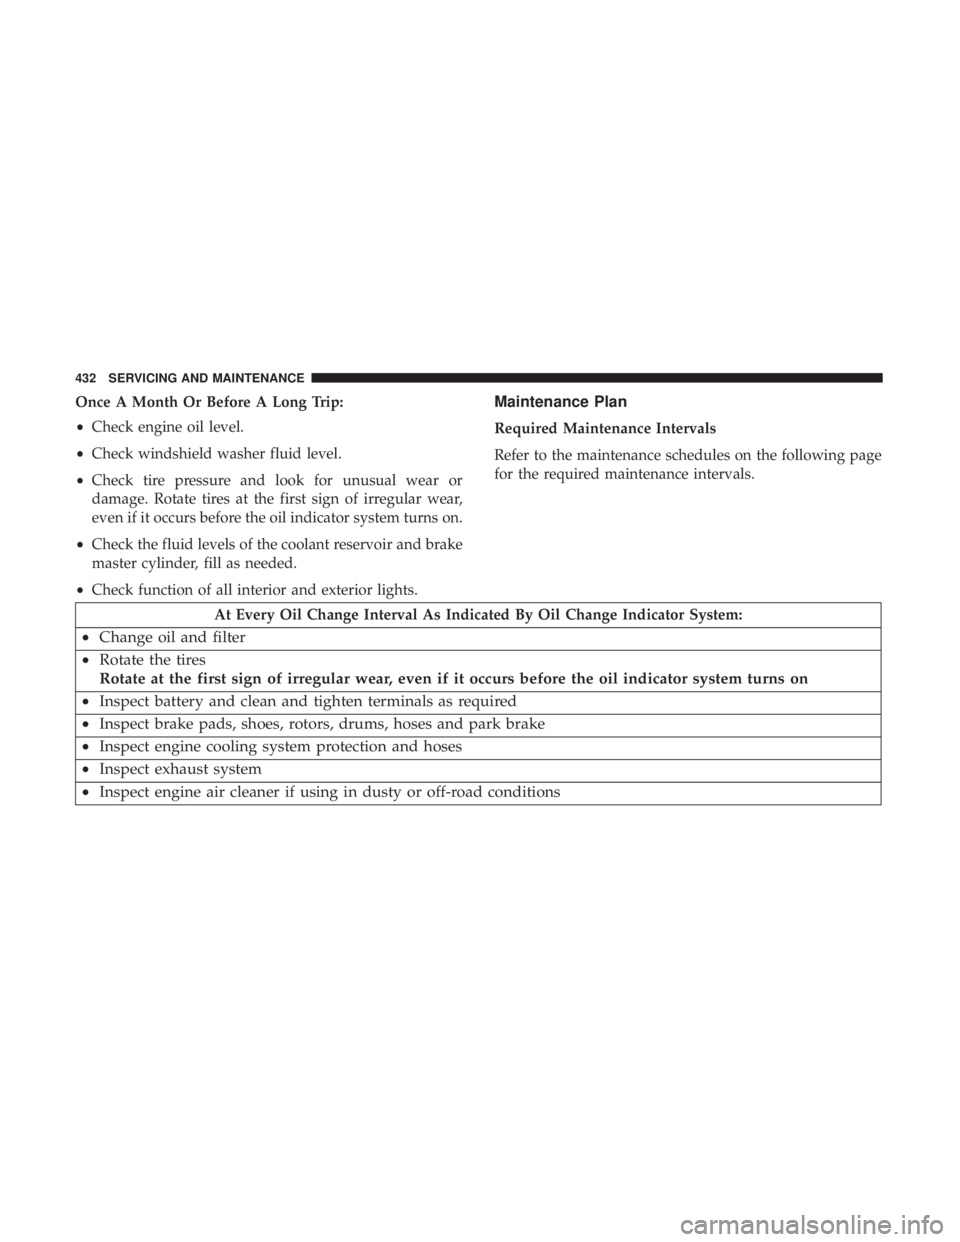
Once A Month Or Before A Long Trip:
•Check engine oil level.
• Check windshield washer fluid level.
• Check tire pressure and look for unusual wear or
damage. Rotate tires at the first sign of irregular wear,
even if it occurs before the oil indicator system turns on.
• Check the fluid levels of the coolant reservoir and brake
master cylinder, fill as needed.
• Check function of all interior and exterior lights.Maintenance Plan
Required Maintenance Intervals
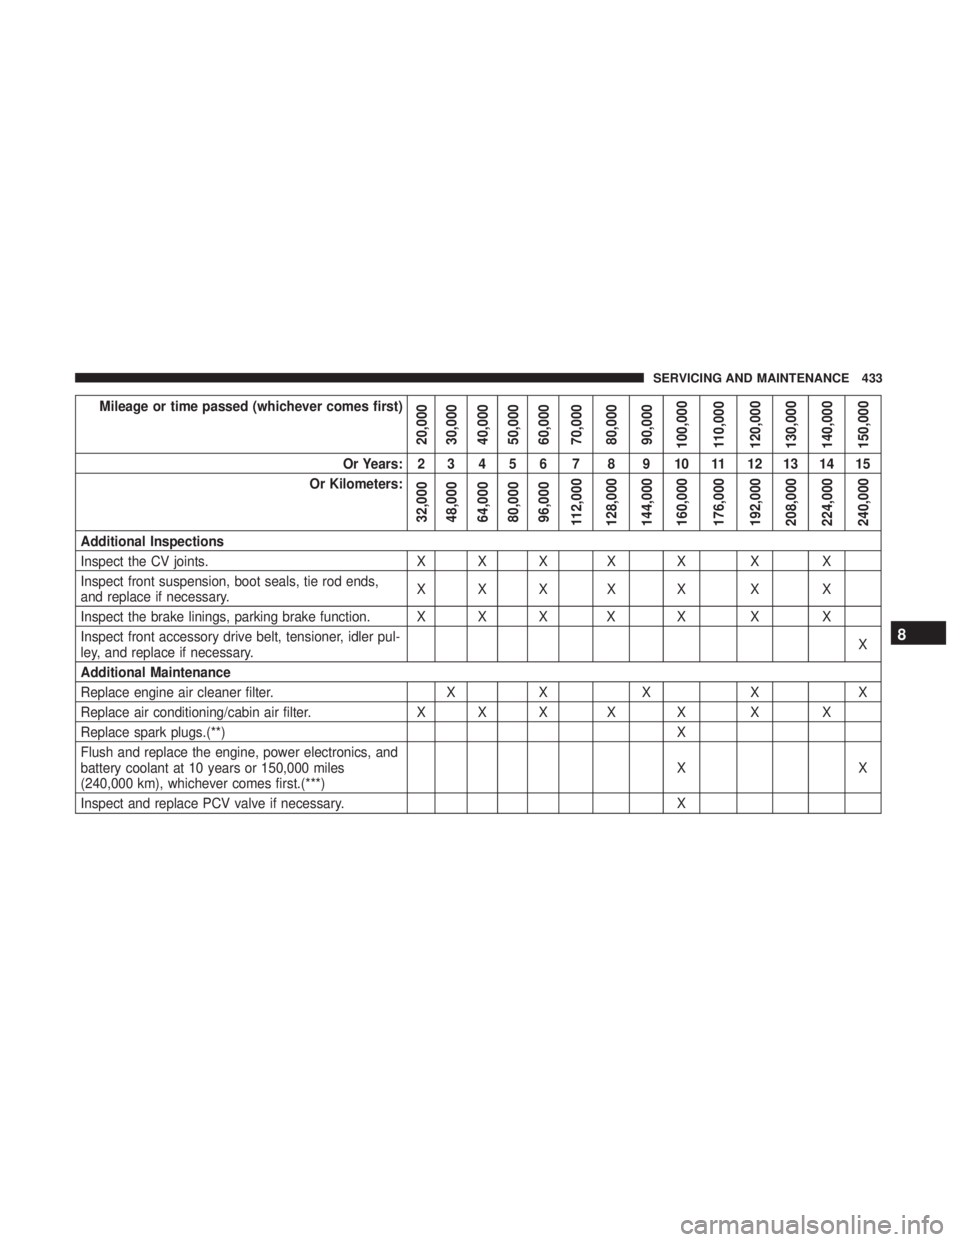
Refer to the maintenance schedules on the following page
for the required maintenance intervals.
At Every Oil Change Interval As Indicated By Oil Change Indicator System:
• Change oil and filter
• Rotate the tires
Rotate at the first sign of irregular wear, even if it occurs before the oil indicator system turns on
• Inspect battery and clean and tighten terminals as required
• Inspect brake pads, shoes, rotors, drums, hoses and park brake
• Inspect engine cooling system protection and hoses
• Inspect exhaust system
• Inspect engine air cleaner if using in dusty or off-road conditions
432 SERVICING AND MAINTENANCE
Page 435 of 614
Mileage or time passed (whichever comes first)
20,000
30,000
40,000
50,000
60,000
70,000
80,000
90,000
100,000
110,000
120,000
130,000
140,000
150,000
Or Years: 2 3 4 5 6 7 8 9 10 11 12 13 14 15
Or Kilometers:
32,000
48,000
64,000
80,000
96,000
112,000
128,000
144,000
160,000
176,000
192,000
208,000
224,000
240,000
Additional Inspections
Inspect the CV joints. X X X X X X X
Inspect front suspension, boot seals, tie rod ends,
and replace if necessary. XXX X X X X
Inspect the brake linings, parking brake function. X X X X X X X
Inspect front accessory drive belt, tensioner, idler pul-
ley, and replace if necessary. X
Additional Maintenance
Replace engine air cleaner filter. XX X XX
Replace air conditioning/cabin air filter. X X X X X X X
Replace spark plugs.(**) X
Flush and replace the engine, power electronics, and
battery coolant at 10 years or 150,000 miles
(240,000 km), whichever comes first.(***) XX
Inspect and replace PCV valve if necessary. X
8
SERVICING AND MAINTENANCE 433
Page 436 of 614
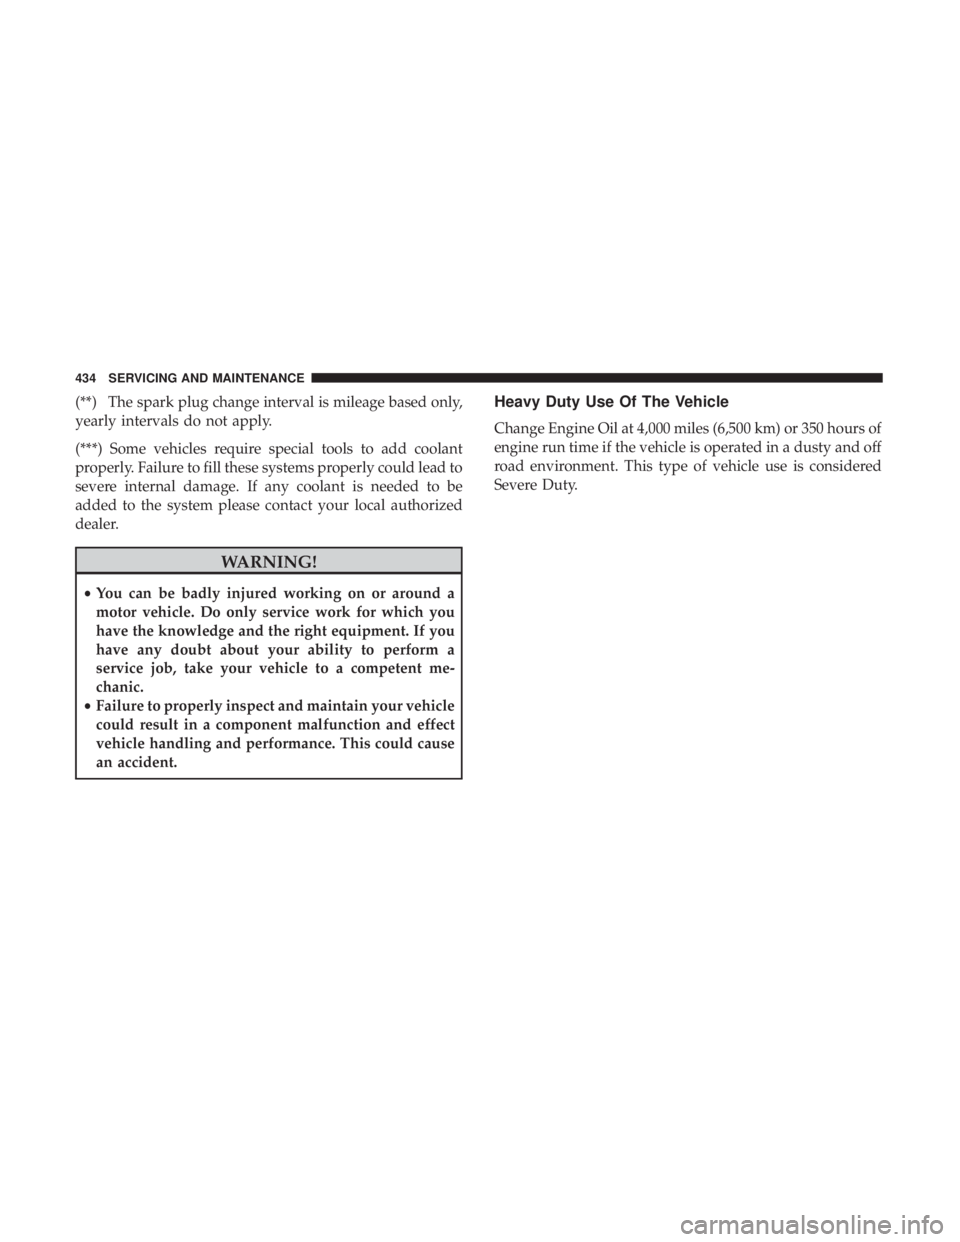
(**) The spark plug change interval is mileage based only,
yearly intervals do not apply.
(***) Some vehicles require special tools to add coolant
properly. Failure to fill these systems properly could lead to
severe internal damage. If any coolant is needed to be
added to the system please contact your local authorized
dealer.
WARNING!
•You can be badly injured working on or around a
motor vehicle. Do only service work for which you
have the knowledge and the right equipment. If you
have any doubt about your ability to perform a
service job, take your vehicle to a competent me-
chanic.
• Failure to properly inspect and maintain your vehicle
could result in a component malfunction and effect
vehicle handling and performance. This could cause
an accident.
Heavy Duty Use Of The Vehicle
Change Engine Oil at 4,000 miles (6,500 km) or 350 hours of
engine run time if the vehicle is operated in a dusty and off
road environment. This type of vehicle use is considered
Severe Duty.
434 SERVICING AND MAINTENANCE