warning light CHRYSLER PACIFICA HYBRID 2019 Owners Manual
[x] Cancel search | Manufacturer: CHRYSLER, Model Year: 2019, Model line: PACIFICA HYBRID, Model: CHRYSLER PACIFICA HYBRID 2019Pages: 620, PDF Size: 4.92 MB
Page 7 of 620
HOW TO USE THIS MANUAL
Essential Information
Consult the Table of Contents to determine which section
contains the information you desire.
Since the specification of your vehicle depends on the items
of equipment ordered, certain descriptions and illustra-
tions may differ from your vehicle’s equipment.
The detailed index at the back of this Owner’s Manual
contains a complete listing of all subjects.
Symbols
Some vehicle components have colored labels whose sym-
bols indicate precautions to be observed when using this
component. Refer to “Warning Lights and Messages” in
“Getting To Know Your Instrument Panel” for further
information on the symbols used in your vehicle.
WARNINGS AND CAUTIONS
This Owner ’s Manual containsWARNINGSagainst oper-
ating procedures that could result in a collision, bodily
injury and/or death. It also contains CAUTIONSagainst
procedures that could result in damage to your vehicle. If
you do not read this entire Owner ’s Manual, you may miss
important information. Observe all Warnings and Cau-
tions.
VEHICLE MODIFICATIONS/ALTERATIONS
WARNING!
Any modifications or alterations to this vehicle could
seriously affect its roadworthiness and safety and may
lead to a collision resulting in serious injury or death.
1
INTRODUCTION 5
Page 19 of 620
HIGH VOLTAGE BATTERY
Your vehicle is equipped with a Lithium-ion high voltage
battery that is used to power the electric powertrain
systems and the 12 volt vehicle electrical system.
The high voltage battery is located under the middle
section of the vehicle, below and in front of the second row
seating. The high voltage battery is maintenance free and
designed to last for the life of the vehicle.
Lithium-ion batteries provide the following benefits:
•Lithium-ion batteries are much lighter than other types
of rechargeable batteries of the same size.
• Lithium-ion batteries hold their charge; they only lose
approximately 3 percent of their charge per month.
• Lithium-ion batteries have no memory, which means
that you do not have to completely discharge them
before recharging, as with some other batteries.
• Lithium-ion batteries can be recharged and discharged
thousands of times. High Voltage Battery Service Disconnect
The High Voltage Battery Service Disconnect is located
under the access panel, in front of the second row passen-
ger seating.
If your vehicle requires high voltage battery service, see
your authorized dealer.
WARNING!
Never try to remove the high voltage battery service
disconnect. The high voltage battery service disconnect
is used when your vehicle requires serviced by a
trained technician at an authorized dealer. Failure to
follow this warning can cause severe burns or electrical
shock that may result in serious injury or death.
Disposal of the High Voltage Battery
Your vehicle’s high voltage battery is designed to last the
life of your vehicle. See your authorized dealer for infor-
mation on the disposal of the battery if it should require
replacement.
3
GETTING TO KNOW YOUR VEHICLE 17
Page 25 of 620
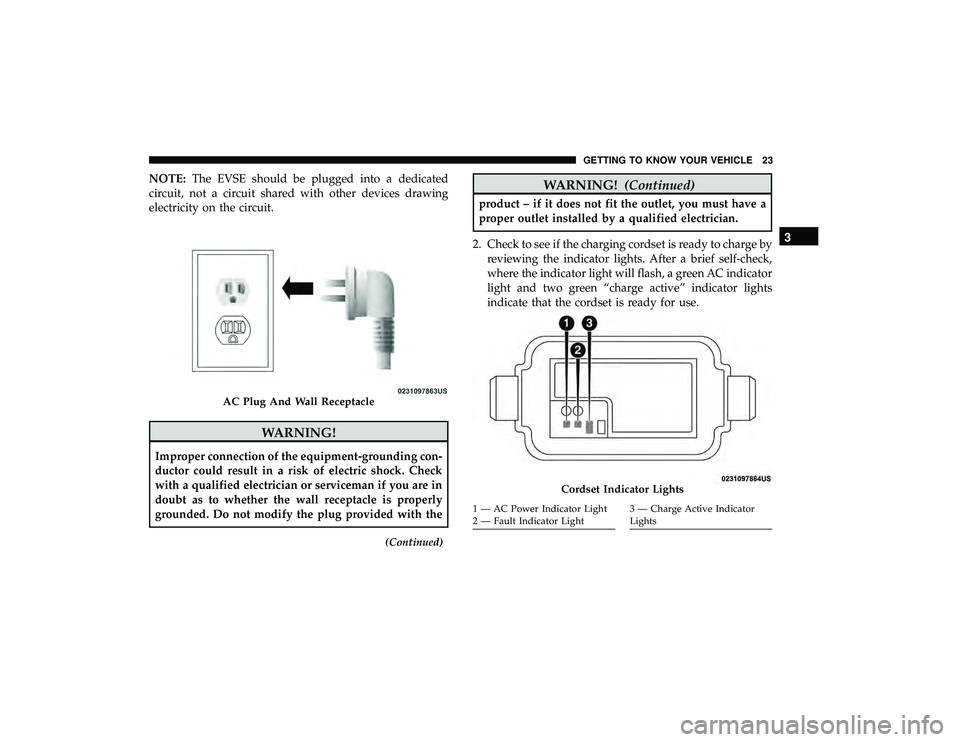
NOTE:The EVSE should be plugged into a dedicated
circuit, not a circuit shared with other devices drawing
electricity on the circuit.
WARNING!
Improper connection of the equipment-grounding con-
ductor could result in a risk of electric shock. Check
with a qualified electrician or serviceman if you are in
doubt as to whether the wall receptacle is properly
grounded. Do not modify the plug provided with the
(Continued)
WARNING! (Continued)
product – if it does not fit the outlet, you must have a
proper outlet installed by a qualified electrician.
2. Check to see if the charging cordset is ready to charge by reviewing the indicator lights. After a brief self-check,
where the indicator light will flash, a green AC indicator
light and two green “charge active” indicator lights
indicate that the cordset is ready for use.
AC Plug And Wall Receptacle
Cordset Indicator Lights
1 — AC Power Indicator Light
2 — Fault Indicator Light3 — Charge Active Indicator
Lights
3
GETTING TO KNOW YOUR VEHICLE 23
Page 68 of 620
WARNING!
Personal injury or cargo damage may occur if caught in
the path of the sliding door. Make sure the door path is
clear before closing the door.
WARNING!
Before driving off, check the instrument cluster for a
sliding door or door open message or warning indica-
tor. Failure to do this could result in unintentionally
leaving the sliding door open while driving.
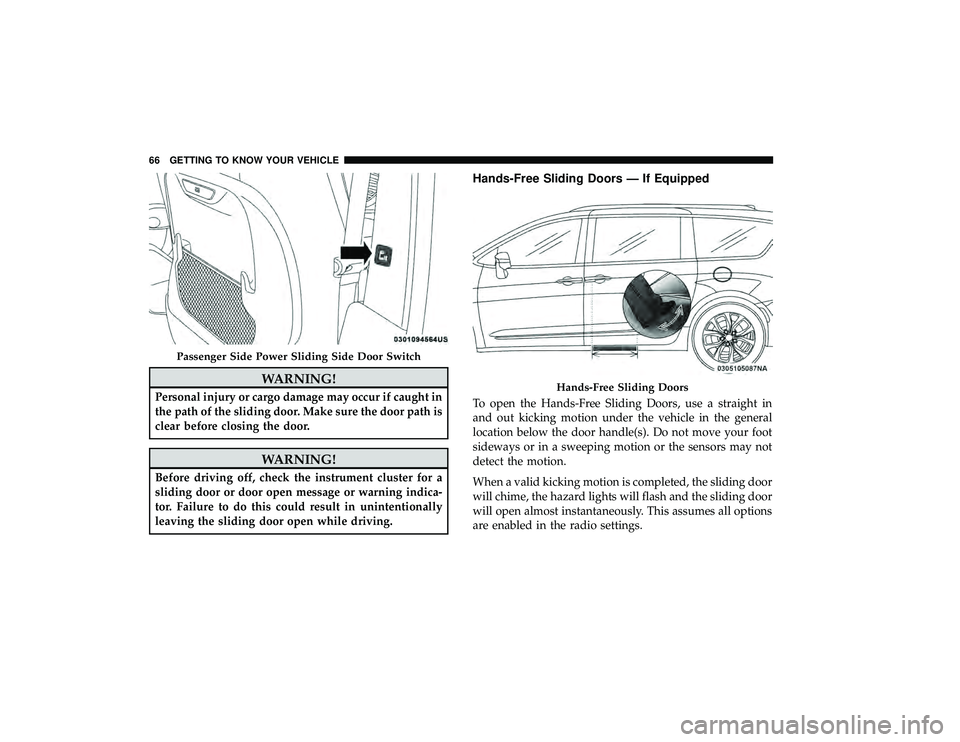
Hands-Free Sliding Doors — If Equipped
To open the Hands-Free Sliding Doors, use a straight in
and out kicking motion under the vehicle in the general
location below the door handle(s). Do not move your foot
sideways or in a sweeping motion or the sensors may not
detect the motion.
When a valid kicking motion is completed, the sliding door
will chime, the hazard lights will flash and the sliding door
will open almost instantaneously. This assumes all options
are enabled in the radio settings.
Passenger Side Power Sliding Side Door Switch
Hands-Free Sliding Doors
66 GETTING TO KNOW YOUR VEHICLE
Page 73 of 620
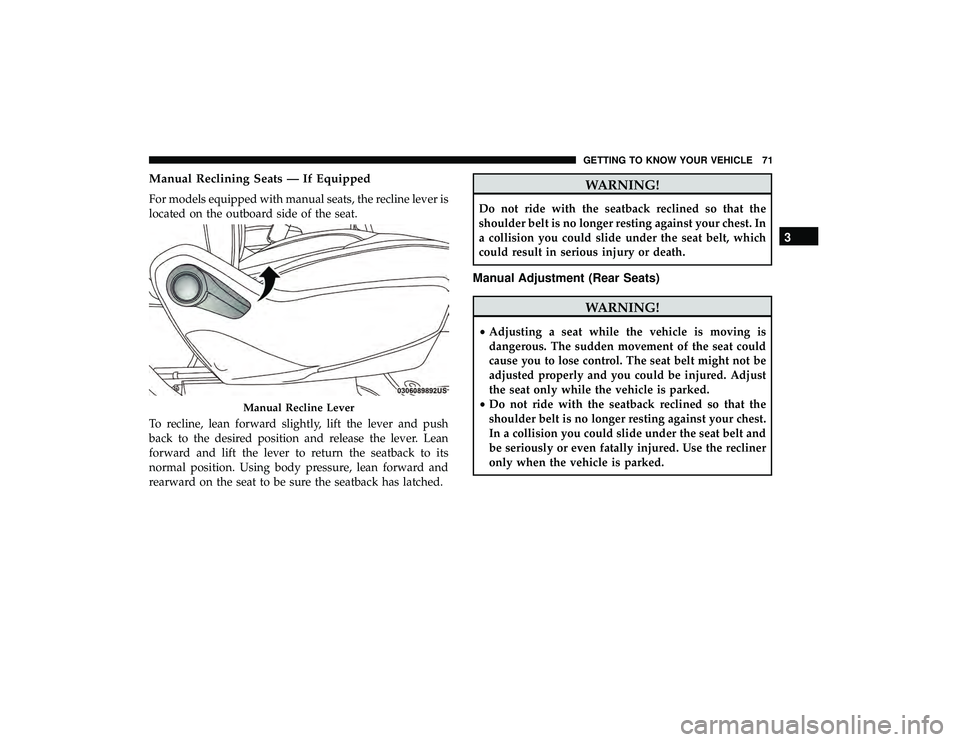
Manual Reclining Seats — If Equipped
For models equipped with manual seats, the recline lever is
located on the outboard side of the seat.
To recline, lean forward slightly, lift the lever and push
back to the desired position and release the lever. Lean
forward and lift the lever to return the seatback to its
normal position. Using body pressure, lean forward and
rearward on the seat to be sure the seatback has latched.
WARNING!
Do not ride with the seatback reclined so that the
shoulder belt is no longer resting against your chest. In
a collision you could slide under the seat belt, which
could result in serious injury or death.
Manual Adjustment (Rear Seats)
WARNING!
•Adjusting a seat while the vehicle is moving is
dangerous. The sudden movement of the seat could
cause you to lose control. The seat belt might not be
adjusted properly and you could be injured. Adjust
the seat only while the vehicle is parked.
• Do not ride with the seatback reclined so that the
shoulder belt is no longer resting against your chest.
In a collision you could slide under the seat belt and
be seriously or even fatally injured. Use the recliner
only when the vehicle is parked.
Manual Recline Lever
3
GETTING TO KNOW YOUR VEHICLE 71
Page 75 of 620
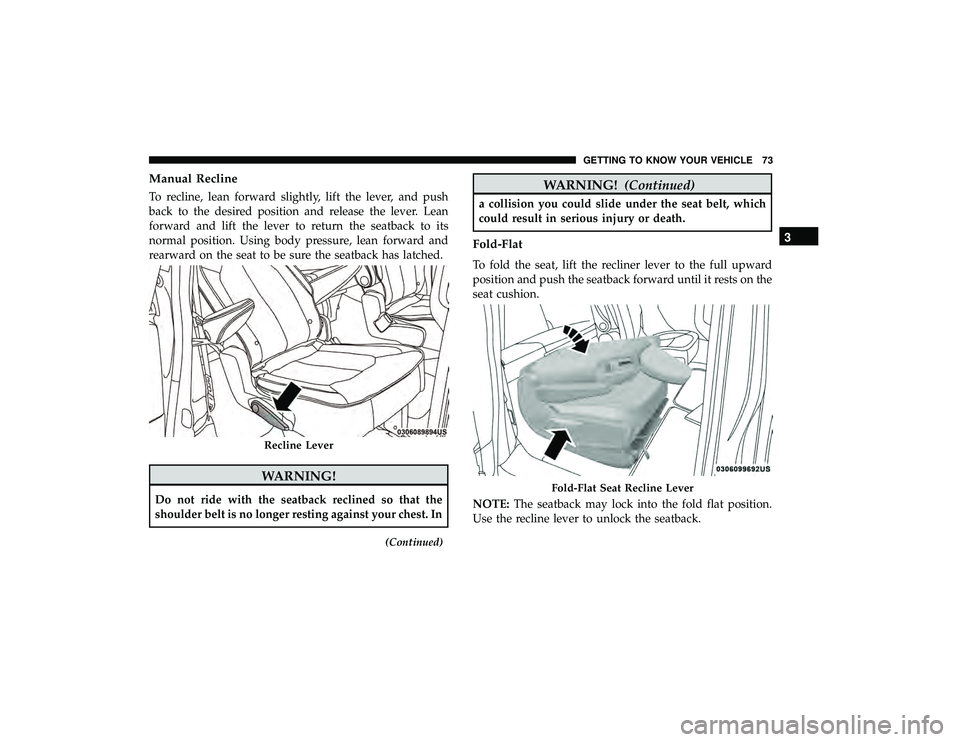
Manual Recline
To recline, lean forward slightly, lift the lever, and push
back to the desired position and release the lever. Lean
forward and lift the lever to return the seatback to its
normal position. Using body pressure, lean forward and
rearward on the seat to be sure the seatback has latched.
WARNING!
Do not ride with the seatback reclined so that the
shoulder belt is no longer resting against your chest. In
(Continued)
WARNING!(Continued)
a collision you could slide under the seat belt, which
could result in serious injury or death.
Fold-Flat
To fold the seat, lift the recliner lever to the full upward
position and push the seatback forward until it rests on the
seat cushion.
NOTE:The seatback may lock into the fold flat position.
Use the recline lever to unlock the seatback.
Recline Lever
Fold-Flat Seat Recline Lever
3
GETTING TO KNOW YOUR VEHICLE 73
Page 98 of 620
CAUTION!
To avoid damage to the mirror during cleaning, never
spray any cleaning solution directly onto the mirror.
Apply the solution onto a clean cloth and wipe the
mirror clean.
Outside Mirrors
To receive maximum benefit, adjust the outside mirror(s) to
center on the adjacent lane of traffic with a slight overlap of
the view obtained on the inside mirror.
WARNING!
Vehicles and other objects seen in an outside convex
mirror will look smaller and farther away than they
really are. Relying too much on side convex mirrors
could cause you to collide with another vehicle or other
object. Use your inside mirror when judging the size or
distance of a vehicle seen in a side convex mirror.
Driver’s Outside Automatic Dimming Mirror —
If Equipped
The driver ’s outside mirror will automatically adjust for
glare from vehicles behind you. This feature is controlledby the inside automatic dimming mirror and will automati-
cally adjust for headlight glare when the inside mirror
adjusts.
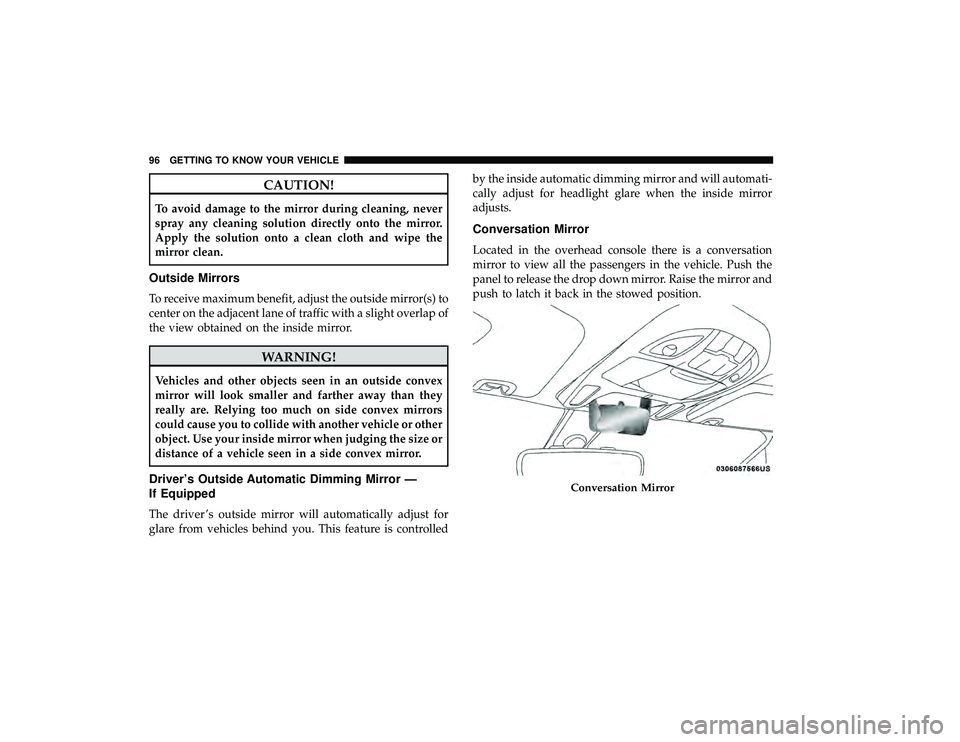
Conversation Mirror
Located in the overhead console there is a conversation
mirror to view all the passengers in the vehicle. Push the
panel to release the drop down mirror. Raise the mirror and
push to latch it back in the stowed position.
Conversation Mirror
96 GETTING TO KNOW YOUR VEHICLE
Page 105 of 620
Turn Signal Warning
If the vehicle electronics sense that the vehicle has traveled
for about 1 mile (1.6 km) with the turn signals on, a chime
will sound and a message will display in the cluster to alert
the driver.
Lane Change Assist — If Equipped
Tap the multifunction lever up or down once, without
moving beyond the detent, and the turn signal (right or
left) will flash three times then automatically turn off.
Battery Protection
This feature provides battery protection to avoid wearing
down the battery if the headlights or parking lights are left
on for extended periods of time when the ignition is in the
OFF position. After eight minutes of the ignition being in
the OFF position and the headlight switch in any position
other than OFF or AUTO, the lights will turn off automati-
cally until the next cycle of the ignition or headlight switch.
The battery protection feature will be disabled if the
ignition is placed in any position other than OFF during the
eight minute delay.
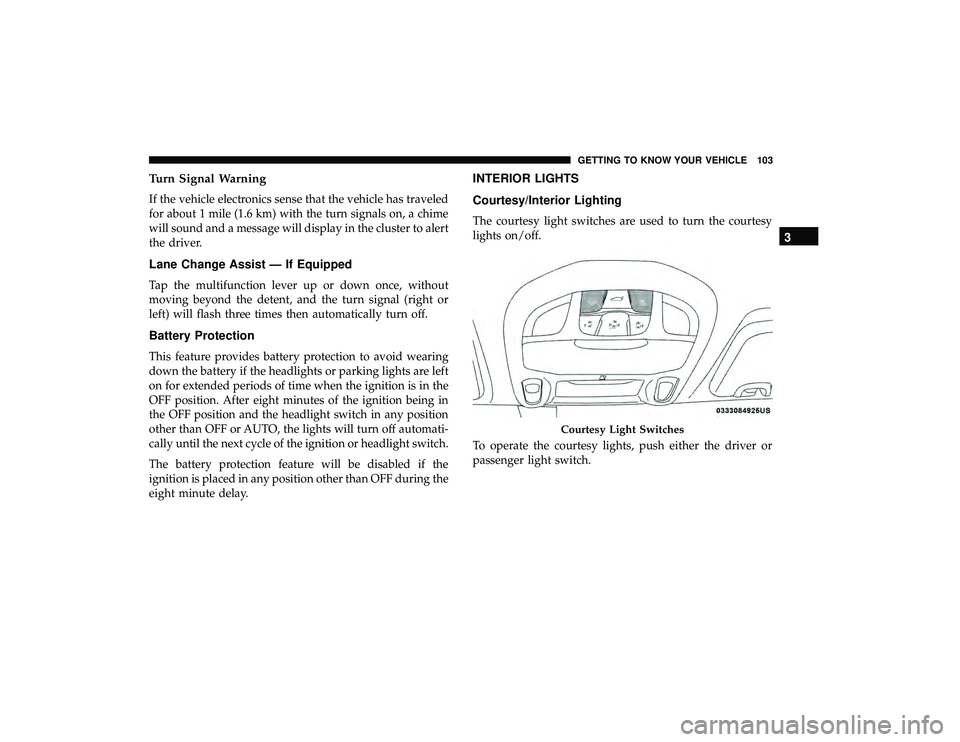
INTERIOR LIGHTS
Courtesy/Interior Lighting
The courtesy light switches are used to turn the courtesy
lights on/off.
To operate the courtesy lights, push either the driver or
passenger light switch.
Courtesy Light Switches
3
GETTING TO KNOW YOUR VEHICLE 103
Page 153 of 620
WARNING!
To avoid serious injury or death:
•Only devices designed for use in this type of outlet
should be inserted into any 12 Volt outlet.
• Do not touch with wet hands.
(Continued)
WARNING! (Continued)
•Close the lid when not in use and while driving the
vehicle.
• If this outlet is mishandled, it may cause an electric
shock and failure.
CAUTION!
• Many accessories that can be plugged in draw power
from the vehicle’s battery, even when not in use (i.e.,
cellular phones, etc.). Eventually, if plugged in long
enough, the vehicle’s battery will discharge suffi-
ciently to degrade battery life and/or prevent the
vehicle from starting.
• Accessories that draw higher power (i.e., coolers,
vacuum cleaners, lights, etc.) will degrade the battery
even more quickly. Only use these intermittently and
with greater caution.
• After the use of high power draw accessories, or long
periods of the vehicle not being started (with acces-
sories still plugged in), the vehicle must be driven a
sufficient length of time to allow the generator to
(Continued)
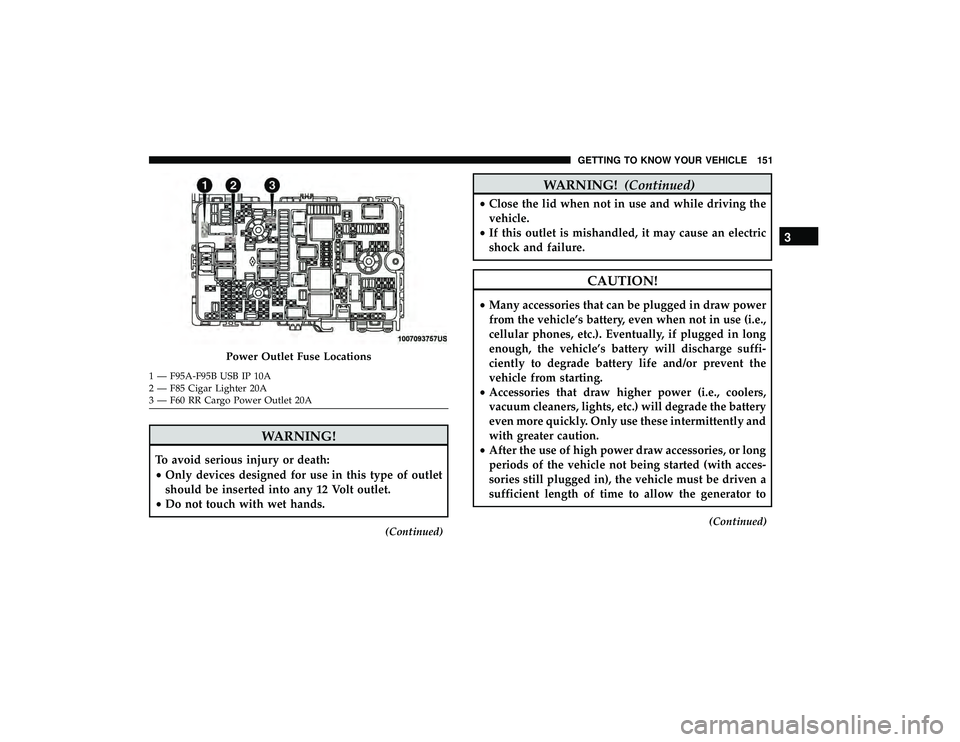
Power Outlet Fuse Locations
1 — F95A-F95B USB IP 10A
2 — F85 Cigar Lighter 20A
3 — F60 RR Cargo Power Outlet 20A
3
GETTING TO KNOW YOUR VEHICLE 151
Page 155 of 620
WARNING!
To avoid serious injury or death:
•Do not insert any objects into the receptacles.
• Do not touch with wet hands.
• Close the lid when not in use.
• If this outlet is mishandled, it may cause an electric
shock and failure.
Cigar Lighter — If Equipped
NOTE: Cigar lighters can be purchased at an authorized
dealer through Mopar parts.
The cigar lighter is located at the bottom of the instrument
panel. Push lighter inward to heat.
After a few seconds, the lighter automatically returns to its
initial position and is ready to be used.
WARNING!
When the cigar lighter is in use it becomes very hot. To
avoid serious injury, handle the cigar lighter with care.
Always check that the cigar lighter has turned off.
CAUTION!
Do not connect devices with power higher than
180 Watts (15 Amps) to the socket. Do not damage the
socket by using unsuitable adaptors. If the 180 Watt
(15 Amp) power rating is exceeded the fuse protecting
the system will need to be replaced.
Smoker’s Package Kit — If Equipped
With the optional authorized dealer-installed Smoker’s
Package Kit, a removable ash receiver is inserted into one
of the two cupholders in the center floor console. To install
the ash receiver, align the receiver so the thumb grip on the
lid is facing rearward. Push the ash receiver into either of
the cup wells to secure. Pull upward on the ash receiver to
remove for cleaning and/or storage.
The left rear trim panel cupholder is designed to accom-
modate a second ash receiver, if desired.
3
GETTING TO KNOW YOUR VEHICLE 153