jacking CHRYSLER PACIFICA HYBRID 2022 Owners Manual
[x] Cancel search | Manufacturer: CHRYSLER, Model Year: 2022, Model line: PACIFICA HYBRID, Model: CHRYSLER PACIFICA HYBRID 2022Pages: 384, PDF Size: 23.92 MB
Page 8 of 384
6
Accessing Rear Seat Entertainment
with Fire TV Built-in from the
Rear Screens ................................................. 214
First Time Starting Up
(Using the Rear Screens) .............................. 214 Rear Seat Entertainment with Fire TV
Built-in Alexa .................................................. 214
Listen Via Vehicle Speakers ......................... 215Quick Menu.................................................... 215
Parental Controls
(Using the Rear Screens) .............................. 215Pairing The Voice Remote with Alexa
(Using the Rear Screens) .............................. 215Media Sources Input (Using the Front
Radio and Rear Screens) .............................. 216Rear Seat Entertainment with Fire TV
Built-in Voice Remote with Alexa .................. 216
Rear Seat Entertainment with Fire TV
Built-in Streaming (Using the Front
Radio and Rear Screens) .............................. 217Play A Blu-ray™ or DVD — If Equipped ......... 218Fire TV Apps/Games
(Using the Rear Screens) .............................. 219 Using The Video USB Port ............................. 219
Play Video Games ......................................... 219
Headphones Operation................................. 220
Rear Climate Controls ................................... 220
Legal & Compliance ...................................... 222
RADIO OPERATION AND MOBILE
PHONES ............................................................... 222
Regulatory And Safety Information .............. 222
SAFETY
SAFETY FEATURES .............................................. 223 Anti-Lock Brake System (ABS) ..................... 223
Electronic Brake Control (EBC) System ...... 224
AUXILIARY DRIVING SYSTEMS.......................... 229
Blind Spot Monitoring (BSM) —
If Equipped..................................................... 229Forward Collision Warning (FCW) With
Mitigation — If Equipped ............................... 233
Tire Pressure Monitoring System
(TPMS)............................................................ 236
OCCUPANT RESTRAINT SYSTEMS ................... 239
Occupant Restraint Systems Features ....... 239
Important Safety Precautions ...................... 239Seat Belt Systems ........................................ 240Supplemental Restraint Systems (SRS) ...... 250Child Restraints ............................................ 262 SAFETY TIPS ........................................................ 278
Transporting Passengers.............................. 278
Transporting Pets ......................................... 279
Connected Vehicles ...................................... 279
Safety Checks You Should Make Inside
The Vehicle ................................................... 279
Periodic Safety Checks You Should
Make Outside The Vehicle ............................ 280
Exhaust Gas................................................... 281
Carbon Monoxide Warnings ....................... 281IN CASE OF EMERGENCY
HAZARD WARNING FLASHERS ......................... 282
ASSIST AND SOS MIRROR — IF EQUIPPED...... 282
JACKING AND TIRE CHANGING —
IF EQUIPPED ......................................................... 286 Preparations For Jacking ............................. 286Jack And Spare Tire Location ....................... 287
Equipment Removal ..................................... 287Jacking Instructions ..................................... 288Road Tire Installation .................................... 292
Portable Air Compressor — If Equipped ....... 293
Return Inflatable Spare Tire ........................ 294
TIRE SERVICE KIT — IF EQUIPPED ..................... 294
22_RUP_OM_EN_USC_t.book Page 6
Page 31 of 384
GETTING TO KNOW YOUR VEHICLE29
HANDS-FREE SLIDING DOORS —
I
F EQUIPPED
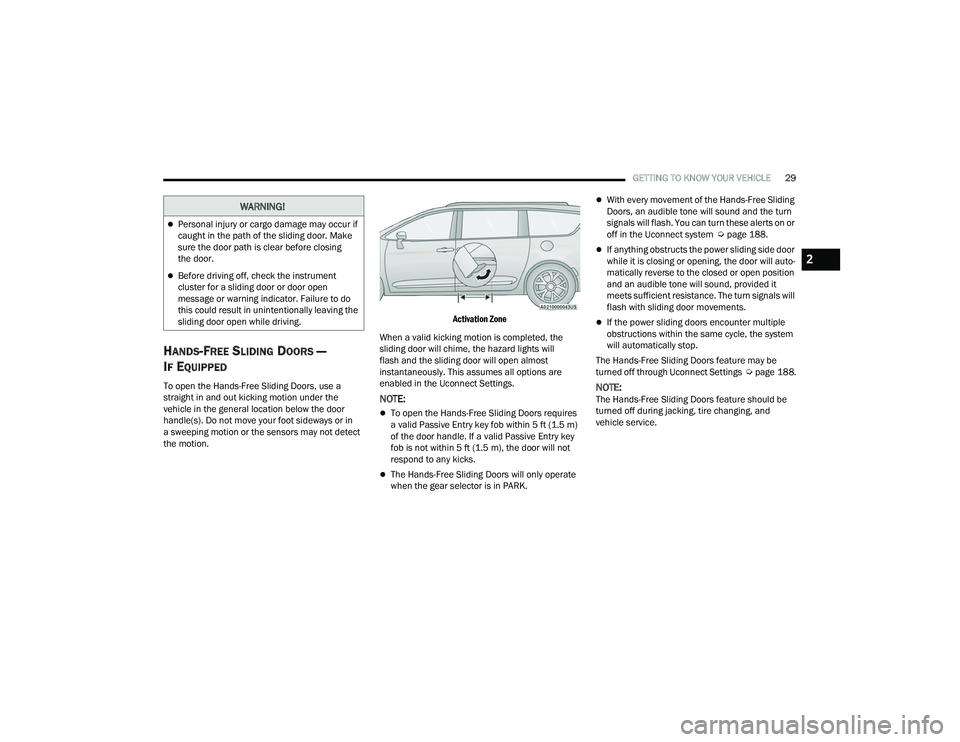
To open the Hands-Free Sliding Doors, use a
straight in and out kicking motion under the
vehicle in the general location below the door
handle(s). Do not move your foot sideways or in
a sweeping motion or the sensors may not detect
the motion.
Activation Zone
When a valid kicking motion is completed, the
sliding door will chime, the hazard lights will
flash and the sliding door will open almost
instantaneously. This assumes all options are
enabled in the Uconnect Settings.
NOTE:
To open the Hands-Free Sliding Doors requires
a valid Passive Entry key fob within 5 ft (1.5 m)
of the door handle. If a valid Passive Entry key
fob is not within 5 ft (1.5 m), the door will not
respond to any kicks.
The Hands-Free Sliding Doors will only operate
when the gear selector is in PARK.
With every movement of the Hands-Free Sliding
Doors, an audible tone will sound and the turn
signals will flash. You can turn these alerts on or
off in the Uconnect system Ú page 188.
If anything obstructs the power sliding side door
while it is closing or opening, the door will auto -
matically reverse to the closed or open position
and an audible tone will sound, provided it
meets sufficient resistance. The turn signals will
flash with sliding door movements.
If the power sliding doors encounter multiple
obstructions within the same cycle, the system
will automatically stop.
The Hands-Free Sliding Doors feature may be
turned off through Uconnect Settings Úpage 188.
NOTE:The Hands-Free Sliding Doors feature should be
turned off during jacking, tire changing, and
vehicle service.
WARNING!
Personal injury or cargo damage may occur if
caught in the path of the sliding door. Make
sure the door path is clear before closing
the door.
Before driving off, check the instrument
cluster for a sliding door or door open
message or warning indicator. Failure to do
this could result in unintentionally leaving the
sliding door open while driving.
2
22_RUP_OM_EN_USC_t.book Page 29
Page 101 of 384

GETTING TO KNOW YOUR VEHICLE99
HANDS-FREE LIFTGATE — IF EQUIPPED
Hands-Free Liftgate Activation Zone
To open the liftgate using hands-free activation,
use a straight in and out kicking motion under the
vehicle activation zone in the general location
below the liftgate door handle. Do not move your
foot sideways or in a sweeping motion or the
sensors may not detect the motion. Vehicles Equipped With A Trailer Tow Package
NOTE:If your vehicle is equipped with the Trailer Tow
Package, the hands-free activation zone(s) for the
Power Liftgate will be located on the left and right
side of the receiver. Use a straight kicking motion
under either activation zone to open the
Hands-Free Liftgate.
Hands-Free Liftgate Trailer Tow Activation Zones
When a valid kicking motion is completed, the
liftgate will chime, the hazard lights will flash and
the liftgate will open after approximately one
second. This assumes all options are enabled in
the Uconnect system.
NOTE:To open the Hands-Free Liftgate requires a valid
Passive Entry key fob within 5 ft (1.5 m) of the door
handle. If a valid Passive Entry key fob is not within
5 ft (1.5 m), the liftgate will not respond to any
kicks.
NOTE:
The Hands-Free Liftgate will only operate when
the transmission is in PARK.
If anything obstructs the Hands-Free Liftgate
while it is opening or closing, the liftgate will
automatically reverse to the closed position,
provided it meets sufficient resistance.
There are pinch sensors attached to the side of
the liftgate opening. Light pressure anywhere
along these strips will cause the liftgate to
return to the open position.
CAUTION!
The Hands-Free Liftgate feature may be turned
on or off in Uconnect Settings. The Hands-Free
Liftgate feature should be turned off during
jacking, tire changing, and vehicle service
Ú page 188.
2
22_RUP_OM_EN_USC_t.book Page 99
Page 288 of 384
286IN CASE OF EMERGENCY
(Continued)
NOTE:
Your vehicle may be transmitting data as autho-
rized by the subscriber.
Never place anything on or near the vehicle’s
LTE (voice/data) or 4G (data) and GPS
antennas. You could prevent LTE (voice/data) or
4G (data) and GPS signal reception, which can
prevent your vehicle from placing an emergency
call. An operable LTE (voice/data) or 4G (data)
network connection and a GPS signal is
required for the SOS Call system to function
properly.
NOTE:Changes or modifications not expressly approved
by the party responsible for compliance could void
the user's authority to operate the equipment.
Automatic SOS — If Equipped
Automatic SOS is a hands-free safety service that
can immediately connect you with help in the event
that your vehicle’s airbags deploy. Please refer to
your provided radio supplement for complete
information.
JACKING AND TIRE CHANGING —
IF EQUIPPED PREPARATIONS FOR JACKING
1. Park the vehicle on a firm, level surface. Avoid ice or slippery areas.
2. Turn on the Hazard Warning Flashers.
3. Apply the parking brake.
4. Place the gear selector into PARK (P).
5. Place the ignition in OFF mode.
CAUTION!
To avoid damage to the mirror during cleaning,
never spray any cleaning solution directly onto
the mirror. Apply the solution onto a clean cloth
and wipe the mirror clean.
WARNING!
Do not attempt to change a tire on the side of
the vehicle close to moving traffic. Pull far
enough off the road to avoid the danger of
being hit when operating the jack or changing
the wheel.
Being under a jacked-up vehicle is dangerous.
The vehicle could slip off the jack and fall on
you. You could be crushed. Never put any part
of your body under a vehicle that is on a jack.
If you need to get under a raised vehicle, take
it to a service center where it can be raised on
a lift.
The jack is designed to be used as a tool for
changing tires only. The jack should not be
used to lift the vehicle for service purposes.
The vehicle should be jacked on a firm level
surface only. Avoid ice or slippery areas.
WARNING!
Do not attempt to change a tire on the side of
the vehicle close to moving traffic. Pull far
enough off the road to avoid being hit when
operating the jack or changing the wheel.
WARNING!
22_RUP_OM_EN_USC_t.book Page 286
Page 289 of 384
IN CASE OF EMERGENCY287
6. Block both the front and rear of the wheel diagonally opposite the jacking position. For
example, if the driver’s front wheel is being
changed, block the passenger’s rear wheel.
Wheel Blocked Example
NOTE:Passengers should not remain in the vehicle when
the vehicle is being lifted or raised.
JACK AND SPARE TIRE LOCATION
The jacking tools, spare tire and portable air
compressor (if equipped) or tire service kit (if
equipped) are stowed behind an access panel on
the left hand side of the vehicle.
Jacking Equipment Location
EQUIPMENT REMOVAL
1. Remove the access panel to the jacking
equipment.
2. Unlatch the Portable Air Compressor or Tire Service Kit if equipped. Unscrew the wing nut
that is holding the Inflatable Spare Tire and
gently remove it from the storage area.
Remove wrench from foam tray.
NOTE:Depending on the trim level of the vehicle, the
options for spare tire equipment may vary.
Jacking Equipment
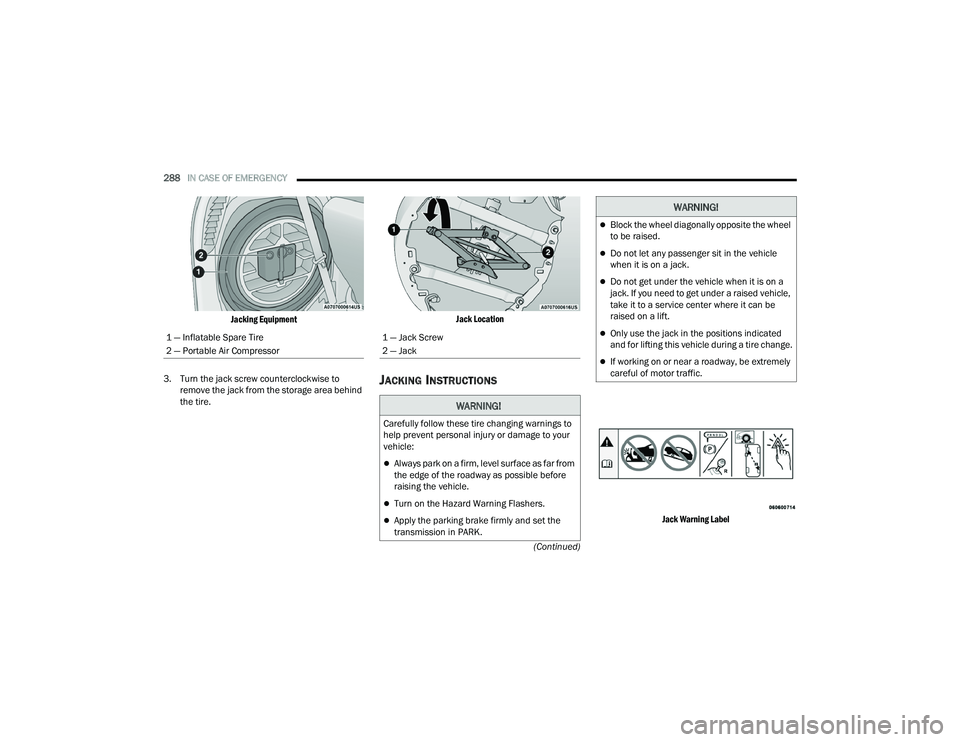
1 — Inflatable Spare Tire
2 — Tire Service Kit
3 — Wrench
4 — Fuel Filler Funnel
7
22_RUP_OM_EN_USC_t.book Page 287
Page 290 of 384
288IN CASE OF EMERGENCY
(Continued)
Jacking Equipment
3. Turn the jack screw counterclockwise to remove the jack from the storage area behind
the tire.
Jack Location
JACKING INSTRUCTIONS
Jack Warning Label
1 — Inflatable Spare Tire
2 — Portable Air Compressor
1 — Jack Screw
2 — Jack
WARNING!
Carefully follow these tire changing warnings to
help prevent personal injury or damage to your
vehicle:
Always park on a firm, level surface as far from
the edge of the roadway as possible before
raising the vehicle.
Turn on the Hazard Warning Flashers.
Apply the parking brake firmly and set the
transmission in PARK.
Block the wheel diagonally opposite the wheel
to be raised.
Do not let any passenger sit in the vehicle
when it is on a jack.
Do not get under the vehicle when it is on a
jack. If you need to get under a raised vehicle,
take it to a service center where it can be
raised on a lift.
Only use the jack in the positions indicated
and for lifting this vehicle during a tire change.
If working on or near a roadway, be extremely
careful of motor traffic.
WARNING!
22_RUP_OM_EN_USC_t.book Page 288
Page 291 of 384
IN CASE OF EMERGENCY289
Detailed information about the inflatable spare
tire, its use, and operation Ú page 351.
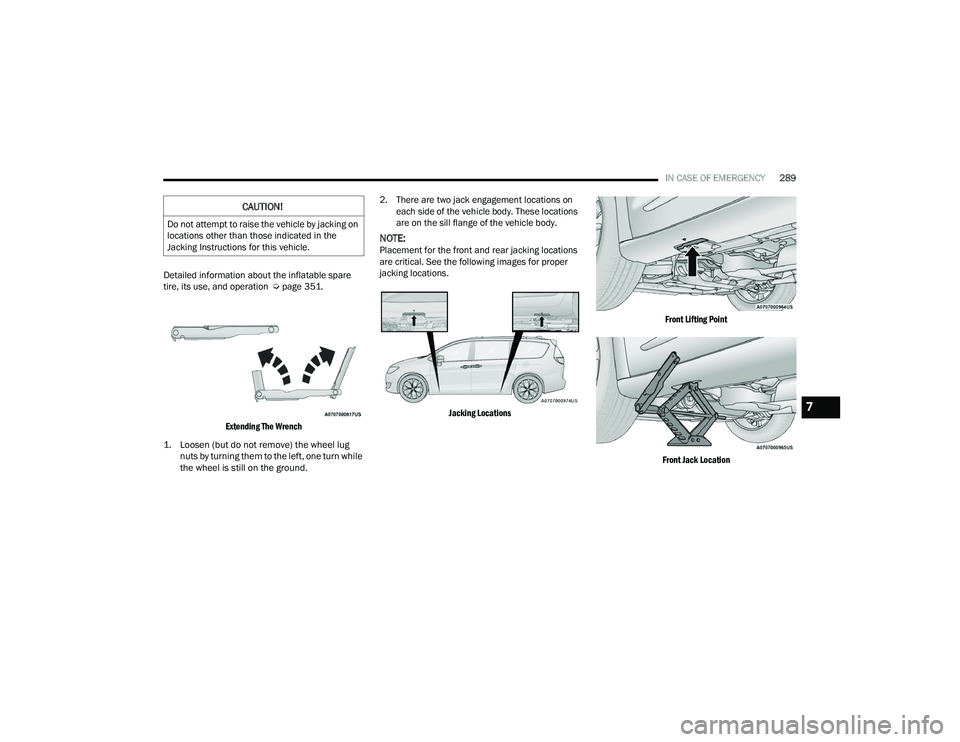
Extending The Wrench
1. Loosen (but do not remove) the wheel lug nuts by turning them to the left, one turn while
the wheel is still on the ground.
2. There are two jack engagement locations on
each side of the vehicle body. These locations
are on the sill flange of the vehicle body.
NOTE:Placement for the front and rear jacking locations
are critical. See the following images for proper
jacking locations.
Jacking Locations Front Lifting Point
Front Jack Location
CAUTION!
Do not attempt to raise the vehicle by jacking on
locations other than those indicated in the
Jacking Instructions for this vehicle.
7
22_RUP_OM_EN_USC_t.book Page 289
Page 292 of 384
290IN CASE OF EMERGENCY
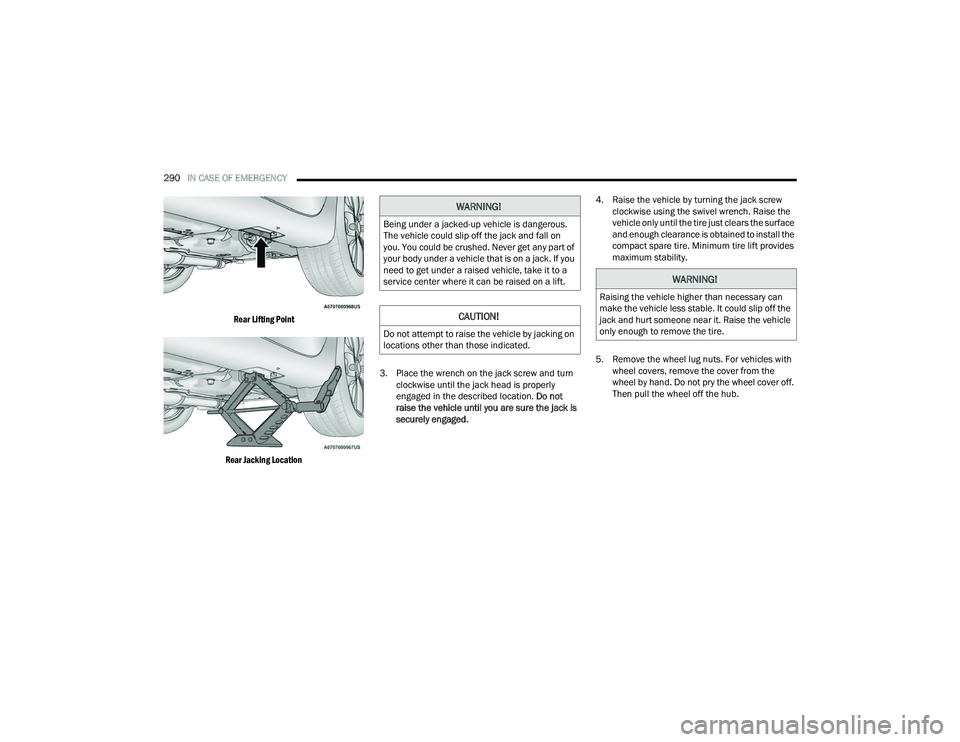
Rear Lifting Point
Rear Jacking Location
3. Place the wrench on the jack screw and turn
clockwise until the jack head is properly
engaged in the described location. Do not
raise the vehicle until you are sure the jack is
securely engaged. 4. Raise the vehicle by turning the jack screw
clockwise using the swivel wrench. Raise the
vehicle only until the tire just clears the surface
and enough clearance is obtained to install the
compact spare tire. Minimum tire lift provides
maximum stability.
5. Remove the wheel lug nuts. For vehicles with wheel covers, remove the cover from the
wheel by hand. Do not pry the wheel cover off.
Then pull the wheel off the hub.
WARNING!
Being under a jacked-up vehicle is dangerous.
The vehicle could slip off the jack and fall on
you. You could be crushed. Never get any part of
your body under a vehicle that is on a jack. If you
need to get under a raised vehicle, take it to a
service center where it can be raised on a lift.
CAUTION!
Do not attempt to raise the vehicle by jacking on
locations other than those indicated.
WARNING!
Raising the vehicle higher than necessary can
make the vehicle less stable. It could slip off the
jack and hurt someone near it. Raise the vehicle
only enough to remove the tire.
22_RUP_OM_EN_USC_t.book Page 290
Page 295 of 384
IN CASE OF EMERGENCY293
5. Lower the vehicle to the ground by turning the jack handle counterclockwise.
6. Finish tightening the lug nuts. Push down on the wrench while at the end of the handle for
increased leverage. Tighten the lug nuts in a
star pattern until each nut has been tightened
twice Ú page 360. If in doubt about the
correct tightness, have them checked with a
torque wrench by an authorized dealer or at a
service station.
7. After 25 miles (40 km) check the lug nut torque with a torque wrench to ensure that all
lug nuts are properly seated against the wheel.
PORTABLE AIR COMPRESSOR —
I
F EQUIPPED
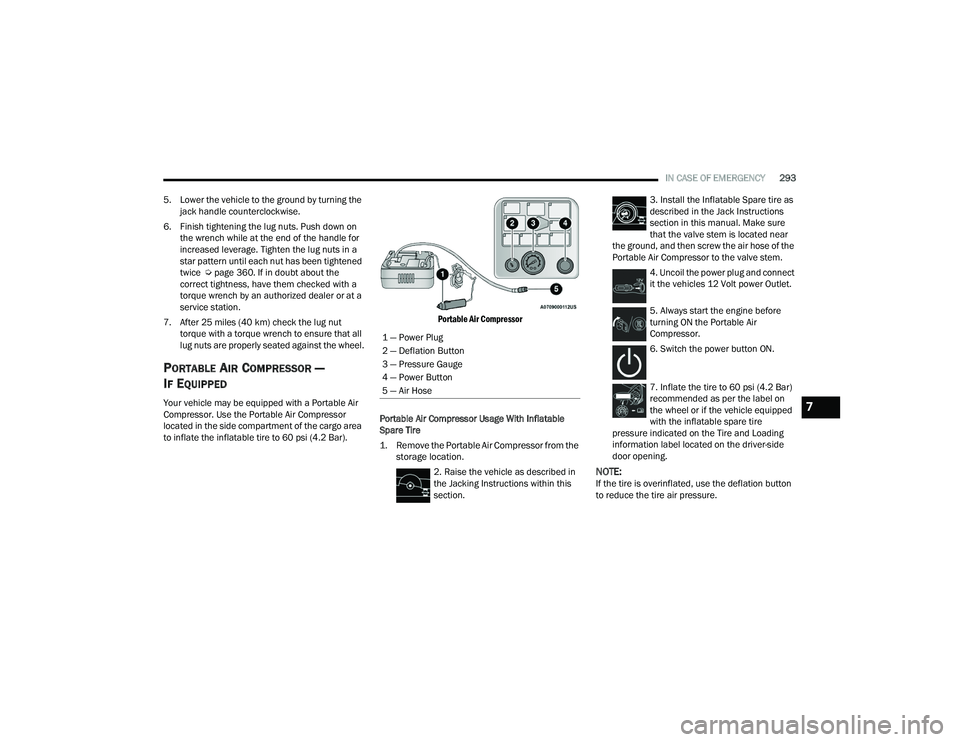
Your vehicle may be equipped with a Portable Air
Compressor. Use the Portable Air Compressor
located in the side compartment of the cargo area
to inflate the inflatable tire to 60 psi (4.2 Bar).
Portable Air Compressor
Portable Air Compressor Usage With Inflatable
Spare Tire
1. Remove the Portable Air Compressor from the storage location.
2. Raise the vehicle as described in
the Jacking Instructions within this
section. 3. Install the Inflatable Spare tire as
described in the Jack Instructions
section in this manual. Make sure
that the valve stem is located near
the ground, and then screw the air hose of the
Portable Air Compressor to the valve stem.
4. Uncoil the power plug and connect
it the vehicles 12 Volt power Outlet.
5. Always start the engine before
turning ON the Portable Air
Compressor.
6. Switch the power button ON.
7. Inflate the tire to 60 psi (4.2 Bar)
recommended as per the label on
the wheel or if the vehicle equipped
with the inflatable spare tire
pressure indicated on the Tire and Loading
information label located on the driver-side
door opening.
NOTE:If the tire is overinflated, use the deflation button
to reduce the tire air pressure.
1 — Power Plug
2 — Deflation Button
3 — Pressure Gauge
4 — Power Button
5 — Air Hose
7
22_RUP_OM_EN_USC_t.book Page 293
Page 375 of 384
373
Compact Spare Tire
....................................... 351Computer, Trip/Travel................................... 121Contract, Service........................................... 368Cooling Pressure Cap (Radiator Cap).............326Cooling System.............................................. 324Adding Coolant (Antifreeze)....................... 325Coolant Level............................................ 326Cooling Capacity........................................ 364Disposal Of Used Coolant.......................... 326Drain, Flush, And Refill.............................. 324Inspection....................................... 324, 326Points To Remember................................. 326Pressure Cap............................................. 326Radiator Cap............................................. 326Selection Of Coolant (Antifreeze)........................ 325, 364, 365Corrosion Protection...................................... 357Cruise Control................................................ 146Cruise Control (Speed Control)...................... 147Cruise Light......................................... 127, 128Customer Assistance..................................... 367Cybersecurity................................................. 187
D
Daytime Running Lights................................... 65Dealer Service.............................................. 315Defroster, Windshield................................... 279Delay (Intermittent) Wipers.............................. 70Diagnostic System, Onboard......................... 129Dimmer SwitchHeadlight..................................................... 65DipsticksOil (Engine)............................................... 314Disable Vehicle Towing................................. 306DisposalAntifreeze (Engine Coolant)...................... 326Door Ajar.............................................. 122, 123Door Ajar Light..................................... 122, 123Driver’s Seat Back Tilt...................................... 33DrivingThrough Flowing, Rising, Or ShallowStanding Water
.................................... 186
E
Electric Brake Control System....................... 224Anti-Lock Brake System............................ 223Traction Control System........................... 228Electric Parking Brake................................... 136Electric Remote Mirrors................................... 59
Electronic Stability Control (ESC)................... 225Electronic Throttle Control Warning Light...... 123Emergency Braking....................................... 235Emergency, In Case OfHazard Warning Flasher........................... 282Jacking............................................. 286, 288Jump Starting........................................... 300Overheating.............................................. 303Towing...................................................... 306Emission Control System Maintenance......... 130Engine........................................................... 313Air Cleaner................................................ 316Block Heater............................................. 135Break-In Recommendations..................... 135Checking Oil Level.................................... 314Compartment........................................... 313Compartment Identification...................... 313Coolant (Antifreeze).................................. 365Cooling...................................................... 324Exhaust Gas Caution................................ 281Fails To Start............................................. 134Flooded, Starting...................................... 134Fuel Requirements................................... 361Oil...........................................315, 364, 365Oil Filler Cap............................................. 313
11
22_RUP_OM_EN_USC_t.book Page 373