change wheel CHRYSLER PT CRUISER 2010 1.G Owners Manual
[x] Cancel search | Manufacturer: CHRYSLER, Model Year: 2010, Model line: PT CRUISER, Model: CHRYSLER PT CRUISER 2010 1.GPages: 368, PDF Size: 5.61 MB
Page 231 of 368
WARNING!
•Do not use a tire, wheel size or rating other than
that specified for your vehicle. Some combinations
of unapproved tires and wheels may change sus-
pension dimensions and performance characteris-
tics, resulting in changes to steering, handling, and
braking of your vehicle. This can cause unpredict-
able handling and stress to steering and suspen-
sion components. You could lose control and have
an accident resulting in serious injury or death.
Use only the tire and wheel sizes with load ratings
approved for your vehicle.
•Never use a tire with a smaller load index or
capacity, other than what was originally equipped
on your vehicle. Using a tire with a smaller load
index could result in tire overloading and failure.
You could lose control and have an accident.(Continued)
WARNING! (Continued)
•Failure to equip your vehicle with tires having
adequate speed capability can result in sudden tire
failure and loss of vehicle control.
CAUTION!
Replacing original tires with tires of a different size
may result in false speedometer and odometer read-
ings.
230 STARTING AND OPERATING
Page 236 of 368
•Seasonal temperature changes will affect tire pressure,
and the TPMS will monitor the actual tire pressure in
the tire.
Base System
The TPMS uses wireless technology with wheel rim-
mounted electronic sensors to monitor tire pressure lev-
els. Sensors, mounted to each wheel as part of the valve
stem, transmit tire pressure readings to the Receiver
Module.
NOTE:It is particularly important for you to perform a
monthly tire pressure check on, and to maintain the
proper pressure of all the tires on your vehicle.
The TPMS consists of the following components:
•Receiver Module
•Four Tire Pressure Monitoring Sensors
•Tire Pressure Monitoring Telltale Light
Tire Pressure Monitoring Low Pressure Warnings
The TPMS Telltale Light will illuminate in the
instrument cluster and a chime will sound when
tire pressure is low in one or more of the four
active road tires. Should this occur, you should stop as
soon as possible, check the inflation pressure of each tire
on your vehicle, and inflate each tire to the vehicle’s
recommended cold placard pressure value. Once the
system receives the updated tire pressures, the system
will automatically update and the TPMS Telltale Light
will turn off. The vehicle may need to be driven for up to
20 minutes above 15 mph (25 km/h) in order for the
TPMS to receive this information.
Check TPMS Warning
The TPMS Telltale Light will flash on and off for 75 sec-
onds and then remain on solid when a system fault is
detected. The system fault will also sound a chime. If the
ignition key is cycled, this sequence will repeat, provid-
ing the system fault still exists. The TPMS Telltale Light
5
STARTING AND OPERATING 235
Page 246 of 368
Curb Weight
The curb weight of a vehicle is defined as the total weight
of the vehicle with all fluids, including vehicle fuel, at full
capacity conditions, and with no occupants or cargo
loaded into the vehicle. The front and rear curb weight
values are determined by weighing your vehicle on a
commercial scale before any occupants or cargo are
added.
Overloading
The load carrying components (springs, tires, wheels,
etc.) of your vehicle will provide satisfactory service as
long as you do not exceed the GVWR.
The best way to figure out the total weight of your
vehicle is to weigh it when it is fully loaded and ready for
operation. Weigh it on a commercial scale to ensure that
it is not over the GVWR.Overloading can cause potential safety hazards and
shorten useful service life. Heavier suspension compo-
nents do not necessarily increase the vehicle’s GVWR.
Loading
To load your vehicle properly, first figure out its empty
weight. Store heavier items down low and be sure you
distribute their weight as evenly as possible. Stow all
loose items securely before driving. Improper weight
distribution can have an adverse effect on the way your
vehicle steers and handles, and the way the brakes
operate.
CAUTION!
Do not load your vehicle any heavier than the
GVWR. If you do, parts on your vehicle can break, or
it can change the way your vehicle handles. This
could cause you to lose control. Also, overloading can
shorten the life of your vehicle.
5
STARTING AND OPERATING 245
Page 265 of 368
Preparations For Jacking
1. Park the vehicle on a firm, level surface. Avoid ice or
slippery areas.
WARNING!
Do not attempt to change a tire on the side of the
vehicle close to moving traffic. Pull far enough off
the road to avoid the danger of being hit when
operating the jack or changing the wheel.
2. Set the parking brake.
3. Place the shift lever in PARK (automatic transaxle) or
REVERSE (manual transaxle).
4. Turn OFF the ignition.
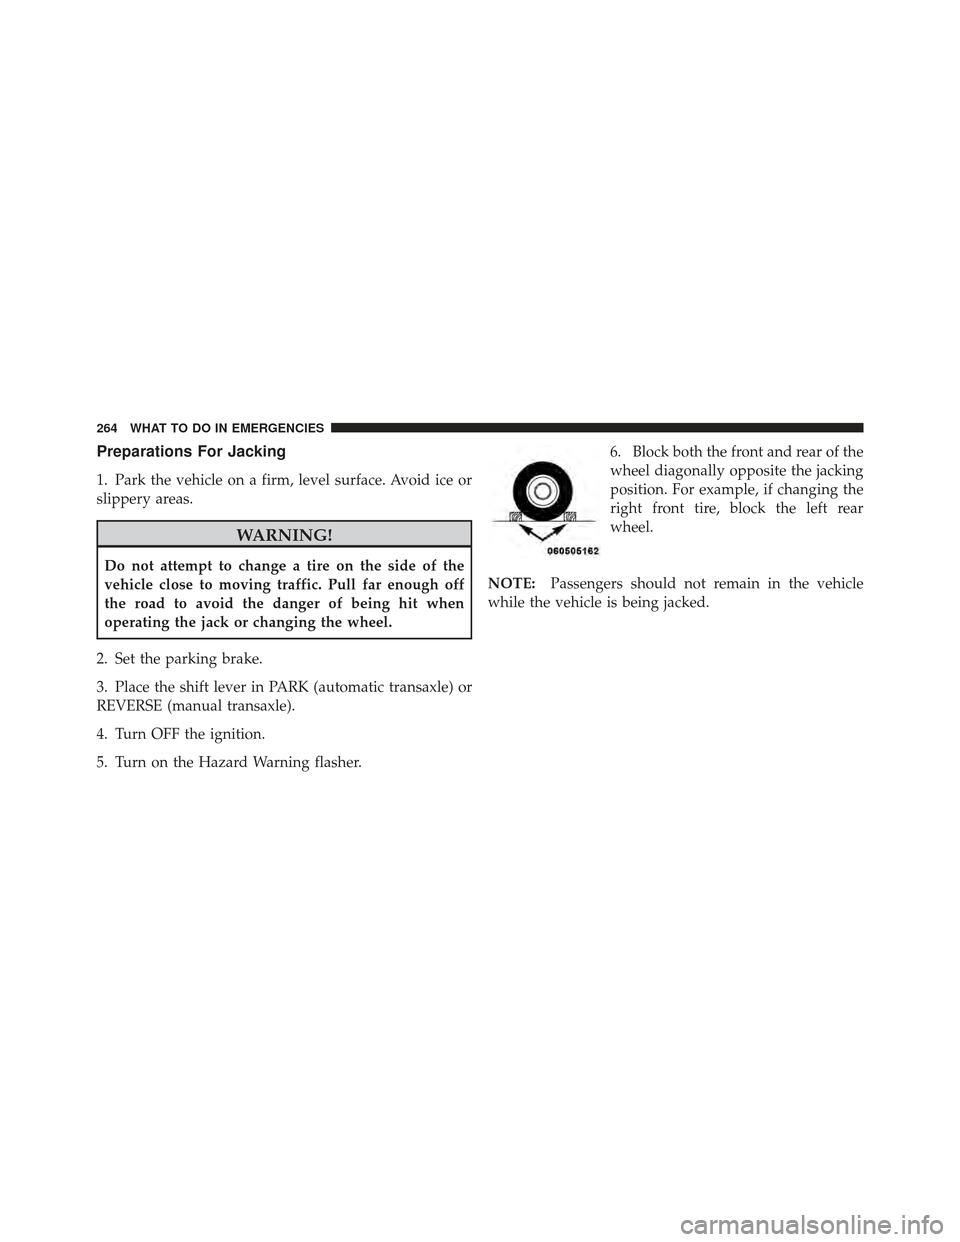
5. Turn on the Hazard Warning flasher. 6. Block both the front and rear of the
wheel diagonally opposite the jacking
position. For example, if changing the
right front tire, block the left rear
wheel.
NOTE: Passengers should not remain in the vehicle
while the vehicle is being jacked.
264 WHAT TO DO IN EMERGENCIES
Page 266 of 368
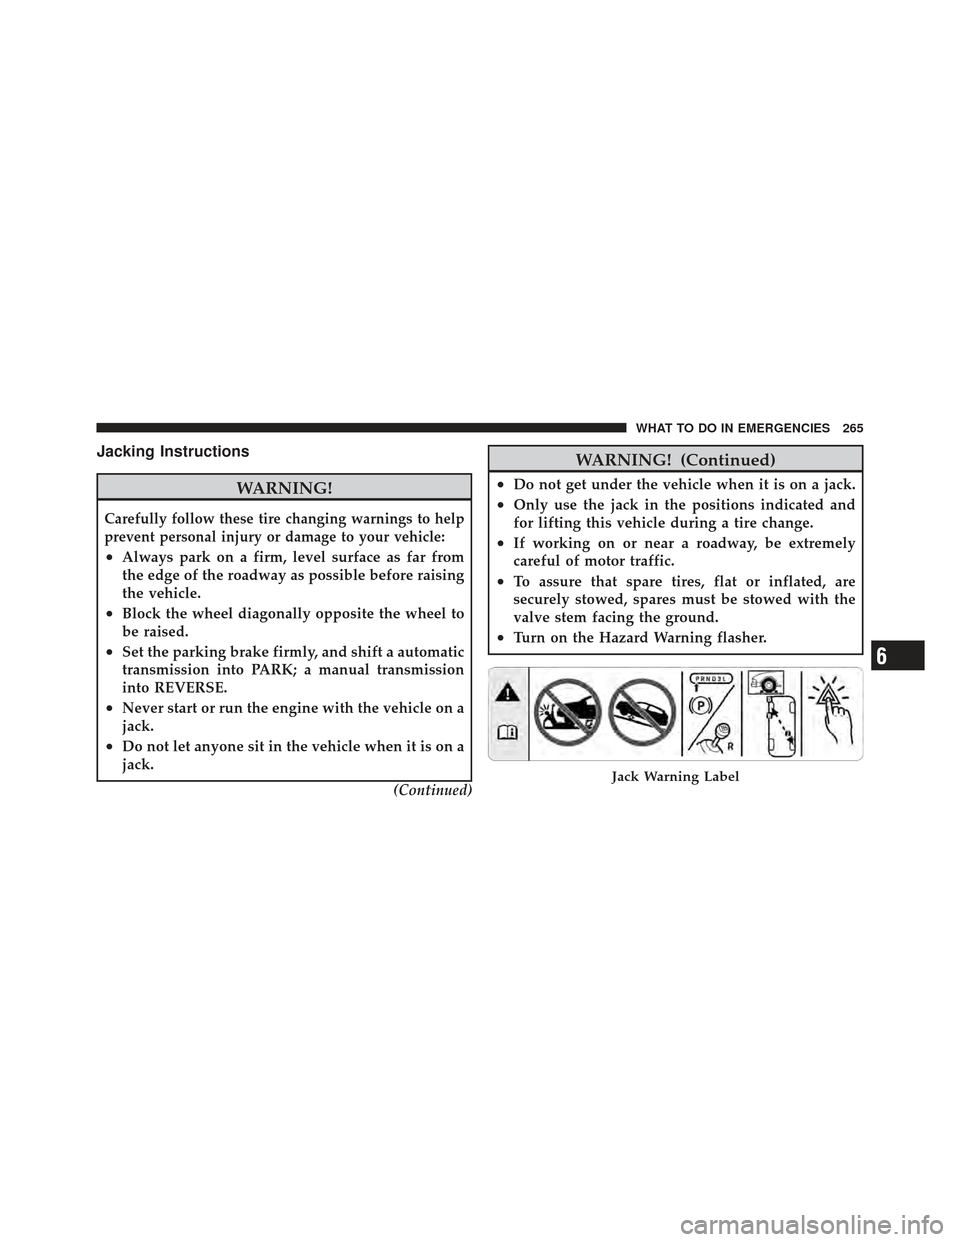
Jacking Instructions
WARNING!
Carefully follow these tire changing warnings to help
prevent personal injury or damage to your vehicle:
•Always park on a firm, level surface as far from
the edge of the roadway as possible before raising
the vehicle.
•Block the wheel diagonally opposite the wheel to
be raised.
•Set the parking brake firmly, and shift a automatic
transmission into PARK; a manual transmission
into REVERSE.
•Never start or run the engine with the vehicle on a
jack.
•Do not let anyone sit in the vehicle when it is on a
jack.(Continued)
WARNING! (Continued)
•Do not get under the vehicle when it is on a jack.
•Only use the jack in the positions indicated and
for lifting this vehicle during a tire change.
•If working on or near a roadway, be extremely
careful of motor traffic.
•To assure that spare tires, flat or inflated, are
securely stowed, spares must be stowed with the
valve stem facing the ground.
•Turn on the Hazard Warning flasher.
Jack Warning Label
6
WHAT TO DO IN EMERGENCIES 265
Page 267 of 368
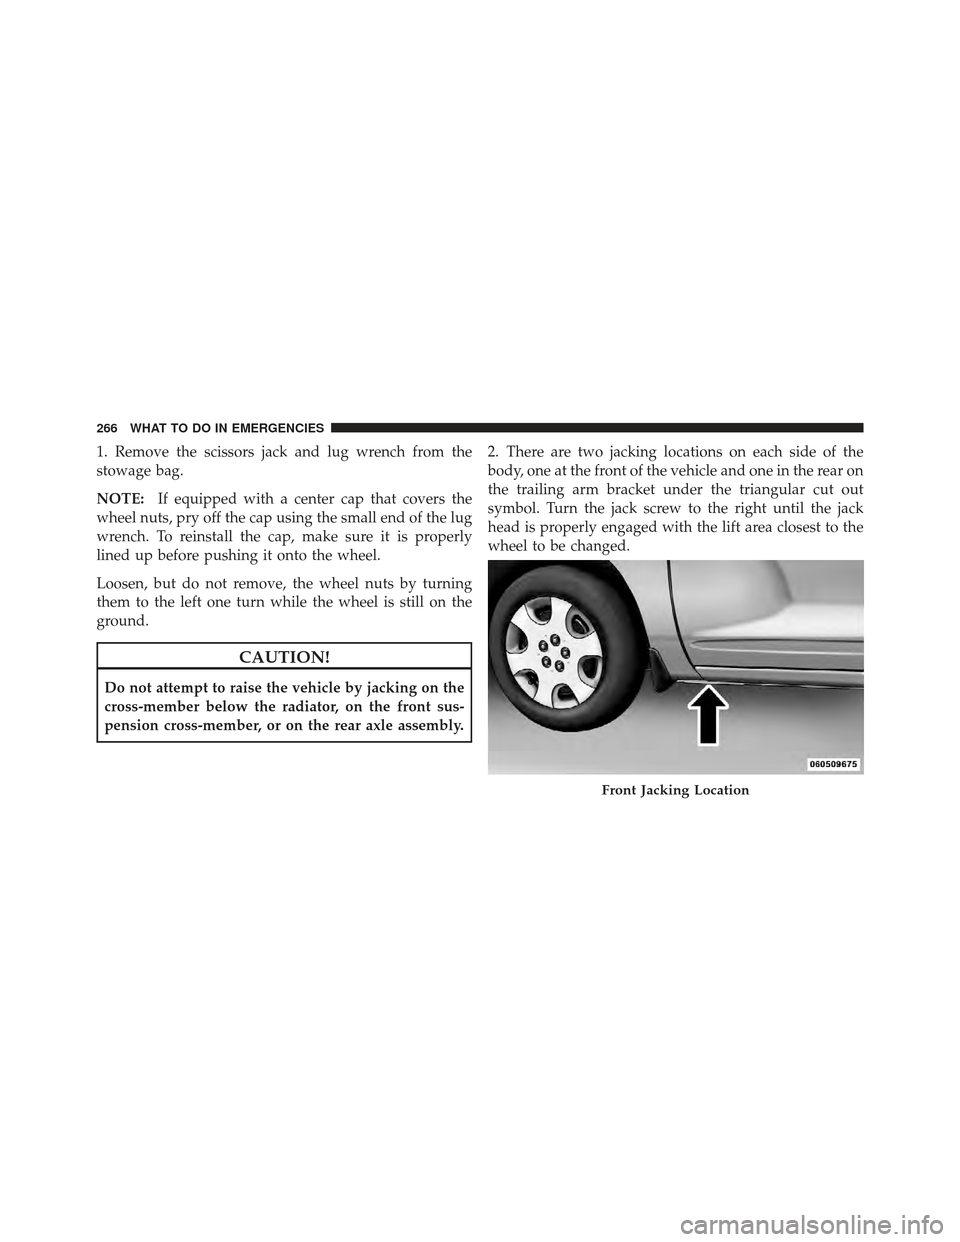
1. Remove the scissors jack and lug wrench from the
stowage bag.
NOTE:If equipped with a center cap that covers the
wheel nuts, pry off the cap using the small end of the lug
wrench. To reinstall the cap, make sure it is properly
lined up before pushing it onto the wheel.
Loosen, but do not remove, the wheel nuts by turning
them to the left one turn while the wheel is still on the
ground.
CAUTION!
Do not attempt to raise the vehicle by jacking on the
cross-member below the radiator, on the front sus-
pension cross-member, or on the rear axle assembly. 2. There are two jacking locations on each side of the
body, one at the front of the vehicle and one in the rear on
the trailing arm bracket under the triangular cut out
symbol. Turn the jack screw to the right until the jack
head is properly engaged with the lift area closest to the
wheel to be changed.
Front Jacking Location
266 WHAT TO DO IN EMERGENCIES
Page 326 of 368
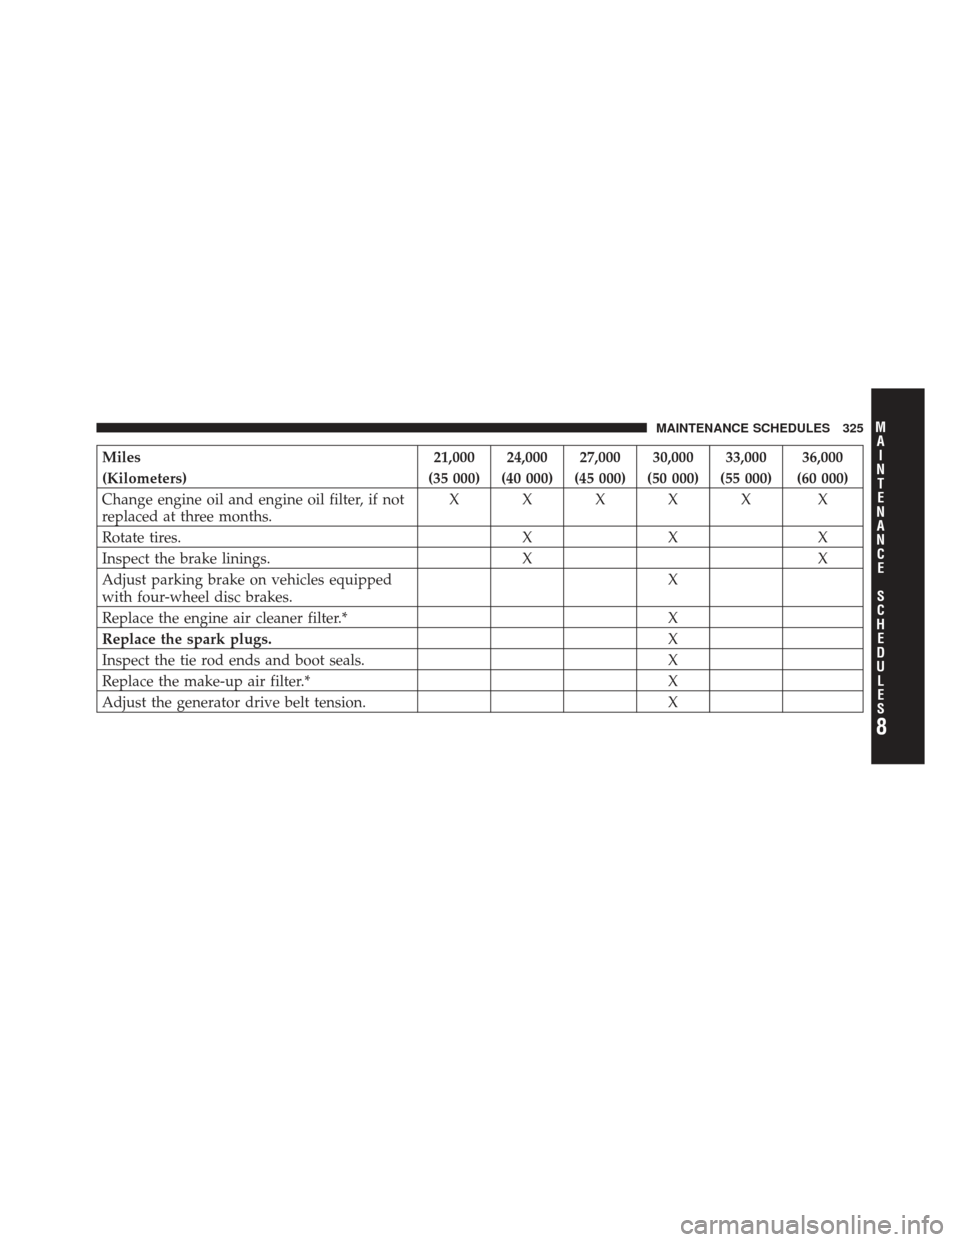
Miles21,000 24,000 27,000 30,000 33,000 36,000
(Kilometers) (35 000) (40 000) (45 000) (50 000) (55 000) (60 000)
Change engine oil and engine oil filter, if not
replaced at three months. XXXXX X
Rotate tires. XX X
Inspect the brake linings. XX
Adjust parking brake on vehicles equipped
with four-wheel disc brakes. X
Replace the engine air cleaner filter.* X
Replace the spark plugs. X
Inspect the tie rod ends and boot seals. X
Replace the make-up air filter.* X
Adjust the generator drive belt tension. X
8
M
A I
N T
E
N A
N CE
S
C
H E
D
U L
E
SMAINTENANCE SCHEDULES 325
Page 328 of 368
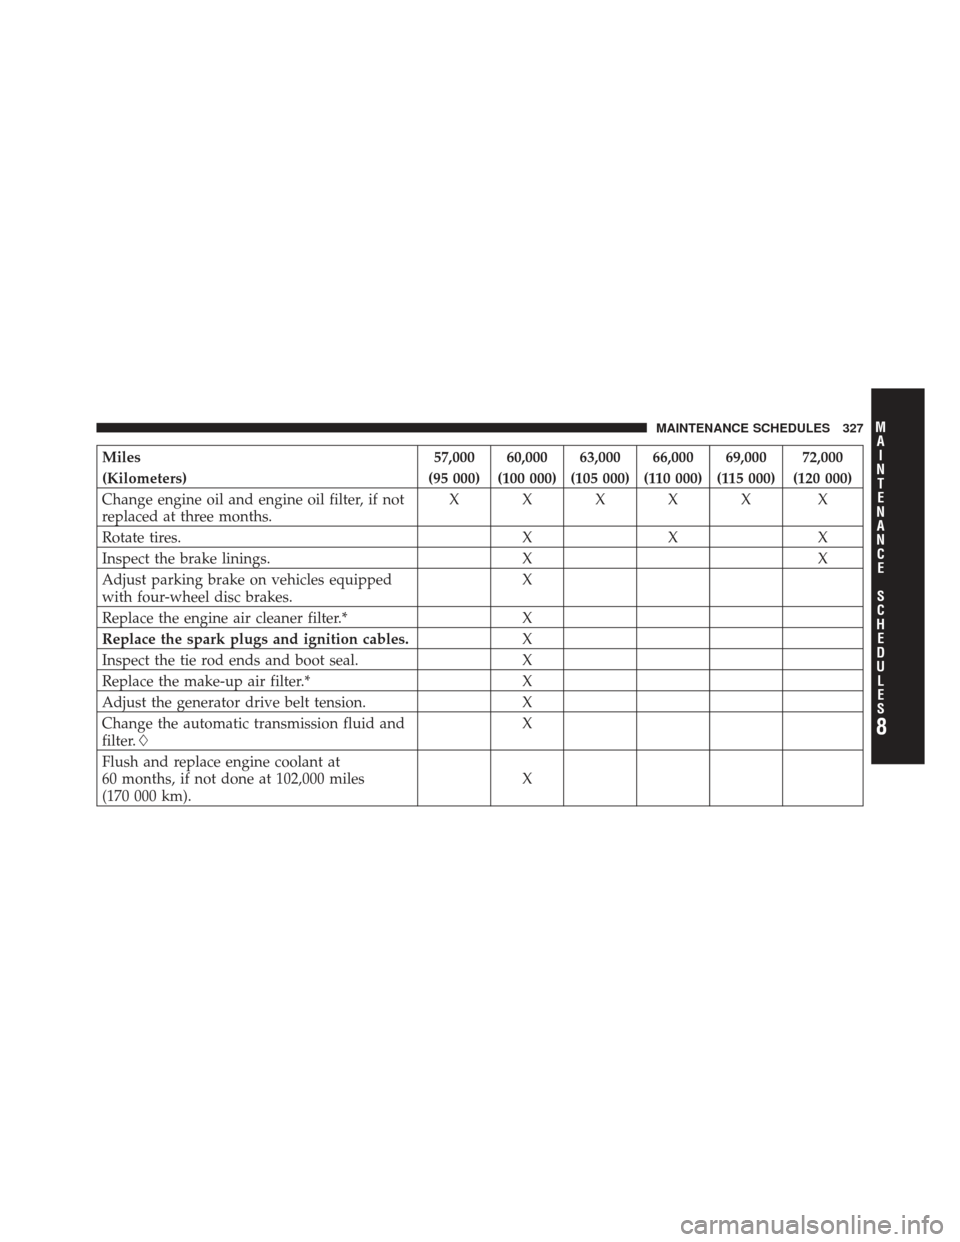
Miles57,000 60,000 63,000 66,000 69,000 72,000
(Kilometers) (95 000) (100 000) (105 000) (110 000) (115 000) (120 000)
Change engine oil and engine oil filter, if not
replaced at three months. XXXXX X
Rotate tires. XX X
Inspect the brake linings. XX
Adjust parking brake on vehicles equipped
with four-wheel disc brakes. X
Replace the engine air cleaner filter.* X
Replace the spark plugs and ignition cables. X
Inspect the tie rod ends and boot seal. X
Replace the make-up air filter.* X
Adjust the generator drive belt tension. X
Change the automatic transmission fluid and
filter.\b X
Flush and replace engine coolant at
60 months, if not done at 102,000 miles
(170 000 km). X
8
M
A I
N T
E
N A
N CE
S
C
H E
D
U L
E
SMAINTENANCE SCHEDULES 327
Page 329 of 368
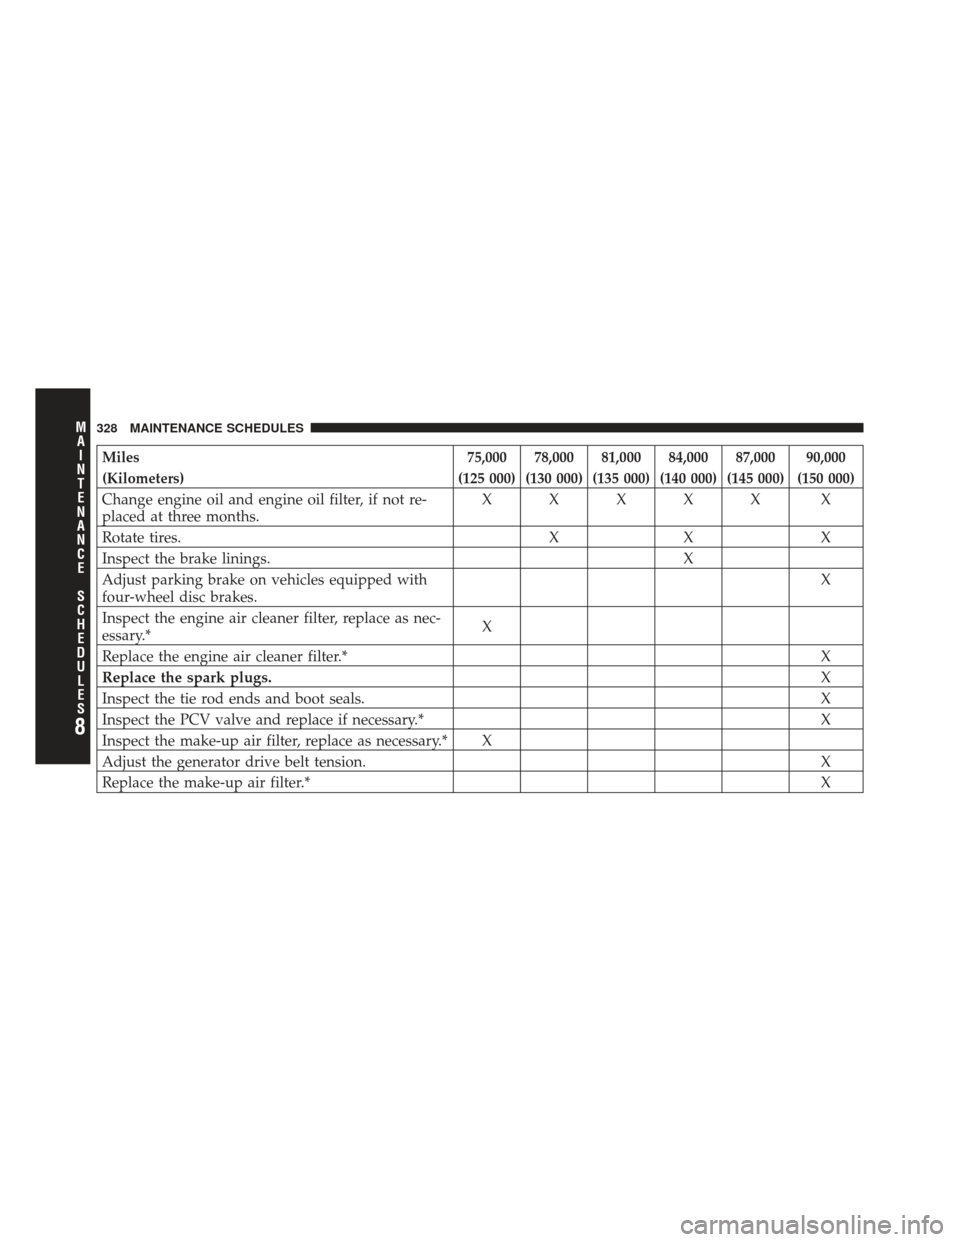
Miles75,000 78,000 81,000 84,000 87,000 90,000
(Kilometers) (125 000) (130 000) (135 000) (140 000) (145 000) (150 000)
Change engine oil and engine oil filter, if not re-
placed at three months. XXXXX X
Rotate tires. X X X
Inspect the brake linings. X
Adjust parking brake on vehicles equipped with
four-wheel disc brakes. X
Inspect the engine air cleaner filter, replace as nec-
essary.* X
Replace the engine air cleaner filter.* X
Replace the spark plugs. X
Inspect the tie rod ends and boot seals. X
Inspect the PCV valve and replace if necessary.* X
Inspect the make-up air filter, replace as necessary.* X
Adjust the generator drive belt tension. X
Replace the make-up air filter.* X
8
M
A I
N T
E
N A
N CE
S
C
H E
D
U L
E
S328 MAINTENANCE SCHEDULES
Page 331 of 368
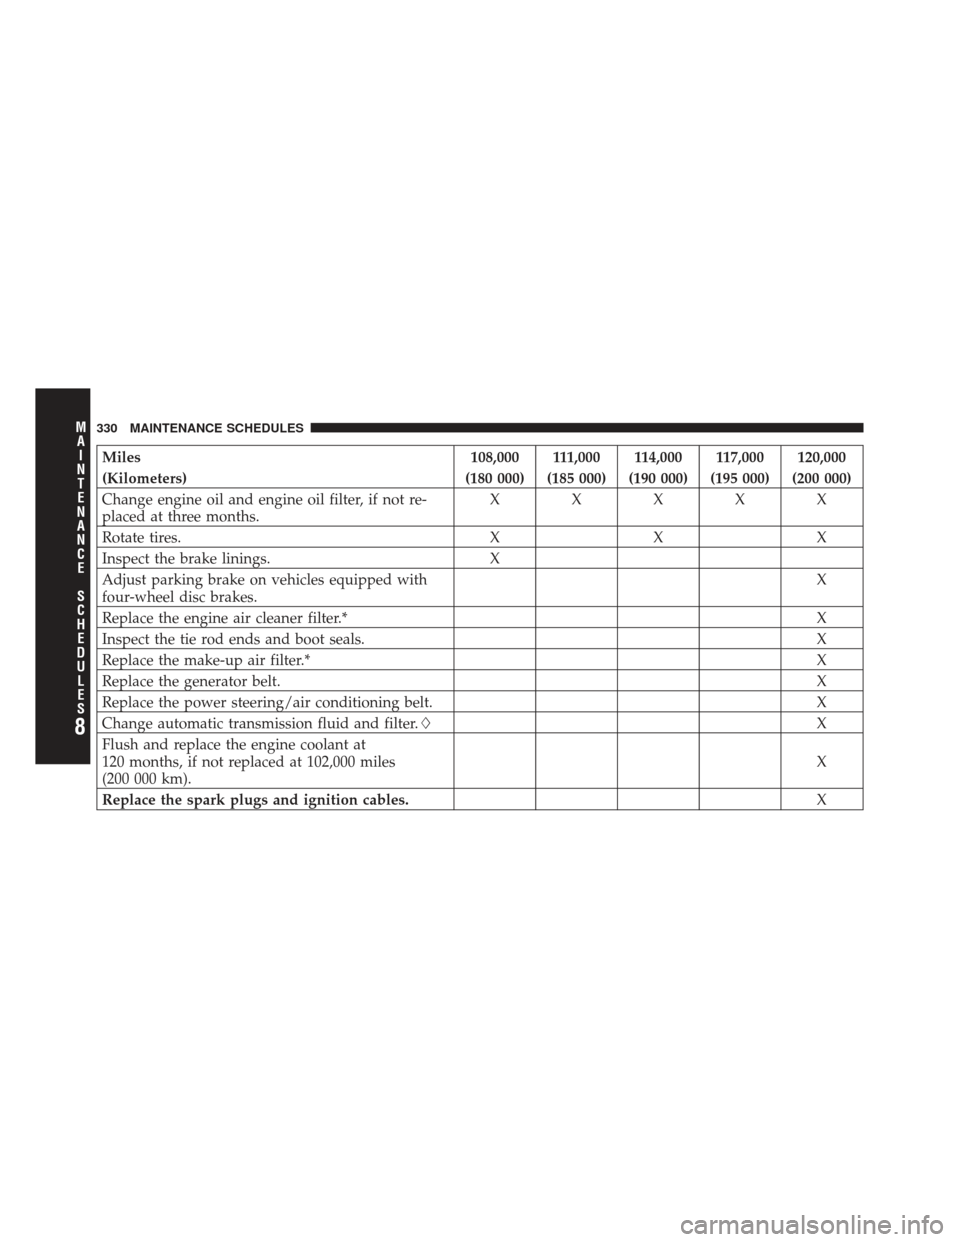
Miles108,000 111,000 114,000 117,000 120,000
(Kilometers) (180 000) (185 000) (190 000) (195 000) (200 000)
Change engine oil and engine oil filter, if not re-
placed at three months. XXXXX
Rotate tires. XXX
Inspect the brake linings. X
Adjust parking brake on vehicles equipped with
four-wheel disc brakes. X
Replace the engine air cleaner filter.* X
Inspect the tie rod ends and boot seals. X
Replace the make-up air filter.* X
Replace the generator belt. X
Replace the power steering/air conditioning belt. X
Change automatic transmission fluid and filter.\b X
Flush and replace the engine coolant at
120 months, if not replaced at 102,000 miles
(200 000 km). X
Replace the spark plugs and ignition cables. X
8
M
A I
N T
E
N A
N CE
S
C
H E
D
U L
E
S330 MAINTENANCE SCHEDULES