battery CHRYSLER PT CRUISER 2010 1.G User Guide
[x] Cancel search | Manufacturer: CHRYSLER, Model Year: 2010, Model line: PT CRUISER, Model: CHRYSLER PT CRUISER 2010 1.GPages: 60, PDF Size: 6.19 MB
Page 28 of 60
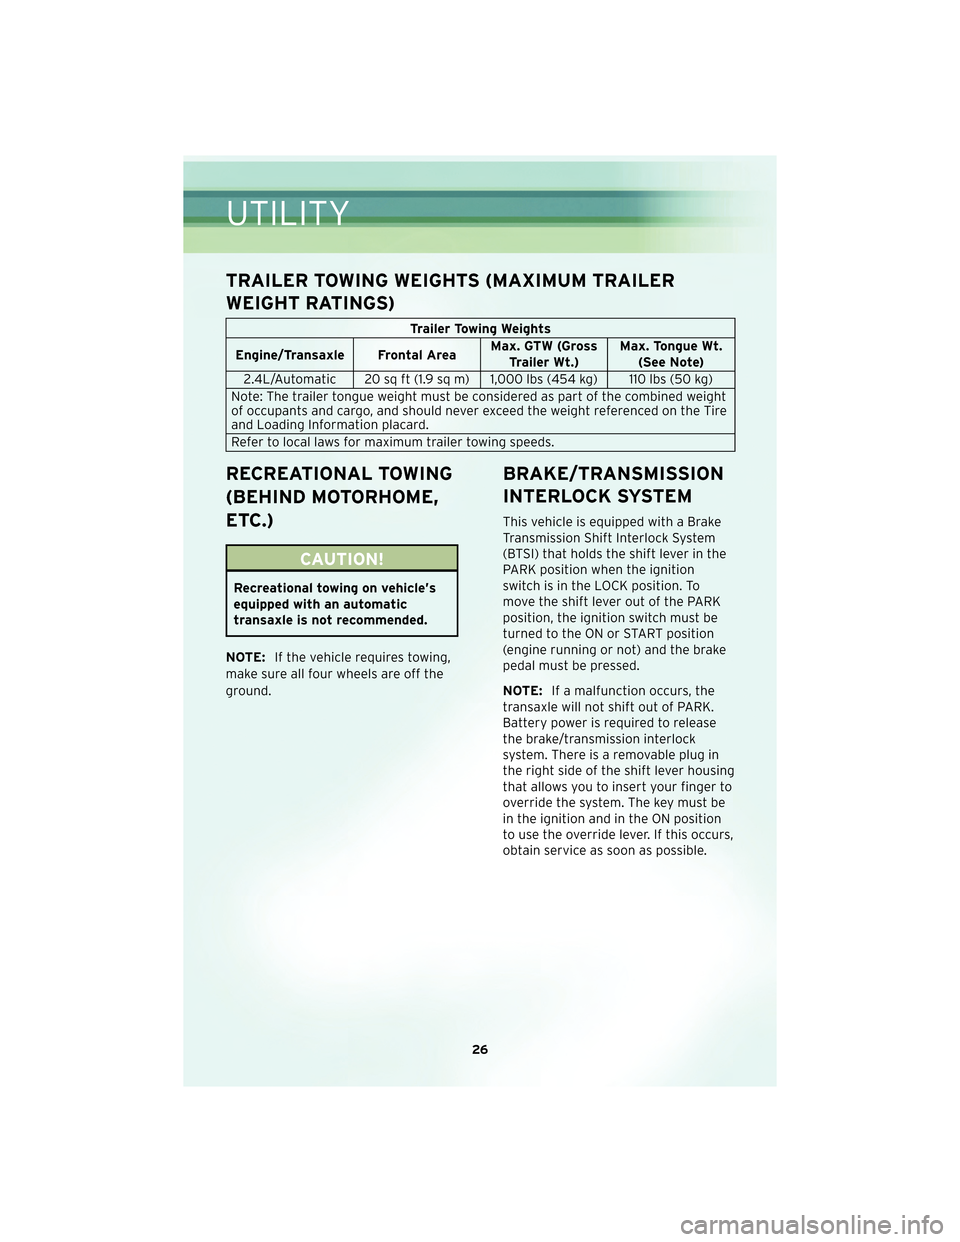
TRAILER TOWING WEIGHTS (MAXIMUM TRAILER
WEIGHT RATINGS)
Trailer Towing Weights
Engine/Transaxle Frontal Area Max. GTW (Gross
Trailer Wt.) Max. Tongue Wt.
(See Note)
2.4L/Automatic 20 sq ft (1.9 sq m) 1,000 lbs (454 kg) 110 lbs (50 kg)
Note: The trailer tongue weight must be considered as part of the combined weight
of occupants and cargo, and should never exceed the weight referenced on the Tire
and Loading Information placard.
Refer to local laws for maximum trailer towing speeds.
RECREATIONAL TOWING
(BEHIND MOTORHOME,
ETC.)
CAUTION!
Recreational towing on vehicle’s
equipped with an automatic
transaxle is not recommended.
NOTE: If the vehicle requires towing,
make sure all four wheels are off the
ground.
BRAKE/TRANSMISSION
INTERLOCK SYSTEM
This vehicle is equipped with a Brake
Transmission Shift Interlock System
(BTSI) that holds the shift lever in the
PARK position when the ignition
switch is in the LOCK position. To
move the shift lever out of the PARK
position, the ignition switch must be
turned to the ON or START position
(engine running or not) and the brake
pedal must be pressed.
NOTE: If a malfunction occurs, the
transaxle will not shift out of PARK.
Battery power is required to release
the brake/tr ansmission interlock
system. There is a removable plug in
the right side of the shift lever housing
that allows you to insert your finger to
override the system. The key must be
in the ignition and in the ON position
to use the override lever. If this occurs,
obtain service as soon as possible.
UTILITY
26
Page 36 of 60
NOTE:The wheel cover is held on the wheel by the wheel nuts. When reinstalling
original wheel, properly align the wheel cover to the valve stem, place the wheel
cover onto the wheel, then install the wheel nuts.
• Lower the vehicle by turning the jack screw to the left.
• Finish tightening the nuts. Push down on the wrench while tightening the wheel nuts. Alternate nuts until each nut has been tightened twice. The correct wheel nut
torque is 100 ft lbs (135 N m). If you doubt that you have tightened the nuts
correctly, have them checked with a torque wrench by your authorized dealer or at
a qualified service station.
• Remove the wheel blocks and lower the jack until it is free. Stow the lug wrench and jack in their designated location. Secure all parts using the means provided.
WARNING!
A loose tire or jack thrown forward in a collision or hard stop could endanger the
occupants of the vehicle. Always stow the jack parts and the spare tire in the
places provided. Have the deflated (flat) tire repaired or replaced immediately.
• Place the deflated (flat) tire in the cargo area; have the tire repaired or replaced
as soon as possible.
• Check the tire pressure as soon as possible. Correct the pressure as required.
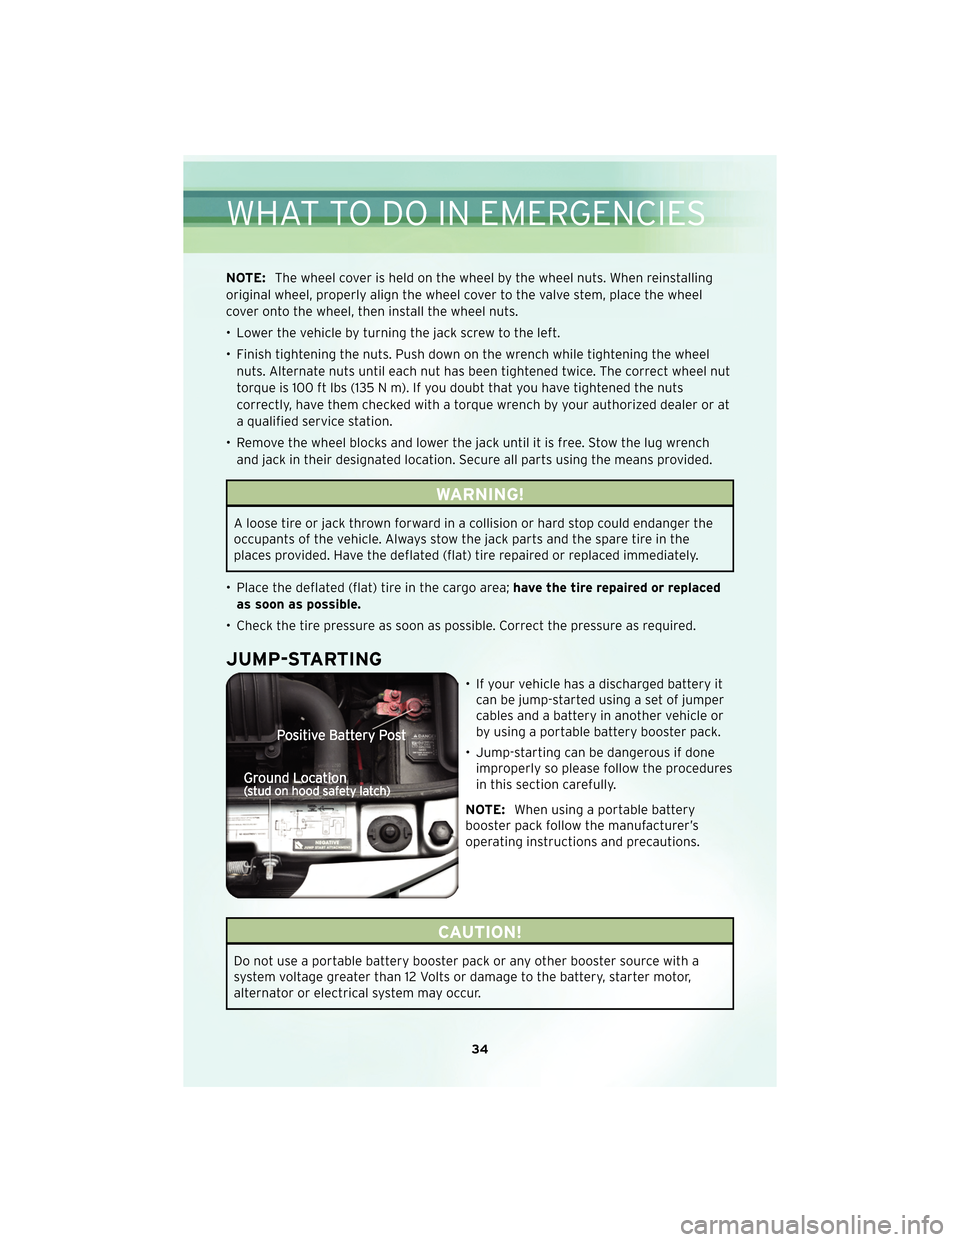
JUMP-STARTING
• If your vehicle has a discharged battery it can be jump-started using a set of jumper
cables and a battery in another vehicle or
by using a portable battery booster pack.
• Jump-starting can be dangerous if done improperly so please follow the procedures
in this section carefully.
NOTE: When using a portable battery
booster pack follow the manufacturer’s
operating instructions and precautions.
CAUTION!
Do not use a portable battery booster pack or any other booster source with a
system voltage greater than 12 Volts or damage to the battery, starter motor,
alternator or electrical system may occur.
WHAT TO DO IN EMERGENCIES
34
Page 37 of 60
WARNING!
When temperatures are below the freezing point, electrolyte in a discharged
battery may freeze. Do not attempt jump-starting because the battery could
rupture or explode and cause personal injury. Battery temperature must be
brought above the freezing point before attempting a jump-start.
Preparations for Jump-Start
• The battery in your vehicle is located in the engine compartment just behind theleft front headlight assembly.
WARNING!
• Take care to avoid the radiator cooling fan whenever the hood is raised. It canstart anytime the ignition switch is on. You can be injured by moving fan blades.
• Remove any metal jewelry such as watch bands or bracelets that might make an inadvertent electrical contact. You could be seriously injured.
• Batteries contain sulfuric acid that can burn your skin or eyes and generate hydrogen gas which is flammable and explosive. Keep open flames or sparks
away from the battery.
• Set the parking brake, shift the automatic transmission into PARK and turn the ignition to LOCK.
• Turn off the heater, radio, and all unnecessaryelectrical acc essories.
• If using a another vehicle to jump-start the battery, park the vehicle within the jumper cables reach, set the parking brake and make sure the ignition is OFF.
WARNING!
Do not allow vehicles to touch each other as this could establish a ground
connection and personal injury could result.
35
WHAT TO DO IN EMERGENCIES
Page 38 of 60
Jump-Starting Procedure
WARNING!
Failure to follow this procedure could result in personal injury or property damage
due to battery explosion.
CAUTION!
Failure to follow these procedures could result in damage to the charging system
of the booster vehicle or the discharged vehicle.
• Connect the positive (+)end of the jumper cable to the positive (+)post of the
discharged vehicle.
• Connect the opposite end of the positive (+)jumper cable to the positive (+)post
of the booster battery.
• Connect the negative end (-)of the jumper cable to the negative (-)post of the
booster battery.
• Connect the opposite end of the negative (-)jumper cable to the stud on the hood
latch assembly (-)of the vehicle with the discharged battery.
WARNING!
Do not connect the cable to the negative post (-)of the discharged battery. The
resulting electrical spark could cause the battery to explode and could result in
personal injury.
• Start the engine in the vehicle that has the booster battery, let the engine idle a few minutes, and then start the engine in the vehicle with the discharged battery.
Once the engine is started, remove the jumper cables in the reverse sequence:
• Disconnect the negative (-)jumper cable from the stud on the hood latch assembly
(-) of the vehicle with the discharged battery.
• Disconnect the negative end (-)of the jumper cable from the negative (-)post of
the booster battery.
• Disconnect the opposite end of the positive (+)jumper cable from the positive (+)
post of the booster battery.
• Disconnect the positive (+)end of the jumper cable from the positive (+)post of
the discharged vehicle.
• If frequent jump-starting is required to start your vehicle you should have the battery and charging system inspected at your authorized dealer.
WHAT TO DO IN EMERGENCIES
36
Page 39 of 60

CAUTION!
Accessories that can be plugged into the vehicle power outlets draw power from
the vehicle’s battery, even when not in use (i.e., cellular phones, etc.). Eventually, if
plugged in long enough, the vehicle’s battery will discharge sufficiently to degrade
battery life and/or prevent the engine from starting.
37
WHAT TO DO IN EMERGENCIES
Page 48 of 60
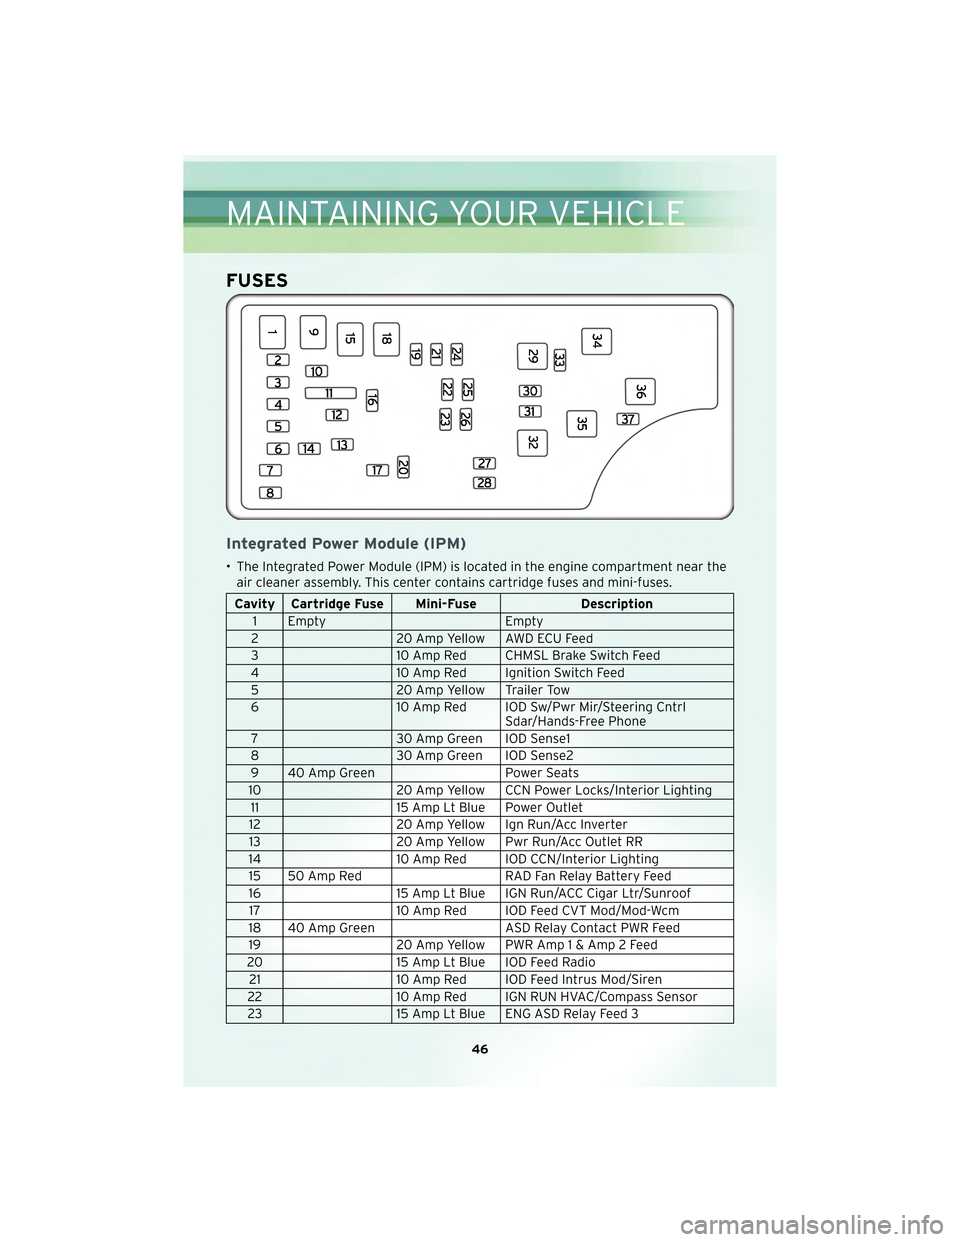
FUSES
Integrated Power Module (IPM)
• The Integrated Power Module (IPM) is located in the engine compartment near theair cleaner assembly. This center contains cartridge fuses and mini-fuses.
Cavity Cartridge Fuse Mini-Fuse Description
1 Empty Empty
2 20 Amp Yellow AWD ECU Feed
3 10 Amp Red CHMSL Brake Switch Feed
4 10 Amp Red Ignition Switch Feed
5 20 Amp Yellow Trailer Tow
6 10 Amp Red IOD Sw/Pwr Mir/Steering Cntrl
Sdar/Hands-Free Phone
7 30 Amp Green IOD Sense1
8 30 Amp Green IOD Sense2
9 40 Amp Green Power Seats
10 20 Amp Yellow CCN Power Locks/Interior Lighting
11 15 Amp Lt Blue Power Outlet
12 20 Amp Yellow Ign Run/Acc Inverter
13 20 Amp Yellow Pwr Run/Acc Outlet RR
14 10 Amp Red IOD CCN/Interior Lighting
15 50 Amp Red RAD Fan Relay Battery Feed
16 15 Amp Lt Blue IGN Run/ACC Cigar Ltr/Sunroof
17 10 Amp Red IOD Feed CVT Mod/Mod-Wcm
18 40 Amp Green ASD Relay Contact PWR Feed
19 20 Amp Yellow PWR Amp1&Amp2Feed
20 15 Amp Lt Blue IOD Feed Radio
21 10 Amp Red IOD Feed Intrus Mod/Siren
22 10 Amp Red IGN RUN HVAC/Compass Sensor
23 15 Amp Lt Blue ENG ASD Relay Feed 3
MAINTAINING YOUR VEHICLE
46