parking brake CHRYSLER PT CRUISER 2010 1.G User Guide
[x] Cancel search | Manufacturer: CHRYSLER, Model Year: 2010, Model line: PT CRUISER, Model: CHRYSLER PT CRUISER 2010 1.GPages: 60, PDF Size: 6.19 MB
Page 10 of 60
KEY FOB
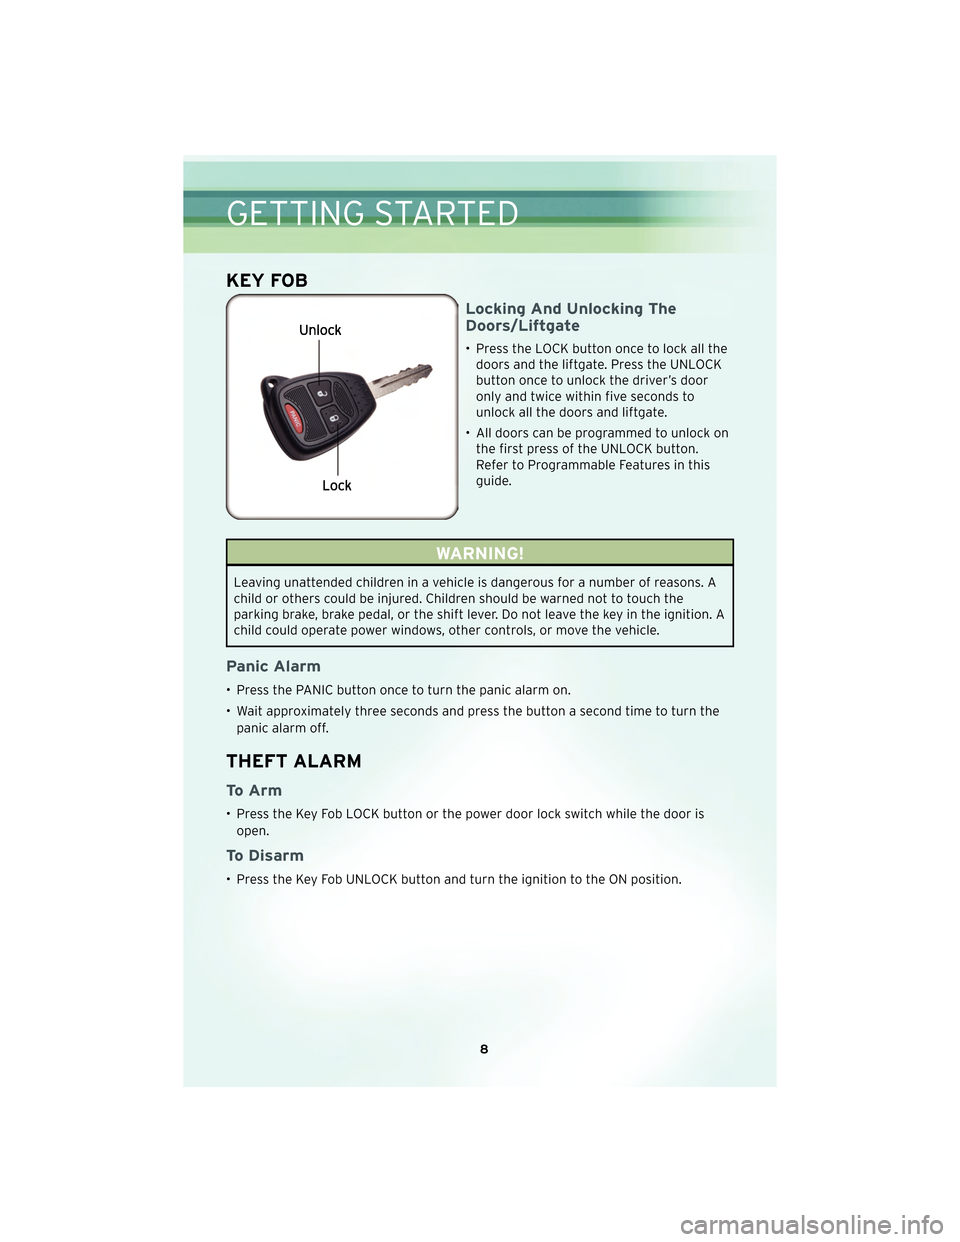
Locking And Unlocking The
Doors/Liftgate
• Press the LOCK button once to lock all thedoors and the liftgate. Press the UNLOCK
button once to unlock the driver’s door
only and twice within five seconds to
unlock all the doors and liftgate.
• All doors can be programmed to unlock on the first press of the UNLOCK button.
Refer to Programmable Features in this
guide.
WARNING!
Leaving unattended children in a vehicle is dangerous for a number of reasons. A
child or others could be injured. Children should be warned not to touch the
parking brake, brake pedal, or the shift lever. Do not leave the key in the ignition. A
child could operate power windows, other controls, or move the vehicle.
Panic Alarm
• Press the PANIC button once to turn the panic alarm on.
• Wait approximately three seconds and press the button a second time to turn the
panic alarm off.
THEFT ALARM
To Arm
• Press the Key Fob LOCK button or the power door lock switch while the door isopen.
To Disarm
• Press the Key Fob UNLOCK button and turn the ignition to the ON position.
GETTING STARTED
8
Page 29 of 60
24 HOUR TOWING ASSISTANCE - U.S. ONLY
• Dial toll-free 1-800-521-2779.
• Provide your name, vehicle identification number and license plate number.
• Provide your location, including telephone number, from which you are calling.
• Briefly describe the nature of the problem and answer a few simple questions.
• You will be given the name of the service provider and an estimated time of arrival.If you feel you are in an “unsafe situation”, please let us know. With your consent,
we will contact local police or safety authorities.
INSTRUMENT CLUSTER WARNING LIGHTS
- Traction Control System (TCS) Indicator Light
• If this indicator light flashes during acceleration, apply as little throttle as possible.While driving, ease up on the accelerator. Adapt your speed and driving to the
prevailing road conditions. To improve the vehicle’s traction when starting off in
deep snow, sand or gravel, it may be desirable to switch the TCS system off.
- Tire Pressure Monitoring System (TPMS) Light
• A Tire Pressure Monitoring Light and a “low tire” message will display in yourinstrument cluster along with an audible chime if one or more of your vehicle’s four
road tires are significantly under-inflated.
• Check the inflation pressure of each tire and inflate to the recommended pressure for your vehicle. The tire pressures recommended for your vehicle are found on the
“Tire and Loading Information” label located on the driver’s side door opening. The
TPMS light should not be used as a tire pressure gauge when adjusting your tire
pressure.
• It is recommended that you check the tire pressure in the morning when tires are cool; inflate each tire to the recommended pressure for your vehicle. The light will
turn off after your vehicle’s tire pressures are properly inflated and the pressure
has been recognized. The vehicle may need to be driven for up to 20 minutes
above 15 mph (25 km/h) before the light will turn off.
• Temperature changes can affect tire pressure, causing the TPMS light to turn on. Tire pressures will also increase as the vehicle is driven – this is normal and you
should not adjust for this increased pressure.
• Driving on under-inflated tires reduces your vehicle’s fuel efficiency and tire tread life. If a spare tire is in use on the vehicle, the TPMS light may turn on.
- Brake Warning Light
• The Brake Warning light illuminates when there is either a system malfunction orthe parking brake is applied. If the light is on and the parking brake is not applied, it
indicates a possible brake hydraulic malfunction, brake booster problem or an
Anti-Lock Brake System problem.
27
WHAT TO DO IN EMERGENCIES
Page 33 of 60
Spare Tire Removal
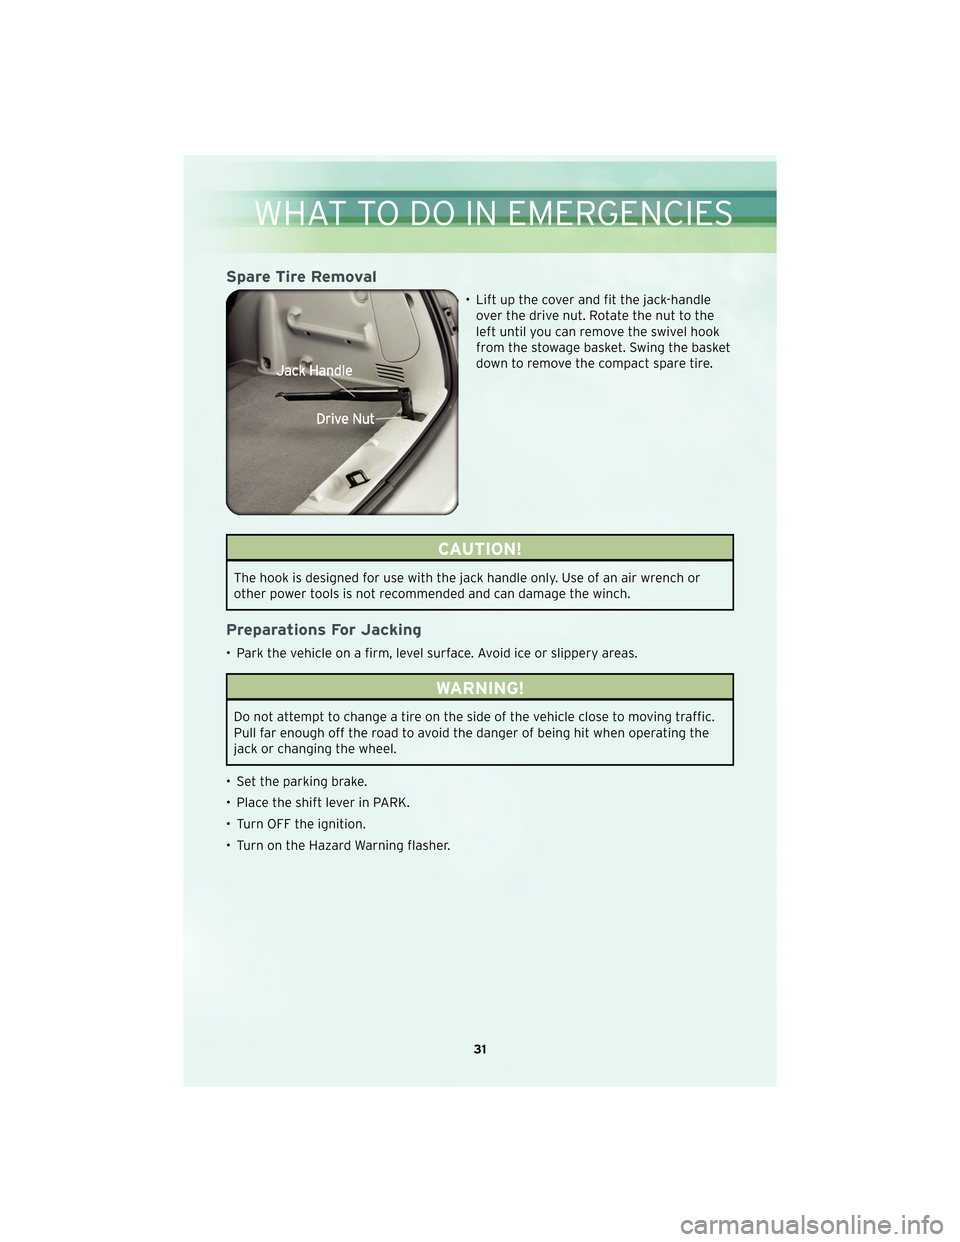
• Lift up the cover and fit the jack-handleover the drive nut. Rotate the nut to the
left until you can remove the swivel hook
from the stowage basket. Swing the basket
down to remove the compact spare tire.
CAUTION!
The hook is designed for use with the jack handle only. Use of an air wrench or
other power tools is not recommended and can damage the winch.
Preparations For Jacking
• Park the vehicle on a firm, level surface. Avoid ice or slippery areas.
WARNING!
Do not attempt to change a tire on the side of the vehicle close to moving traffic.
Pull far enough off the road to avoid the danger of being hit when operating the
jack or changing the wheel.
• Set the parking brake.
• Place the shift lever in PARK.
• Turn OFF the ignition.
• Turn on the Hazard Warning flasher.
31
WHAT TO DO IN EMERGENCIES
Page 34 of 60
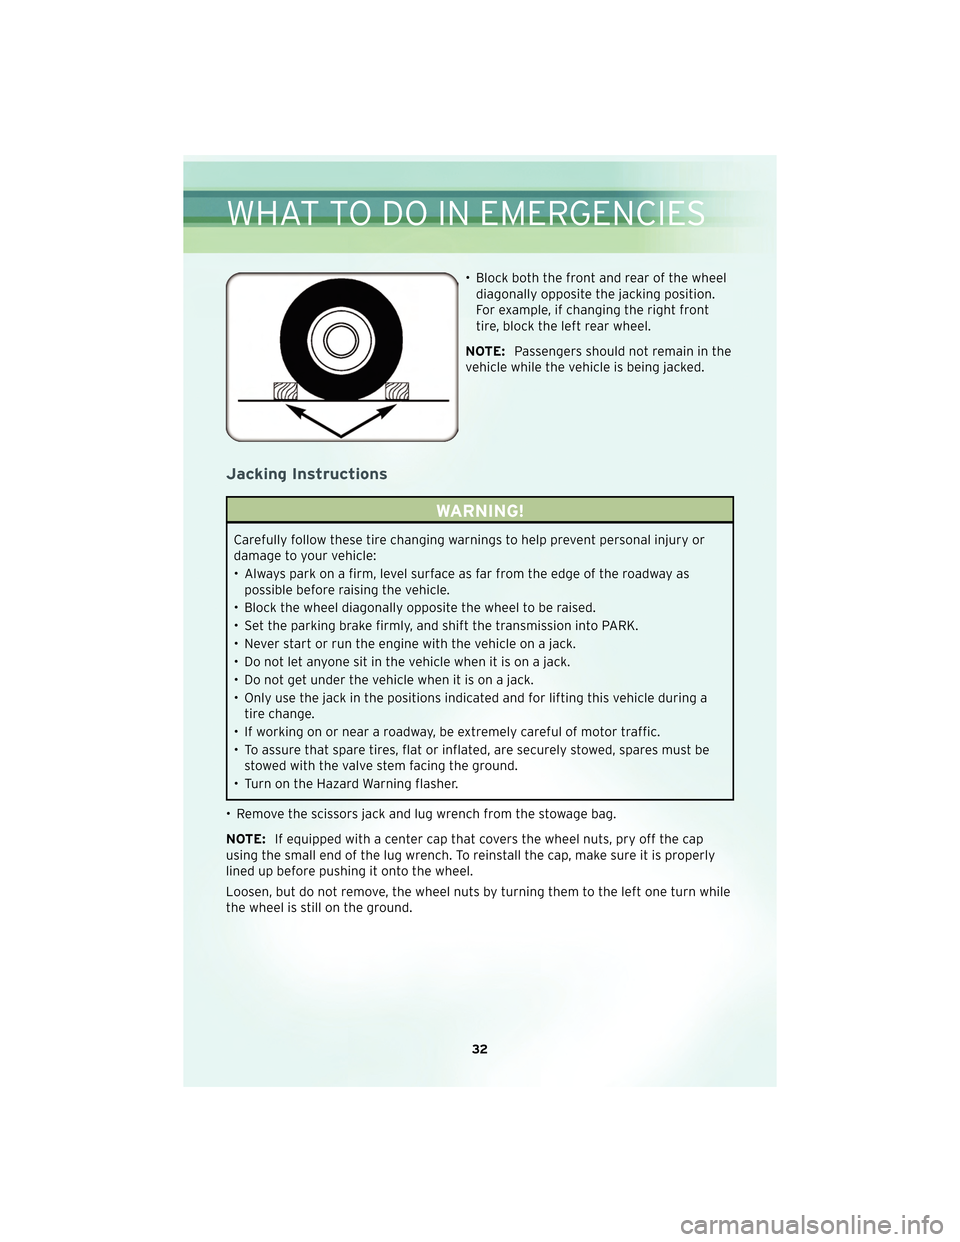
• Block both the front and rear of the wheeldiagonally opposite the jacking position.
For example, if changing the right front
tire, block the left rear wheel.
NOTE: Passengers should not remain in the
vehicle while the vehicle is being jacked.
Jacking Instructions
WARNING!
Carefully follow these tire changing warnings to help prevent personal injury or
damage to your vehicle:
• Always park on a firm, level surface as far from the edge of the roadway as possible before raising the vehicle.
• Block the wheel diagonally opposite the wheel to be raised.
• Set the parking brake firmly, and shift the transmission into PARK.
• Never start or run the engine with the vehicle on a jack.
• Do not let anyone sit in the vehicle when it is on a jack.
• Do not get under the vehicle when it is on a jack.
• Only use the jack in the positions indicated and for lifting this vehicle during a tire change.
• If working on or near a roadway, be extremely careful of motor traffic.
• To assure that spare tires, flat or inflated, are securely stowed, spares must be stowed with the valve stem facing the ground.
• Turn on the Hazard Warning flasher.
• Remove the scissors jack and lug wrench from the stowage bag.
NOTE: If equipped with a center cap that covers the wheel nuts, pry off the cap
using the small end of the lug wrench. To reinstall the cap, make sure it is properly
lined up before pushing it onto the wheel.
Loosen, but do not remove, the wheel nuts by turning them to the left one turn while
the wheel is still on the ground.
WHAT TO DO IN EMERGENCIES
32
Page 37 of 60
WARNING!
When temperatures are below the freezing point, electrolyte in a discharged
battery may freeze. Do not attempt jump-starting because the battery could
rupture or explode and cause personal injury. Battery temperature must be
brought above the freezing point before attempting a jump-start.
Preparations for Jump-Start
• The battery in your vehicle is located in the engine compartment just behind theleft front headlight assembly.
WARNING!
• Take care to avoid the radiator cooling fan whenever the hood is raised. It canstart anytime the ignition switch is on. You can be injured by moving fan blades.
• Remove any metal jewelry such as watch bands or bracelets that might make an inadvertent electrical contact. You could be seriously injured.
• Batteries contain sulfuric acid that can burn your skin or eyes and generate hydrogen gas which is flammable and explosive. Keep open flames or sparks
away from the battery.
• Set the parking brake, shift the automatic transmission into PARK and turn the ignition to LOCK.
• Turn off the heater, radio, and all unnecessaryelectrical acc essories.
• If using a another vehicle to jump-start the battery, park the vehicle within the jumper cables reach, set the parking brake and make sure the ignition is OFF.
WARNING!
Do not allow vehicles to touch each other as this could establish a ground
connection and personal injury could result.
35
WHAT TO DO IN EMERGENCIES
Page 46 of 60
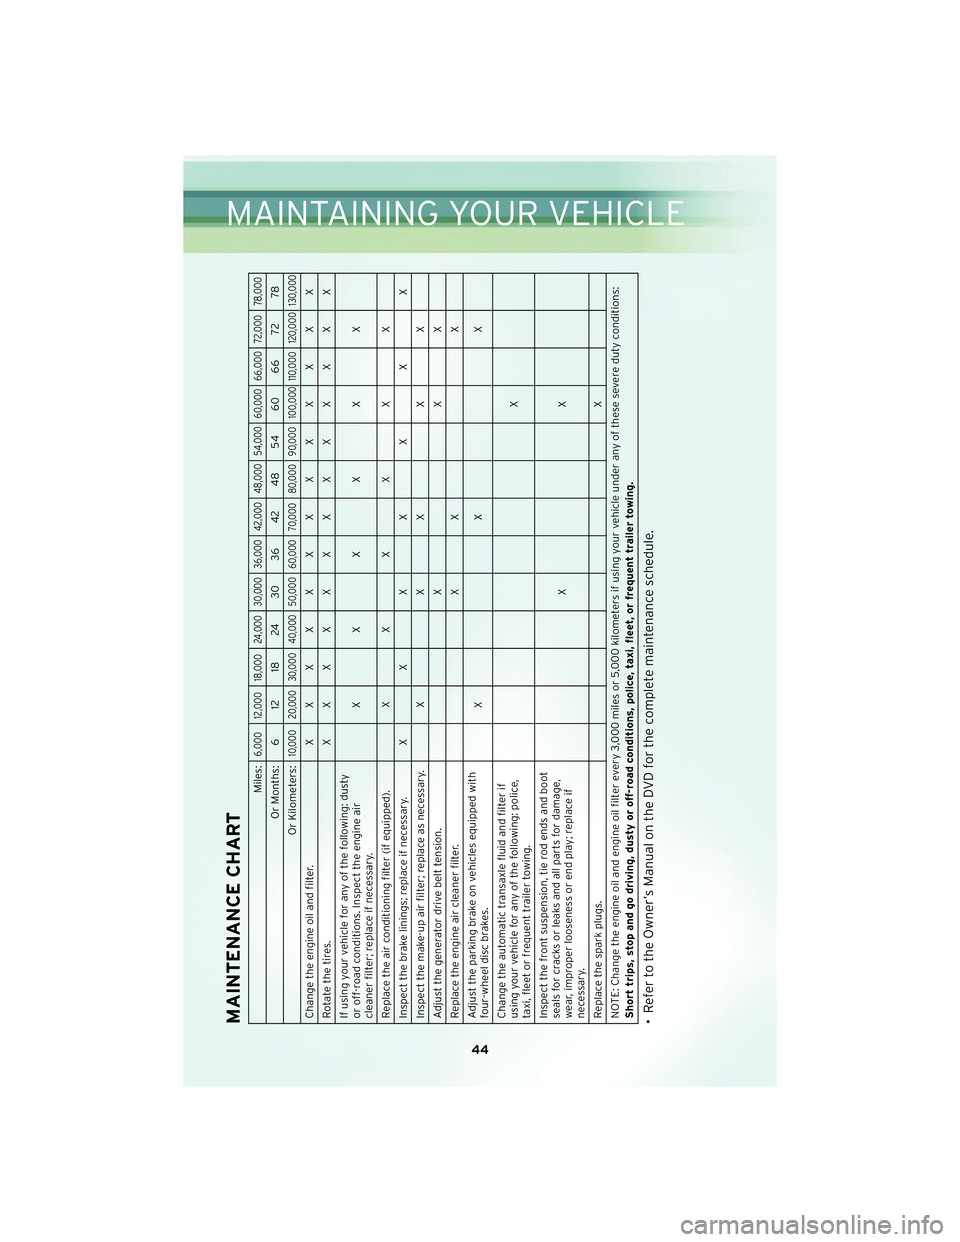
MAINTENANCE CHART
Miles:
6,000 12,000 18,000 24,000 30,000 36,000 42,000 48,000 54,000 60,000 66,000 72,000 78,000
Or Months: 6 12 18 24 30 36 42 48 54 60 66 72 78
Or Kilometers:
10,000 20,000 30,000 40,000 50,000 60,000 70,000 80,000 90,000 100,000 110,000 120,000 130,000
Change the engine oil and filter. XXXXXXXXXXXXX
Rotatethetires. XXXXXXXXXXXXX
If using your vehicle for any of the following: dusty
or off-road conditions. Inspect the engine air
cleaner filter; replace if necessary. XXXXXX
Replace the air conditioning filter (if equipped). X X X X X X
Inspect the brake linings; replace if necessary. X X X X X X X
Inspect the make-up air filter; replace as necessary. X X X X X
Adjust the generator drive belt tension. X X X
Replace the engine air cleaner filter. X X X
Adjust the parking brake on vehicles equipped with
four-wheel disc brakes. XXX
Change the automatic transaxle fluid and filter if
using your vehicle for any of the following: police,
taxi, fleet or frequent trailer towing. X
Inspect the front suspension, tie rod ends and boot
seals for cracks or leaks and all parts for damage,
wear, improper looseness or end play; replace if
necessary. XX
Replace the spark plugs. X
NOTE: Change the engine oil and engine oil filter every 3,000 miles or 5,000 kilometers if using your vehicle under any of these severe duty conditions:
Short trips, stop and go driving, dusty or off-road conditions, police, taxi, fleet, or frequent trailer towing.• Refer to the Owner’s Manual on the DVD for the complete maintenance schedule.
44
MAINTAINING YOUR VEHICLE