warning CHRYSLER SEBRING 2004 2.G Repair Manual
[x] Cancel search | Manufacturer: CHRYSLER, Model Year: 2004, Model line: SEBRING, Model: CHRYSLER SEBRING 2004 2.GPages: 273, PDF Size: 4.88 MB
Page 165 of 273
WARNING!
²Never have any smoking materials lit in or near
the vehicle when the gas cap is removed or the
tank filled.
²Never add fuel to the vehicle when the engine is
running.
²A fire may result if gasoline is pumped into a
portable container that is inside of a vehicle. You
could be burned. Always place gas containers on
the ground while filling.
VEHICLE LOADING
Vehicle Loading Capacities
Front Seat Occupants....................... 2
Rear Seat Occupants........................ 3
Luggage...................... 115lbs. (52 kg)
Rated Vehicle Capacity........... 865lbs. ( 392 kg)
TRAILER TOWING
In this section you will find safety tips and information
on limits to the type of towing you can reasonably do
with your vehicle. Before towing a trailer carefully re-
view this information to tow your load as efficiently and
safely as possible.
To maintain warranty coverage, follow the requirements
and recommendations in this manual concerning ve-
hicles used for trailer towing.
Perform maintenance services as prescribed in the main-
tenance schedules manual. When your vehicle is used for
trailer towing, never exceed the gross axle weight rating
(GAWR) by the addition of:
²The tongue weight of the trailer.
STARTING AND OPERATING 165
5
Page 166 of 273

²The weight of any other type of cargo or equipment
put in or on your vehicle.
²Remember that everything put in or on the trailer adds
to the load on your vehicle.
Warranty Requirements
The Manufacturer's Passenger Vehicle Warranty will
apply to vehicles used to tow trailers for non-commercial
use. However the following conditions must be met:
²The maximum trailer load is 1,000 lbs (450 kg).
²The maximum frontal area of the trailer cannot exceed
20 square feet (1.86 square meters).
²If using a manual transaxle vehicle for trailer towing,
all starts must be in FIRST gear to avoid excessive
clutch slippage.
²The trailer tongue load must be considered as part of
the combined weight of occupants and cargo, and
should never exceed the weight referenced on the Tire
and Loading Information placard. Refer to the Tire±
Safety Information Section in this manual.
²The ªDº range can be selected when towing. However,
if frquent shifting occurs while in this range, the ª3º
range must be selected.
NOTE:Using the ª3º range while operating the vehicle
under heavy operating conditions will improve perfor-
mance and extend tranaxle life by reducing excessive
shifting and heat build up.
WARNING!
Connecting trailer brakes to your vehicle's hydraulic
brake lines can overload your brake system and
cause it to fail. You might not have brakes when you
need them and could have an accident.
²Do not attempt to tow a trailer while using a compact
spare tire.
²Whenever you pull a trailer, regardless of the trailer
size, stop lights and turn signals on the trailer are
recommended for motoring safety.
166 STARTING AND OPERATING
Page 168 of 273
WARNING!
Ethanol vapors are extremely flammable and could
cause serious personal injury. Never have any smok-
ing materials lit in or near the vehicle when remov-
ing the fuel filler tube cap (gas cap) or filling the
tank. Do not use E-85 as a cleaning agent and never
use it near an open flame.
Fuel Requirements
Your vehicle will operate on both unleaded gasoline with
an octane rating of 87, or E-85 fuel, or any mixture of
these two.
For best results, a refueling pattern that alternates be-
tween E-85 and unleaded gasoline should be avoided.
When you do switch fuels, it is recommended that:
²you do not switch when the fuel gauge indicates less
than 1/4 full
²you do not add less than 5 gallons (19 liters) when
refueling
²you operate the vehicle immediately after refueling for
a period of at least 5 minutes
Observing these precautions will avoid possible hard
starting and/or significant deterioration in drivability
during warm up.
NOTE:When the ambient temperature is above 90ÉF
(32ÉC), you may experience hard starting and rough idle
following start up even if the above recommendations are
followed.
Selection of Engine Oil
For best performance and protection of your vehicle, use
only crankcase engine oils that meet the following re-
quirements:
168 STARTING AND OPERATING
Page 171 of 273

WHAT TO DO IN EMERGENCIES
CONTENTS
mHazard Warning Flasher.................172
mIf Your Engine Overheats................172
mJacking And Tire Changing...............174
NPreparations For Jacking................174
mJump-Starting The Battery...............179
mDriving On Slippery Surfaces.............182
NAcceleration.........................182
NTraction............................182
mFreeing A Stuck Vehicle.................183
mTowing A Disabled Vehicle...............183
mTowing This Vehicle Behind Another Vehicle
(Flat Towing With All Four Wheels On The
Ground)
.............................184
NAutomatic Transaxle...................184
NManual Transaxle.....................184
NAll Transaxles........................1846
Page 172 of 273

HAZARD WARNING FLASHER
The flasher switch is on top of the steering column,
just behind the steering wheel. Depress the switch
and both cluster indicators and all front and rear direc-
tional signals will flash. Depress the switch again to turn
Hazard Warning Flashers off.
Do not use this emergency warning system when the
vehicle is in motion. Use it when your vehicle is disabled
and is creating a safety hazard for other motorists.If it is necessary to leave the vehicle to go for service, the
flasher system will continue to operate with the ignition
key removed and the vehicle locked.
NOTE:With extended use, the flasher may wear down
your battery.
IF YOUR ENGINE OVERHEATS
In any of the following situations, you can reduce the
potential for overheating by taking the appropriate ac-
tion.
²On the highways Ð Slow down.
²In city traffic Ð While stopped, put transaxle in
neutral, but do not increase engine idle speed.
NOTE:There are steps that you can take to slow down
an impending overheat condition. If your air conditioner
is on, turn it off. The air conditioning system adds heat to
the engine cooling system and turning off the A/C
removes this heat. You can also turn the Temperature
control to maximum heat, the Mode control to floor, and
172 WHAT TO DO IN EMERGENCIES
Page 173 of 273
the fan control to High. This allows the heater core to act
as a supplement to the radiator and aids in removing heat
from the engine cooling system.
CAUTION!
Driving with a hot cooling system could damage
your vehicle. If temperature gauge reads ªHº, pull
over and stop the vehicle. Idle the vehicle in Park
with the air conditioner turned off until the pointer
drops back into the normal range. If the pointer
remains on the ªHº, turn the engine off immediately,
and call for service.
WARNING!
A hot engine cooling system is dangerous. You or
others could be badly burned by steam or boiling
coolant. You may want to call a service center if your
vehicle overheats. If you decide to look under the
hood yourself, see Section 7, Maintenance, of this
manual. Follow the warnings under the Cooling
System Pressure Cap paragraph.
WHAT TO DO IN EMERGENCIES 173
6
Page 174 of 273
JACKING AND TIRE CHANGING
WARNING!
²Getting under a jacked-up vehicle is dangerous.
The vehicle could slip off the jack and fall on you.
You could be crushed. Never get any part of your
body under a vehicle that is on a jack. Never start
or run the engine while the vehicle is on a jack. If
you need to get under a raised vehicle, take it to a
service center where it can be raised on a lift.
²Do not attempt to change a tire on the side of the
vehicle close to moving traffic. Pull far enough off
the road to avoid the danger of being hit when
operating the jack or changing the wheel.
²The jack is designed to use as a tool for changing
tires only. The jack should not be used to lift the
vehicle for service purposes. The vehicle should
be jacked on a firm level surface only. Avoid ice or
slippery areas.
Preparations for Jacking
Park the vehicle on a firm level surface, avoid ice or
slippery areas, and set the parking brake. Place the gear
selector in PARK.
²Turn on the Hazard Warning Flasher, park vehicle on
firm, level surface.
²Put gear shift in park (automatic transmission) or
reverse (manual transmission).
²Set parking brake and turn off engine.
²Passengers should not remain in the vehicle while the
vehicle is being jacked.
Changing a Tire
The spare wheel, scissors jack, and lug wrench are
stowed under the spare tire cover in the rear cargo area.
Do not attempt to raise this vehicle using a bumper jack.
174 WHAT TO DO IN EMERGENCIES
Page 176 of 273
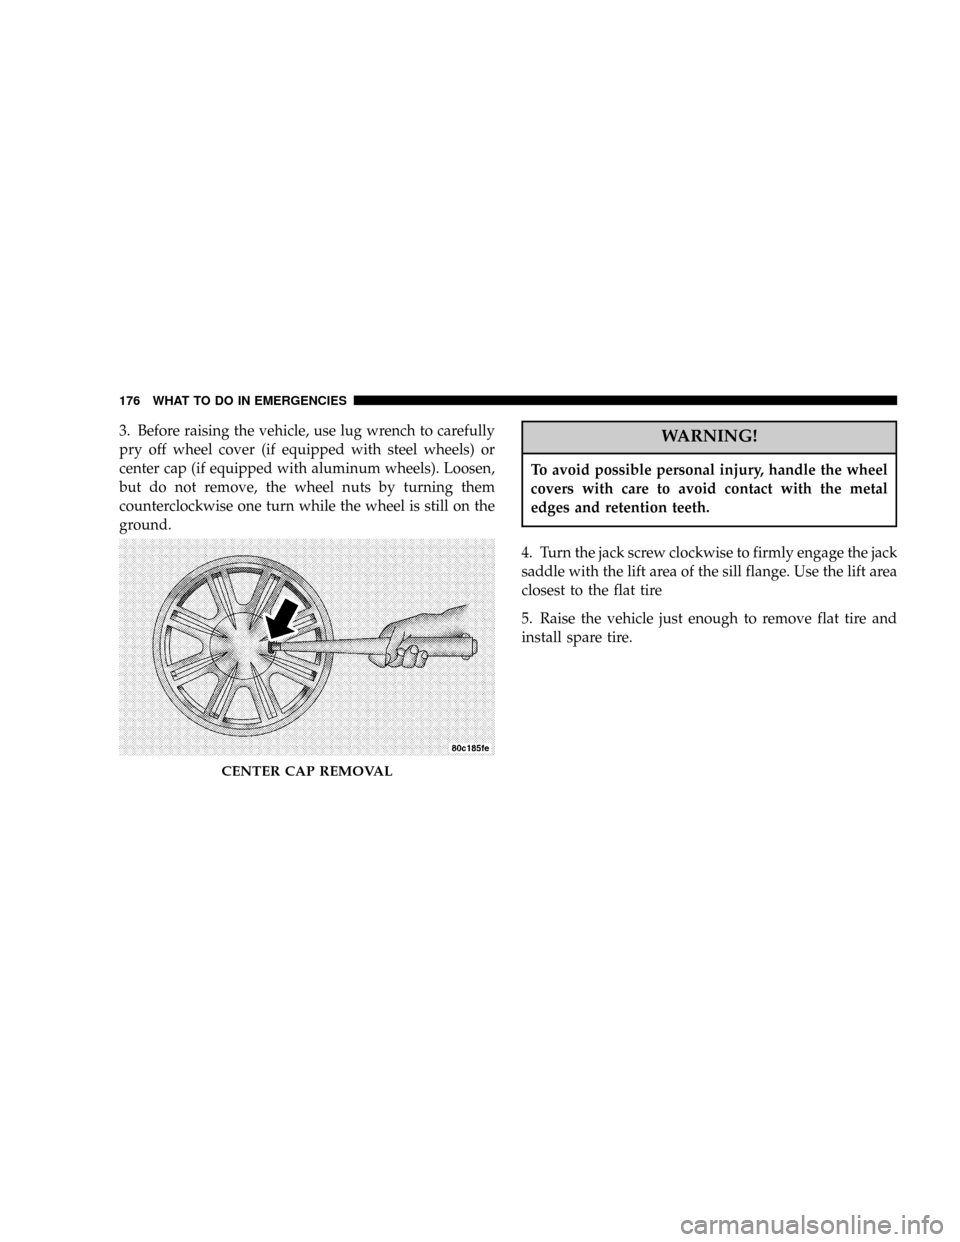
3. Before raising the vehicle, use lug wrench to carefully
pry off wheel cover (if equipped with steel wheels) or
center cap (if equipped with aluminum wheels). Loosen,
but do not remove, the wheel nuts by turning them
counterclockwise one turn while the wheel is still on the
ground.WARNING!
To avoid possible personal injury, handle the wheel
covers with care to avoid contact with the metal
edges and retention teeth.
4. Turn the jack screw clockwise to firmly engage the jack
saddle with the lift area of the sill flange. Use the lift area
closest to the flat tire
5. Raise the vehicle just enough to remove flat tire and
install spare tire.
CENTER CAP REMOVAL
176 WHAT TO DO IN EMERGENCIES
Page 178 of 273
WARNING!
Raising the vehicle higher than necessary can make
the vehicle less stable. It could slip off the jack and
hurt someone near it. Raise the vehicle only enough
to remove the tire.
6. Remove lug nuts and tire.
7. Mount spare tire.
8. Tighten all lug nuts on mounting studs.
9. Lower the vehicle to the ground by turning the jack
handle counterclockwise.
10. Fully tighten the lug nuts. Torque wheel lug nuts to
100 ft. lbs. (135 N´m).
11. Store the flat tire, jack and tools.
WARNING!
A loose tire or jack thrown forward in a collision or
hard stop could endanger the occupants of the ve-
hicle. Always stow the jack parts and the spare tire in
the places provided.
12. Wheel cover installation (if required). Do not attempt
to install a wheel cover on a compact spare. Align valve
notch in wheel cover with valve stem on wheel. Snap
cover into place.
NOTE:When reinstalling the center cap it is necessary
to align the center cap notch with the first spoke, just
right of the valve stem.
13. Adjust the tire pressure as soon as possible. Correct
pressure is on the label located on the driver's door.
178 WHAT TO DO IN EMERGENCIES
Page 179 of 273
JUMP-STARTING THE BATTERY
WARNING!
²Do not attempt to push or tow your vehicle to get
it started. Vehicles equipped with an automatic
transaxle cannot be started this way. Unburned
fuel could enter the catalytic converter and once
the engine has started, ignite and damage the
converter and vehicle. If the vehicle has a dis-
charged battery, booster cables may be used to
obtain a start from another vehicle. This type of
start can be dangerous if done improperly, so
follow this procedure carefully.
²Take care to avoid the radiator cooling fan when-
ever the hood is raised. It can start anytime the
ignition switch is on. You can be hurt by the fan.
NOTE:The battery is stored in a compartment behind
the left front fender and is accessible without removing
the tire and wheel. Remote battery terminals are located
in the engine compartment for jump starting.1. Wear eye protection and remove any metal jewelry
such as watch bands or bracelets that might make an
inadvertent electrical contact.
2. When boosting from a battery in another vehicle, park
that vehicle within booster cable reach but without
letting the vehicles touch. Set parking brake, place auto-
matic transaxle in PARK and turn ignition to OFF for
both vehicles.
3. Turn off the heater, radio and all unnecessary electrical
loads.
4. Connect one end of a jumper cable to the positive
terminal of the booster battery. Connect the other end to
the positive jump start attachment of the discharged
battery.
WHAT TO DO IN EMERGENCIES 179
6