ECO mode CHRYSLER SEBRING COUPE 2004 2.G Owner's Manual
[x] Cancel search | Manufacturer: CHRYSLER, Model Year: 2004, Model line: SEBRING COUPE, Model: CHRYSLER SEBRING COUPE 2004 2.GPages: 382, PDF Size: 2.23 MB
Page 224 of 382

Seek Button (Radio Mode)
Press and release the Seek button to search for the next
station in either the AM or FM mode. Press the top of the
button to seek up and the bottom to seek down. The
radio will remain tuned to the new station until you
make another selection. Holding the button in will by-
pass stations without stopping until you release it.
Tuning
Press the TUNE control up or down to increase or
decrease the frequency. If you press and hold the button,
the radio will continue to tune until you release the
button. The frequency will be displayed and continu-
ously updated while the button is pressed.
Balance
The Balance control adjusts the left-to-right speaker bal-
ance. Push in the button and it will pop out. Adjust the
balance and push the button back in.
Fade
The Fade control provides for balance between the front
and rear speakers. Push in the button and it will pop out.
Adjust the balance and push the button back in.
Tone Control
The unit has 2 separate controls for bass and treble. Each
is controlled by a slider control with a detent at the mid
position. Moving a control up or down increases or
decreases amplification of the band.
MODE Selection
Press the MODE button to change from AM, FM to CD
changer and Sirius (Satellite radio) ± if equipped. A CD
may remain in the player while in the Satellite mode. The
operating mode will be displayed next to the station
frequency. The display will show ST when a stereo
station is received.
PTY (Program Type) Selection
Displays program type in Satellite radio (if equipped)
mode only.
Scan Button
Pressing the SCAN button causes the tuner to search for
the next station, in either AM or FM, pausing for 5 seconds
at each listenable station before continuing to the next. To
stop the search, press SCAN a second time.
224 FOR PLEASANT DRIVING
Page 225 of 382

To Set The Pushbutton Memory
When you are receiving a station that you wish to commit
to push-button memory, press the SET button. SET 1 will
show in the display window. Select the push-button you
wish to lock onto this station and press and release that
button. If a station is not selected within 5 seconds after
pressing the SET button, the station will continue to play
but will not be locked into push-button memory.
You may add a second station to each push-button by
repeating the above procedure with this exception: Press
the SET button twice and SET 2 will show in the display
window. Each button can be set for SET 1 and SET 2 in
both AM and FM. This allows a total of 10 AM and 10 FM
stations to be locked into memory. You can recall the
stations stored in SET 2 memory by pressing the push-
button twice.
To Change From Clock To Radio Mode
Press the time button to change the display between
radio frequency and time.
General Information
This radio complies with Part 15 of FCC rules and with
RS-210 of Industry Canada. Operation is subject to the
following conditions:
1. This device may not cause harmful interference,
2.
This device must accept any interference received, in-
cluding interference that may cause undesired operation.
NOTE:Changes or modifications not expressively ap-
proved by the party responsible for compliance could
void the user's authority to operate the equipment.
Operating Instructions Ð CD Changer
NOTE
: The ignition switch must be in the ON or ACC
position and the volume control ON before the CD player
will operate.
Inserting the Compact Disc
You may either insert or eject a disc with the radio OFF.
If you insert a disc with the ignition ON and the radio
OFF the time of day will be displayed. If the volume
control is ON, the unit will switch from radio to CD mode
and begin to play when you insert the disc. The display
FOR PLEASANT DRIVING 225
6
Page 226 of 382

will show the track number and index time in minutes
and seconds. Play will begin at the start of track 1.
Seek Button
Press the top of the SEEK button for the next selection on
the CD. Press the bottom of the button to return to the
beginning of the current selection.
FF /TUNE/ RW Button
Press the FF (Fast Forward) button and the CD player
will fast forward through the tracks until the button is
released.
Random Play
Press the button while the CD is playing to activate
Random Play. This feature plays the selections on the
compact disc in random order to provide an interesting
change of pace. The CD changer stays in the random
mode when changing to the next disc.
NOTE:The changer will not random play between
discs.
Press the top of the SEEK button once to move to the next
randomly selected track. Press the bottom of the SEEKbutton to go back to the beginning of the track. Press
button for a second time to stop Random Play.
Radio/CD Button
Press this button to select between CD player and radio.
Time Button
Press this button to change the display from elapsed CD
playing time to time of the day.
Scan Button
Press this button to play the first 10 seconds of each track.
To stop the scan function, press the button a second time.
Loading the CD Changer
The CD changer has one load/eject button located on the
right side of the faceplate, and 4 disc position buttons.
1. Select the desired disc position.
2. Wait for the green READY light to stop flashing.
3. Gently insert the CD at a slight downward angle.
4. Press the next disc position and proceed to load
additional CD's.
226 FOR PLEASANT DRIVING
Page 227 of 382

Playing Discs
The radio display indicates the CD number (the slot
where the CD is loaded), and the current track being
played at the time.
If more than one CD is loaded in the CD changer, it
automatically plays the next CD after playing the last
track of the current CD. If there is only one CD loaded, it
will automatically return to the first track of the CD. To
play any available disc select the desired disc position
button.
Removing Discs from the CD Changer
1. Press the load/eject button then press the desired disc
position button to eject that CD.
2. The display will flash the disc number that is being
ejected.
3. If the disc is not removed from the unit within 15
seconds the disc will automatically re-load.
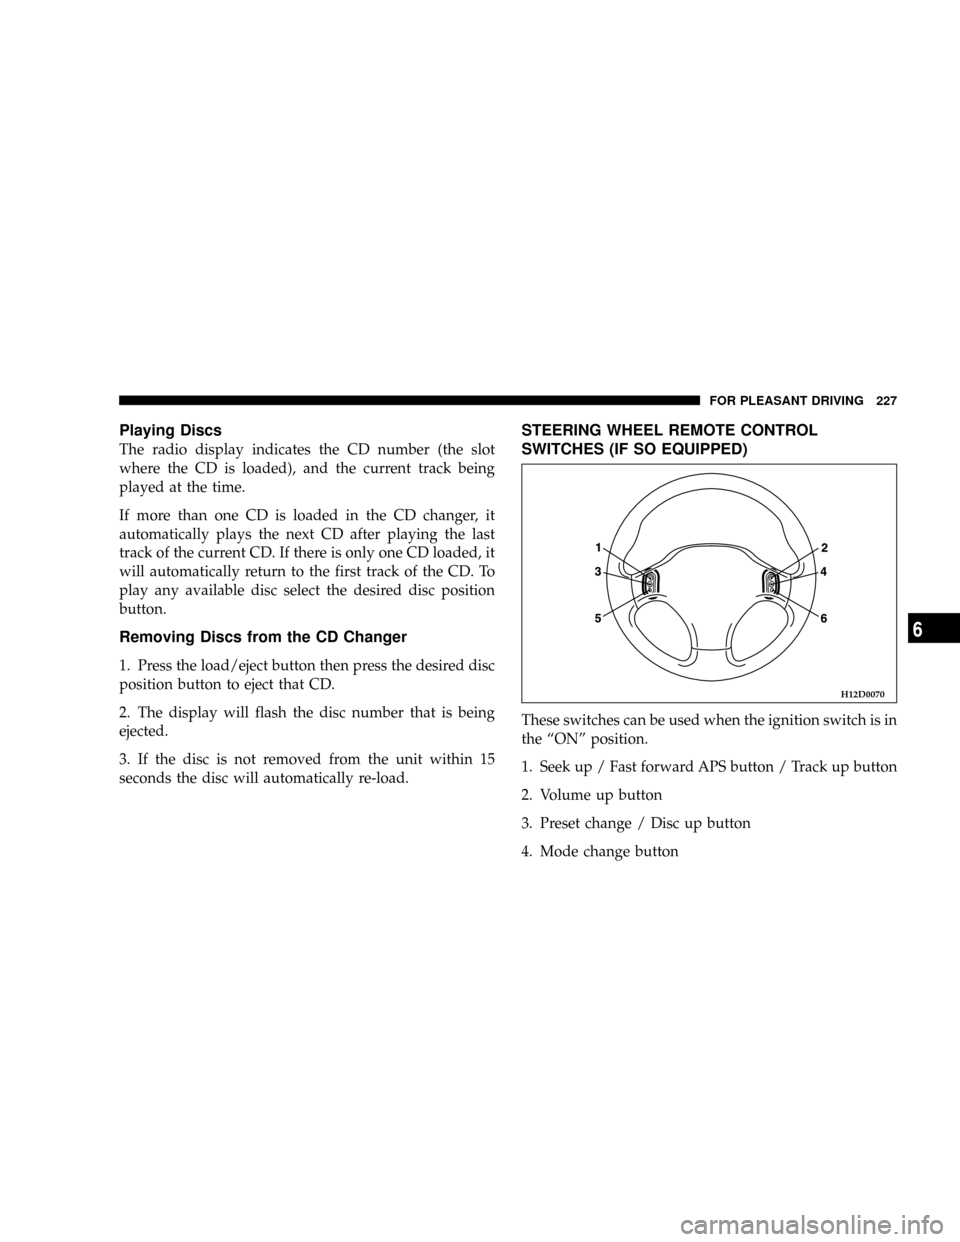
STEERING WHEEL REMOTE CONTROL
SWITCHES (IF SO EQUIPPED)
These switches can be used when the ignition switch is in
the ªONº position.
1. Seek up / Fast forward APS button / Track up button
2. Volume up button
3. Preset change / Disc up button
4. Mode change button
H12D0070
FOR PLEASANT DRIVING 227
6
Page 229 of 382

To listen to a tape
To operate the APS (Automatic Program Sensor)
system
The start of each song on a prerecorded music tape can be
found by using the Fast forward APS button (1) or
Rewind APS button (5). As many as 7 programs can be
skipped over in this manner.
Fast forward APS operation:
Press the APS button (1) to the number of songs you
desire to skip over. The frequency-display window will
display the number songs selected. The tape will be
fast-forwarded to the start of the song, and playback will
begin.
Rewind APS operation:
Press the APS button (5) to the number of the selection
you desire to skip over including the one now being
played. The frequency-display window will display the
number of songs selected. The tape will be rewind to the
start of the song, and playback will begin.
To listen to a CD
To select CD mode
Mode change button - 4
Select the desired mode (CD player mode or CD au-
tochanger mode) by pressing this button.
To select a desired track
Track up button - 1
Press this button until the desired track is reached.
Track down button - 5
Press this button until the desired track is reached.
The frequency display window will display the number
of tracks selected.
To select a desired disc (CD autochanger only)
Disc up button - 3
Press this button until the desired disc is reached.
FOR PLEASANT DRIVING 229
6
Page 376 of 382

Accessory boxes........................ 211
Accessory (installation)................... 246
Adding Fuel.......................... 145
Air cleaner filter........................ 310
Air conditioning........................ 234
Aluminum wheel....................... 255
Antenna.............................. 217
Anti-lock braking system warning light....105,111
Assist-starting procedures if battery is low.... 275
Automatic transaxle indicator.............. 117
Automatic transaxle oil temperature
warning light.......................... 105
Automatic transaxle
Automatic transaxle fluid............... 321
Driving speed........................ 155
Gear positions....................... 154
Holding on an upgrade................ 163
Oil temperature warning light............ 105
Parking............................ 167
Reset Mode.......................156,164
Selector lever operation................. 151
Automatic transmission.................. 156
Autostick............................. 161Ball joint, steering linkage seal and drive
shaft boots............................ 323
Battery............................... 319
Charging system warning light........105,112
During cold weather................... 200
Specification......................... 360
Brake pad wear alarm................... 170
Brake System.......................... 170
Fluid.............................. 317
Hose.............................. 323
Parking brake.....................167,326
Pedal.............................. 169
Power brakes........................ 170
Warning light........................ 115
Warning sound for brake pad wear........ 170
Brake
Parking brake........................ 326
Pedal.............................. 169
Break-in recommendations................ 142
Bulb chart.........................289,290
Car preparation before driving............. 197
Cargo loads........................... 331
376 INDEX