parking brake CHRYSLER SEBRING COUPE 2004 2.G Owners Manual
[x] Cancel search | Manufacturer: CHRYSLER, Model Year: 2004, Model line: SEBRING COUPE, Model: CHRYSLER SEBRING COUPE 2004 2.GPages: 382, PDF Size: 2.23 MB
Page 6 of 382

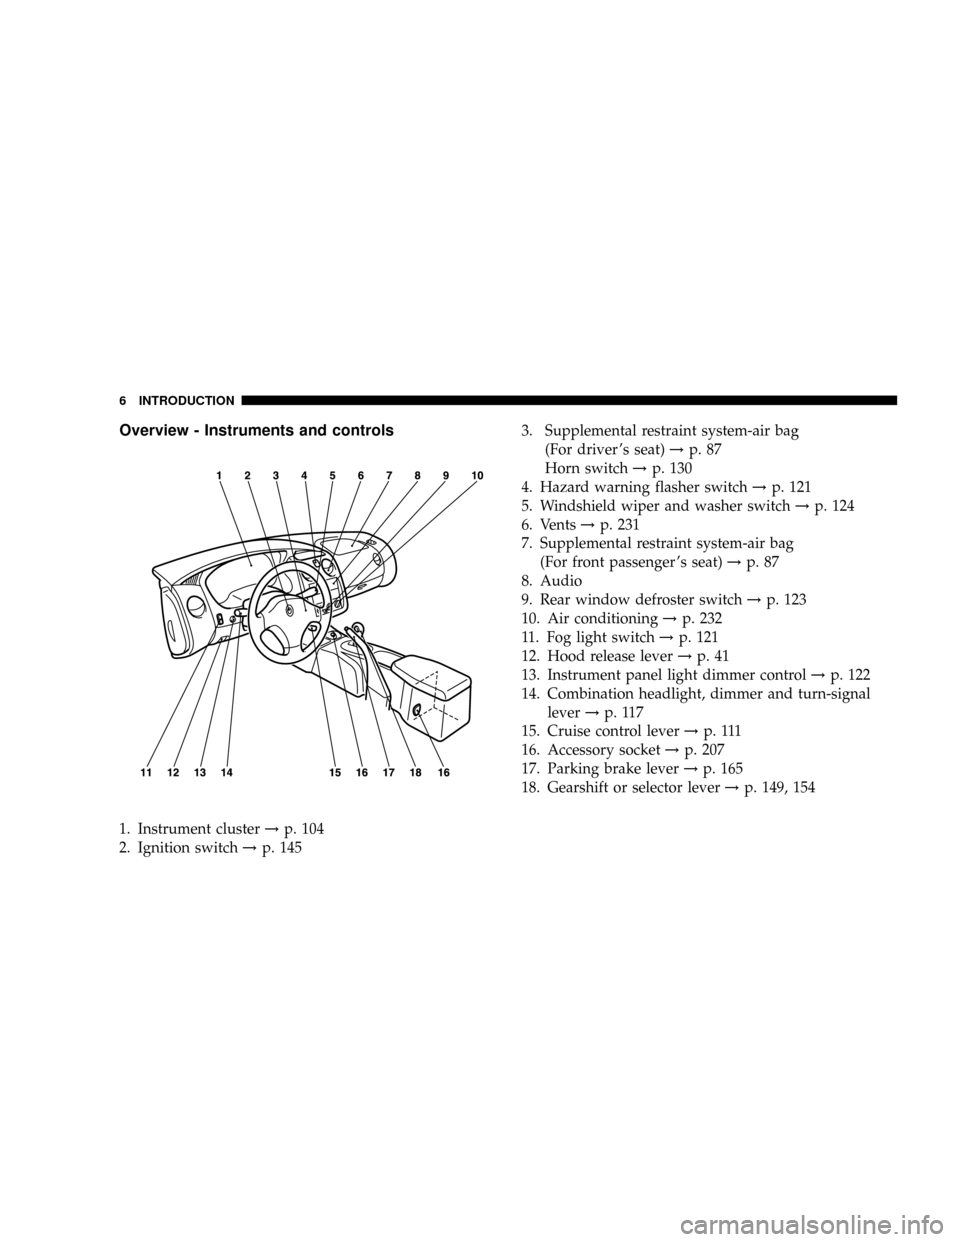
Overview - Instruments and controls
1. Instrument cluster!p. 104
2. Ignition switch!p. 1453. Supplemental restraint system-air bag
(For driver 's seat)!p. 87
Horn switch!p. 130
4. Hazard warning flasher switch!p. 121
5. Windshield wiper and washer switch!p. 124
6. Vents!p. 231
7. Supplemental restraint system-air bag
(For front passenger 's seat)!p. 87
8. Audio
9. Rear window defroster switch!p. 123
10. Air conditioning!p. 232
11. Fog light switch!p. 121
12. Hood release lever!p. 41
13. Instrument panel light dimmer control!p. 122
14. Combination headlight, dimmer and turn-signal
lever!p. 117
15. Cruise control lever!p . 111
16. Accessory socket!p. 207
17. Parking brake lever!p. 165
18. Gearshift or selector lever!p. 149, 154
6 INTRODUCTION
Page 10 of 382

QUICK INDEX
If this warning light comes on¼
NOTE:These warning lights will illuminate for a few seconds for a bulb check when the ignition key is first turned on.
Warning light Do this Ref. page
´Park the vehicle in a safe place and turn off the engine.
Test the system as described on page 111.
´If the light does not go out after the test, or if it illumi-
nates again, have your vehicle inspected at an autho-
rized dealer.
´When this light comes on, the anti-lock braking system is
not functioning and only the ordinary braking system is
functioning.P. 111
Anti-lock braking system
´If this light comes on while driving, check to see that the
parking brake is fully released.
´If this light stays on after releasing the parking brake,
stop and check the brake fluid level is correct.
´If the brake fluid level is correct, call an authorized
dealer for assistance.P. 1 1 5
Brake warning light
´If this light comes on while driving, park your vehicle in
a safe place and stop the engine immediately.
Call an authorized dealer for assistance.P. 1 1 2
Oil pressure warning light
10 INTRODUCTION
Page 115 of 382
![CHRYSLER SEBRING COUPE 2004 2.G Owners Manual driving, take your vehicle to your authorized dealer and
have the system checked.
[See ªSupplemental Restraint System (SRS)º on page
114.]
Brake warning light
This light illuminates when the ignitio CHRYSLER SEBRING COUPE 2004 2.G Owners Manual driving, take your vehicle to your authorized dealer and
have the system checked.
[See ªSupplemental Restraint System (SRS)º on page
114.]
Brake warning light
This light illuminates when the ignitio](/img/25/8545/w960_8545-114.png)
driving, take your vehicle to your authorized dealer and
have the system checked.
[See ªSupplemental Restraint System (SRS)º on page
114.]
Brake warning light
This light illuminates when the ignition key
is turned to the ªONº position (engine off).
When the engine is started, the light should go off. But
when the parking brake is applied or the brake fluid falls
below the prescribed level, the light illuminates.
Before driving your vehicle, release the parking brake
fully and make certain that the brake warning light has
gone out.
CAUTION!
If the brake warning light does not go on when you
pull the parking brake lever, or if it does not go out
when you release the lever, contact an authorized
dealer immediately.
If the brake warning light illuminates while driving, it
could mean braking performance deterioration. Park
your vehicle in a safe place using the following proce-
dures:
1. If, when pressing the brake pedal, braking is poor,
press your foot harder against the brake pedal.
2. Should the braking deteriorate, use engine braking by
shifting the transaxle into a lower gear (Manual transaxle
or Automatic transaxle autostick) or into the ``3'' (THIRD)
or the ``2'' (SECOND) or the ``L'' (LOW) position (Auto-
matic transaxle) to reduce the speed and slowly pull the
parking brake lever, while applying pressure against the
brake pedal.
Depress the brake pedal to turn on the stop light (brake
light) to alert the vehicles behind you.
CAUTION!
Suddenly applying the parking brake is dangerous,
the wheels may lock.
INSTRUMENTS AND CONTROLS 115
4
Page 140 of 382

NGear positions........................154
NDriving speed
(Vehicles with automatic transaxle).........155
NHolding on an upgrade.................155
NTransaxle reset mode...................156
mAutomatic transaxle Autostick
(if so equipped)
........................156
NSelector lever operation.................157
NIndicator lights.......................159
NSelector positions (Main gate).............160
NSelector positions Manual gate Autostick.....161
NHolding on an upgrade.................163
NTransaxle reset mode...................164
mManual transaxle (if so equipped)..........164
NTo start.............................165
NProper shift points.....................165NRecommended downshifting speed.........167
NDriving precautions....................167
mParking brake.........................167
mBrake pedal...........................169
mPower brakes.........................170
mBrake pad wear alarm...................170
mAnti-lock braking (ABS) system
(if so equipped)
........................171
NGeneral driving hints
(standard/anti-lock brakes)...............171
mSteering wheel tilt lock lever..............173
mPower steering........................174
mInside Day/Night rearview mirrors.........175
NElectrochromic inside rearview mirror
(if so equipped).......................176
NElectrochromic mirror operation
(if so equipped).......................177
140 STARTING AND DRIVING
Page 154 of 382

Gear positions
ªPº PARK
The ªPº (PARK) position supplements the parking brake
by locking the transaxle while the vehicle is parked.
The engine can be started in this position.
Apply the parking brake before leaving the vehicle in this
position.
ªRº REVERSE
Shift into this position only after the vehicle has come to
a complete stop.
CAUTION!
Never shift into the ªPº (PARK) or ªRº (REVERSE)
position while the vehicle is in motion. If the lever is
shifted into the ªPº or ªRº position while the vehicle
is in motion, the transaxle may be damaged.
ªNº NEUTRAL
The engine may be started in this position.
WARNING!
²Never move the lever to the ªNº position while
driving since you could accidentally move the
lever into the(P(or(R(position, damaging the
transaxle.
²To prevent the vehicle from rolling when stopped
on a slope, the engine should be started in the ªPº
(PARK) position, not in ªNº (NEUTRAL).
²Always keep your foot on the brake pedal when
the vehicle is in ªNº (NEUTRAL), or when shift-
ing into or out of ªNº (NEUTRAL), to maintain
control.
ªDº DRIVE
This position is used for most city and highway driving.
Engine shifting is done automatically, depending on road
conditions.
154 STARTING AND DRIVING
Page 167 of 382

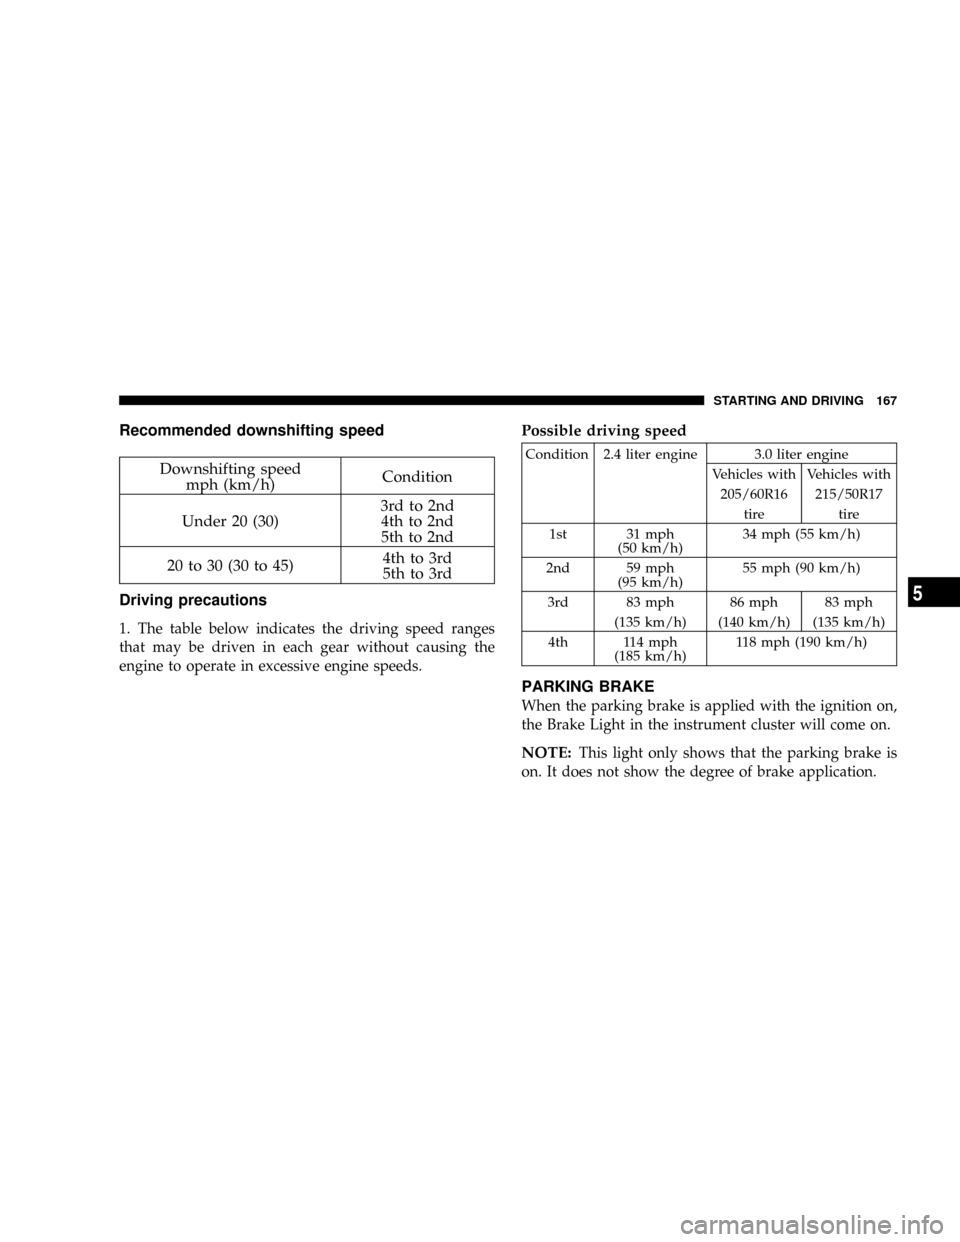
Recommended downshifting speed
Downshifting speed
mph (km/h)Condition
Under 20 (30)3rd to 2nd
4th to 2nd
5th to 2nd
20 to 30 (30 to 45)4th to 3rd
5th to 3rd
Driving precautions
1. The table below indicates the driving speed ranges
that may be driven in each gear without causing the
engine to operate in excessive engine speeds.
Possible driving speed
Condition 2.4 liter engine 3.0 liter engine
Vehicles with Vehicles with
205/60R16 215/50R17
tire tire
1st 31 mph
(50 km/h)34 mph (55 km/h)
2nd 59 mph
(95 km/h)55 mph (90 km/h)
3rd 83 mph 86 mph 83 mph
(135 km/h) (140 km/h) (135 km/h)
4th 114 mph
(185 km/h)118 mph (190 km/h)
PARKING BRAKE
When the parking brake is applied with the ignition on,
the Brake Light in the instrument cluster will come on.
NOTE:This light only shows that the parking brake is
on. It does not show the degree of brake application.
STARTING AND DRIVING 167
5
Page 168 of 382

Before leaving the vehicle, make sure that the parking
brake is set. To set the parking brake, pull up firmly on
the lever. Also place the gear selector in the Park position
(automatic transaxle) or Reverse (manual transaxle). To
release the parking brake, apply the brake pedal and pullup on the parking brake lever. Push the release button
and lower the lever fully.
When parking on a hill, it is important to set the parking
brake before placing the gear selector in Park, otherwise
the load on the transmission locking mechanism may
make it difficult to move the selector out of Park. As an
added precaution, turn the front wheels toward the curb
on a downhill grade and away from the curb on a uphill
grade.
I07A0020
I07A0030
168 STARTING AND DRIVING
Page 169 of 382

You should always apply the parking brake before leav-
ing the vehicle.
WARNING!
²Leaving children in a vehicle unattended is dan-
gerous for a number of reasons. A child or others
could be injured. Children should be warned not
to touch the parking brake or the gear selector.
Don't leave the keys in the ignition. A child could
operate power windows, other controls, or move
the vehicle.
²Be sure the parking brake is fully disengaged
before driving; failure to do so can lead to brake
failure and an accident.
BRAKE PEDAL
Excessive use of the brake can cause fading, resulting in
poor brake response and premature wear of brake lin-
ings.
When driving down a long or steep grade, use engine
braking by shifting the transaxle into a lower gear
(manual transaxle and Autostick A/T) or ª3º (THIRD) or
ª2º (SECOND) or ªLº (LOW) position (except Autostick
A/T).
WARNING!
Do not leave any objects on the floor near the brake
pedal or permit a floor mat to interfere with the
brake pedal. Doing so could prevent proper depres-
sion of the pedal. Make sure that the pedal can be
operated freely at all times.
STARTING AND DRIVING 169
5
Page 198 of 382

Check wheel nuts for tightness and tires (including spare
tire) for proper pressure. Maintain specified tire inflation
pressures. Replace tires before they are excessively worn.
Lights
Have someone observe the operation of all exterior lights
while you activate the controls. Check the turn signals
and highbeam indicators on the instrument panel.
Fluid leaks
Check the area under the vehicle after overnight parking
for fuel, water, oil, or other fluid leaks. Make sure all fluid
levels are at the proper levels. Also, if fuel leaks are
detected, the cause should be located and corrected
immediately.
Driver
Do not drive if you are tired or sleepy. Do not drive if you
have been drinking or taking drugs. Unless you are alert
and able to concentrate on your driving, you could have
an accident, resulting in serious or fatal injury to yourself
and others.
SAFE DRIVING TECHNIQUES
Even this vehicle's safety equipment, and your safest
driving, cannot guarantee that you can avoid accident or
injury. However, we recommend that you give extra
attention to the following, to help maximize the safety of
you and your passengers:
1. Drive defensively. Be aware of traffic, road and
weather conditions. Leave adequate stopping distance
for your vehicle.
2. Before changing lanes, check your mirrors and flash
the proper turn-signal light.
3. While driving, watch the behavior of other drivers,
bicyclists and pedestrians.
4. During an emergency stop, switch on the hazard
warning flasher.
5. When leaving the vehicle, set the parking brake and
place the gearshift lever into low gear.
In vehicles with an automatic transaxle, place the selector
lever in the ªPº (PARK) position. Remove the key.
198 STARTING AND DRIVING
Page 266 of 382

Before installing the wheel cover to the wheel, make sure
that the opening with the symbol mark is correctly
aligned with the air valve.
JACKING AND TIRE CHANGING
If a tire must be changed, do so only after making sure
the vehicle is stopped in a safe, flat location.
Jacking up the vehicle
1. Park the vehicle on level and stable ground.
2. Switch on the hazard warning flashers, set up a
warning triangle, flashing signal light, etc., at an ad-
equate distance from the vehicle, and have all passengers
leave the vehicle. Turn the ignition key to the ªLOCKº
position.
3. Set the parking brake firmly, and move the gearshift
lever (manual transaxle) to the ªNº (Neutral) position or
move the selector lever (automatic transaxle) to the ªPº
(PARK) position.4. Apply a chock or block (A) at the tire diagonally
opposite the tire (B) to be changed.
NOTE: The chock shown is not supplied with the ve-
hicle. It is recommended that you keep one in the vehicle
for use if required.
N24A0100
A
B
266 EMERGENCIES