brake CHRYSLER TOWN AND COUNTRY 2008 5.G Service Manual
[x] Cancel search | Manufacturer: CHRYSLER, Model Year: 2008, Model line: TOWN AND COUNTRY, Model: CHRYSLER TOWN AND COUNTRY 2008 5.GPages: 531, PDF Size: 4.51 MB
Page 463 of 531

NOTE:Inspection of brake hoses should be performed
whenever the brake system is serviced and every engine
oil change. Inspect hydraulic brake hoses for surface
cracking, scuffing, or worn spots. If there is any evidence
of cracking, scuffing, or worn spots, the hose should be
replaced immediately! Eventual deterioration of the hose
can take place resulting in a possibility of a burst failure.
WARNING!
Worn brake hoses can burst and cause brake failure.
You could have an accident. If you see any signs of
cracking, scuffing, or worn spots, have the brake
hoses replaced immediately.
Master Cylinder Ð Brake Fluid Level Check
The fluid level in the master cylinder should be checked
when performing underhood services, or immediately if
the brake system warning light indicates system failure.Clean the top of the master cylinder area before removing
the cap. Add fluid to bring the level up to the top of the
ªFULLº mark on the side of the master cylinder reservoir.
Overfilling of fluid is not recommended because it may
cause leaking in the system.
Add enough fluid to bring the level up to the require-
ments described on the brake fluid reservoir. With disc
brakes, fluid level can be expected to fall as the brake
pads wear. However, low fluid level may be caused by a
leak and a checkup may be needed.
Use only manufacturer's recommended brake fluid, refer
to Fluids, Lubricants and Genuine Parts for correct fluid
type.
MAINTAINING YOUR VEHICLE 461
7
Page 464 of 531

WARNING!
²Overfilling the brake fluid reservoir can result in
spilling brake fluid on hot engine parts and the
brake fluid catching fire.
²Use of a brake fluid that has a lower initial boiling
point than the recommended MOPARtDOT 3
product or a brake fluid that is unidentified as to
FMVSS specification may result in sudden brake
failure during hard prolonged braking. You could
have an accident.
Use only brake fluid that has been in a tightly closed
container to avoid contamination from foreign matter or
moisture.
CAUTION!
Do not allow petroleum base fluid to contaminate the
brake fluid Ð all brake seal components could be
damaged causing partial or complete brake failure.
AUTOMATIC TRANSAXLE
The automatic transaxle and differential assembly are
contained within a single housing.
The fluid level in the automatic transaxle should be
checked whenever the vehicle is serviced. Operation with
an improper fluid level will greatly reduce the life of the
transaxle and the fluid.
All Four±Speed automatic transaxles are equipped with a
conventional filler tube and dipstick. If fluid is added, it
should be added through the filler tube.
462 MAINTAINING YOUR VEHICLE
Page 466 of 531

Fluid Level Check Ð 3.3L Engine with Four-Speed
Automatic Transaxle Ð If Equipped
The dipstick is located just behind the radiator, lower
right side.
To properly check the automatic transaxle fluid level, the
following procedure must be used:
1. The vehicle must be on level ground.
2. The engine should be running at curb idle speed for a
minimum of 60 seconds.
3. Fully apply parking brake.4. Place the gear selector lever momentarily in each gear
position ending with the lever in PARK. Wipe the area
around the dipstick clean to eliminate the possibility of
dirt entering the transaxle.
5. Remove the dipstick and determine if the fluid is hot
or warm. Hot fluid is approximately 180ÉF (82ÉC), which
is the normal operating temperature after the vehicle has
been driven at least 15 miles (24 km). The fluid cannot be
comfortably held between the finger tips. Cold is when
the fluid is below 80ÉF (27ÉC).
6. Wipe the dipstick clean and reinsert until seated.
Remove dipstick and note reading.
a. If the fluid is hot, the reading should be in the
crosshatched area marked ªHOTº (between the upper
two holes in the dipstick).
b. If the fluid is cold, the fluid level should be between
the lower two holes in the area marked ªCOLDº.
464 MAINTAINING YOUR VEHICLE
Page 470 of 531

Wheel and Wheel Trim Care
All wheels and wheel trim, especially aluminum and
chrome-plated wheels should be cleaned regularly with a
mild soap and water to prevent corrosion. To remove
heavy soil and/or excessive brake dust, use Mopart
Wheel Cleaner (05066247AB) or equivalent or select a
nonabrasive, non-acidic cleaner. Do not use scouring
pads, steel wool, a bristle brush, or metal polishes. Only
Mopartor equivalent is recommended. Do not use oven
cleaner. Avoid automatic car washes that use acidic
solutions or harsh brushes that may damage the wheels'
protective finish.
Interior Care
Instrument Panel Surfaces
The instrument panel cover has a low glare surface,
which minimizes reflections in the windshield. Do notuse protectants or other products, which may cause
undesirable reflections. Use soap and warm water to
restore the low glare surface.
Cleaning Interior Trim
Interior Trim should be cleaned starting with a damp
cloth, a damp cloth with MopartTotal Clean, then
MopartSpot & Stain Remover if absolutely necessary. Do
not use harsh cleaners or Armorall. Use MopartTotal
Clean to clean vinyl upholstery
Cleaning Leather Upholstery
MopartTotal Clean is specifically recommended for
leather upholstery.
Your leather upholstery can be best preserved by regular
cleaning with a damp soft cloth. Small particles of dirt
can act as an abrasive and damage the leather upholstery
and should be removed promptly with a damp cloth.
Stubborn soils can be removed easily with a soft cloth
and MopartTotal Clean. Care should be taken to avoid
468 MAINTAINING YOUR VEHICLE
Page 475 of 531
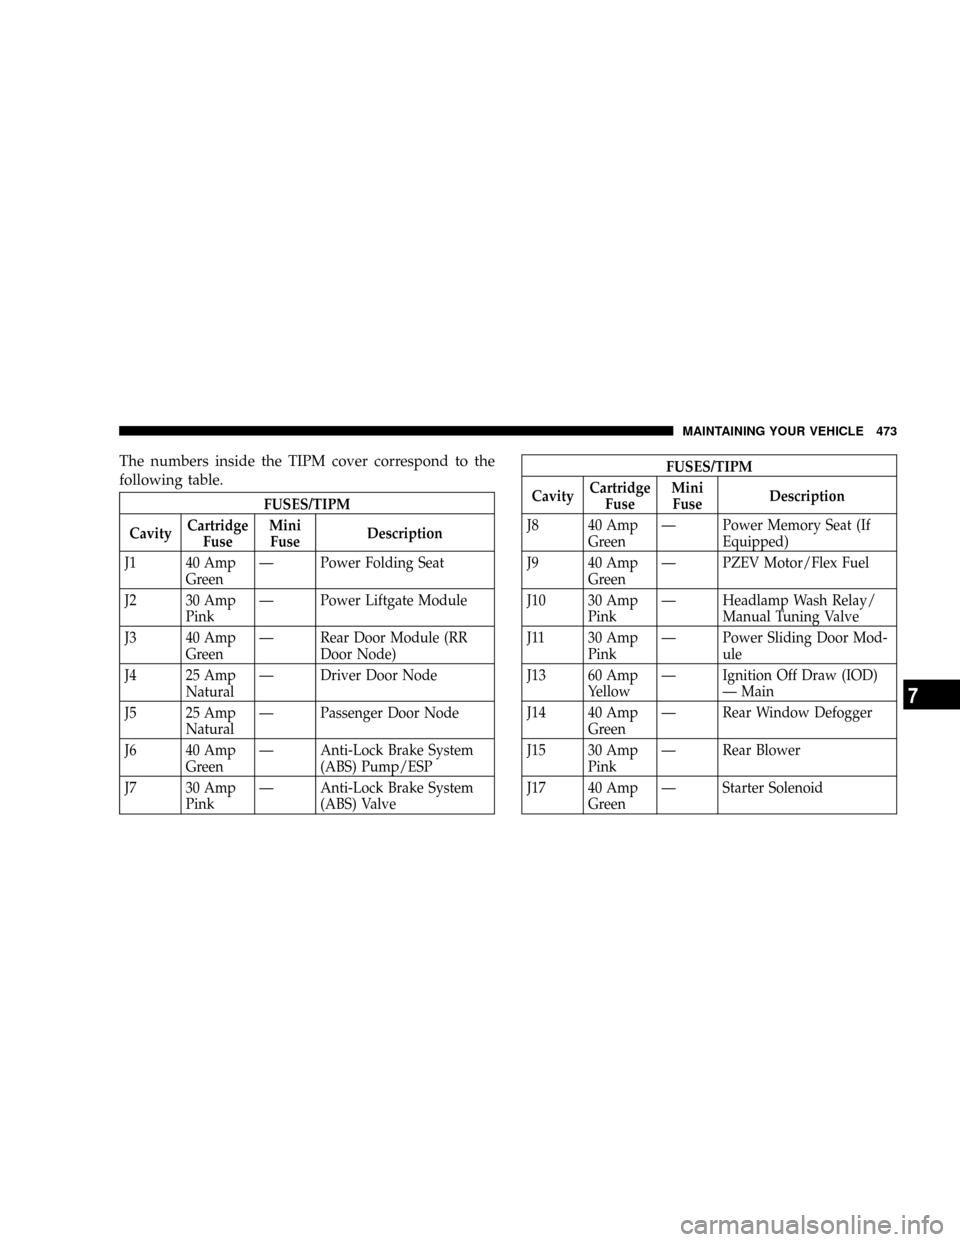
The numbers inside the TIPM cover correspond to the
following table.
FUSES/TIPM
CavityCartridge
FuseMini
FuseDescription
J1 40 Amp
GreenÐ Power Folding Seat
J2 30 Amp
PinkÐ Power Liftgate Module
J3 40 Amp
GreenÐ Rear Door Module (RR
Door Node)
J4 25 Amp
NaturalÐ Driver Door Node
J5 25 Amp
NaturalÐ Passenger Door Node
J6 40 Amp
GreenÐ Anti-Lock Brake System
(ABS) Pump/ESP
J7 30 Amp
PinkÐ Anti-Lock Brake System
(ABS) Valve
FUSES/TIPM
CavityCartridge
FuseMini
FuseDescription
J8 40 Amp
GreenÐ Power Memory Seat (If
Equipped)
J9 40 Amp
GreenÐ PZEV Motor/Flex Fuel
J10 30 Amp
PinkÐ Headlamp Wash Relay/
Manual Tuning Valve
J11 30 Amp
PinkÐ Power Sliding Door Mod-
ule
J13 60 Amp
YellowÐ Ignition Off Draw (IOD)
Ð Main
J14 40 Amp
GreenÐ Rear Window Defogger
J15 30 Amp
PinkÐ Rear Blower
J17 40 Amp
GreenÐ Starter Solenoid
MAINTAINING YOUR VEHICLE 473
7
Page 476 of 531

FUSES/TIPM
CavityCartridge
FuseMini
FuseDescription
J18 20 Amp
YellowÐ Powertrain Control Mod-
ule (PCM) Trans Range
J19 60 Amp
YellowÐ Radiator Fan
J20 30 Amp
PinkÐ Front Wiper LO/HI
J21 20 Amp
YellowÐ Front/Rear Washer
J22 25 Amp
NaturalÐ Sunroof Module
M1 Ð 15 Amp
BlueCenter High Mounted
Stop Light (CHMSL)/
Brake Switch
M2 Ð 20 Amp
YellowTrailer LightingFUSES/TIPM
CavityCartridge
FuseMini
FuseDescription
M3 Ð 20 Amp
YellowÐ
M4 Ð 10 Amp
RedTrailer Tow
M5 Ð 25 Amp
NaturalInverter
M6 Ð 20 Amp
YellowÐ
M7 Ð 20 Amp
YellowPower Outlet #2 (BATT/
ACC SELECT)
M8 Ð 20 Amp
YellowFront Heated Seat (If
Equipped)
M9 Ð 20 Amp
YellowRear Heated Seat (If
Equipped)
474 MAINTAINING YOUR VEHICLE
Page 480 of 531

FUSES/TIPM
CavityCartridge
FuseMini
FuseDescription
M32 Ð 10 Amp
RedOccupant Restraint Con-
troller (ORC), TT EU-
ROPE
M33 Ð 10 Amp
RedNext Generation Control-
ler (NGC), Global Power-
train Engine Controller
(GPEC)
M34 Ð 10 Amp
RedPark Assist (PRK ASST),
Heater Ventilation, Air
Conditioning Module
(HVAC MOD), Headlamp
Wash (HDLP WASH),
Compass (COMPAS)
M35 Ð 10 Amp
RedHeated Mirrors
M36 Ð 20 Amp
YellowPower Outlet #3 (BATT)FUSES/TIPM
CavityCartridge
FuseMini
FuseDescription
M37 Ð 10 Amp
RedAnti-Lock Brake System
(ABS), Electronic Stability
Program (ESP), Stop
Lamp Switch (STP LP
SW), Fuel Pump Rly Hi
Control
M38 Ð 25 Amp
NaturalLock/Unlock Motors
(LOCK/UNLOCK MTRS)
478 MAINTAINING YOUR VEHICLE
Page 490 of 531

Chassis
FLUIDS, LUBRICANTS AND GENUINE PARTS Ð CHASSIS
Component Fluids, Lubricants and Genuine Parts
Automatic Transmission MopartATF+4 Automatic Transmission Fluid
Brake Master Cylinder MopartDOT 3 and SAE J1703 should be used or equivalent. If DOT 3 brake fluid is
not available, then DOT 4 is acceptable. Use only recommended brake fluids.
Power Steering Reservoir MopartPower Steering Fluid +4 or MopartATF+4 Automatic Transmission Fluid
488 MAINTAINING YOUR VEHICLE
Page 494 of 531

Once A Month
²Check tire pressure and look for unusual wear or
damage.
²Inspect the battery and clean and tighten the terminals
as required.
²Check the fluid levels of coolant reservoir, brake
master cylinder, power steering and transmission and
add as needed.
²Check all lights and other electrical items for correct
operation.At Each Oil Change
²Change the engine oil filter.
²Inspect the brake hoses and lines.
CAUTION!
Failure to perform the required maintenance items
may result in damage to the vehicle.
492 MAINTENANCE SCHEDULES
8
M
A
I
N
T
E
N
A
N
C
E
S
C
H
E
D
U
L
E
S
Page 495 of 531

Required Maintenance Intervals
Perform Maintenance Every(Where time and mileage
are listed, follow the interval that occurs first.)
Maintenance Items Miles Kilometers or Months
Change the engine oil and engine oil filter. 6,000 10 000 6
Rotate Tires. 6,000 10 000 6
If using your vehicle for any of the following: Dusty
or off-road conditions. Inspect the engine air cleaner
filter, replace if necessary.12,000 20 000 12
Inspect the brake linings, replace if necessary. 12,000 20 000 12
Replace the air conditioning filter. 12,000 20 000 12
Inspect the CV Joints. Perform the first inspection at
12,000 mi (20 000 km) or 12 months.24,000 40 000 24
Inspect Exhaust System. Perform the first inspection at
12,000 mi (20 000 km) or 12 months.24,000 40 000 24
Inspect the front suspension, tie rod ends and boot
seals, replace if necessary.24,000 40 000 24
Replace the engine air cleaner filter. 30,000 50 000 30
MAINTENANCE SCHEDULES 493
8
M
A
I
N
T
E
N
A
N
C
E
S
C
H
E
D
U
L
E
S