brake light CHRYSLER TOWN AND COUNTRY 2008 5.G Owners Manual
[x] Cancel search | Manufacturer: CHRYSLER, Model Year: 2008, Model line: TOWN AND COUNTRY, Model: CHRYSLER TOWN AND COUNTRY 2008 5.GPages: 531, PDF Size: 4.51 MB
Page 30 of 531
How To Use Remote Start
All of the following conditions must be met before the
engine will Remote Start:
²Gear shift lever in PARK
²Doors closed
²Hood closed
²Trunk closed
²HAZARD switch off
²BRAKE switch inactive (brake pedal not pressed)
²Ignition key removed from ignition switch
²Battery at an acceptable charge level, and
²RKE PANIC button not pressed.
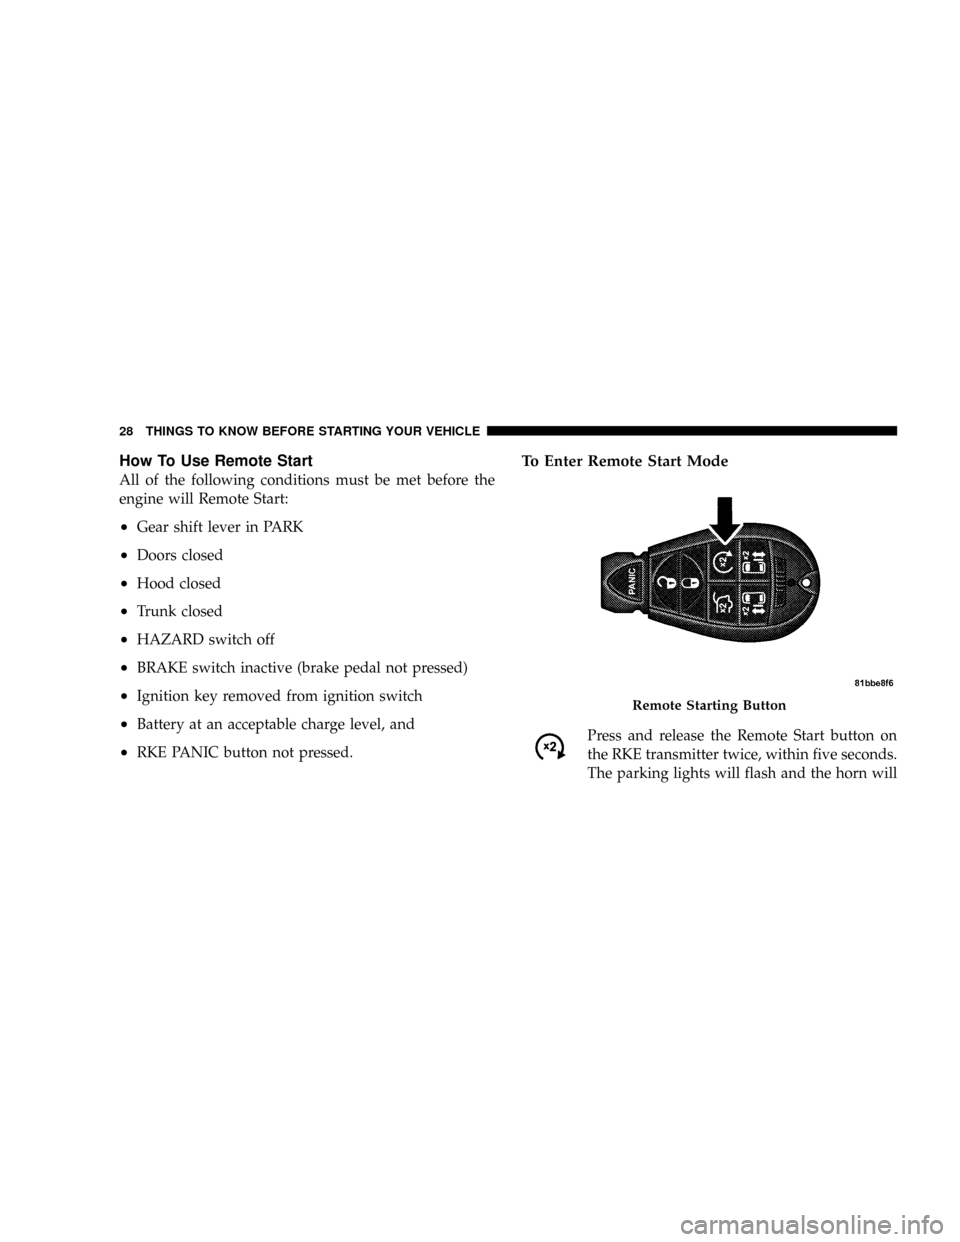
To Enter Remote Start Mode
Press and release the Remote Start button on
the RKE transmitter twice, within five seconds.
The parking lights will flash and the horn will
Remote Starting Button
28 THINGS TO KNOW BEFORE STARTING YOUR VEHICLE
Page 32 of 531
²For vehicles equipped with the Electronic Vehicle
Information Center (EVIC), the message ªInsert Key/
Turn To Runº will flash in the EVIC until you insert
the key. Once inserted, the message ªTurn To Runº
will flash in the EVIC until you turn the key to run.
Cancel Remote Start
Remote Starting will also cancel if any of the following
occur:
²The engine stalls or RPM exceeds 2500.
²Any engine warning telltale lights come on.
²The hood is opened.
²The Hazard Switch is pressed.
²The transmission gear selector lever is moved out of
PARK.
²Pressing the brake pedal.
²Allow the engine to run for the entire 15 minute cycle.
To Turn Off the Engine While in Remote Start
Mode
Press and release the Remote Start button one time.
NOTE:To avoid inadvertent shut downs, the system
will disable the one time press of the Remote Start button
for two seconds after receiving a valid Remote Start
request.
When To Reset Remote Start
The vehicle can be started remotely up to a maximum of
two times. The vehicle is also allowed a maximum of one
failed start, where the Remote Starting sequence was
initiated but the engine stopped cranking without start-
ing. After either of these conditions, or if the Security
Alarm System is alarming, or if the PANIC button was
pressed, the vehicle must be reset by inserting a valid key
into the ignition switch, rotating to the RUN position,
and then rotating back to the LOCK/OFF position.
30 THINGS TO KNOW BEFORE STARTING YOUR VEHICLE
Page 81 of 531
3. Requested by police under a legal warrant.
4. Otherwise required by law.
Data Parameters That May Be Recorded:
²Diagnostic trouble code(s) and warning light status for
electronically-controlled safety systems, including the
airbag system
²Airbag disable light status (if equipped)
²9Time9of airbag deployment (in terms of ignition
cycles and vehicle mileage)
²Airbag deployment level (if applicable)
²Impact acceleration and angle
²Seat belt status
²Brake status (service and parking brakes)
²Accelerator status (including vehicle speed)
²Engine control status (including engine speed)
²Transmission gear selection
²Cruise control status
²Traction/stability control status
²Tire pressure monitoring system status ± if equipped
THINGS TO KNOW BEFORE STARTING YOUR VEHICLE 79
2
Page 96 of 531
PERIODIC SAFETY CHECKS YOU SHOULD MAKE
OUTSIDE THE VEHICLE
Tires
Examine tires for excessive tread wear or uneven wear
patterns. Check for stones, nails, glass, or other objects
lodged in the tread. Inspect tread and sidewall for cuts or
cracks. Check wheel nuts for tightness, and tires (includ-
ing spare) for proper pressure.
Lights
Have someone observe the operation of exterior lights
while you work the controls. Check turn signal and high
beam indicator lights on the instrument panel.
Fluid Leaks
Check area under vehicle after overnight parking for fuel,
engine coolant, oil or other fluid leaks. Also, if gasoline
fumes are detected or fuel, power steering fluid, trans-
mission fluid or brake fluid leaks are suspected, the cause
should be located and corrected immediately.
Exhaust Gas
WARNING!
Exhaust gases can injure or kill. They contain carbon
monoxide (CO) which is colorless and odorless.
Breathing it can make you unconscious and can
eventually poison you. To avoid breathing (CO)
follow the safety tips below.
Do not run the engine in a closed garage or in confined
areas any longer than needed to move your vehicle in or
out of the area.
If it is necessary to sit in a parked vehicle with the engine
running, adjust your heating or cooling controls to force
outside air into the vehicle. Set the blower at high speed.
94 THINGS TO KNOW BEFORE STARTING YOUR VEHICLE
Page 163 of 531
HALO Lights Ð If Equipped
Halo Lights are strategically-placed, soft lighting that
helps to illuminate specific areas to aid the occupants in
locating specific features while driving at night.
To activate the Halo lights, push in on the Halo
switch located below the dimmer control.
Pressing the switch in a second time, will turn
the Halo lights off.
Exterior Lights
Parking Lights
Turn the headlight switch knob to the first detent
to turn the park lights on. This also turns on all
instrument panel lighting.
Daytime Running Lights (Canada/Fleet Vehicles
Only)
The headlights on your vehicle will illuminate when the
engine is started and the transmission is in any gear
except PARK. This provides a constant lights on condi-
tion until the ignition is turned OFF. The lights illuminate
at less than 50% of normal intensity. If the parking brake
is applied the Daytime Running Lights (DRL) will turn
off. Also, if a turn signal is activated, the DRL lamp on the
same side of the vehicle will turn off for the duration of
the turn signal activation. Once the turn signal is no
longer active, the DRL lamp will illuminate.
Headlights
Turn the headlight switch knob to the 2nd detent
to turn the headlights and park lights on. This
also turns on all instrument panel lighting.
To change the brightness of the instrument panel lights,
rotate the dimmer control up or down.
UNDERSTANDING THE FEATURES OF YOUR VEHICLE 161
3
Page 232 of 531
turned to the ªONº position. They should go out with the
engine running. If the ªESP/BAS Warning Lampº comes
on continuously with the engine running, a malfunction
has been detected in either the ESP or the BAS system. If
this light remains on after several ignition cycles, and the
vehicle has been driven several miles at speeds greater
than 30 mph (48 km/h), see your authorized dealer as
soon as possible.
11. Brake System Warning Light
This light monitors various brake functions,
including brake fluid level and parking brake
application. If the brake light turns on, it may
indicate that the parking brake is applied, that
the brake fluid level is low, or that there is a problem with
the anti-lock brake system (if equipped).
The dual brake system provides a reserve braking capac-
ity in the event of a failure to a portion of the hydraulic
system. Failure of either half of the dual brake system isindicated by the Brake Warning Light which will turn on
when the brake fluid level in the master cylinder has
dropped below a specified level.
The light will remain on until the cause is corrected.
NOTE:The light may flash momentarily during sharp
cornering maneuvers which change fluid level condi-
tions. The vehicle should have service performed, and
the brake fluid level checked.
If brake failure is indicated, immediate repair is neces-
sary.
WARNING!
Driving a vehicle with the brake light on is danger-
ous. Part of the brake system may have failed. It will
take longer to stop the vehicle. You could have an
accident. Have the vehicle checked immediately.
230 UNDERSTANDING YOUR INSTRUMENT PANEL
Page 233 of 531
Vehicles equipped with the Anti-Lock Brake System
(ABS), are also equipped with Electronic Brake Force
Distribution (EBD). In the event of an EBD failure, the
Brake Warning Light will turn on along with the ABS
Light. Immediate repair to the ABS system is required.
The operation of the Brake Warning Light can be checked
by turning the ignition switch from the OFF position to
the ON position. The light should illuminate for approxi-
mately two seconds. The light should then turn off unless
the parking brake is applied or a brake fault is detected.
If the light does not illuminate, have the light inspected
by an authorized dealer.
The light also will turn on when the parking brake is
applied with the ignition switch in the ON position.
NOTE:This light shows only that the parking brake is
applied. It does not show the degree of brake application.12. Vehicle Security Light Ð If Equipped
This light will flash at a fast rate for approxi-
mately 16 seconds when the vehicle security
alarm is arming and then will flash slowly until
the system is disarmed.
13. Anti-Lock Brake System Light
This light monitors the Anti-Lock Brake Sys-
tem. The light will turn on when the ignition
switch is turned to the ON position and may
stay on for as long as four seconds.
If the ABS light remains on or turns on while driving, it
indicates that the Anti-Lock portion of the brake system
is not functioning and that service is required. However,
the conventional brake system will continue to operate
normally if the BRAKE warning light is not on.
If the ABS light is on, the brake system should be serviced
as soon as possible to restore the benefits of Anti-Lock
UNDERSTANDING YOUR INSTRUMENT PANEL 231
4
Page 234 of 531
brakes. If the ABS light does not turn on when the
Ignition switch is turned to the ON position, have the
light inspected by an authorized dealer.
14. Electronic Stability Program (ESP) Indicator
Light/Traction Control System (TCS) Indicator Light
If this indicator light flashes during accelera-
tion, apply as little throttle as possible. While
driving, ease up on the accelerator. Adapt your
speed and driving to the prevailing road con-
ditions, and do not switch off the ESP, or TCS.
15. Tachometer
The red segments indicate the maximum permissible
engine revolutions per minute (RPM x 1000) for each gear
range. Before reaching the red area, ease up on the
accelerator.16. High Beam Light
This light shows that the headlights are on high
beam. Pull the turn signal lever towards the
steering wheel to switch the headlights from high or low
beam.
17. Front Fog Light Indicator Ð If Equipped
This light shows when the front fog lights are ON.
18. Seat Belt Reminder Light
When the ignition switch is first turned ON, this
light will turn on for five to eight seconds as a bulb
check. During the bulb check, if the driver's seat
belt is unbuckled, a chime will sound. After the bulb
check or when driving, if the driver's seat belt remains
unbuckled, the Seat Belt Reminder Light will illuminate
and the chime will sound. Refer to the Occupant Re-
straints section for more information.
232 UNDERSTANDING YOUR INSTRUMENT PANEL
Page 339 of 531
Reset Mode - Electronic Transmission
The transmission is monitored electronically for abnor-
mal conditions. If a condition is detected that could cause
damage, the transmission automatically shifts into 2nd
gear (3rd gear for six-speed). The transmission remains in
2nd gear (3rd gear for six-speed) despite the forward gear
selected. PARK, REVERSE, and NEUTRAL will continue
to operate. This Reset feature allows the vehicle to be
driven to an authorized dealer for service without dam-
aging the transmission.
In the event of a momentary problem, the transmission
can be reset to regain all forward gears by performing the
following steps:
1. Stop the vehicle.
2. Shift into PARK.
3. Turn the ignition switch to the LOCK position.
4. Restart the engine.5. Shift into the desired gear range and resume driving.
NOTE:Even if the transmission can be reset, it is
recommended that you visit an authorized dealer at your
earliest possible convenience. Your authorized dealer has
diagnostic equipment to determine if the problem could
recur.
If the transmission cannot be reset, authorized dealer
service is required.
PARKING BRAKE
When the parking brake is applied with the ignition
switch ON, the brake light in the instrument cluster will
turn on.
NOTE:This light only shows that the parking brake is
applied. It does not show the degree of brake application.
Before leaving the vehicle, make sure that the parking
brake is fully applied by depressing the pedal located at
the bottom left of the instrument panel and place the gear
STARTING AND OPERATING 337
5
Page 342 of 531
WARNING!
²Riding the brakes can lead to brake failure and
possibly an accident. Driving with your foot rest-
ing or riding on the brake pedal can result in
abnormally high brake temperatures, excessive
lining wear, and possible brake damage. You
wouldn't have your full braking capacity in an
emergency.
²Driving a vehicle with the brake light on is dan-
gerous. A significant decrease in braking perfor-
mance or vehicle stability during braking may
occur. It will take you longer to stop the vehicle or
will make your vehicle harder to control. You
could have an accident. Have the vehicle checked
immediately.
ANTI-LOCK BRAKE SYSTEM (ABS)
ABS provides increased vehicle stability and brake per-
formance under most braking conditions. The system
automatically ªpumpsº the brakes during severe braking
conditions to prevent wheel lock-up.
ABS is activated during braking under certain road or
stopping conditions. ABS-inducing conditions can in-
clude ice, snow, gravel, bumps, railroad tracks, loose
debris, or panic stops.
You may experience the following when the brake system
goes into Anti-lock:
²The ABS motor running (it may continue to run for a
short time after the stop).
²A clicking sound of solenoid valves.
²Brake pedal pulsations.
340 STARTING AND OPERATING