heating CHRYSLER TOWN AND COUNTRY 2008 5.G Owners Manual
[x] Cancel search | Manufacturer: CHRYSLER, Model Year: 2008, Model line: TOWN AND COUNTRY, Model: CHRYSLER TOWN AND COUNTRY 2008 5.GPages: 531, PDF Size: 4.51 MB
Page 96 of 531
PERIODIC SAFETY CHECKS YOU SHOULD MAKE
OUTSIDE THE VEHICLE
Tires
Examine tires for excessive tread wear or uneven wear
patterns. Check for stones, nails, glass, or other objects
lodged in the tread. Inspect tread and sidewall for cuts or
cracks. Check wheel nuts for tightness, and tires (includ-
ing spare) for proper pressure.
Lights
Have someone observe the operation of exterior lights
while you work the controls. Check turn signal and high
beam indicator lights on the instrument panel.
Fluid Leaks
Check area under vehicle after overnight parking for fuel,
engine coolant, oil or other fluid leaks. Also, if gasoline
fumes are detected or fuel, power steering fluid, trans-
mission fluid or brake fluid leaks are suspected, the cause
should be located and corrected immediately.
Exhaust Gas
WARNING!
Exhaust gases can injure or kill. They contain carbon
monoxide (CO) which is colorless and odorless.
Breathing it can make you unconscious and can
eventually poison you. To avoid breathing (CO)
follow the safety tips below.
Do not run the engine in a closed garage or in confined
areas any longer than needed to move your vehicle in or
out of the area.
If it is necessary to sit in a parked vehicle with the engine
running, adjust your heating or cooling controls to force
outside air into the vehicle. Set the blower at high speed.
94 THINGS TO KNOW BEFORE STARTING YOUR VEHICLE
Page 190 of 531
GATE OPERATOR/CANADIAN PROGRAMMING
Canadian radio frequency laws require transmitter sig-
nals to time-out (or quit) after several seconds of trans-
mission ± which may not be long enough for HomeLinkt
to pick up the signal during programming. Similar to this
Canadian law, some U.S. gate operators are designed to
time-out in the same manner.
It may be helpful to unplug the device during the cycling
process to prevent possible overheating of the garage
door or gate motor.
If you are having difficulties programming a garage door
opener or a gate operator, replace ªProgramming
HomeLinktº Step 3, with the following:
3. Continue to press and hold the HomeLinktbutton
while you press and release - every two seconds
(ªcycleº) your hand-held transmitter until HomeLinkthas successfully accepted the frequency signal. The
indicator light will flash slowly and then rapidly when
fully trained.
If you unplugged the device for training, plug it back in
at this time.
Then proceed with Step 4 under ªProgramming
HomeLinkt,º earlier in this section.
SECURITY
It is advised to erase all channels before you sell or turn
in your vehicle.
To do this, press and hold the two outside buttons for 20
seconds until the red indicator flashes. Note that all
channels will be erased. Individual channels cannot be
erased.
The HomeLinktUniversal Transceiver is disabled when
the Vehicle Security Alarm is active.
188 UNDERSTANDING THE FEATURES OF YOUR VEHICLE
Page 224 of 531
mRadio Operation And Cellular Phones........300
mRemote Sound System Controls Ð If Equipped . . 300
NRadio Operation......................301
NCD Player..........................301
mCD/DVD Maintenance...................301
mClimate Controls.......................302
NManual Heating, Ventilation And Air
Conditioning (HVAC) System.............302
NRear Manual Climate Control Zone Ð
If Equipped.........................308
NAutomatic Temperature Control (ATC) Ð
If Equipped.........................311NSummer Operation....................319
NWinter Operation.....................319
NVacation/Storage.....................320
NWindow Fogging.....................320
NOutside Air Intake....................320
NOperating Tips.......................321
NA/C Air Filter Ð If Equipped............321
mElectric Rear Window Defroster Ð
If Equipped...........................321
222 UNDERSTANDING YOUR INSTRUMENT PANEL
Page 304 of 531
2. If a disc is stained, clean the surface with a soft cloth,
wiping from center to edge.
3. Do not apply paper, paper CD labels, or tape to the
disc; avoid scratching a disc.
4. Do not use solvents such as benzine, thinner, cleaners,
or antistatic sprays.
5. Store a disc in its case after playing.
6. Do not expose a disc to direct sunlight.
7. Do not store a disc where temperatures may become
too high.
8. Do not play discs that are small in size or have
irregular shapes.CLIMATE CONTROLS
The Climate Control System allows you to regulate the
temperature, amount, and direction of air circulating
throughout the vehicle. The controls are located on the
instrument panel, below the radio.
MANUAL HEATING, VENTILATION AND AIR
CONDITIONING (HVAC) SYSTEM
The controls for the manual HVAC system in this vehicle
consist of a series of outer rotary dials inner push knobs.
These comfort controls can be set to obtain desired
interior conditions.
302 UNDERSTANDING YOUR INSTRUMENT PANEL
Page 309 of 531
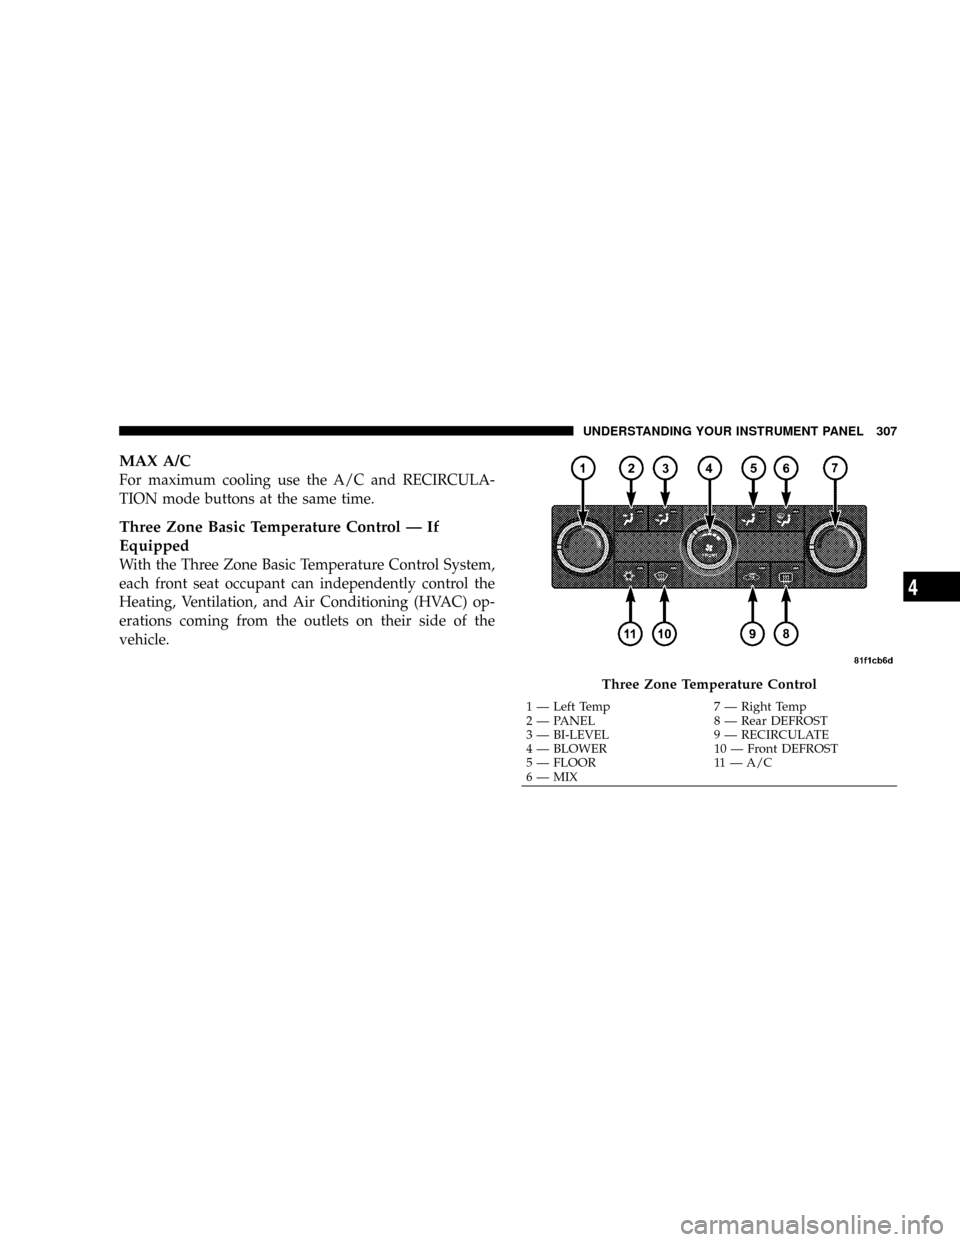
MAX A/C
For maximum cooling use the A/C and RECIRCULA-
TION mode buttons at the same time.
Three Zone Basic Temperature Control Ð If
Equipped
With the Three Zone Basic Temperature Control System,
each front seat occupant can independently control the
Heating, Ventilation, and Air Conditioning (HVAC) op-
erations coming from the outlets on their side of the
vehicle.
Three Zone Temperature Control
1 Ð Left Temp 7 Ð Right Temp
2 Ð PANEL 8 Ð Rear DEFROST
3 Ð BI-LEVEL 9 Ð RECIRCULATE
4 Ð BLOWER 10 Ð Front DEFROST
5 Ð FLOOR 11 Ð A/C
6 Ð MIXUNDERSTANDING YOUR INSTRUMENT PANEL 307
4
Page 310 of 531
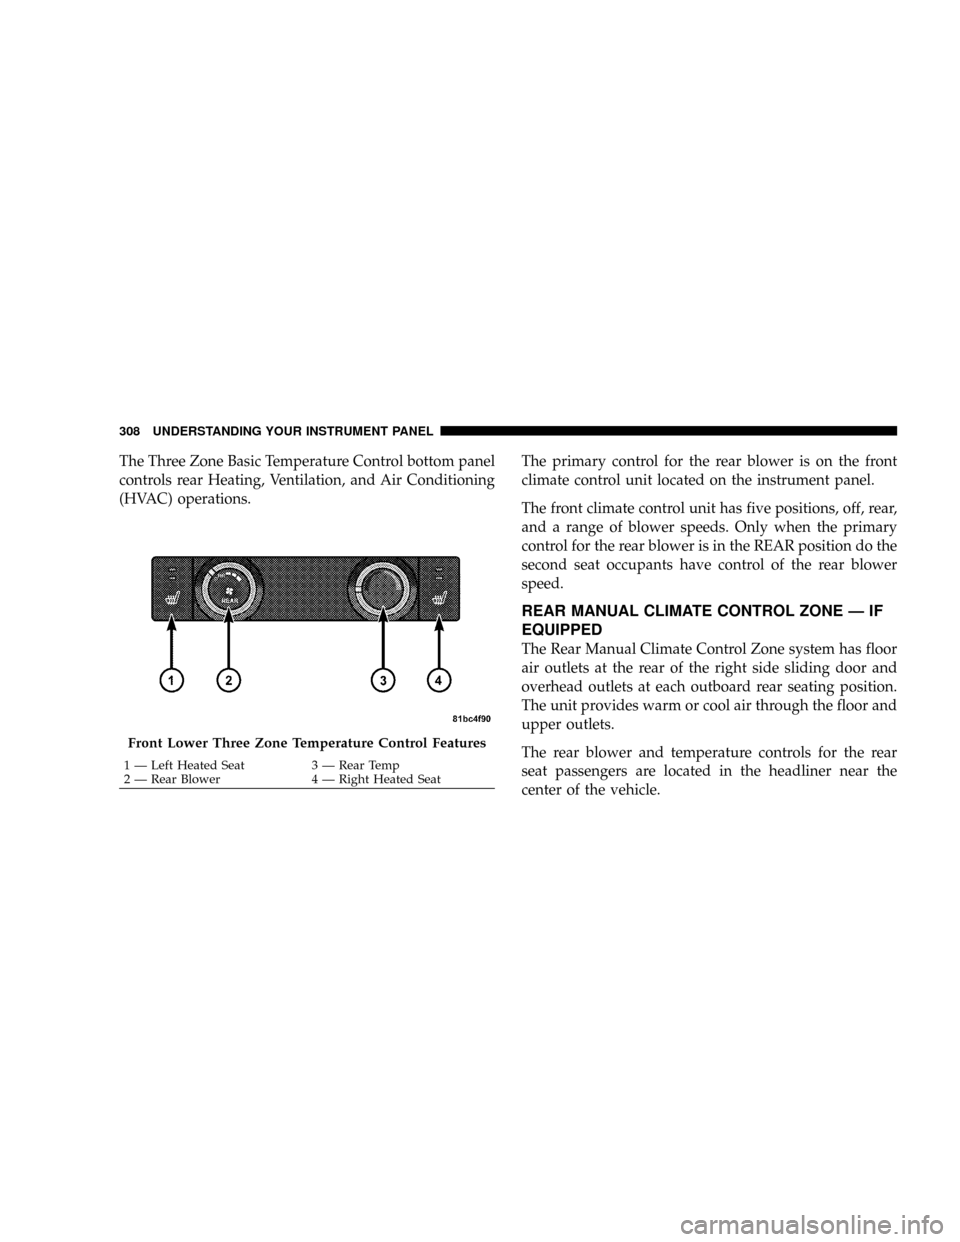
The Three Zone Basic Temperature Control bottom panel
controls rear Heating, Ventilation, and Air Conditioning
(HVAC) operations.The primary control for the rear blower is on the front
climate control unit located on the instrument panel.
The front climate control unit has five positions, off, rear,
and a range of blower speeds. Only when the primary
control for the rear blower is in the REAR position do the
second seat occupants have control of the rear blower
speed.
REAR MANUAL CLIMATE CONTROL ZONE Ð IF
EQUIPPED
The Rear Manual Climate Control Zone system has floor
air outlets at the rear of the right side sliding door and
overhead outlets at each outboard rear seating position.
The unit provides warm or cool air through the floor and
upper outlets.
The rear blower and temperature controls for the rear
seat passengers are located in the headliner near the
center of the vehicle.
Front Lower Three Zone Temperature Control Features
1 Ð Left Heated Seat 3 Ð Rear Temp
2 Ð Rear Blower 4 Ð Right Heated Seat 308 UNDERSTANDING YOUR INSTRUMENT PANEL
Page 321 of 531
When rear controls are locked by the front system, the
LOCK symbol on the temperature knob is illuminated
and any rear overhead adjustments are ignored.
Rear Mode Control
AUTO Mode
The rear system automatically maintains the correct
mode and comfort level desired by the rear seat occu-
pants.
FLOOR Mode
Air comes from the floor outlets.
BI-LEVEL Mode
Air comes from both the headliner outlets and the
floor outlets.
NOTE:In many temperature positions, the BI-LEVEL
mode is designed to provide cooler air out of the head-
liner outlets and warmer air from the floor outlets.HEADLINER Mode
Air comes from the outlets in the headliner. Each of
these outlets can be individually adjusted to direct
the flow of air. Moving the air vanes of the outlets to one
side will shut off the airflow.SUMMER OPERATION
The engine cooling system in air conditioned vehicles
must be protected with a high-quality antifreeze coolant
to provide proper corrosion protection and to protect
against engine overheating. A 50% solution of ethylene
glycol antifreeze coolant in water is recommended. Refer
to section 7, ªMaintenance Proceduresº, of this manual
for proper coolant selection.
WINTER OPERATION
To ensure the best possible heater and defroster perfor-
mance, make sure the engine cooling system is function-
ing properly and the proper amount, type, and concen-
tration of coolant is used. Refer to section 7,
UNDERSTANDING YOUR INSTRUMENT PANEL 319
4
Page 328 of 531
STARTING PROCEDURES
Before starting your vehicle, adjust your seat, adjust the
inside and outside mirrors, fasten your seat belt, and if
present, instruct all other occupants to buckle their seat
belts.WARNING!
²NEVER leave unattended children alone in a ve-
hicle. Leaving children in a vehicle is dangerous for
a number of reasons. A child or others could be
seriously or fatally injured. Don't leave the key in
the ignition. A child could operate power windows,
other controls, or move the vehicle.
²DO NOT leave animals or children inside parked
vehicles in hot weather. Interior heat build-up may
cause serious injury or death.
²Be sure to turn off the engine and remove the key
from the ignition switch if you want to rest or sleep
in your car. Accidents can be caused by inadvert-
ently moving the gear selection lever. Accidents can
also be caused by pressing the accelerator pedal.
This may cause excessive heat in the exhaust system,
resulting in overheating and vehicle fire, which may
cause serious or fatal injuries.
326 STARTING AND OPERATING
Page 337 of 531
using the ª5º range will improve performance and
extend transmission life by reducing excessive shifting
and heat build-up.
DRIVE Ð Four-Speed Transmission
This range should be used for most city and highway
driving. It provides the smoothest upshifts, downshifts,
and best fuel economy. However, select the ª3º range
when frequent transmission shifting occurs while using
the DRIVE range, such as when operating the vehicle
under heavy loading conditions, (i.e., in hilly terrain,
traveling into strong head winds or while towing heavy
trailers). Under these conditions, using the ª3º range will
improve performance and extend transmission life by
reducing excessive shifting and heat build-up.
CAUTION!
If the transmission operating temperature exceeds
acceptable limits, the vehicle computer will override
DRIVE and select ª5º range (on six-speed transmis-
sions) or ª3º range (on four-speed transmissions) by
changing shift points. This is done to prevent trans-
mission damage due to overheating.
Electronic Range Select (ERS) Operation
The Electronic Range Select (ERS) shift control allows
you to move the gear selector lever to the left (-) or right
(+) when the gear selector lever is in the D (Drive)
position, this allows the selection of the desired top gear.
For example, if the driver shifts the transmission into 3rd
gear, the transmission will never shift above 3rd gear, but
can shift down to 2nd or 1st gear automatically, when
needed.
STARTING AND OPERATING 335
5
Page 340 of 531
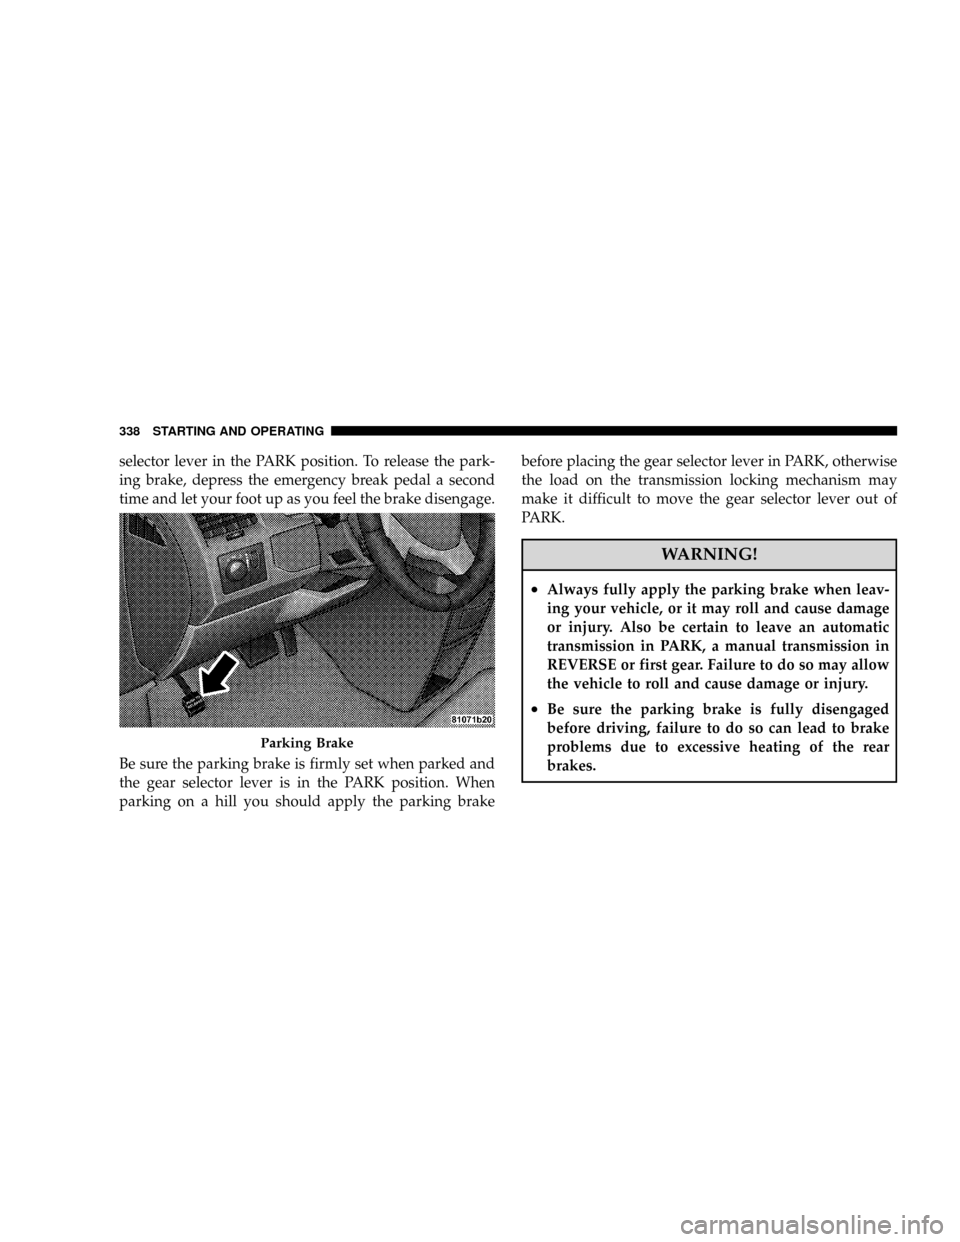
selector lever in the PARK position. To release the park-
ing brake, depress the emergency break pedal a second
time and let your foot up as you feel the brake disengage.
Be sure the parking brake is firmly set when parked and
the gear selector lever is in the PARK position. When
parking on a hill you should apply the parking brakebefore placing the gear selector lever in PARK, otherwise
the load on the transmission locking mechanism may
make it difficult to move the gear selector lever out of
PARK.
WARNING!
²Always fully apply the parking brake when leav-
ing your vehicle, or it may roll and cause damage
or injury. Also be certain to leave an automatic
transmission in PARK, a manual transmission in
REVERSE or first gear. Failure to do so may allow
the vehicle to roll and cause damage or injury.
²Be sure the parking brake is fully disengaged
before driving, failure to do so can lead to brake
problems due to excessive heating of the rear
brakes.
Parking Brake
338 STARTING AND OPERATING