parking brake CHRYSLER TOWN AND COUNTRY 2008 5.G Owners Manual
[x] Cancel search | Manufacturer: CHRYSLER, Model Year: 2008, Model line: TOWN AND COUNTRY, Model: CHRYSLER TOWN AND COUNTRY 2008 5.GPages: 531, PDF Size: 4.51 MB
Page 30 of 531
How To Use Remote Start
All of the following conditions must be met before the
engine will Remote Start:
²Gear shift lever in PARK
²Doors closed
²Hood closed
²Trunk closed
²HAZARD switch off
²BRAKE switch inactive (brake pedal not pressed)
²Ignition key removed from ignition switch
²Battery at an acceptable charge level, and
²RKE PANIC button not pressed.
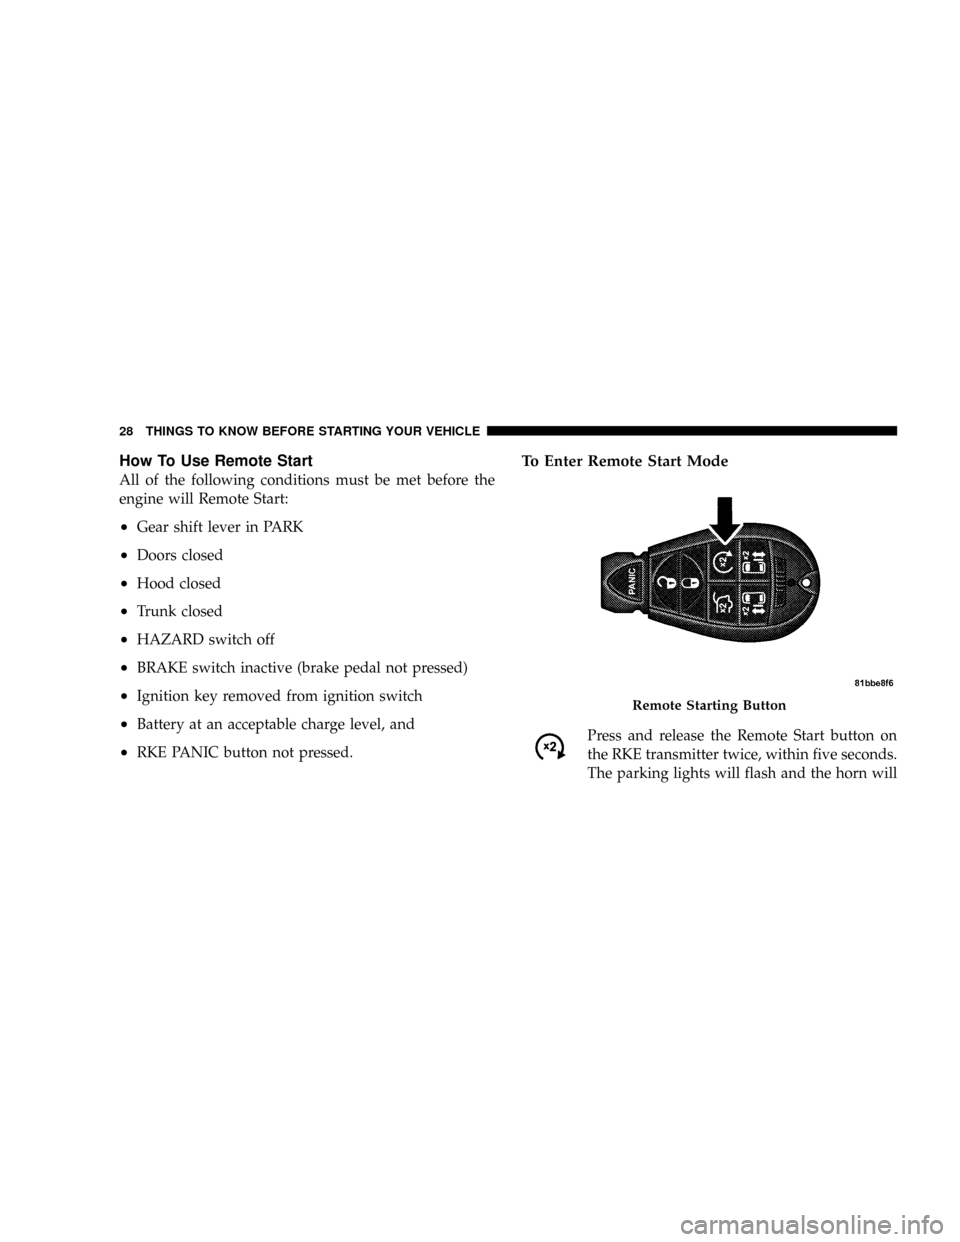
To Enter Remote Start Mode
Press and release the Remote Start button on
the RKE transmitter twice, within five seconds.
The parking lights will flash and the horn will
Remote Starting Button
28 THINGS TO KNOW BEFORE STARTING YOUR VEHICLE
Page 81 of 531
3. Requested by police under a legal warrant.
4. Otherwise required by law.
Data Parameters That May Be Recorded:
²Diagnostic trouble code(s) and warning light status for
electronically-controlled safety systems, including the
airbag system
²Airbag disable light status (if equipped)
²9Time9of airbag deployment (in terms of ignition
cycles and vehicle mileage)
²Airbag deployment level (if applicable)
²Impact acceleration and angle
²Seat belt status
²Brake status (service and parking brakes)
²Accelerator status (including vehicle speed)
²Engine control status (including engine speed)
²Transmission gear selection
²Cruise control status
²Traction/stability control status
²Tire pressure monitoring system status ± if equipped
THINGS TO KNOW BEFORE STARTING YOUR VEHICLE 79
2
Page 96 of 531
PERIODIC SAFETY CHECKS YOU SHOULD MAKE
OUTSIDE THE VEHICLE
Tires
Examine tires for excessive tread wear or uneven wear
patterns. Check for stones, nails, glass, or other objects
lodged in the tread. Inspect tread and sidewall for cuts or
cracks. Check wheel nuts for tightness, and tires (includ-
ing spare) for proper pressure.
Lights
Have someone observe the operation of exterior lights
while you work the controls. Check turn signal and high
beam indicator lights on the instrument panel.
Fluid Leaks
Check area under vehicle after overnight parking for fuel,
engine coolant, oil or other fluid leaks. Also, if gasoline
fumes are detected or fuel, power steering fluid, trans-
mission fluid or brake fluid leaks are suspected, the cause
should be located and corrected immediately.
Exhaust Gas
WARNING!
Exhaust gases can injure or kill. They contain carbon
monoxide (CO) which is colorless and odorless.
Breathing it can make you unconscious and can
eventually poison you. To avoid breathing (CO)
follow the safety tips below.
Do not run the engine in a closed garage or in confined
areas any longer than needed to move your vehicle in or
out of the area.
If it is necessary to sit in a parked vehicle with the engine
running, adjust your heating or cooling controls to force
outside air into the vehicle. Set the blower at high speed.
94 THINGS TO KNOW BEFORE STARTING YOUR VEHICLE
Page 163 of 531
HALO Lights Ð If Equipped
Halo Lights are strategically-placed, soft lighting that
helps to illuminate specific areas to aid the occupants in
locating specific features while driving at night.
To activate the Halo lights, push in on the Halo
switch located below the dimmer control.
Pressing the switch in a second time, will turn
the Halo lights off.
Exterior Lights
Parking Lights
Turn the headlight switch knob to the first detent
to turn the park lights on. This also turns on all
instrument panel lighting.
Daytime Running Lights (Canada/Fleet Vehicles
Only)
The headlights on your vehicle will illuminate when the
engine is started and the transmission is in any gear
except PARK. This provides a constant lights on condi-
tion until the ignition is turned OFF. The lights illuminate
at less than 50% of normal intensity. If the parking brake
is applied the Daytime Running Lights (DRL) will turn
off. Also, if a turn signal is activated, the DRL lamp on the
same side of the vehicle will turn off for the duration of
the turn signal activation. Once the turn signal is no
longer active, the DRL lamp will illuminate.
Headlights
Turn the headlight switch knob to the 2nd detent
to turn the headlights and park lights on. This
also turns on all instrument panel lighting.
To change the brightness of the instrument panel lights,
rotate the dimmer control up or down.
UNDERSTANDING THE FEATURES OF YOUR VEHICLE 161
3
Page 232 of 531
turned to the ªONº position. They should go out with the
engine running. If the ªESP/BAS Warning Lampº comes
on continuously with the engine running, a malfunction
has been detected in either the ESP or the BAS system. If
this light remains on after several ignition cycles, and the
vehicle has been driven several miles at speeds greater
than 30 mph (48 km/h), see your authorized dealer as
soon as possible.
11. Brake System Warning Light
This light monitors various brake functions,
including brake fluid level and parking brake
application. If the brake light turns on, it may
indicate that the parking brake is applied, that
the brake fluid level is low, or that there is a problem with
the anti-lock brake system (if equipped).
The dual brake system provides a reserve braking capac-
ity in the event of a failure to a portion of the hydraulic
system. Failure of either half of the dual brake system isindicated by the Brake Warning Light which will turn on
when the brake fluid level in the master cylinder has
dropped below a specified level.
The light will remain on until the cause is corrected.
NOTE:The light may flash momentarily during sharp
cornering maneuvers which change fluid level condi-
tions. The vehicle should have service performed, and
the brake fluid level checked.
If brake failure is indicated, immediate repair is neces-
sary.
WARNING!
Driving a vehicle with the brake light on is danger-
ous. Part of the brake system may have failed. It will
take longer to stop the vehicle. You could have an
accident. Have the vehicle checked immediately.
230 UNDERSTANDING YOUR INSTRUMENT PANEL
Page 233 of 531
Vehicles equipped with the Anti-Lock Brake System
(ABS), are also equipped with Electronic Brake Force
Distribution (EBD). In the event of an EBD failure, the
Brake Warning Light will turn on along with the ABS
Light. Immediate repair to the ABS system is required.
The operation of the Brake Warning Light can be checked
by turning the ignition switch from the OFF position to
the ON position. The light should illuminate for approxi-
mately two seconds. The light should then turn off unless
the parking brake is applied or a brake fault is detected.
If the light does not illuminate, have the light inspected
by an authorized dealer.
The light also will turn on when the parking brake is
applied with the ignition switch in the ON position.
NOTE:This light shows only that the parking brake is
applied. It does not show the degree of brake application.12. Vehicle Security Light Ð If Equipped
This light will flash at a fast rate for approxi-
mately 16 seconds when the vehicle security
alarm is arming and then will flash slowly until
the system is disarmed.
13. Anti-Lock Brake System Light
This light monitors the Anti-Lock Brake Sys-
tem. The light will turn on when the ignition
switch is turned to the ON position and may
stay on for as long as four seconds.
If the ABS light remains on or turns on while driving, it
indicates that the Anti-Lock portion of the brake system
is not functioning and that service is required. However,
the conventional brake system will continue to operate
normally if the BRAKE warning light is not on.
If the ABS light is on, the brake system should be serviced
as soon as possible to restore the benefits of Anti-Lock
UNDERSTANDING YOUR INSTRUMENT PANEL 231
4
Page 325 of 531
STARTING AND OPERATING
CONTENTS
mStarting Procedures.....................326
NAutomatic Transmission................327
mEngine Block Heater Ð If Equipped.........329
mAutomatic Transmission..................330
NBrake/Transmission Interlock System.......330
NFour-Speed Or Six-Speed Automatic
Transmission........................331
NReset Mode - Electronic Transmission.......337
mParking Brake.........................337mBrake System..........................339
NAnti-Lock Brake System (ABS)............340
mElectronic Brake Control Systems............342
NTraction Control System (TCS)............342
mPower Steering........................347
mDriving On Slippery Surfaces..............348
NAcceleration.........................348
NTraction............................348
5
Page 334 of 531
the instrument cluster will display transmission gear
selection as 6, 5, 4, 3, 2, 1 for six-speed and 4, 3, 2, 1 for
four-speed transmissions.
Gear Ranges
DO NOT race the engine when shifting the gear selector
lever from PARK or NEUTRAL positions into another
gear range.
PARK
Shifting the gear selector lever in PARK supplements the
parking brake by locking the transmission. The engine
can be started in this gear. Never attempt to use PARK
while vehicle is in motion. Apply the parking brake when
leaving the vehicle in this gear.
When parking on a flat surface, place the shift lever in the
PARK position first, and then apply the parking brake.When parking on a hill, it is important to set the parking
brake before placing the shift lever in PARK, otherwise
the load on the transmission locking mechanism may
make it difficult to move the shift lever out of PARK. As
an added precaution, turn the front wheels toward the
curb on a downhill grade and away from the curb on an
uphill grade.
WARNING!
Never use PARK position on an automatic transmis-
sion as a substitute for the parking brake. Always
apply parking brake fully when parked to guard
against vehicle movement and possible injury or
damage.
332 STARTING AND OPERATING
Page 335 of 531
WARNING!
Unintended movement of a vehicle could injure
those in and near the vehicle. As with all vehicles,
you should never exit a vehicle while the engine is
running. Before exiting a vehicle, you should always
shift the gear selector lever into PARK, remove the
key from the ignition, and apply the parking brake.
Once the key is removed from the ignition, the
transmission gear selector lever is locked in the
PARK position, securing the vehicle against un-
wanted movement. Furthermore, you should never
leave unattended children or pets inside a vehicle.The following indicators should be used to ensure that
you have engaged the transmission gear selector lever
into the PARK position:
²When shifting the gear selector lever into PARK,
depress the button on the gear selector lever and
firmly move the lever all the way forward until it
stops.
²Look at the shift indicator window on the console to
ensure gear selector lever is in the PARK position.
²When engaged in PARK, you will not be able to move
the gear selector lever rearward without depressing
the gear selector lever button.
STARTING AND OPERATING 333
5
Page 339 of 531
Reset Mode - Electronic Transmission
The transmission is monitored electronically for abnor-
mal conditions. If a condition is detected that could cause
damage, the transmission automatically shifts into 2nd
gear (3rd gear for six-speed). The transmission remains in
2nd gear (3rd gear for six-speed) despite the forward gear
selected. PARK, REVERSE, and NEUTRAL will continue
to operate. This Reset feature allows the vehicle to be
driven to an authorized dealer for service without dam-
aging the transmission.
In the event of a momentary problem, the transmission
can be reset to regain all forward gears by performing the
following steps:
1. Stop the vehicle.
2. Shift into PARK.
3. Turn the ignition switch to the LOCK position.
4. Restart the engine.5. Shift into the desired gear range and resume driving.
NOTE:Even if the transmission can be reset, it is
recommended that you visit an authorized dealer at your
earliest possible convenience. Your authorized dealer has
diagnostic equipment to determine if the problem could
recur.
If the transmission cannot be reset, authorized dealer
service is required.
PARKING BRAKE
When the parking brake is applied with the ignition
switch ON, the brake light in the instrument cluster will
turn on.
NOTE:This light only shows that the parking brake is
applied. It does not show the degree of brake application.
Before leaving the vehicle, make sure that the parking
brake is fully applied by depressing the pedal located at
the bottom left of the instrument panel and place the gear
STARTING AND OPERATING 337
5