fuel CHRYSLER TOWN AND COUNTRY 2011 5.G User Guide
[x] Cancel search | Manufacturer: CHRYSLER, Model Year: 2011, Model line: TOWN AND COUNTRY, Model: CHRYSLER TOWN AND COUNTRY 2011 5.GPages: 100, PDF Size: 3.24 MB
Page 3 of 100
INTRODUCTION/WELCOMEWelcome From Chrysler Group LLC......2
CONTROLS AT A GLANCEDriver Cockpit................4
Instrument Cluster ..............6
GETTING STARTEDKeyFob ...................8
Remote Start.................9
Keyless Enter-N-Go .............10
Theft Alarm .................11
Seat Belt ...................12
Supplemental Restraint System (SRS) —
Air Bags ...................13
Child Restraints ................13
Front Seats ..................15
Heated Seats .................17
Tilt/Telescoping Steering Column .......18
Adjustable Pedals ...............19
OPERATING YOUR VEHICLETurn Signal/Wiper/Washer/High Beam Lever . . 20
Headlight Switch And Halo Light Switch ....21
Speed Control ................22
Electronic Range Selection (ERS) .......23
Fuel Economy (Econ) Mode ..........24
Manual Climate Controls ...........24
Three Zone Manual Climate Controls .....25
Three Zone Automatic Temperature Controls
(ATC)....................26
Parksense® Rear Park Assist ..........27
Parkview® Rear Back-Up Camera .......27
Rear Cross Path With Blind Spot Monitoring . . 28
Power Sliding Side Doors ...........28
Stow 'N Go® Seating .............29
Third Row Power Recliner ...........30
Power Liftgate ................31
Power Sunroof ................31
Wind Buffeting ................33
ELECTRONICSYour Vehicle's Sound System .........34
Non-Touch-Screen Radios ...........36
Touch-Screen Radios .............38
Steering Wheel Audio Controls ........44
Uconnect™ Phone ...............44
Uconnect™ Voice Command .........46
Video Entertainment System (VES)™ .....47
iPod®/USB/MP3 Control ...........48 Electronic Vehicle Information Center
(EVIC)
....................49
Programmable Features ............50
Universal Garage Door Opener
(HomeLink®) .................51
Power Inverter ................53
Power Outlets ................54
UTILITY
In-Floor Storage – Stow 'N Go® ........55
Roof Luggage Rack ..............55
Trailer Towing Weights (Maximum Trailer
Weight Ratings) ...............56
Recreational Towing
(Behind Motorhome, Etc.) ...........57
WHAT TO DO IN EMERGENCIES
24-Hour Towing Assistance ..........58
Instrument Cluster Warning Lights .......58
If Your Engine Overheats ...........61
Jacking And Tire Changing ..........62
Jump-Starting ................70
Shift Lever Override .............72
Towing A Disabled Vehicle ..........73
Freeing A Stuck Vehicle ............74
Event Data Recorder (EDR) ..........75
MAINTAINING YOUR VEHICLEOpening The Hood..............76
Adding Fuel .................76
Engine Compartment .............78
Fluids And Capacities .............79
Maintenance Chart ..............80
Fuses .....................82
Tire Pressures .................85
Wheel And Wheel Trim Care .........86
Exterior Bulbs .................86
CONSUMER ASSISTANCEChrysler Group LLC Customer Center .....87
Chrysler Canada Inc. Customer Center ....87
Assistance For The Hearing Impaired .....87
Publications Ordering .............87
Reporting Safety Defects In The
50 United States And Washington, D.C. ....88
MOPAR ACCESSORIESAuthentic Accessories By MOPAR®......89
INDEX..................90
TABLE OF CONTENTS
Page 8 of 100
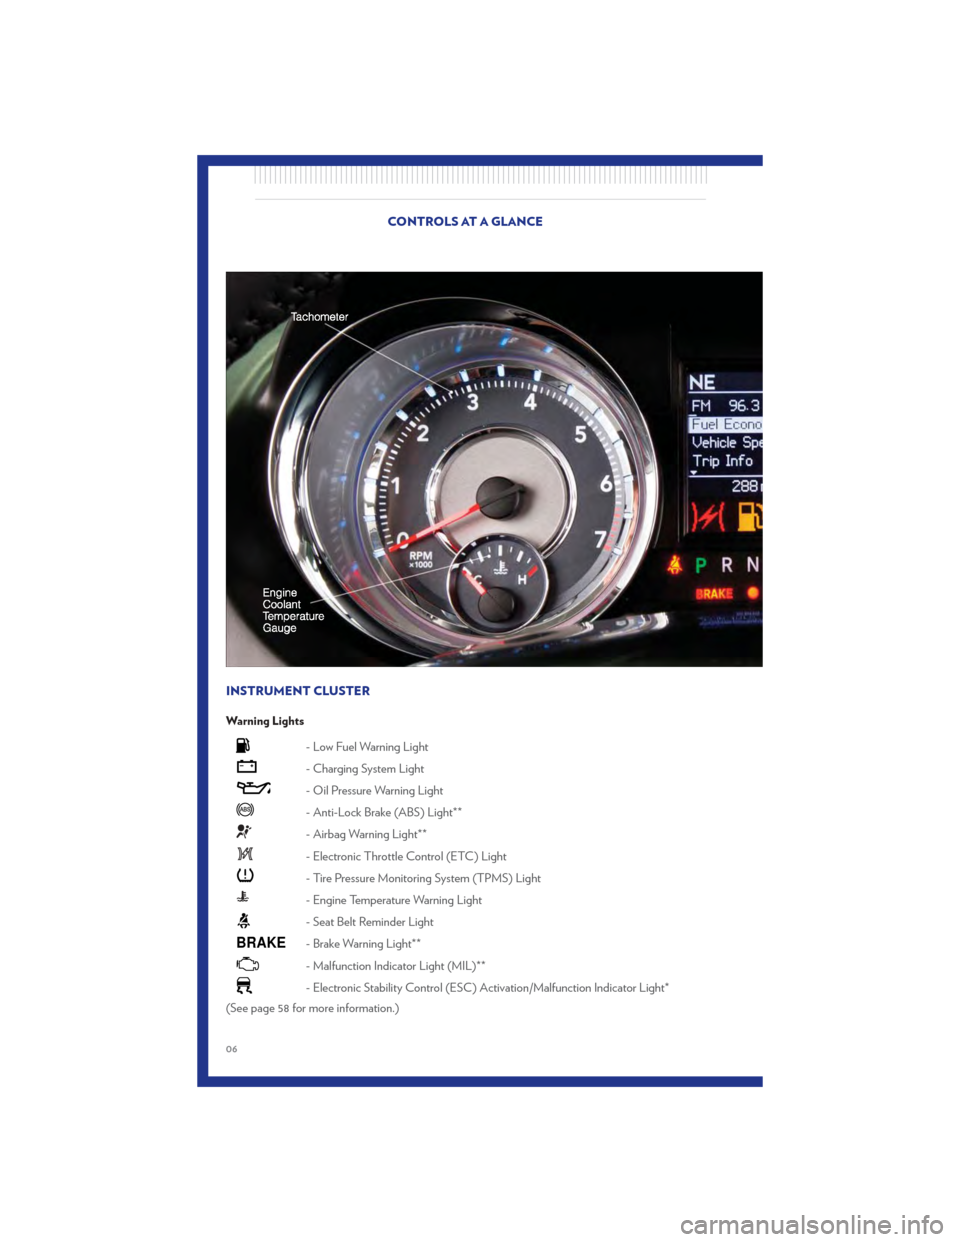
INSTRUMENT CLUSTER
Warning Lights
- Low Fuel Warning Light
- Charging System Light
- Oil Pressure Warning Light
- Anti-Lock Brake (ABS) Light**
- Airbag Warning Light**
- Electronic Throttle Control (ETC) Light
- Tire Pressure Monitoring System (TPMS) Light
- Engine Temperature Warning Light
- Seat Belt Reminder Light
BRAKE- Brake Warning Light**
- Malfunction Indicator Light (MIL)**
- Electronic Stability Control (ESC) Activation/Malfunction Indicator Light*
(See page 58 for more information.)
CONTROLS AT A GLANCE
06
Page 9 of 100
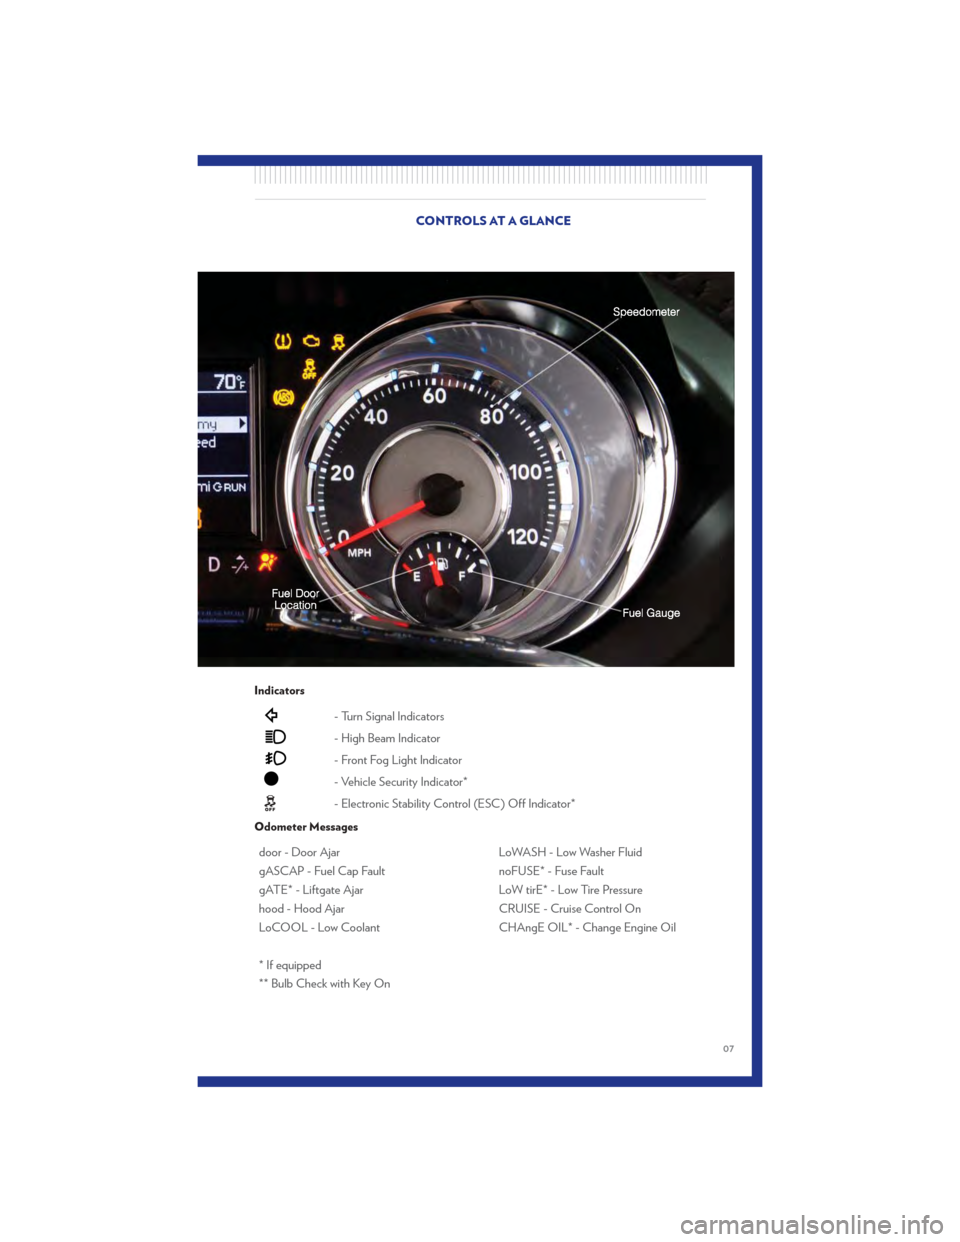
Indicators
- Turn Signal Indicators
- High Beam Indicator
- Front Fog Light Indicator
- Vehicle Security Indicator*
- Electronic Stability Control (ESC) Off Indicator*
Odometer Messages
door - Door AjarLoWASH - Low Washer Fluid
gASCAP - Fuel Cap Fault noFUSE* - Fuse Fault
gATE* - Liftgate Ajar LoW tirE* - Low Tire Pressure
hood - Hood Ajar CRUISE - Cruise Control On
LoCOOL - Low Coolant CHAngE OIL* - Change Engine Oil
* If equipped
** Bulb Check with Key On
CONTROLS AT A GLANCE
07
Page 26 of 100

FUEL ECONOMY (ECON) MODE• The Fuel Economy (ECON) mode can improve the vehicle’s overall fuel economy duringnormal driving conditions.
• Press the “econ” switch in the center stack of the instrument panel and a green light will indicate the ECON mode is engaged.
• When the Fuel Economy (ECON) Mode is engaged, the vehicle control systems will be able to change the following:
• The transmission will upshift sooner and downshift later.
• The transmission will skip select gears during shifts to allow the engine to operate at lower speeds.
• The torque converter clutch will engage sooner (lower engine rpm’s) and remain on longer.
• The engine idle speed will be lower.
• The overall driving performance will be more conservative.
MANUAL CLIMATE CONTROLS
Air Recirculation
• Use recirculation for maximum A/C operation.
• For window defogging, turn the recirculation button off.
• Recirculation is not allowed in defrost, floor, defrost/floor (mix) modes.
OPERATING YOUR VEHICLE
24
Page 45 of 100

• Touch theWhere To?soft-key to program a destination.
• Next touch one of the subcategories to search for your destination. Address, Points of Interest, Recently Found, Favorites and Intersection are a few of the options.
• After touching one of the subcategories, follow the on-screen steps to complete the process and be routed to your destination.
Setting a Home Location • Touch the NAV soft-key in the upper-right corner of your radio screen, to access the Navigation system.
• Touch the Where To?soft-key, then touch Go Home.
• Next, select from: • Enter My Address – enter an address for the location using the on-screen keyboard.
• Use my current location – sets your current location as your Home Location.
• Choose from Recently Found – select a location from your recently found locations.
• After you set your Home Location, touch Where To?, then touch Go Home.
Editing Home Location • Touch the NAV soft-key in the upper-right corner of your radio screen, to access the Navigation system.
• Touch the Where To?soft-key, then touch Favorites.
• Touch the location you want to edit.
• Next, touch Press for More.
• Touch Edit.
• Follow the on-screen steps for editing the Home Location.
Go Home • Touch the NAV soft-key in the upper-right corner of your radio screen, to access the Navigation system.
• Touch Where To? , then touch Go Home.
SIRIUS Travel Link – Media Center 730N (RHR) & Media Center 430N (RHB) Only
• To access SIRIUS Travel Link, press the MENU hard-key, then touch the Travel Link soft-key.
NOTE:SIRIUS Travel Link requires a subscription, sold separately after trial subscription
included with vehicle purchase.
• SIRIUS Travel Link brings a wealth of useful information into your vehicle and right to your fingertips:
• Weather
• View detailed weather conditions at your current location.
• Ski Info
• View ski and snowboarding conditions at ski resorts.
• Fuel Prices
• Check detailed price information for fuel stations near your current location. ELECTRONICS
43
Page 51 of 100
• To hear audio from devices connected to this port from a non-touch-screen radio, press theAUX button on the radio faceplate. From a touch-screen radio, press the MEDIA hard-key,
then touch the AUX or iPod® soft-key.
• When connected to this feature: • The iPod® can be controlled using the radio buttons to Play, Browse, and List the iPod® orexternal devices contents. Refer to the Owner's Manual on the DVD for details.
• The iPod® battery charges when plugged into the USB port (if supported by the specific audio device).
• Compatible iPod® devices may also be controllable using voice commands. Refer to the Owner's Manual on the DVD for details.
NOTE:
• The USB port supports certain Mini, Classic, Nano, Touch, and iPhone® devices. The USB port also supports playing music from compatible external USB Mass Storage Class memory
devices. For supported audio file formats, refer to the USB Port section in the Owner's Manual
on the DVD. Refer to www.chrysler.com/uconnect website for a list of tested iPod®s. Some
iPod® software versions may not fully support the USB port features. Please visit Apple’s
website for iPod® software updates.
Bluetooth® Streaming Audio
• If equipped with Uconnect™ Voice Command, your Bluetooth-equipped iPod® devices, cellphones or other media players, may also be able to stream music to your vehicle's speakers.
Your connected device must be Bluetooth-compatible, and paired with your Media Center
radio (see Uconnect™ Phone for pairing instructions). Press the AUX button on the radio
faceplate until "BT" is displayed on the radio screen.
WARNING!
Do not plug in or remove the iPod® or external device while driving. Failure to follow this
warning could result in a collision.
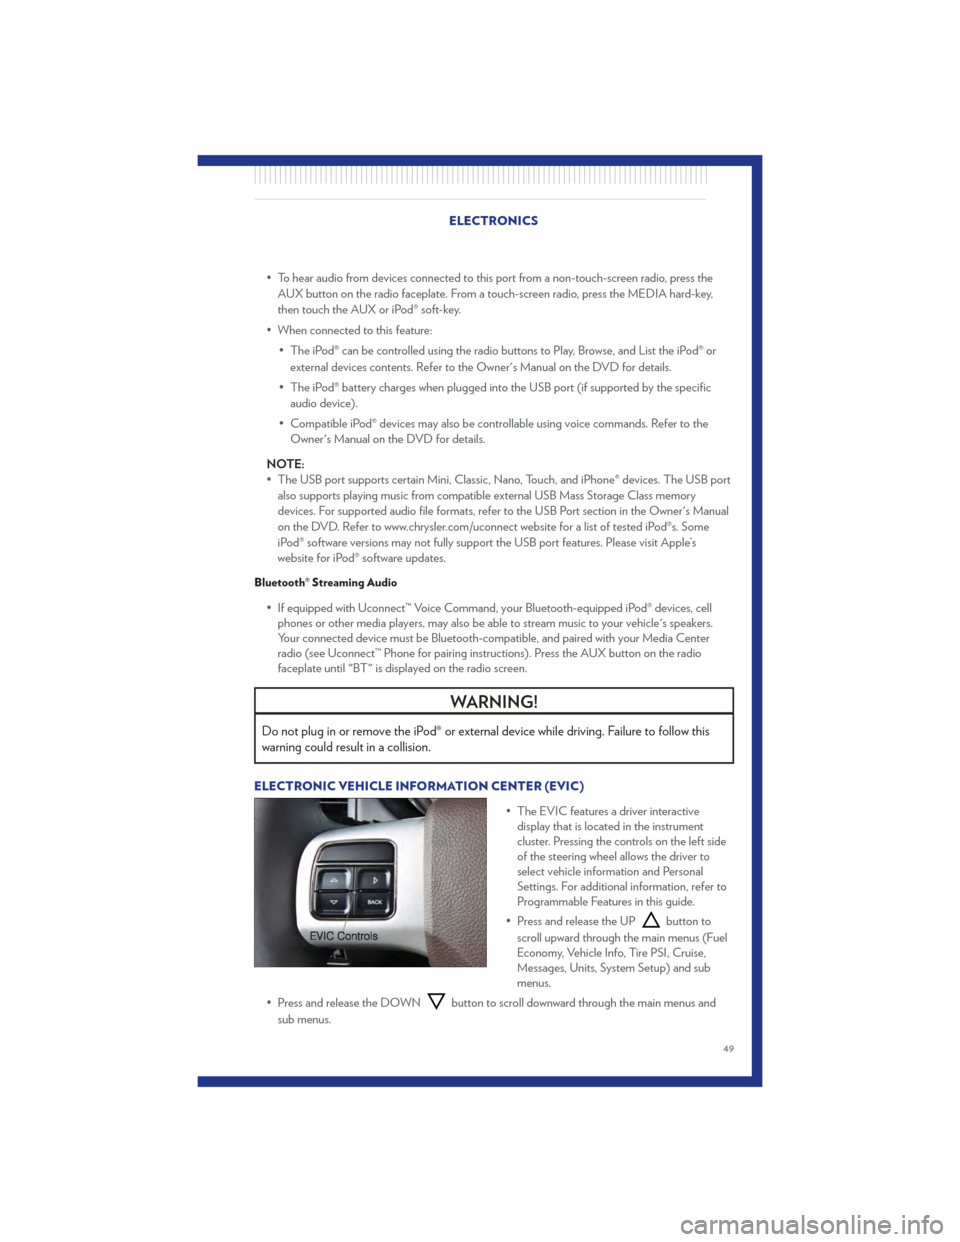
ELECTRONIC VEHICLE INFORMATION CENTER (EVIC)
• The EVIC features a driver interactivedisplay that is located in the instrument
cluster. Pressing the controls on the left side
of the steering wheel allows the driver to
select vehicle information and Personal
Settings. For additional information, refer to
Programmable Features in this guide.
• Press and release the UP
button to
scroll upward through the main menus (Fuel
Economy, Vehicle Info, Tire PSI, Cruise,
Messages, Units, System Setup) and sub
menus.
• Press and release the DOWN
button to scroll downward through the main menus and
sub menus.
ELECTRONICS
49
Page 60 of 100

24-HOUR TOWING ASSISTANCE• Dial toll-free 1-800-521-2779 or 1-800-363-4869 for Canadian residents.
• Provide your name, vehicle identification number and license plate number.
• Provide your location, including telephone number, from which you are calling.
• Briefly describe the nature of the problem and answer a few simple questions.
• You will be given the name of the service provider and an estimated time of arrival. If you feelyou are in an “unsafe situation”, please let us know. With your consent, we will contact local
police or safety authorities.
INSTRUMENT CLUSTER WARNING LIGHTS
- Electronic Stability Control (ESC) Indicator Light
• If this indicator light flashes during acceleration, apply as little throttle as possible. While driving, ease up on the accelerator. Adapt your speed and driving to the prevailing road
conditions. To improve the vehicle's traction when starting off in deep snow, sand or gravel, it
may be desirable to switch the ESC system off.
- Tire Pressure Monitoring System (TPMS) Light
• Each tire, including the spare (if provided), should be checked monthly, when cold and inflatedto the inflation pressure recommended by the vehicle manufacturer on the vehicle placard or
tire inflation pressure label. (If your vehicle has tires of a different size than the size indicated on
the vehicle placard or tire inflation pressure label, you should determine the proper tire inflation
pressure for those tires.)
• As an added safety feature, your vehicle has been equipped with a Tire Pressure Monitoring System (TPMS) that illuminates a low tire pressure telltale when one or more of your tires is
significantly under-inflated. Accordingly, when the low tire pressure telltale illuminates, you
should stop and check your tires as soon as possible, and inflate them to the proper pressure.
Driving on a significantly under-inflated tire causes the tire to overheat and can lead to tire
failure. Under-inflation also reduces fuel efficiency and tire tread life, and may affect the
vehicle’s handling and stopping ability.
• IF THE LIGHT STARTS FLASHING INDICATING A LOW TIRE PRESSURE, ADJUST
THE AIR PRESSURE IN THE LOW TIRE TO THE AIR PRESSURE SHOWN ON THE
VEHICLE PLACARD OR TIRE INFLATION PRESSURE LABEL LOCATED ON THE
DRIVER'S DOOR. NOTE: AFTER INFLATION, THE VEHICLE MAY NEED TO BE
DRIVEN FOR 20 MINUTES BEFORE THE FLASHING LIGHT WILL TURN OFF.
• Please note that the TPMS is not a substitute for proper tire maintenance, and it is the driver’s responsibility to maintain correct tire pressure, even if under-inflation has not reached the level
to trigger illumination of the TPMS low tire pressure telltale.
• Your vehicle has also been equipped with a TPMS malfunction indicator to indicate when the system is not operating properly. The TPMS malfunction indicator is combined with the low tire
pressure telltale. When the system detects a malfunction, the telltale will flash for approximately
one minute and then remain continuously illuminated. This sequence will continue each time
the vehicle is restarted as long as the malfunction exists. WHAT TO DO IN EMERGENCIES
58
Page 62 of 100
- Malfunction Indicator Light (MIL)
• Certain conditions, such as a loose or missing gas cap, poor fuel quality, etc., may illuminate theMIL after engine start. The vehicle should be serviced if the light stays on through several
typical driving cycles. In most situations, the vehicle will drive normally and not require towing.
• If the MIL flashes when the engine is running, serious conditions may exist that could lead to immediate loss of power or severe catalytic converter damage. We recommend you do not
operate the vehicle. Have the vehicle serviced immediately.
- Electronic Stability Control (ESC) Indicator Light/Brake Assist System (BAS) Warning
Light
• If the ESC/BAS warning light comes on continuously with the engine running, a malfunction has been detected.
• If this light remains on after several ignition cy cles, and the vehicle has been driven several miles
(kilometers) at speeds greater than 30 mph (48 km/h), we recommend you drive to the nearest
service center and have the vehicle serviced immediately.
- Charging System Light
• This light shows the status of the electrical charging system. If the charging system light remains on, it means that the vehicle is experiencing a problem with the charging system.
• We recommend you do not continue driving if the charging system light is on. Have the vehicle serviced immediately.
- Oil Pressure Warning Light
• This light indicates low engine oil pressure. If the light turns on while driving, stop the vehicleand shut off the engine as soon as possible. A chime will sound for four minutes when this light
turns on.
• We recommend you do not operate the vehicle or engine damage will occur. Have the vehicle serviced immediately.
- Anti-Lock Brake (ABS) Light
• This light monitors the Anti-Lock Brake System (ABS).
• If the light is not on during starting, stays on, or turns on while driving, we recommend you driveto the nearest service center and have the vehicle serviced immediately.
- Electronic Throttle Control (ETC) Light
• This light informs you of a problem with the Electronic Throttle Control (ETC) system.
• If a problem is detected, the light will come on while the engine is running. Cycle the ignitionwhen the vehicle has completely stopped and the shift lever is placed in the PARK position; the
light should turn off.
• If the light remains lit with the engine running, your vehicle will usually be drivable; however, see an authorized service center immediately. If the light is flashing when the engine is running,
immediate service is required and you may experience reduced performance, an
elevated/rough idle or engine stall and your vehicle may require towing. WHAT TO DO IN EMERGENCIES
60
Page 63 of 100
- Air Bag Warning Light
• If the light is not on during starting, stays on, or turns on while driving, have the vehicle servicedby an authorized service center immediately.
Fuel Cap/Loose Gas Cap Message
• If a “gas cap” message (shown as gASCAP) appears, tighten the gas cap until a “clicking” soundis heard.
• Press the odometer reset button to turn the message off.
• If the message continues to appear for more than three days after tightening the gas cap, see your authorized service center.
Oil Change Indicator
Message
• If an “oil change” message (shown as CHAngE OIL) appears and a single chime sounds, it is time for your next required oil change.
Resetting The Light After Servicing
• Turn the ignition switch to the ON/RUN position (do not start engine).
• Fully depress the accelerator pedal three times within 10 seconds.
• Turn the ignition switch to the OFF/LOCK position.
IF YOUR ENGINE OVERHEATS • In any of the following situations, you can reduce the potential for overheating by taking theappropriate action.
• On the highways — slow down.
• In city traffic — while stopped, place the transmission in NEUTRAL, but do not increase engine idle speed.
NOTE: There are steps that you can take to slow down an impending overheat condition:
• If your air conditioner (A/C) is on, turn it off. The A/C system adds heat to the engine cooling system and turning the A/C off can help remove this heat.
• You can also turn the temperature control to maximum heat, the mode control to floor and the blower control to high. This allows the heater core to act as a supplement to the radiator and aids
in removing heat from the engine cooling system.
CAUTION!
Driving with a hot cooling system could damage your vehicle. If the temperature gauge
reads 240°F (116 °C) or greater pull over and stop the vehicle. Idle the vehicle with the air
conditioner turned off until the pointer drops back into the normal range 200–230°F
(93–110°C). If the pointer remains at 240°F (116°C) or greater and you hear a chime, turn
the engine off immediately and call for service.
WHAT TO DO IN EMERGENCIES
61
Page 73 of 100
Preparations for Jump-Start
• The battery in your vehicle is located on the left side of the engine compartment.
• Set the parking brake, shift the automatic transmission into PARK and turn the ignition toLOCK.
• Turn off the heater, radio, and all unnecessary electrical accessories.
• If using another vehicle to jump-start the battery, park the vehicle within the jumper cables reach, set the parking brake and make sure the ignition is OFF.
Jump-Starting Procedure
• Connect the positive (+)end of the jumper cable to the positive (+)post of the discharged
vehicle.
• Connect the opposite end of the positive (+)jumper cable to the positive (+)post of the
booster battery.
• Connect the negative end (-)of the jumper cable to the negative (-)post of the booster
battery.
• Connect the opposite end of the negative (-)jumper cable to a good engine ground (exposed
metal part of the discharged vehicle's engine) away from the battery and fuel injection system.
• Start the engine in the vehicle that has the booster battery, let the engine idle a few minutes, and then start the engine in the vehicle with the discharged battery.
Once the engine is started, remove the jumper cables in the reverse sequence:
• Disconnect the negative (-)jumper cable from the negative (-)post of the vehicle with the
discharged battery.
• Disconnect the negative end (-)of the jumper cable from the negative (-)post of the booster
battery.
• Disconnect the opposite end of the positive (+)jumper cable from the positive (+)post of the
booster battery.
• Disconnect the positive (+)end of the jumper cable from the positive (+)post of the
discharged vehicle.
• If frequent jump-starting is required to start your vehicle you should have the battery and charging system inspected at your authorized dealer.
CAUTION!
• Do not use a portable battery booster pack or any other booster source with a systemvoltage greater than 12 Volts or damage to the battery, starter motor, alternator or
electrical system may occur.
• Failure to follow these procedures could result in damage to the charging system of the booster vehicle or the discharged vehicle.
• Accessories that can be plugged into the vehicle power outlets draw power from the vehicle’s battery, even when not in use (i.e., cellular phones, etc.). Eventually, if plugged
in long enough, the vehicle’s battery will discharge sufficiently to degrade battery life
and/or prevent the engine from starting.
WHAT TO DO IN EMERGENCIES
71