headlamp CHRYSLER TOWN AND COUNTRY 2011 5.G User Guide
[x] Cancel search | Manufacturer: CHRYSLER, Model Year: 2011, Model line: TOWN AND COUNTRY, Model: CHRYSLER TOWN AND COUNTRY 2011 5.GPages: 100, PDF Size: 3.24 MB
Page 52 of 100

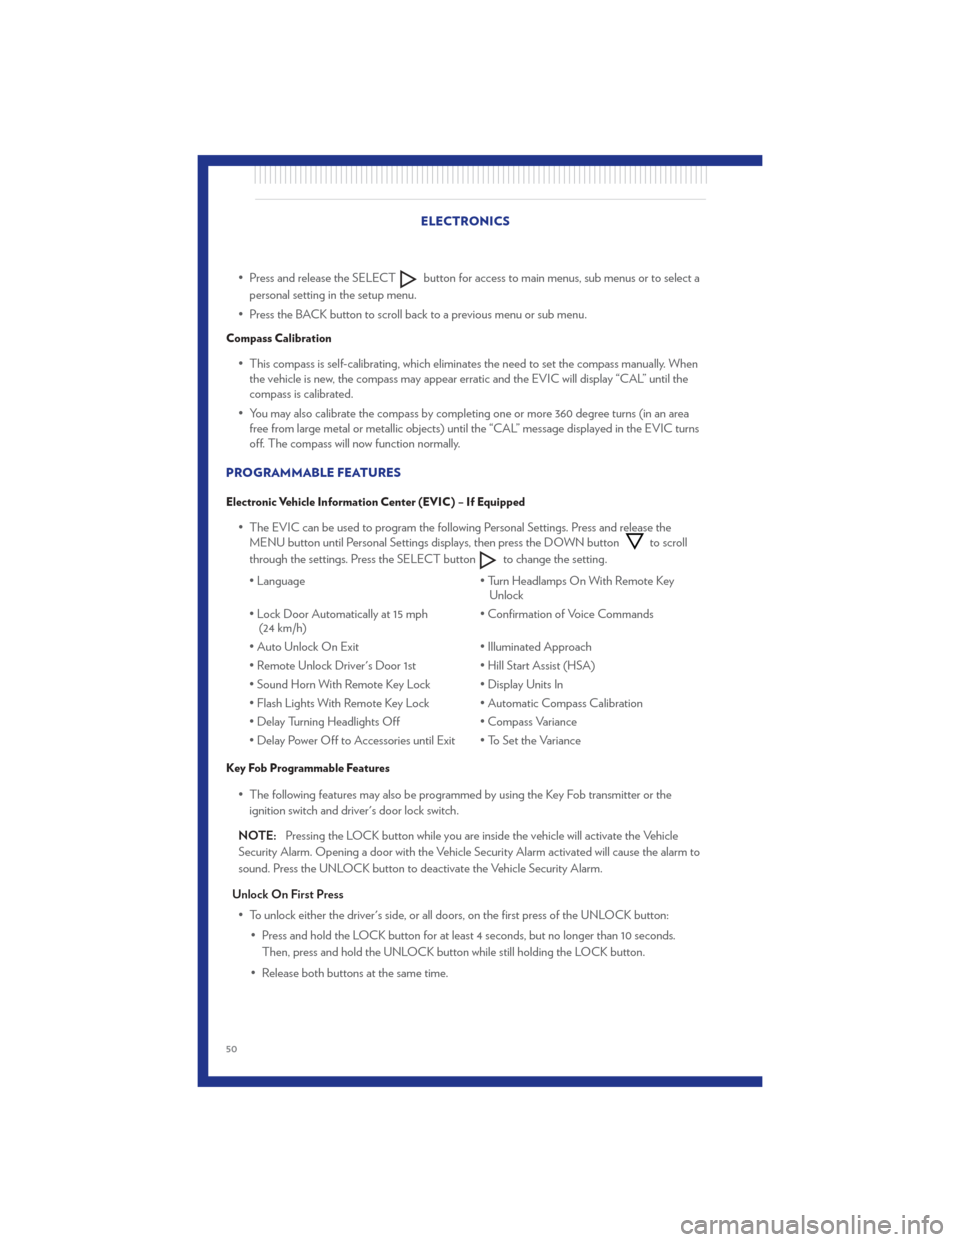
• Press and release the SELECTbutton for access to main menus, sub menus or to select a
personal setting in the setup menu.
• Press the BACK button to scroll back to a previous menu or sub menu.
Compass Calibration
• This compass is self-calibrating, which eliminates the need to set the compass manually. When the vehicle is new, the compass may appear erratic and the EVIC will display “CAL” until the
compass is calibrated.
• You may also calibrate the compass by completing one or more 360 degree turns (in an area free from large metal or metallic objects) until the “CAL” message displayed in the EVIC turns
off. The compass will now function normally.
PROGRAMMABLE FEATURES
Electronic Vehicle Information Center (EVIC) – If Equipped
• The EVIC can be used to program the following Personal Settings. Press and release the MENU button until Personal Settings displays, then press the DOWN buttonto scroll
through the settings. Press the SELECT button
to change the setting.
• Language • Turn Headlamps On With Remote Key
Unlock
• Lock Door Automatically at 15 mph (24 km/h) • Confirmation of Voice Commands
• Auto Unlock On Exit • Illuminated Approach
• Remote Unlock Driver's Door 1st • Hill Start Assist (HSA)
• Sound Horn With Remote Key Lock • Display Units In
• Flash Lights With Remote Key Lock • Automatic Compass Calibration
• Delay Turning Headlights Off • Compass Variance
• Delay Power Off to Accessories until Exit • To Set the Variance
Key Fob Programmable Features
• The following features may also be programmed by using the Key Fob transmitter or the ignition switch and driver's door lock switch.
NOTE: Pressing the LOCK button while you are inside the vehicle will activate the Vehicle
Security Alarm. Opening a door with the Vehicle Security Alarm activated will cause the alarm to
sound. Press the UNLOCK button to deactivate the Vehicle Security Alarm.
Unlock On First Press • To unlock either the driver's side, or all doors, on the first press of the UNLOCK button: • Press and hold the LOCK button for at least 4 seconds, but no longer than 10 seconds.Then, press and hold the UNLOCK button while still holding the LOCK button.
• Release both buttons at the same time. ELECTRONICS
50
Page 85 of 100

Integrated Power Module (fuses)
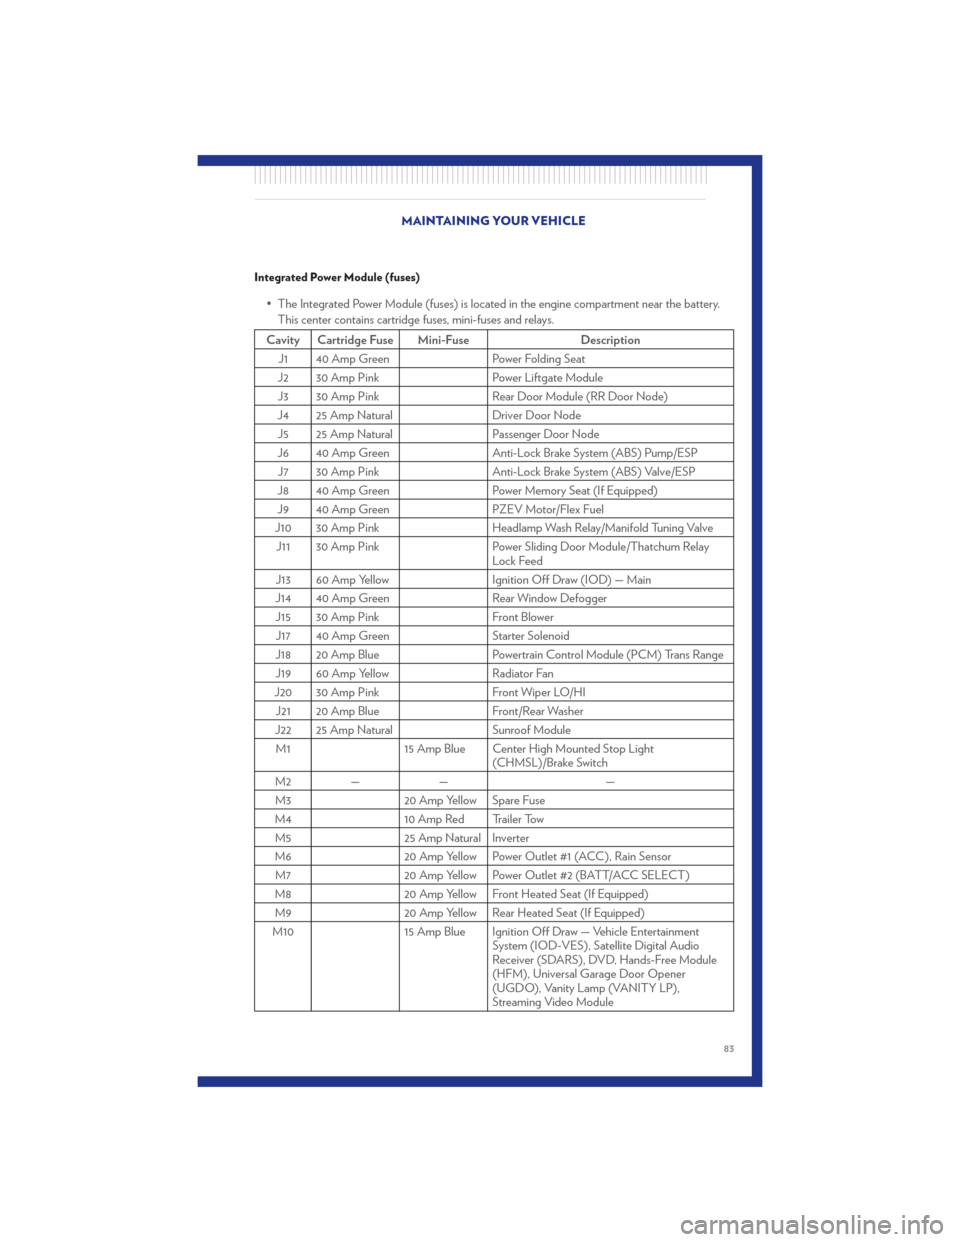
• The Integrated Power Module (fuses) is located in the engine compartment near the battery.This center contains cartridge fuses, mini-fuses and relays.
Cavity Cartridge Fuse Mini-Fuse Description
J1 40 Amp Green Power Folding Seat
J2 30 Amp Pink Power Liftgate Module
J3 30 Amp Pink Rear Door Module (RR Door Node)
J4 25 Amp Natural Driver Door Node
J5 25 Amp Natural Passenger Door Node
J6 40 Amp Green Anti-Lock Brake System (ABS) Pump/ESP
J7 30 Amp Pink Anti-Lock Brake System (ABS) Valve/ESP
J8 40 Amp Green Power Memory Seat (If Equipped)
J9 40 Amp Green PZEV Motor/Flex Fuel
J10 30 Amp Pink Headlamp Wash Relay/Manifold Tuning Valve
J11 30 Amp Pink Power Sliding Door Module/Thatchum Relay
Lock Feed
J13 60 Amp Yellow Ignition Off Draw (IOD) — Main
J14 40 Amp Green Rear Window Defogger
J15 30 Amp Pink Front Blower
J17 40 Amp Green Starter Solenoid
J18 20 Amp Blue Powertrain Control Module (PCM) Trans Range
J19 60 Amp Yellow Radiator Fan
J20 30 Amp Pink Front Wiper LO/HI
J21 20 Amp Blue Front/Rear Washer
J22 25 Amp Natural Sunroof Module
M1 15 Amp Blue Center High Mounted Stop Light
(CHMSL)/Brake Switch
M2 — — —
M3 20 Amp Yellow Spare Fuse
M4 10 Amp Red Trailer Tow
M5 25 Amp Natural Inverter
M6 20 Amp Yellow Power Outlet #1 (ACC), Rain Sensor
M7 20 Amp Yellow Power Outlet #2 (BATT/ACC SELECT)
M8 20 Amp Yellow Front Heated Seat (If Equipped)
M9 20 Amp Yellow Rear Heated Seat (If Equipped)
M10 15 Amp Blue Ignition Off Draw — Vehicle Entertainment
System (IOD-VES), Satellite Digital Audio
Receiver (SDARS), DVD, Hands-Free Module
(HFM), Universal Garage Door Opener
(UGDO), Vanity Lamp (VANITY LP),
Streaming Video Module
MAINTAINING YOUR VEHICLE
83
Page 87 of 100

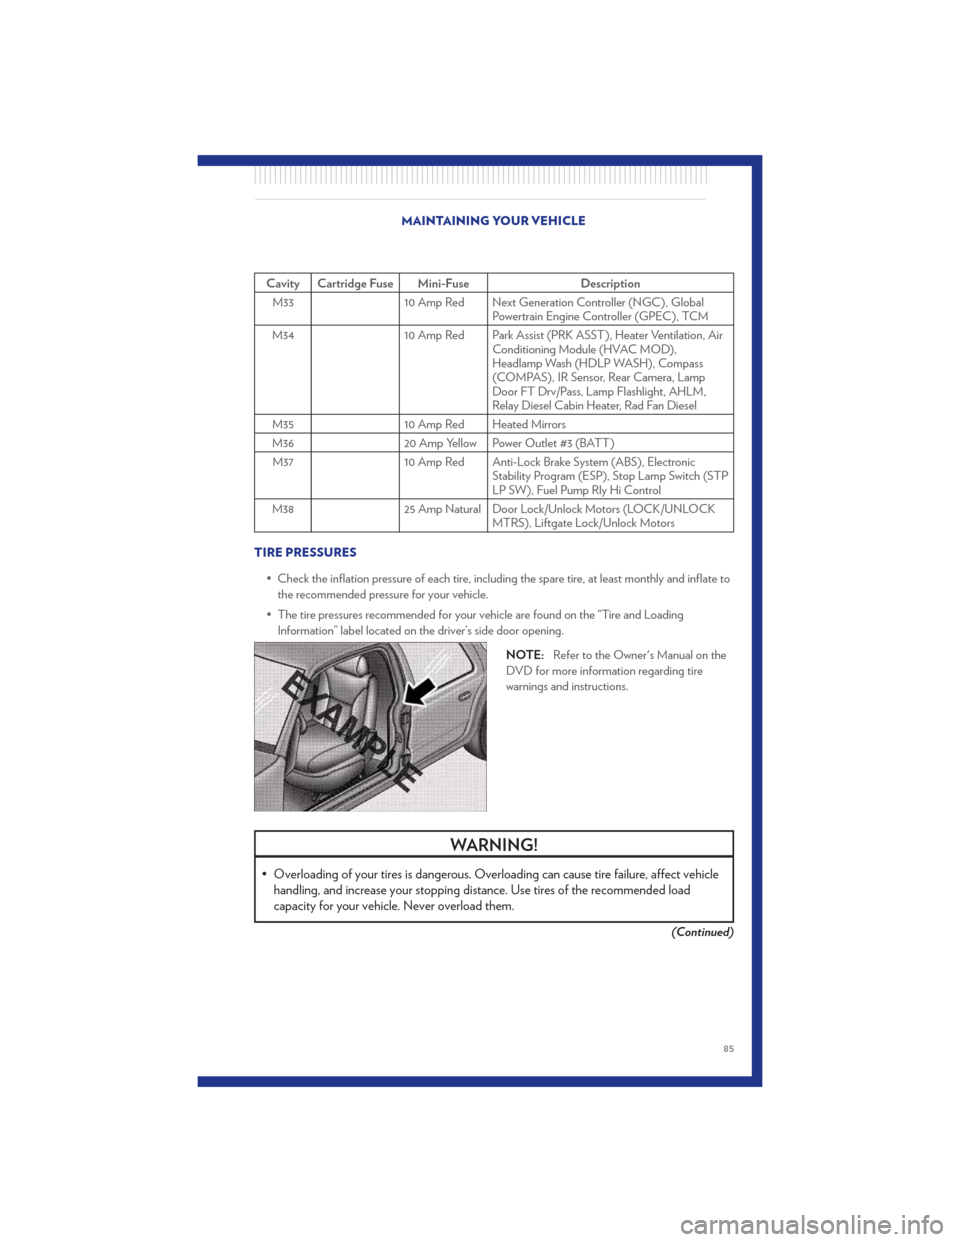
Cavity Cartridge Fuse Mini-FuseDescription
M33 10 Amp Red Next Generation Controller (NGC), Global
Powertrain Engine Controller (GPEC), TCM
M34 10 Amp Red Park Assist (PRK ASST), Heater Ventilation, Air
Conditioning Module (HVAC MOD),
Headlamp Wash (HDLP WASH), Compass
(COMPAS), IR Sensor, Rear Camera, Lamp
Door FT Drv/Pass, Lamp Flashlight, AHLM,
Relay Diesel Cabin Heater, Rad Fan Diesel
M35 10 Amp Red Heated Mirrors
M36 20 Amp Yellow Power Outlet #3 (BATT)
M37 10 Amp Red Anti-Lock Brake System (ABS), Electronic
Stability Program (ESP), Stop Lamp Switch (STP
LP SW), Fuel Pump Rly Hi Control
M38 25 Amp Natural Door Lock/Unlock Motors (LOCK/UNLOCK
MTRS), Liftgate Lock/Unlock Motors
TIRE PRESSURES • Check the inflation pressure of each tire, including the spare tire, at least monthly and inflate tothe recommended pressure for your vehicle.
• The tire pressures recommended for your vehicle are found on the “Tire and Loading Information” label located on the driver’s side door opening.
NOTE:Refer to the Owner's Manual on the
DVD for more information regarding tire
warnings and instructions.
WARNING!
• Overloading of your tires is dangerous. Overloading can cause tire failure, affect vehicle handling, and increase your stopping distance. Use tires of the recommended load
capacity for your vehicle . Never overload them.
(Continued)
MAINTAINING YOUR VEHICLE
85
Page 88 of 100

WARNING!(Continued)
• Improperly inflated tires are dangerous and can cause collisions. Under-inflation is theleading cause of tire failure and may result in severe cracking, component separation, or
“blow out”. Over-inflation reduces a tire’s ability to cushion shock. Objects on the road
and chuck holes can cause damage that results in tire failure. Unequal tire pressures can
cause steering problems. You could lose control of your vehicle. Over-inflated or
under-inflated tires can affect vehicle handling and can fail suddenly, resulting in loss of
vehicle control.
WHEEL AND WHEEL TRIM CARE
• All wheels and wheel trim, especially aluminum and chrome plated wheels, should be cleanedregularly with a mild soap and water to prevent corrosion.
• To remove heavy soil and/or excessive brake dust, use MOPAR® Wheel Cleaner or equivalent or select a non-abrasive, non-acidic cleaner.
CAUTION!
Do not use scouring pads, steel wool, a bristle brush, or metal polishes. Do not use oven
cleaner. These products may damage the wheel's protective finish. Avoid automatic car
washes that use acidic solutions or harsh brushes that may damage the wheel's protective
finish. Only MOPAR® Wheel Cleaner or equivalent is recommended.
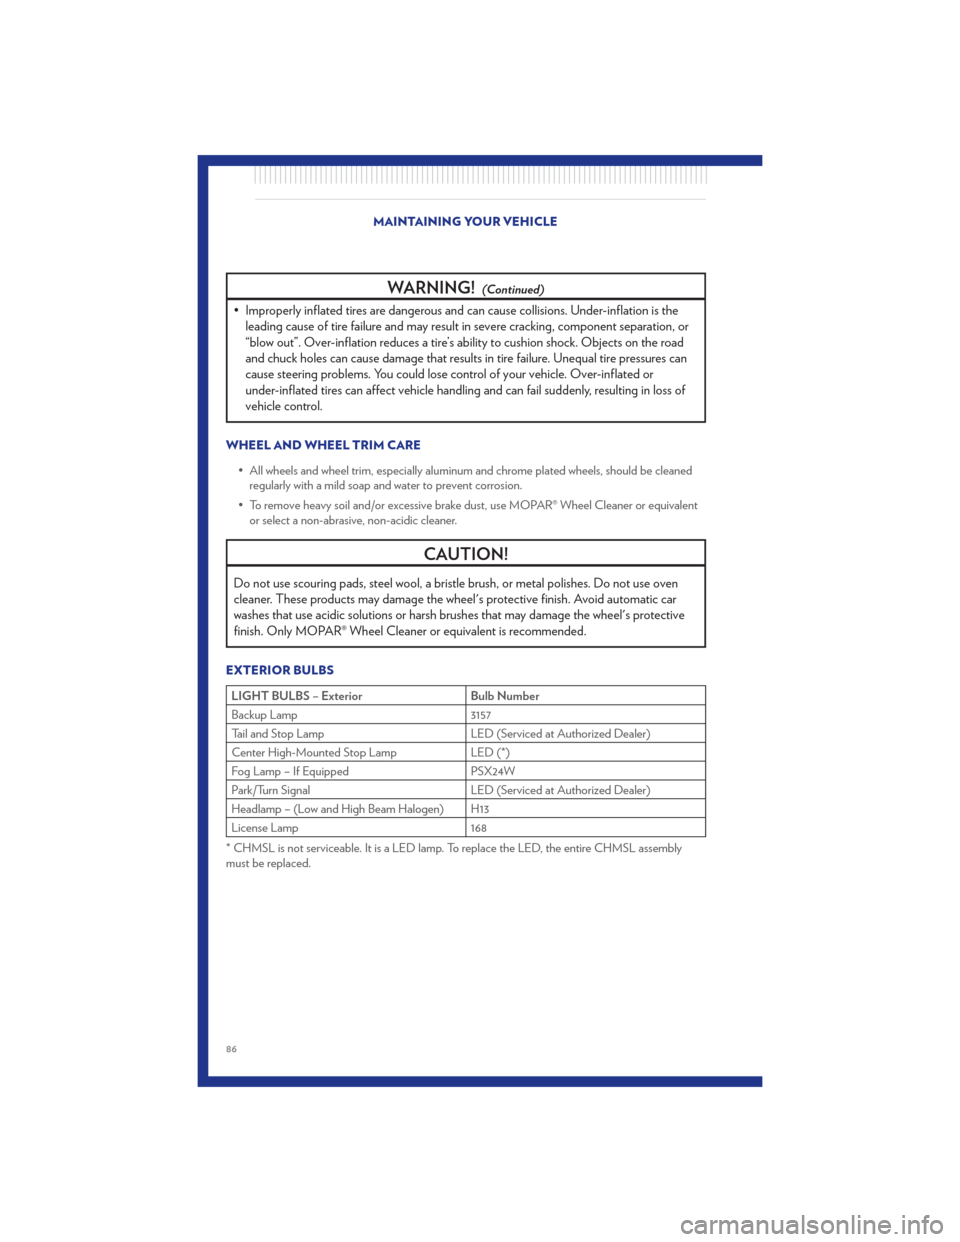
EXTERIOR BULBS
LIGHT BULBS – Exterior Bulb Number
Backup Lamp 3157
Tail and Stop Lamp LED (Serviced at Authorized Dealer)
Center High-Mounted Stop Lamp LED (*)
Fog Lamp – If Equipped PSX24W
Park/Turn Signal LED (Serviced at Authorized Dealer)
Headlamp – (Low and High Beam Halogen) H13
License Lamp 168
* CHMSL is not serviceable. It is a LED lamp. To replace the LED, the entire CHMSL assembly
must be replaced. MAINTAINING YOUR VEHICLE
86