air conditioning CHRYSLER TOWN AND COUNTRY 2013 5.G User Guide
[x] Cancel search | Manufacturer: CHRYSLER, Model Year: 2013, Model line: TOWN AND COUNTRY, Model: CHRYSLER TOWN AND COUNTRY 2013 5.GPages: 140, PDF Size: 4.18 MB
Page 39 of 140

Air Conditioning (A/C)
• If the air conditioning button is pressed while in AUTO mode, the system will exit AUTOmode and stay in A/C. The mode and blower will go to the previous user setting.
SYNC Temperature Button
• Push the SYNC button once to control driver and passenger temperatures simultaneously.Push the SYNC button a second time to control the temperatures individually.
Air Recirculation
• Use Recirculation for maximum A/C operation.
• For window defogging, turn the recirculation button off.
• If the Recirculation button is pressed when the system is in Defrost mode the RecirculationLED indicator will flash three times to indicate Recirculation mode is not allowed.
Heated Mirrors
• The mirrors are heated to melt frost or ice. This feature is activated whenever you turn on therear window defroster.
Rear Window Defroster
•Pressing the rear window defroster button will turn on the defroster for approximately 10 minutes.
An indicator in the button will illuminate when the rear window defroster is on. For an additional
10 minutes of operation, press the button a second time.
Activating Rear Automatic Temperature Control
• Pressing the REAR LOCK button for the Rear Automatic Temperature Control (ATC) System from the front lower ATC panel, illuminates a LOCK symbol in the rear display. The
rear temperature and air source are controlled from the front lower ATC panel.
• Rear second row occupants can only adjust the rear ATC control when the REAR LOCK button is turned off.
• The Rear ATC system is located in the headliner, near the center of the vehicle.
OPERATING YOUR VEHICLE
37
Page 118 of 140

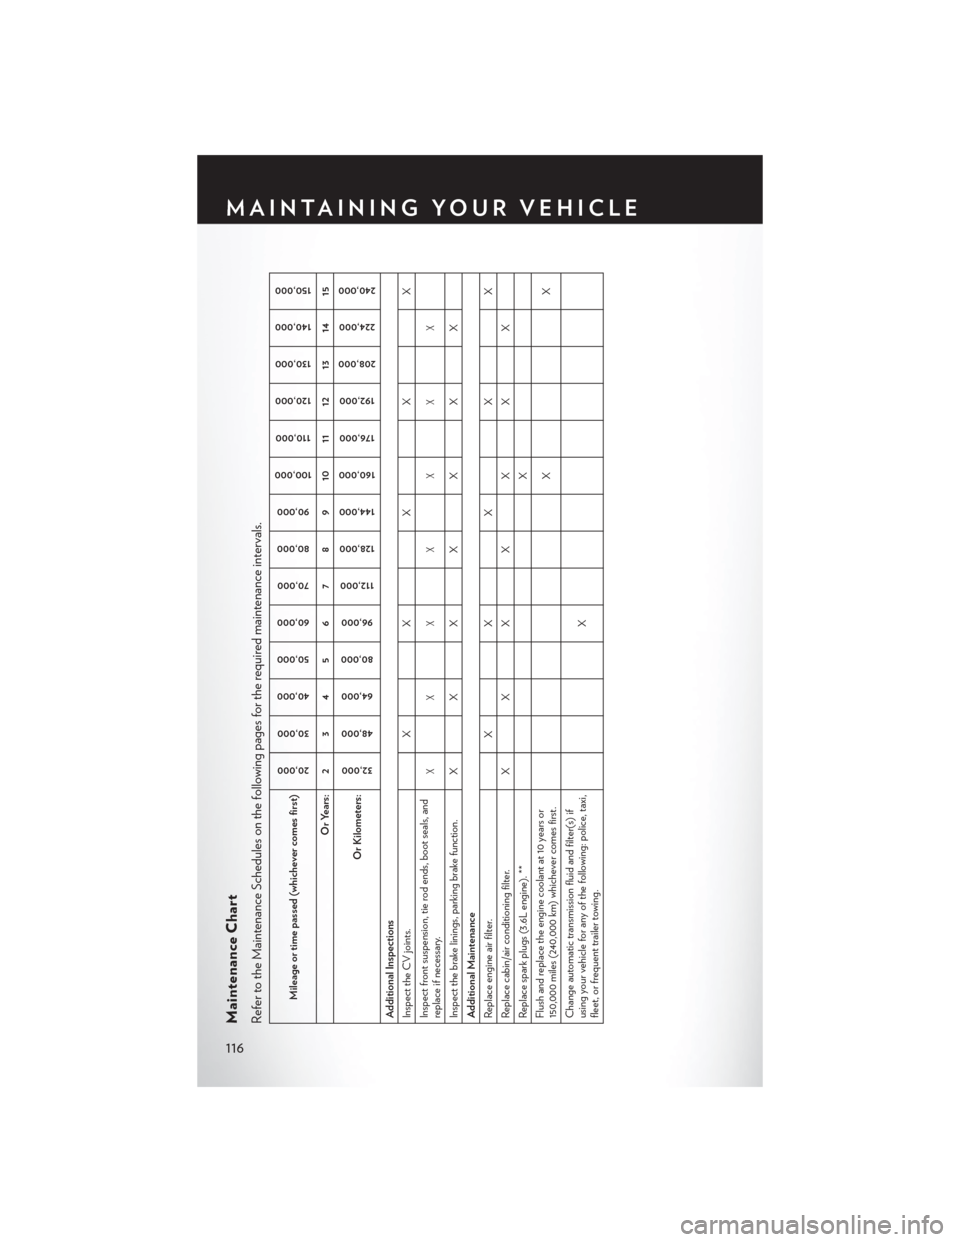
Maintenance ChartRefer to the Maintenance Schedules on the following pages for the required maintenance intervals.
Mileage or time passed (whichever comes first)
20,00030,000
40,000 50,000
60,000 70,000
80,000 90,000
100,000 110,000
120,000 130,000
140,000 150,000
Or Years: 2 3 4 5 6 7 8 9 10 11 12 13 14 15
Or Kilometers:
32,000
48,000 64,000
80,000 96,000
112,000
128,000
144,000
160,000 176,000
192,000
208,000 224,000
240,000
Additional Inspections
Inspect the CV joints. X X X X X
Inspect front suspension, tie rod ends, boot seals, and
replace if necessary.
XXXXXXX
Inspect the brake linings, parking brake function. X XXXXXX
Additional Maintenance
Replace engine air filter. X X X X X
Replace cabin/air conditioning filter. X XXXXXX
Replace spark plugs (3.6L engine). ** X
Flush and replace the engine coolant at 10 years or
150,000 miles (240,000 km) whichever comes first. XX
Change automatic transmission fluid and filter(s) if
using your vehicle for any of the following: police, taxi,
fleet, or frequent trailer towing. X
MAINTAINING YOUR VEHICLE
116
Page 124 of 140

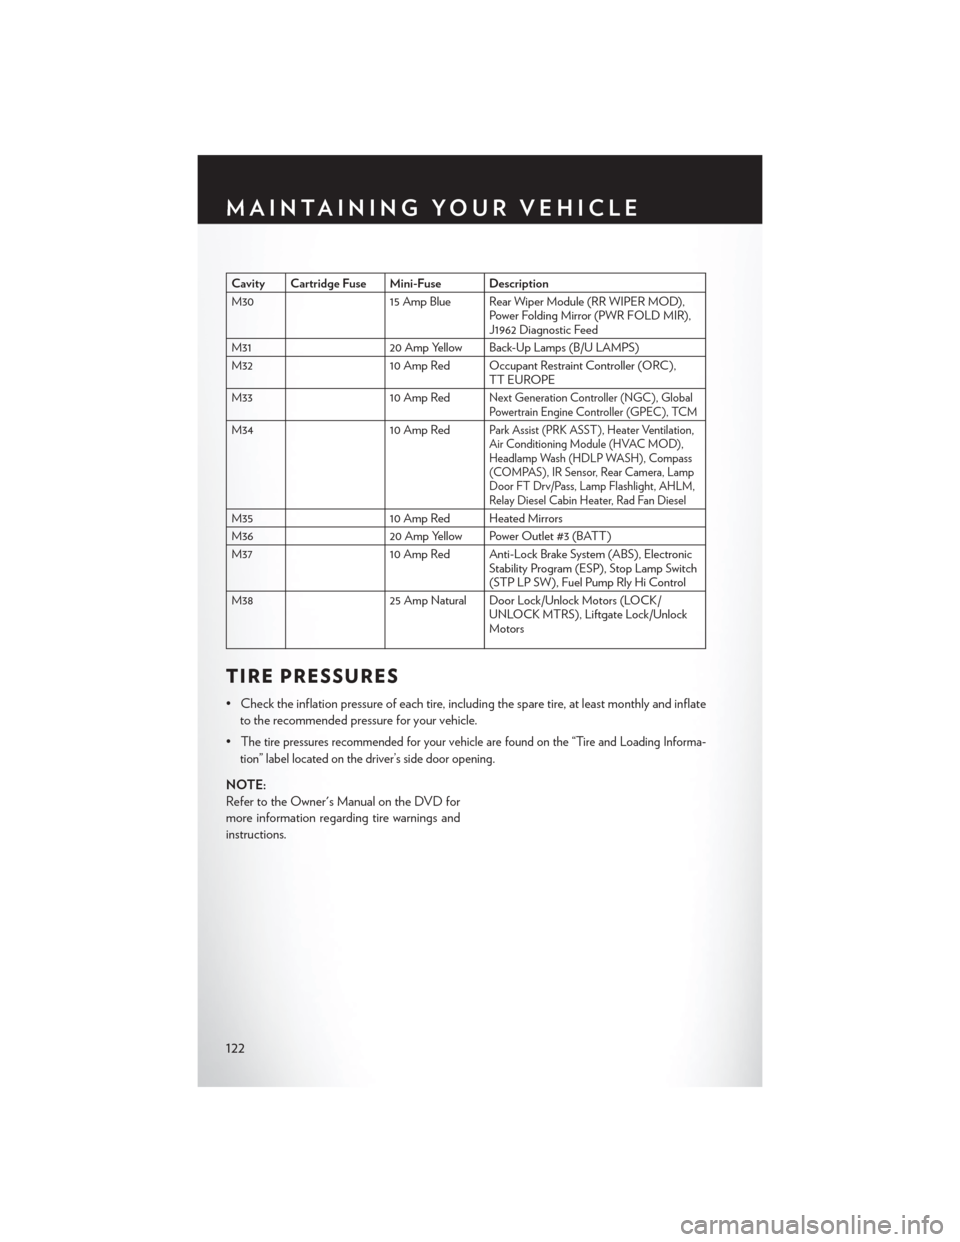
Cavity Cartridge Fuse Mini-Fuse Description
M3015 Amp Blue Rear Wiper Module (RR WIPER MOD),
Power Folding Mirror (PWR FOLD MIR),
J1962 Diagnostic Feed
M31 20 Amp Yellow Back-Up Lamps (B/U LAMPS)
M32 10 Amp Red Occupant Restraint Controller (ORC),
TT EUROPE
M33 10 Amp Red
Next Generation Controller (NGC), Global
Powertrain Engine Controller (GPEC), TCM
M3410 Amp RedPark Assist (PRK ASST), Heater Ventilation,
Air Conditioning Module (HVAC MOD),
Headlamp Wash (HDLP WASH), Compass
(COMPAS), IR Sensor, Rear Camera, Lamp
Door FT Drv/Pass, Lamp Flashlight, AHLM,
Relay Diesel Cabin Heater, Rad Fan Diesel
M3510 Amp Red Heated Mirrors
M36 20 Amp Yellow Power Outlet #3 (BATT)
M37 10 Amp Red Anti-Lock Brake System (ABS), Electronic
Stability Program (ESP), Stop Lamp Switch
(STP LP SW), Fuel Pump Rly Hi Control
M38 25 Amp Natural Door Lock/Unlock Motors (LOCK/
UNLOCK MTRS), Liftgate Lock/Unlock
Motors
TIRE PRESSURES
• Check the inflation pressure of each tire, including the spare tire, at least monthly and inflate
to the recommended pressure for your vehicle.
•
The tire pressures recommended for your vehicle are found on the “Tire and Loading Informa-
tion” label located on the driver’s side door opening.
NOTE:
Refer to the Owner's Manual on the DVD for
more information regarding tire warnings and
instructions.
MAINTAINING YOUR VEHICLE
122