ignition CHRYSLER TOWN AND COUNTRY 2014 5.G Owner's Manual
[x] Cancel search | Manufacturer: CHRYSLER, Model Year: 2014, Model line: TOWN AND COUNTRY, Model: CHRYSLER TOWN AND COUNTRY 2014 5.GPages: 148, PDF Size: 4.26 MB
Page 89 of 148
Programming A Non-Rolling Code
NOTE:
For programming Garage Door Openers manufactured before 1995.
1. Turn the ignition switch to the ON/RUN position.
2. Place the hand-held transmitter 1 to 3 inches (3 to 8 cm) away from the HomeLink® button youwish to program while keeping the HomeLink® indicator light in view.
3. Simultaneously press and hold both the HomeLink® button you want to program and the hand-held transmitter button.
4. Continue to hold both buttons and observe the indicator light. The HomeLink® indicator will flash slowly and then rapidly after HomeLink® has received the frequency signal from the
hand-held transmitter. Release both buttons after the indicator light changes from slow to
rapid.
5. Press and hold the programmed HomeLink® button and observe the indicator light. If the indicator light stays on constantly, programming is complete and the garage door (or device)
should activate when the HomeLink® button is pressed.
6. To program the two remaining HomeLink® buttons, repeat each step for each remaining button. DO NOT erase the channels.
Using HomeLink®
• To operate, press and release the programmed HomeLink® button. Activation will now occurfor the programmed device (e.g., garage door opener, gate operator, security system, entry
door lock, home/office lighting, etc.,). The hand-held transmitter of the device may also be
used at any time.
WARNING!
• Your motorized door or gate will open and close while you are programming the universal
transceiver. Do not program the transceiver if people or pets are in the path of the door or
gate.
• Do not run your vehicle in a closed garage or confined area while programming the
transceiver. Exhaust gas from your vehicle contains Carbon Monoxide (CO) which is
odorless and colorless. Carbon Monoxide is poisonous when inhaled and can cause you
and others to be severely injured or killed.
ELECTRONICS
87
Page 90 of 148
POWER INVERTER
• There is a 115 Volt, 150 Watt power inverteroutlet located on the left rear trim panel
immediately behind the second row left
passenger seat. This outlet can power cellu-
lar phones, electronics and other low power
devices requiring power up to 150 Watts.
• Press the switch located in the center of the instrument panel to turn the power to the
outlet on.
• Press the switch again to turn the power off.
•
The status indicator of the AC power inverter
indicates whether the inverter is producing
AC power.
NOTE:
The power inverter is designed with built-in overload protection. If the power rating of 150 Watts
is exceeded, the power inverter will automatically shut down. Once the electrical device has been
removed from the outlet, the inverter should automatically reset. If the power rating exceeds
approximately 170 Watts, the power inverter may have to be reset manually. To reset the inverter
manually, unplug the device and plug it in again. To avoid overloading the circuit, check the power
ratings on electrical devices prior to using the inverter.
WARNING!
To Avoid Serious Injury or Death DO NOT:
• use a three-prong adaptor
• insert any objects into the receptacles
• touch with wet hands
Close the lid when not in use. If this outlet is mishandled, it may cause an electric shock and
failure.
POWER OUTLETS
• Two 12 Volt (13 Amp) power outlets are
located on the lower instrument panel,
below the open storage bin. The driver-side
power outlet is controlled by the ignition
switch and the passenger-side power outlet
is connected directly to the battery. The
driver-side power outlet will also operate a
conventional cigar lighter unit (if equipped
with an optional Smoker's Package).
ELECTRONICS
88
Page 91 of 148

• One outlet in the removable floor console (if equipped) shares a fuse with the lower outlet inthe instrument panel and is also connected to the battery. Do not exceed a maximum power of
160 Watts (13 Amps) shared between the lower panel outlet and the removable floor console
outlet.
• On vehicles equipped with the Super Console the power outlets are located under the retractable cover. To access the power outlets push down on the cover and slide it toward the
instrument panel.
• The outlet in the rear quarter panel near the liftgate and the upper outlet in the instrument panel are both controlled by the ignition switch. Each of these outlets can support 160 Watts
(13 Amps). Do not exceed 160 Watts (13 Amps) for each of these outlets.
NOTE:
• Do not exceed the maximum power of 160 Watts (13 Amps) at 12 Volts. If the 160 Watt (13 Amp) power rating is exceeded, the fuse protecting the system will need to be replaced.
• Power outlets are designed for accessory plugs only. Do not insert any other object in the power outlet as this will damage the outlet and blow the fuse. Improper use of the power outlet
can cause damage not covered by your new vehicle warranty.
ELECTRONICS
89
Page 97 of 148
- Electronic Throttle Control (ETC) Indicator Light
This light informs you of a problem with the system.
If a problem is detected, the light will come on while the engine is running. Cycle the ignition
when the vehicle has completely stopped and the shift lever is placed in the PARK position; the
light should turn off.
If the light remains lit with the engine running, your vehicle will usually be drivable; however, see
an authorized dealer immediately. If the light is flashing when the engine is running, immediate
service is required and you may experience reduced performance, an elevated/rough idle or
engine stall and your vehicle may require towing.
- Air Bag Warning Light
If the light is not on during starting, stays on, or turns on while driving, have the vehicle serviced
by an authorized dealer immediately.
Fuel Cap/Loose Gas Cap Message
If a “gas cap” message (shown as gASCAP) appears, tighten the gas cap until a “clicking” sound
is heard.
If the message continues to appear for more than three days after tightening the gas cap, see your
authorized service center.
“CHANGE OIL” MESSAGE
• If a “Change Oil” message appears and a single chime sounds, it is time for your next requiredoil change.
Resetting The Light After Servicing
Vehicles Equipped With Keyless Enter-N-Go™
• Without pressing the brake pedal, push the ENGINE START/STOP button and cycle theignition to the ON/RUN position (do not start the engine.)
• Fully depress the accelerator pedal, slowly, three times within 10 seconds.
• Without pressing the brake pedal, push the ENGINE START/STOP button once to return the ignition to the OFF/LOCK position.
Vehicles Not Equipped With Keyless Enter-N-Go™
• Turn the ignition switch to the ON/RUN position (do not start the engine.)
• Fully depress the accelerator pedal, slowly, three times within 10 seconds.
• Turn the ignition switch to the OFF/LOCK position.
NOTE:
If the indicator message illuminates when you start the vehicle, the oil change indicator system did
not reset. If necessary, repeat this procedure.
WHAT TO DO IN EMERGENCIES
95
Page 100 of 148
Sealing A Tire With TIREFIT
(A) Whenever You Stop To Use TIREFIT:
1. Pull over to a safe location and turn on the vehicle’s Hazard Warning flashers.
2. Verify that the valve stem (on the wheel with the deflated tire) is in a position that is near to theground. This will allow the TIREFIT Hoses (6) and (7) to reach the valve stem and keep the
TIREFIT kit flat on the ground. This will provide the best positioning of the kit when injecting
the sealant into the deflated tire and running the air pump. Move the vehicle as necessary to
place the valve stem in this position before proceeding.
3. Place the transmission in PARK (auto transmission) or in Gear (manual transmission) and cycle the ignition to the OFF position.
4. Set the parking brake.
(B) Setting Up To Use TIREFIT:
1. Turn the Mode Select Knob (5) to the Sealant Mode position.
2. Uncoil the Sealant Hose (6) and then remove the cap from the fitting at the end of the hose.
3. Place the TIREFIT kit flat on the ground next to the deflated tire.
4. Remove the cap from the valve stem and then screw the fitting at the end of the Sealant Hose (6) onto the valve stem.
5. Uncoil the Power Plug (8) and insert the plug into the vehicle’s 12 Volt power outlet.
6. Do not remove foreign objects (e.g., screws or nails) from the tire.
(C) Injecting TIREFIT Sealant Into The Deflated Tire:
Always start the engine before turning ON the TIREFIT kit.
NOTE:
Manual transmission vehicles must have the p arking brake engaged and the shift lever in
NEUTRAL.
After pressing the Power Button (4), the sealant (white fluid) will flow from the Sealant Bottle (1)
through the Sealant Hose (6) and into the tire.
NOTE:
Sealant may leak out through the puncture in the tire.
If the sealant (white fluid) does not flow within0–10seconds through the Sealant Hose (6):
1. Press the Power Button (4) to turn Off the TIREFIT kit. Disconnect the Sealant Hose (6) from the valve stem. Make sure the valve stem is free of debris. Reconnect the Sealant Hose (6) to
the valve stem. Check that the Mode Select Knob (5) is in the Sealant Mode position and not
Air Mode. Press the Power Button (4) to turn On the TIREFIT kit.
2. Connect the Power Plug (8) to a different 12 Volt power outlet in your vehicle or another vehicle, if available. Make sure the engine is running before turning ON the TIREFIT kit.
3. The Sealant Bottle (1) may be empty due to previous use. Call for assistance.
WHAT TO DO IN EMERGENCIES
98
Page 107 of 148
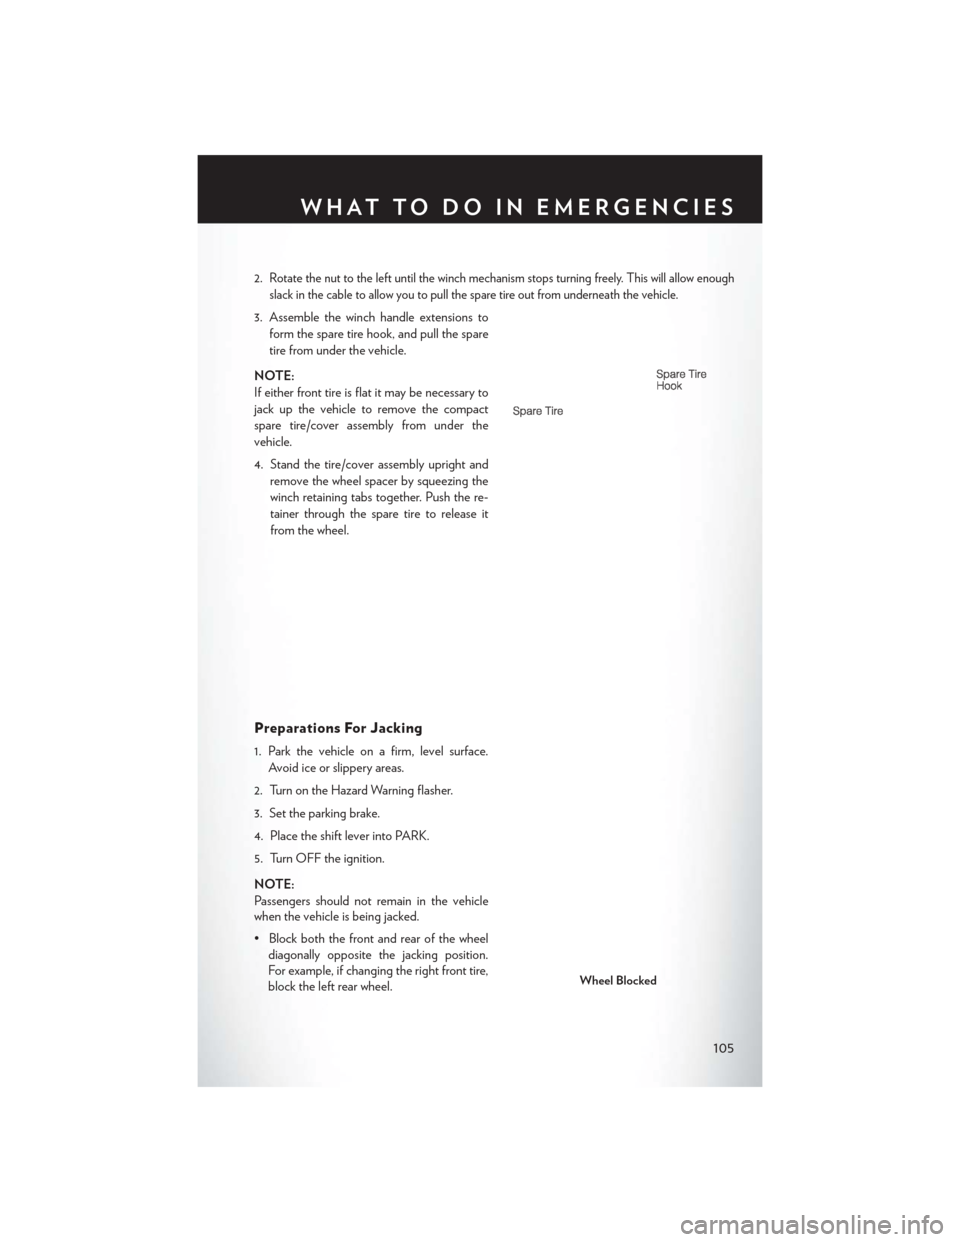
2.Rotate the nut to the left until the winch mechanism stops turning freely. This will allow enough
slack in the cable to allow you to pull the spare tire out from underneath the vehicle.
3. Assemble the winch handle extensions to form the spare tire hook, and pull the spare
tire from under the vehicle.
NOTE:
If either front tire is flat it may be necessary to
jack up the vehicle to remove the compact
spare tire/cover assembly from under the
vehicle.
4. Stand the tire/cover assembly upright and remove the wheel spacer by squeezing the
winch retaining tabs together. Push the re-
tainer through the spare tire to release it
from the wheel.
Preparations For Jacking
1. Park the vehicle on a firm, level surface.Avoid ice or slippery areas.
2. Turn on the Hazard Warning flasher.
3. Set the parking brake.
4. Place the shift lever into PARK.
5. Turn OFF the ignition.
NOTE:
Passengers should not remain in the vehicle
when the vehicle is being jacked.
• Block both the front and rear of the wheel diagonally opposite the jacking position.
For example, if changing the right front tire,
block the left rear wheel.
Wheel Blocked
WHAT TO DO IN EMERGENCIES
105
Page 113 of 148

JUMP-STARTING
• If your vehicle has a discharged battery itcan be jump-started using a set of jumper
cables and a battery in another vehicle or by
using a portable battery booster pack.
• Jump-starting can be dangerous if done improperly so please follow the procedures
in this section carefully.
NOTE:
When using a portable battery booster pack
follow the manufacturer’s operating instruc-
tions and precautions.
Preparations For Jump-Start
• The battery in your vehicle is located on the left side of the engine compartment.
• Set the parking brake, shift the automatic transmission into PARK and turn the ignition to LOCK.
• Turn off the heater, radio, and all unnecessary electrical accessories.
• If using another vehicle to jump-start the battery, park the vehicle within the jumper cables reach, set the parking brake and make sure the ignition is OFF.
Jump-Starting Procedure
1. Connect the positive (+)end of the jumper cable to the positive (+)post of the vehicle with the
discharged battery.
2. Connect the opposite end of the positive (+)jumper cable to the positive (+)post of the
booster battery.
3. Connect the negative (-)end of the jumper cable to the negative (-)post of the booster
battery.
4. Connect the opposite end of the negative (-)jumper cable to a good engine ground
(exposed metal part of the discharged vehicle’s engine) away from the battery and the fuel
injection system.
5. Start the engine in the vehicle that has the booster battery, let the engine idle a few minutes, and then start the engine in the vehicle with the discharged battery.
Once the engine is started, remove the jumper cables in the reverse sequence:
1. Disconnect the negative (-)end of the jumper cable from the engine ground of the vehicle
with the discharged battery.
2. Disconnect the opposite end of the negative (-)jumper cable from the negative (-)post of
the booster battery.
WHAT TO DO IN EMERGENCIES
111
Page 114 of 148

3. Disconnect the positive(+)end of the jumper cable from the positive (+)post of the booster
battery.
4. Disconnect the opposite end of the positive (+)jumper cable from the positive (+)post of the
vehicle with the discharged battery.
NOTE:
If frequent jump-starting is required to start your vehicle you should have the battery and
charging system inspected at your authorized dealer.
CAUTION!
• Do not use a portable battery booster pack or any other booster source with a system voltage greater than 12 Volts or damage to the battery, starter motor, alternator or
electrical system may occur.
• Failure to follow these procedures could result in damage to the charging system of the booster vehicle or the discharged vehicle.
• Accessories that can be plugged into the vehicle power outlets draw power from the vehicle’s battery, even when not in use (e.g., cellular phones, etc.). Eventually, if plugged in
long enough, the vehicle’s battery discharges sufficiently to degrade battery life and/or
prevent the engine from starting.
WARNING!
• When temperatures are below the freezing point, electrolyte in a discharged battery mayfreeze. Do not attempt jump-starting because the battery could rupture or explode and
cause personal injury. Battery temperature must be brought above the freezing point
before attempting a jump-start.
• Take care to avoid the radiator cooling fan whenever the hood is raised. It can start anytime the ignition switch is on. You can be injured by moving fan blades.
• Remove any metal jewelry, such as watch bands or bracelets, that might make an inadver-
tent electrical contact. You could be severely injured.
• Batteries contain sulfuric acid that can burn your skin or eyes and generate hydrogen gas
which is flammable and explosive. Keep open flames or sparks away from the battery.
• Do not allow vehicles to touch each other as this could establish a ground connection and
personal injury could result.
• Failure to follow this procedure could result in personal injury or property damage due to
battery explosion.
• Do not connect the cable to the negative post (-) of the discharged battery. The resulting electrical spark could cause the battery to explode and could result in personal injury.
WHAT TO DO IN EMERGENCIES
112
Page 115 of 148

SHIFT LEVER OVERRIDE
If a malfunction occurs and the shift lever
cannot be moved out of the PARK position,
you can use the following procedure to tempo-
rarily move the shift lever:
1. To access the shift lever override, removethe cover located to the top right of the shift
lever in the instrument panel.
2. Firmly set the parking brake.
3. Turn the ignition switch to the ACC or ON position without starting the engine.
4. Press and maintain firm pressure on the brake pedal.
5.
The override can be activated by pressing
the white-colored tab, which can be accessed
through the hole in the instrument panel.
6. Move the shift lever into the NEUTRAL position.
7. The vehicle may then be started in NEU- TRAL.
8. Reinstall the override cover.
TOWING A DISABLED VEHICLE
Towing Condition Wheels OFF
the Ground ALL MODELS
Flat Tow NONEIf transmission is operable:
• Transmission in NEUTRAL
• 25 mph (40 km/h) maxspeed
• 15 miles (24 km) maxdistance
Wheel lift Rear
Front OK
Flatbed ALLBEST METHOD
WHAT TO DO IN EMERGENCIES
113
Page 128 of 148
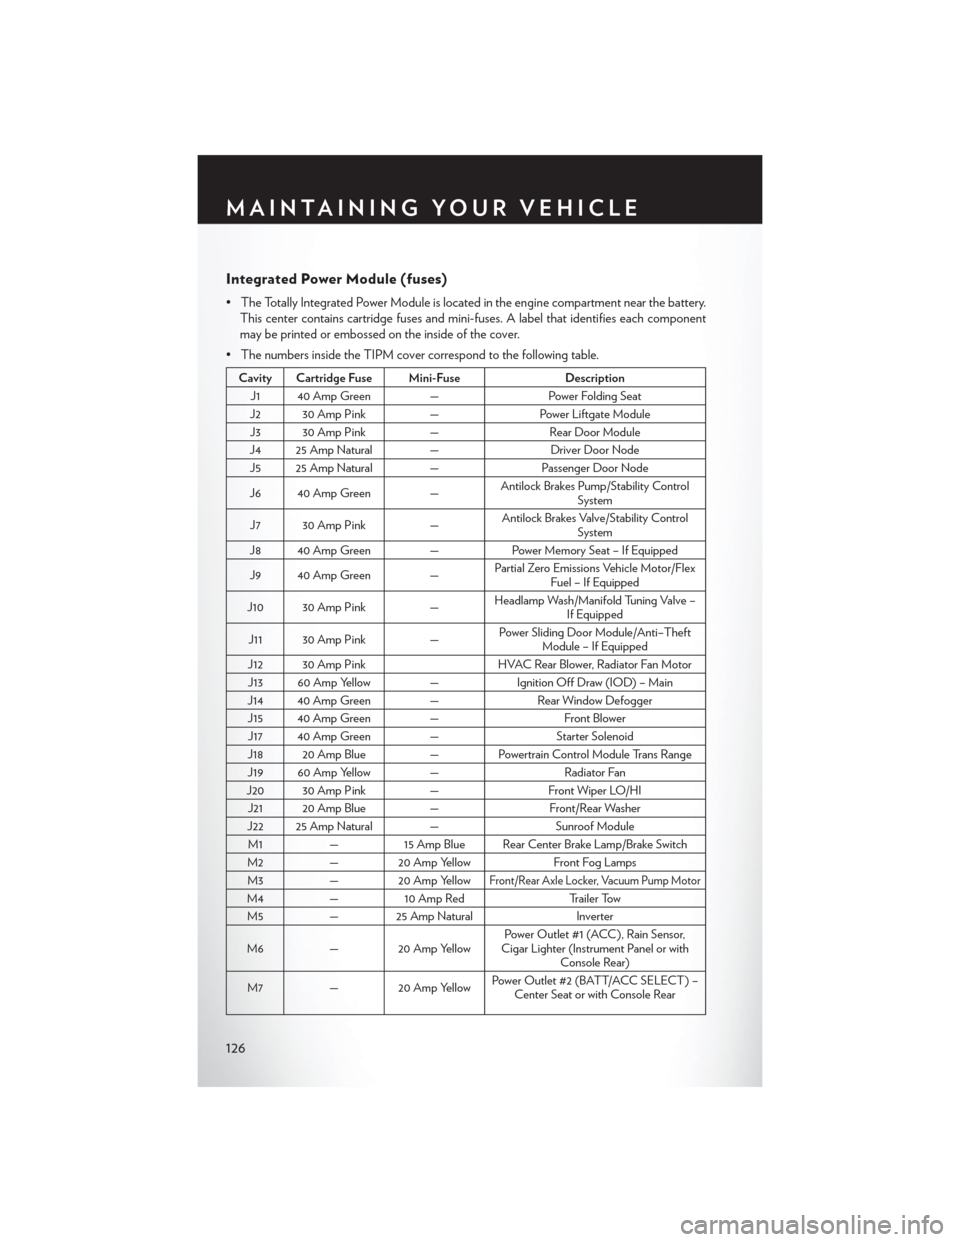
Integrated Power Module (fuses)
• The Totally Integrated Power Module is located in the engine compartment near the battery.This center contains cartridge fuses and mini-fuses. A label that identifies each component
may be printed or embossed on the inside of the cover.
• The numbers inside the TIPM cover correspond to the following table.
Cavity Cartridge Fuse Mini-Fuse Description
J1 40 Amp Green — Power Folding Seat
J2 30 Amp Pink —Power Liftgate Module
J3 30 Amp Pink —Rear Door Module
J4 25 Amp Natural — Driver Door Node
J5 25 Amp Natural — Passenger Door Node
J6 40 Amp Green — Antilock Brakes Pump/Stability Control
System
J7 30 Amp Pink —Antilock Brakes Valve/Stability Control
System
J8 40 Amp Green — Power Memory Seat – If Equipped
J9 40 Amp Green — Partial Zero Emissions Vehicle Motor/Flex
Fuel – If Equipped
J10 30 Amp Pink —Headlamp Wash/Manifold Tuning Valve –
If Equipped
J11 30 Amp Pink —Power Sliding Door Module/Anti–Theft
Module – If Equipped
J12 30 Amp Pink HVAC Rear Blower, Radiator Fan Motor
J13 60 Amp Yellow — Ignition Off Draw (IOD) – Main
J14 40 Amp Green — Rear Window Defogger
J15 40 Amp Green — Front Blower
J17 40 Amp Green — Starter Solenoid
J18 20 Amp Blue — Powertrain Control Module Trans Range
J19 60 Amp Yellow — Radiator Fan
J20 30 Amp Pink —Front Wiper LO/HI
J21 20 Amp Blue —Front/Rear Washer
J22 25 Amp Natural — Sunroof Module
M1 —15 Amp Blue Rear Center Brake Lamp/Brake Switch
M2 — 20 Amp Yellow Front Fog Lamps
M3 — 20 Amp Yellow
Front/Rear Axle Locker, Vacuum Pump Motor
M4 —10 Amp Red Trailer Tow
M5 — 25 Amp Natural Inverter
M6 — 20 Amp Yellow Power Outlet #1 (ACC), Rain Sensor,
Cigar Lighter (Instrument Panel or with Console Rear)
M7 — 20 Amp Yellow Power Outlet #2 (BATT/ACC SELECT) –
Center Seat or with Console Rear
MAINTAINING YOUR VEHICLE
126