tow CHRYSLER TOWN AND COUNTRY 2014 5.G Owner's Manual
[x] Cancel search | Manufacturer: CHRYSLER, Model Year: 2014, Model line: TOWN AND COUNTRY, Model: CHRYSLER TOWN AND COUNTRY 2014 5.GPages: 148, PDF Size: 4.26 MB
Page 112 of 148
WARNING!
• Do not attempt to change a tire on the side of the vehicle close to moving traffic. Pull farenough off the road to avoid the danger of being hit when operating the jack or changing
the wheel.
• Being under a jacked-up vehicle is dangerous. The vehicle could slip off the jack and fall on
you. You could be crushed. Never put any part of your body under a vehicle that is on a
jack. If you need to get under a raised vehicle, take it to a service center where it can be
raised on a lift.
• Never start or run the engine while the vehicle is on a jack.
• The jack is designed to be used as a tool for changing tires only. The jack should not be
used to lift the vehicle for service purposes. The vehicle should be jacked on a firm level
surface only. Avoid ice or slippery areas.
• Carefully follow these tire changing warnings to help prevent personal injury or damage to
your vehicle:
• Always park on a firm, level surface as far from the edge of the roadway as possible before
raising the vehicle.
• Turn on the Hazard Warning flasher.
• Block the wheel diagonally opposite the wheel to be raised.
• Set the parking brake firmly and set an automatic transmission in PARK; a manual
transmission in REVERSE.
• Do not let anyone sit in the vehicle when it is on a jack.
• Do not get under the vehicle when it is on a jack.
• Only use the jack in the positions indicated and for lifting this vehicle during a tire change.
• If working on or near a roadway, be extremely careful of motor traffic.
• To assure that spare tires, flat or inflated, are securely stowed, spares must be stowed with
the valve stem facing the ground.
• Raising the vehicle higher than necessary can make the vehicle less stable. It could slip off
the jack and hurt someone near it. Raise the vehicle only enough to remove the tire.
• To avoid the risk of forcing the vehicle off the jack, do not tighten the wheel nuts fully until
the vehicle has been lowered. Failure to follow this warning may result in personal injury.
• A loose tire or jack thrown forward in a collision or hard stop could endanger the occupants
of the vehicle. Always stow the jack parts and the spare tire in the places provided. Have
the deflated (flat) tire repaired or replaced immediately.
• Verify that both retainer tabs of the wheel spacer have been properly extended through
the center of the wheel and spare tire/cover assembly. Failure to properly engage both
retainer tabs could result in loss of the spare tire and cover assembly, which will cause
vehicle damage and may cause loss of vehicle control.
WHAT TO DO IN EMERGENCIES
110
Page 115 of 148

SHIFT LEVER OVERRIDE
If a malfunction occurs and the shift lever
cannot be moved out of the PARK position,
you can use the following procedure to tempo-
rarily move the shift lever:
1. To access the shift lever override, removethe cover located to the top right of the shift
lever in the instrument panel.
2. Firmly set the parking brake.
3. Turn the ignition switch to the ACC or ON position without starting the engine.
4. Press and maintain firm pressure on the brake pedal.
5.
The override can be activated by pressing
the white-colored tab, which can be accessed
through the hole in the instrument panel.
6. Move the shift lever into the NEUTRAL position.
7. The vehicle may then be started in NEU- TRAL.
8. Reinstall the override cover.
TOWING A DISABLED VEHICLE
Towing Condition Wheels OFF
the Ground ALL MODELS
Flat Tow NONEIf transmission is operable:
• Transmission in NEUTRAL
• 25 mph (40 km/h) maxspeed
• 15 miles (24 km) maxdistance
Wheel lift Rear
Front OK
Flatbed ALLBEST METHOD
WHAT TO DO IN EMERGENCIES
113
Page 122 of 148
CAUTION!
• Mixing of engine coolant (antifreeze) other than specified Organic Additive Technology(OAT) engine coolant (antifreeze), may result in engine damage and may decrease
corrosion protection. Organic Additive Technology (OAT) engine coolant is different
and should not be mixed with Hybrid Organic Additive Technology (HOAT) engine
coolant (antifreeze) or any “globally compatible” coolant (antifreeze). If a non-OAT
engine coolant (antifreeze) is introduced into the cooling system in an emergency, the
cooling system will need to be drained, flushed, and refilled with fresh OAT coolant
(conforming to MS-12106), by an authorized dealer as soon as possible.
• Do not use water alone or alcohol-based engine coolant (antifreeze) products. Do not use
additional rust inhibitors or antirust products, as they may not be compatible with the
radiator engine coolant and may plug the radiator.
• This vehicle has not been designed for use with propylene glycol-based engine coolant (antifreeze). Use of propylene glycol-based engine coolant (antifreeze) is not recom-
mended.
E-85 FLEXIBLE FUEL — (3.6L ENGINE ONLY)
Refer to your Owner's Manual on the DVD for further details.
CAUTION!
Only vehicles with the E-85 fuel filler door label or a yellow gas cap can operate on E-85.
MAINTENANCE SCHEDULE
Your vehicle is equipped with an automatic oil change indicator system. The oil change indicator
system will remind you that it is time to take your vehicle in for scheduled maintenance.
Based on engine operation conditions, the oil change indicator message will illuminate. This
means that service is required for your vehicle. Operating conditions such as frequent short-trips,
trailer tow, extremely hot or cold ambient temperatures, and E85 fuel usage will influence when
the “Oil Change Required” message is displayed. Severe Operating Conditions can cause the
change oil message to illuminate as early as 3,500 miles (5,600 km) since last reset. Have your
vehicle serviced as soon as possible, within the next 500 miles (805 km).
Your authorized dealer will reset the oil change indicator message after completing the scheduled
oil change. If a scheduled oil change is performed by someone other than your authorized dealer,
the message can be reset by referring to the steps described under “Instrument Cluster Warning
Lights” in “What To Do In Emergencies” in this guide or “Electronic Vehicle Information Center
(EVIC)” in “Understanding Your Instrument Panel” in your Owners Manual on the DVD for
further information.
MAINTAINING YOUR VEHICLE
120
Page 124 of 148
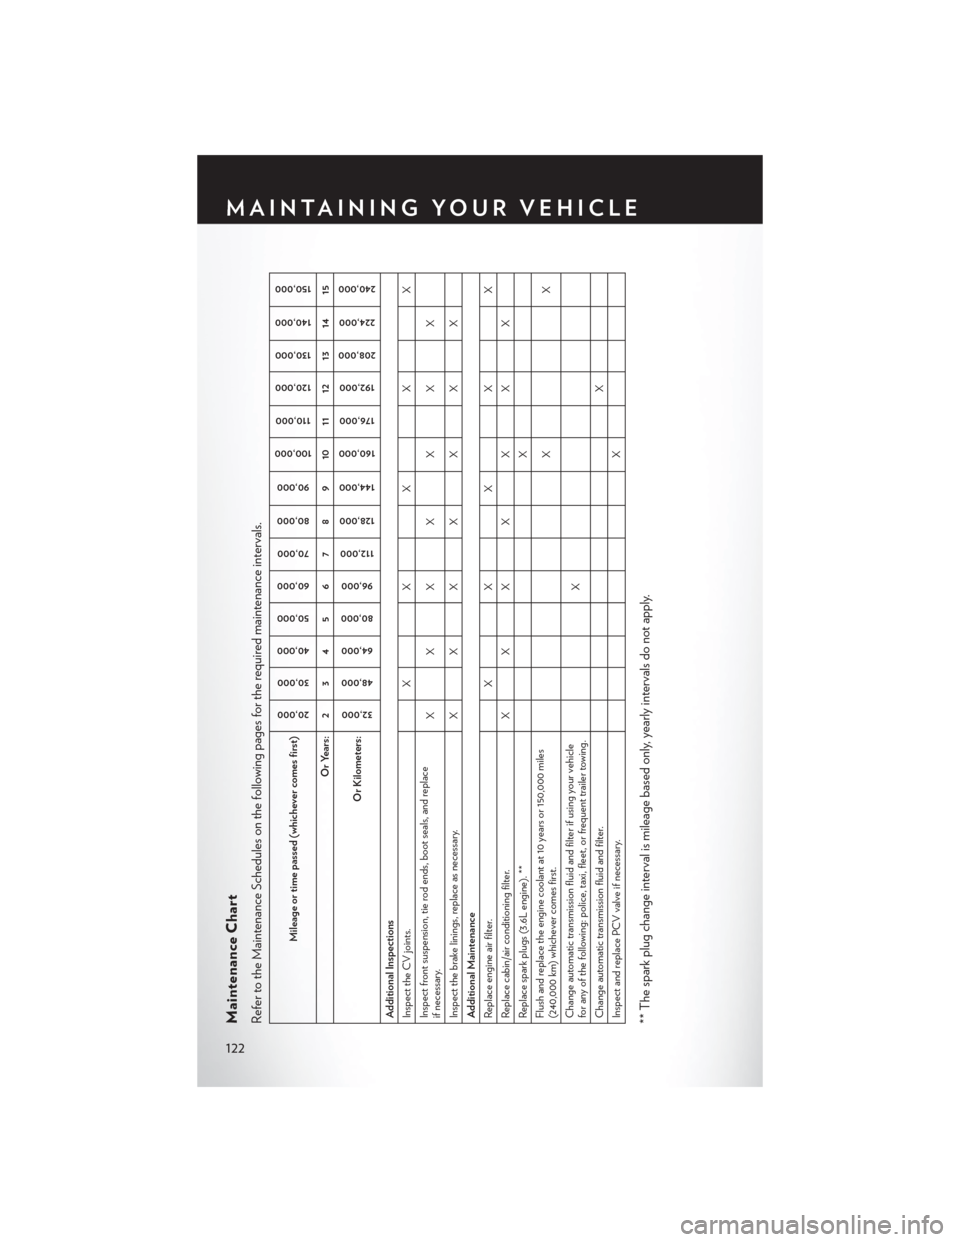
Maintenance ChartRefer to the Maintenance Schedules on the following pages for the required maintenance intervals.
Mileage or time passed (whichever comes first)
20,00030,000
40,000
50,000
60,000 70,000
80,000
90,000
100,000 110,000
120,000 130,000
140,000
150,000
Or Years: 2 3 4 5 6 7 8 9 10 11 12 13 14 15
Or Kilometers:
32,000
48,000 64,000
80,000
96,000
112,000
128,000
144,000
160,000 176,000
192,000
208,000 224,000
240,000
Additional Inspections
Inspect the CV joints. X X X X X
Inspect front suspension, tie rod ends, boot seals, and replace
if necessary. XXXX X XX
Inspect the brake linings, replace as necessary. X X X X X X X
Additional Maintenance
Replace engine air filter. X X X X X
Replace cabin/air conditioning filter. X X X X X X X
Replace spark plugs (3.6L engine). ** X
Flush and replace the engine coolant at 10 years or 150,000 miles
(240,000 km) whichever comes first. XX
Change automatic transmission fluid and filter if using your vehicle
for any of the following: police, taxi, fleet, or frequent trailer towing. X
Change automatic transmission fluid and filter. X
Inspect and replace PCV valve if necessary. X** The spark plug change interval is mileage based only, yearly intervals do not apply.
MAINTAINING YOUR VEHICLE
122
Page 128 of 148
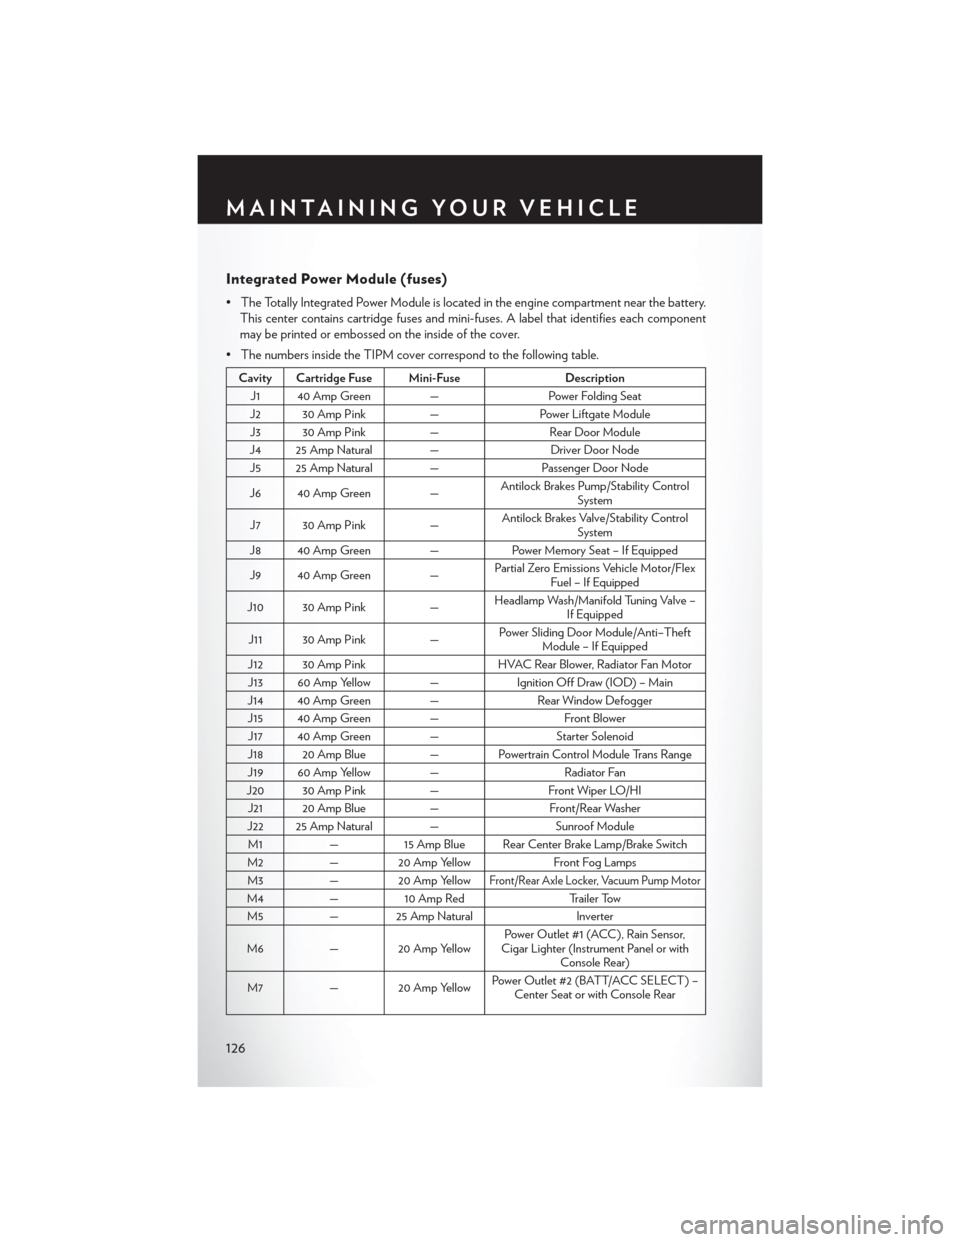
Integrated Power Module (fuses)
• The Totally Integrated Power Module is located in the engine compartment near the battery.This center contains cartridge fuses and mini-fuses. A label that identifies each component
may be printed or embossed on the inside of the cover.
• The numbers inside the TIPM cover correspond to the following table.
Cavity Cartridge Fuse Mini-Fuse Description
J1 40 Amp Green — Power Folding Seat
J2 30 Amp Pink —Power Liftgate Module
J3 30 Amp Pink —Rear Door Module
J4 25 Amp Natural — Driver Door Node
J5 25 Amp Natural — Passenger Door Node
J6 40 Amp Green — Antilock Brakes Pump/Stability Control
System
J7 30 Amp Pink —Antilock Brakes Valve/Stability Control
System
J8 40 Amp Green — Power Memory Seat – If Equipped
J9 40 Amp Green — Partial Zero Emissions Vehicle Motor/Flex
Fuel – If Equipped
J10 30 Amp Pink —Headlamp Wash/Manifold Tuning Valve –
If Equipped
J11 30 Amp Pink —Power Sliding Door Module/Anti–Theft
Module – If Equipped
J12 30 Amp Pink HVAC Rear Blower, Radiator Fan Motor
J13 60 Amp Yellow — Ignition Off Draw (IOD) – Main
J14 40 Amp Green — Rear Window Defogger
J15 40 Amp Green — Front Blower
J17 40 Amp Green — Starter Solenoid
J18 20 Amp Blue — Powertrain Control Module Trans Range
J19 60 Amp Yellow — Radiator Fan
J20 30 Amp Pink —Front Wiper LO/HI
J21 20 Amp Blue —Front/Rear Washer
J22 25 Amp Natural — Sunroof Module
M1 —15 Amp Blue Rear Center Brake Lamp/Brake Switch
M2 — 20 Amp Yellow Front Fog Lamps
M3 — 20 Amp Yellow
Front/Rear Axle Locker, Vacuum Pump Motor
M4 —10 Amp Red Trailer Tow
M5 — 25 Amp Natural Inverter
M6 — 20 Amp Yellow Power Outlet #1 (ACC), Rain Sensor,
Cigar Lighter (Instrument Panel or with Console Rear)
M7 — 20 Amp Yellow Power Outlet #2 (BATT/ACC SELECT) –
Center Seat or with Console Rear
MAINTAINING YOUR VEHICLE
126
Page 129 of 148
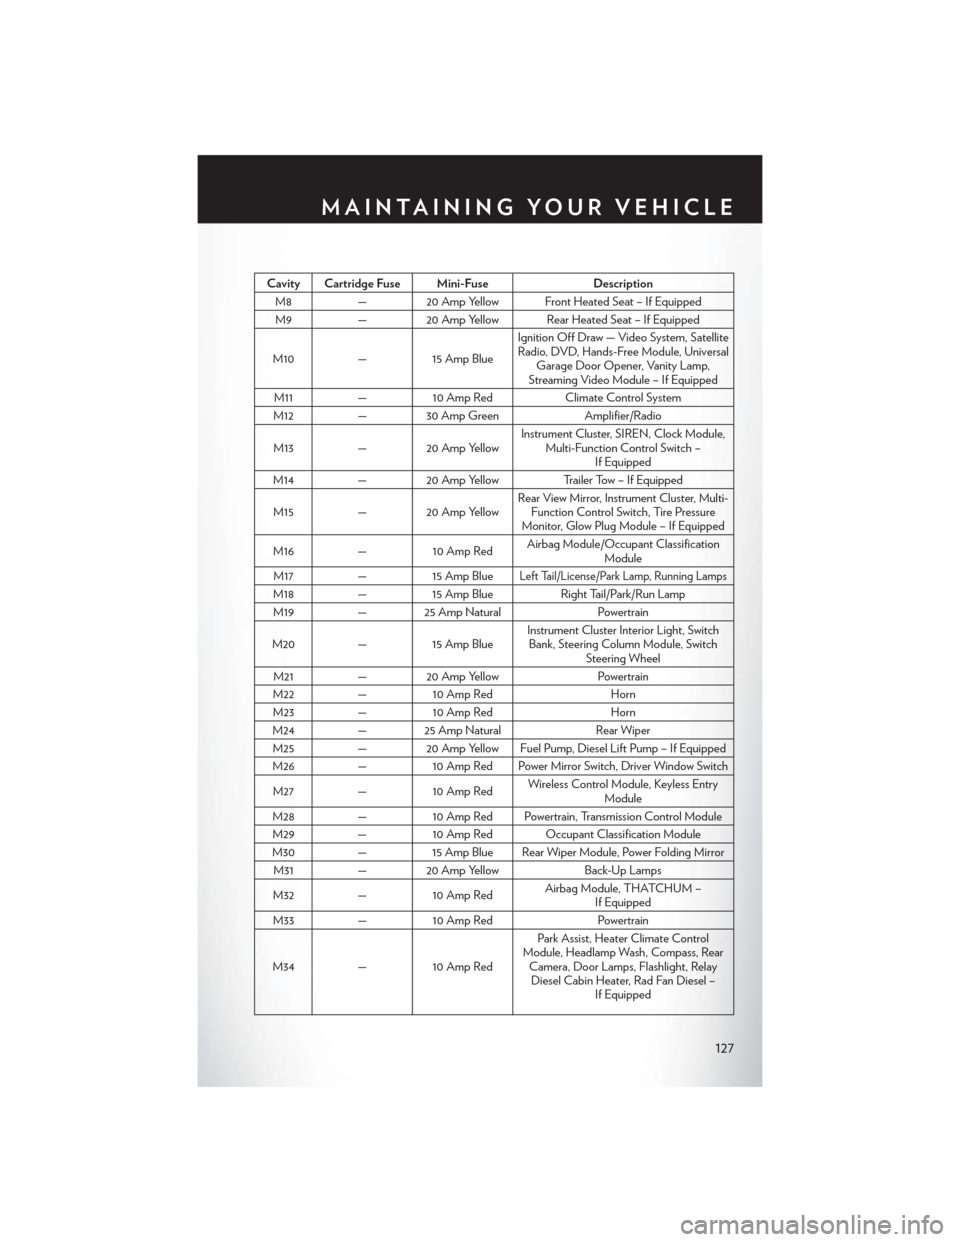
Cavity Cartridge Fuse Mini-FuseDescription
M8 — 20 Amp Yellow Front Heated Seat – If Equipped
M9 — 20 Amp Yellow Rear Heated Seat – If Equipped
M10 —15 Amp Blue Ignition Off Draw — Video System, Satellite
Radio, DVD, Hands-Free Module, Universal Garage Door Opener, Vanity Lamp,
Streaming Video Module – If Equipped
M11 —10 Amp Red Climate Control System
M12 — 30 Amp Green Amplifier/Radio
M13 — 20 Amp Yellow Instrument Cluster, SIREN, Clock Module,
Multi-Function Control Switch – If Equipped
M14 — 20 Amp Yellow Trailer Tow – If Equipped
M15 — 20 Amp Yellow Rear View Mirror, Instrument Cluster, Multi-
Function Control Switch, Tire Pressure
Monitor, Glow Plug Module – If Equipped
M16 —10 Amp Red Airbag Module/Occupant Classification
Module
M17 —15 Amp Blue
Left Tail/License/Park Lamp, Running Lamps
M18 —15 Amp Blue Right Tail/Park/Run Lamp
M19 — 25 Amp Natural Powertrain
M20 —15 Amp Blue Instrument Cluster Interior Light, Switch
Bank, Steering Column Module, Switch Steering Wheel
M21 — 20 Amp Yellow Powertrain
M22 —10 Amp Red Horn
M23 —10 Amp Red Horn
M24 — 25 Amp Natural Rear Wiper
M25 — 20 Amp Yellow Fuel Pump, Diesel Lift Pump – If Equipped
M26 —10 Amp Red Power Mirror Switch, Driver Window Switch
M27 —10 Amp Red Wireless Control Module, Keyless Entry
Module
M28 —10 Amp Red Powertrain, Transmission Control Module
M29 —10 Amp Red Occupant Classification Module
M30 —15 Amp Blue Rear Wiper Module, Power Folding Mirror
M31 — 20 Amp Yellow Back-Up Lamps
M32 —10 Amp Red Airbag Module, THATCHUM –
If Equipped
M33 —10 Amp Red Powertrain
M34 —10 Amp Red Park Assist, Heater Climate Control
Module, Headlamp Wash, Compass, Rear Camera, Door Lamps, Flashlight, RelayDiesel Cabin Heater, Rad Fan Diesel – If Equipped
MAINTAINING YOUR VEHICLE
127
Page 134 of 148
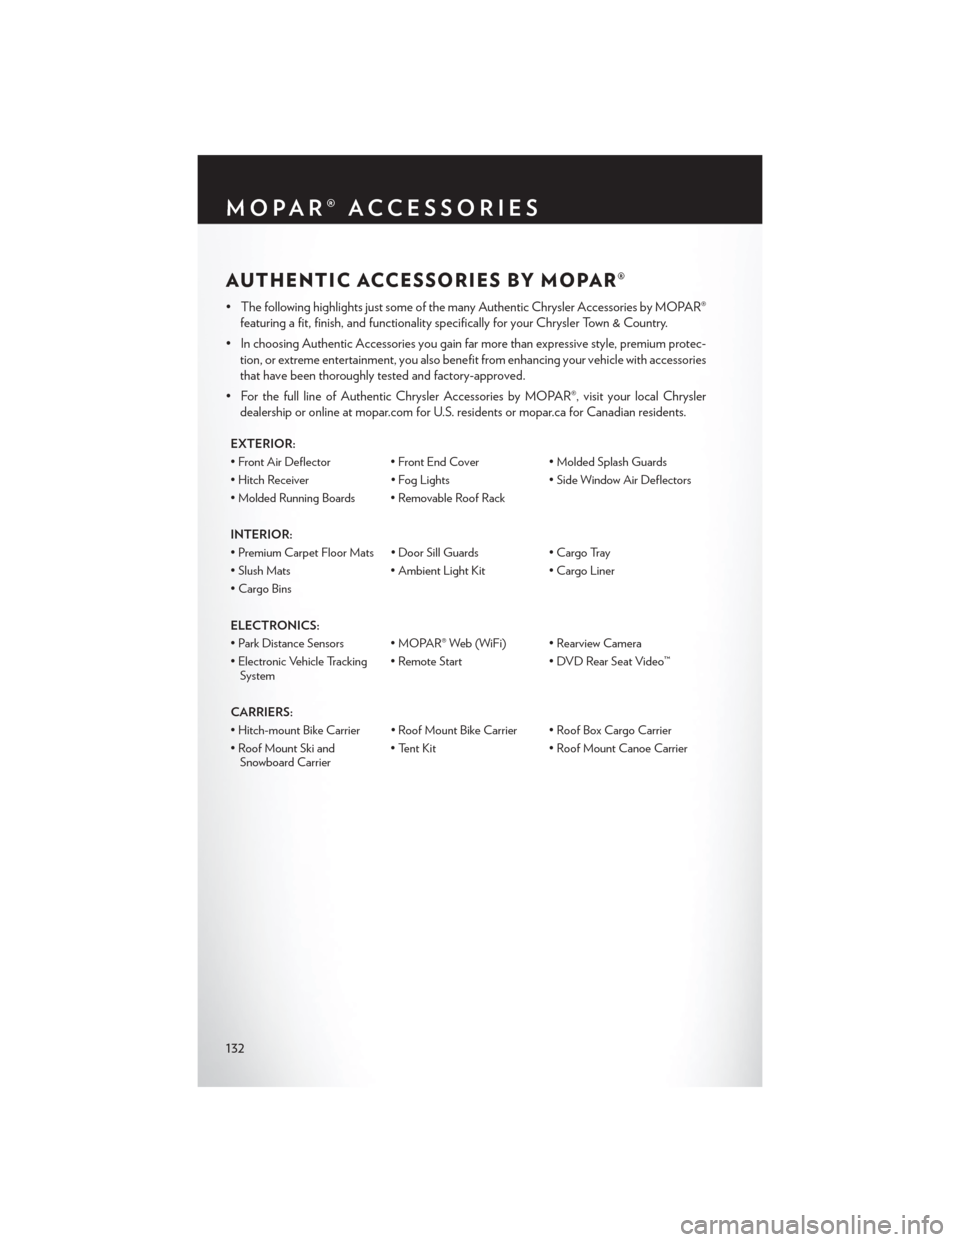
AUTHENTIC ACCESSORIES BY MOPAR®
• The following highlights just some of the many Authentic Chrysler Accessories by MOPAR®featuring a fit, finish, and functionality specifically for your Chrysler Town & Country.
• In choosing Authentic Accessories you gain far more than expressive style, premium protec- tion, or extreme entertainment, you also benefit from enhancing your vehicle with accessories
that have been thoroughly tested and factory-approved.
• For the full line of Authentic Chrysler Accessories by MOPAR®, visit your local Chrysler dealership or online at mopar.com for U.S. residents or mopar.ca for Canadian residents.
EXTERIOR:
• Front Air Deflector • Front End Cover • Molded Splash Guards
• Hitch Receiver • Fog Lights• Side Window Air Deflectors
• Molded Running Boards • Removable Roof Rack
INTERIOR:
• Premium Carpet Floor Mats • Door Sill Guards • Cargo Tray
• Slush Mats • Ambient Light Kit• Cargo Liner
• Cargo Bins
ELECTRONICS:
• Park Distance Sensors • MOPAR® Web (WiFi) • Rearview Camera
• Electronic Vehicle Tracking System • Remote Start
• DVD Rear Seat Video™
CARRIERS:
• Hitch-mount Bike Carrier • Roof Mount Bike Carrier • Roof Box Cargo Carrier
• Roof Mount Ski and Snowboard Carrier • Tent Kit
• Roof Mount Canoe Carrier
MOPAR® ACCESSORIES
132
Page 136 of 148

UTILITY
• How do I know how much I can tow with my Chrysler Town & Country? pg. 91
WHAT TO DO IN EMERGENCIES
• What do I do if my TPMS warning light is blinking? pg. 92
• How do I change a flat tire? pg. 106
• How do I Jump-Start my vehicle? pg. 111
MAINTAINING YOUR VEHICLE
• Where is my Fuse Block located? pg. 126
• What type of oil do I use? pg. 119
• How often should I change my engine’s oil? pg. 120
• What should my tire pressure be set at? pg. Tire Pressures 128
FREQUENTLY ASKED QUESTIONS
134
Page 137 of 148
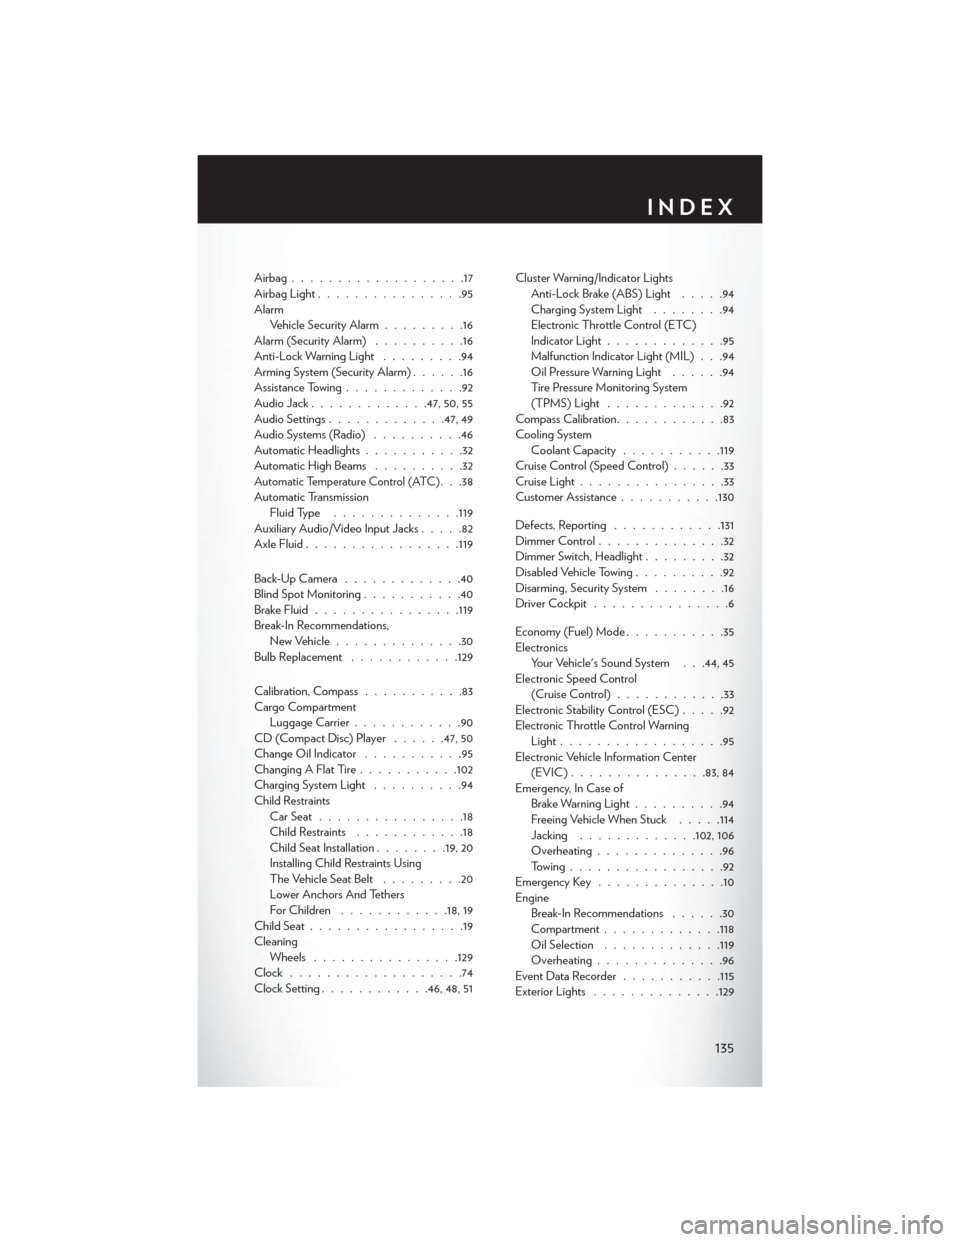
Airbag...................17
Airbag Light................95
Alarm Vehicle Security Alarm .........16
Alarm (Security Alarm) ..........16
Anti-Lock Warning Light .........94
Arming System (Security Alarm) ......16
Assistance Towing .............92
AudioJack.............47, 50, 55
Audio Settings .............47, 49
Audio Systems (Radio) ..........46
Automatic Headlights ...........32
Automatic High Beams ..........32
Automatic Temperature Control (ATC). . .38
Automatic Transmission Fluid Type ............. .119
Auxiliary Audio/Video Input Jacks .....82
Axle Fluid ................ .119
Back-UpCamera .............40
Blind Spot Monitoring ...........40
Brake Fluid ............... .119
Break-In Recommendations, New Vehicle ..............30
Bulb Replacement ............129
Calibration, Compass ...........83
Cargo Compartment Luggage Carrier ............90
CD (Compact Disc) Player ......47, 50
Change Oil Indicator ...........95
ChangingAFlatTire...........102
Charging System Light ..........94
Child Restraints CarSeat................18
Child Restraints ............18
Child Seat Installation ........19, 20
Installing Child Restraints Using
The Vehicle Seat Belt .........20
Lower Anchors And Tethers
For Children ............18, 19
ChildSeat.................19
Cleaning Wheels ............... .129
Clock ...................74
Clock Setting ............46, 48, 51 Cluster Warning/Indicator Lights
Anti-Lock Brake (ABS) Light .....94
Charging System Light ........94
Electronic Throttle Control (ETC)
Indicator Light .............95
Malfunction Indicator Light (MIL) . . .94
Oil Pressure Warning Light ......94
Tire Pressure Monitoring System
(TPMS) Light .............92
Compass Calibration ............83
Cooling System Coolant Capacity ...........119
Cruise Control (Speed Control) ......33
Cruise Light ................33
Customer Assistance ...........130
Defects, Reporting ............131
Dimmer Control ..............32
Dimmer Switch, Headlight .........32
Disabled Vehicle Towing ..........92
Disarming, Security System ........16
Driver Cockpit ...............6
Economy (Fuel) Mode ...........35
Electronics Your Vehicle's Sound System . . .44, 45
Electronic Speed Control (Cruise Control) ............33
Electronic Stability Control (ESC) .....92
Electronic Throttle Control Warning Light ..................
95
Electronic Vehicle Information Center (EVIC)...............83, 84
Emergency, In Case of Brake Warning Light ..........94
Freeing Vehicle When Stuck .....114
Jacking .............102,106
Overheating ..............96
Towing.................92
Emergency Key ..............10
Engine Break-In Recommendations ......30
Compartment ............ .118
Oil Selection .............119
Overheating ..............96
EventDataRecorder.......... .115
Exterior Lights ............. .129
INDEX
135
Page 138 of 148
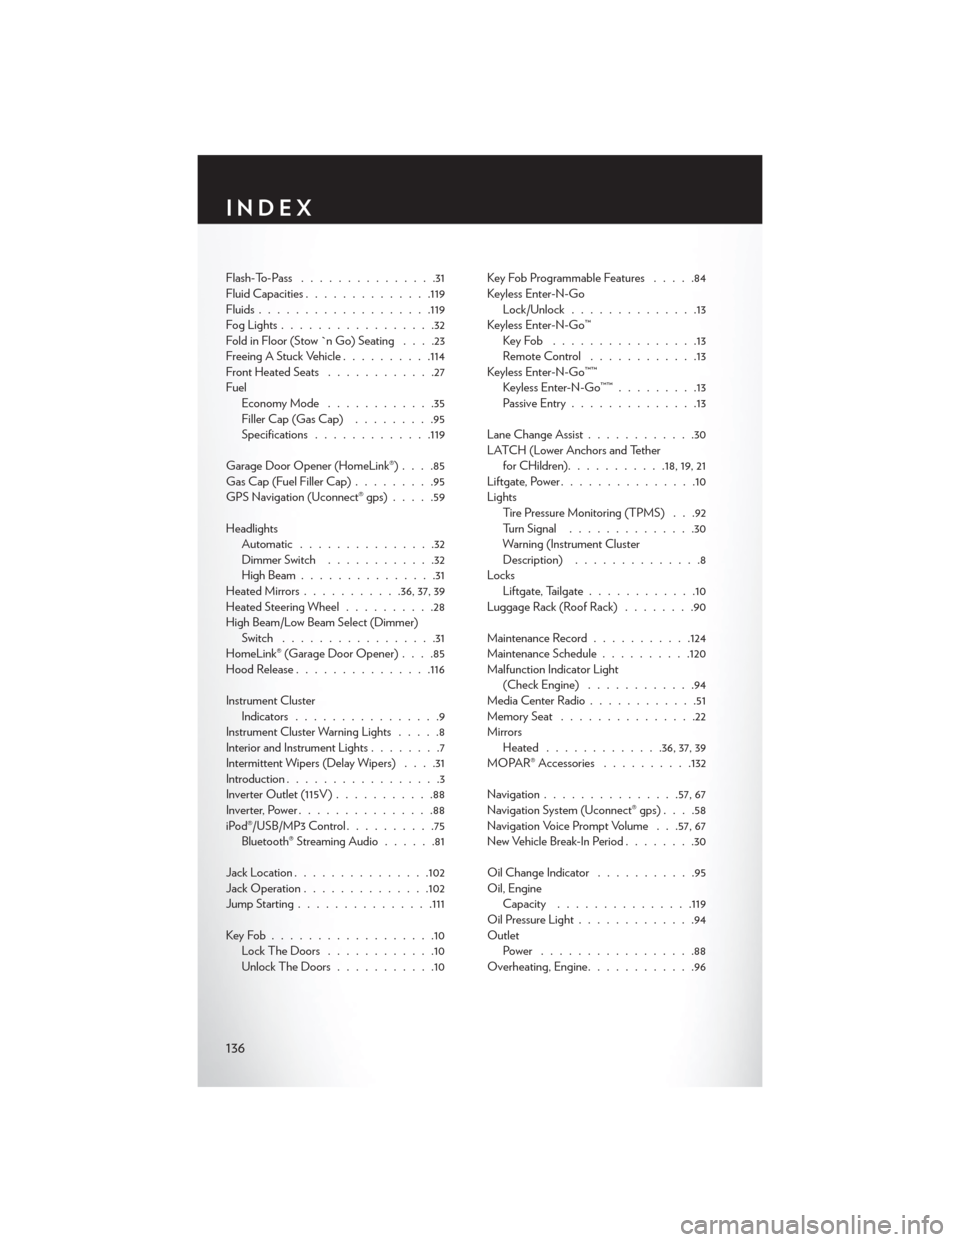
Flash-To-Pass...............31
Fluid Capacities ............. .119
Fluids .................. .119
FogLights.................32
Fold in Floor (Stow `n Go) Seating ....23
Freeing A Stuck Vehicle ..........114
Front Heated Seats ............27
Fuel EconomyMode ............35
Filler Cap (Gas Cap) .........95
Specifications ............ .119
Garage Door Opener (HomeLink®) ....85
Gas Cap (Fuel Filler Cap) .........95
GPS Navigation (Uconnect® gps) .....59
Headlights Automatic ...............32
Dimmer Switch ............32
HighBeam...............31
Heated Mirrors ...........36, 37, 39
Heated Steering Wheel ..........28
High Beam/Low Beam Select (Dimmer) Switch .................31
HomeLink® (Garage Door Opener) ....85
Hood Release .............. .116
Instrument Cluster Indicators ................9
Instrument Cluster Warning Lights .....8
Interior and Instrument Lights ........7
Intermittent Wipers (Delay Wipers) ....31
Introduction .................3
Inverter Outlet (115V) ...........88
Inverter, Power ...............88
iPod®/USB/MP3 Control ..........75
Bluetooth® Streaming Audio ......81
Jack Location .............. .102
Jack Operation ............. .102
Jump Starting .............. .111
KeyFob..................10 LockTheDoors ............10
Unlock The Doors ...........10 Key Fob Programmable Features
.....84
Keyless Enter-N-Go Lock/Unlock ..............13
Keyless Enter-N-Go™ KeyFob ................13
RemoteControl ............13
Keyless Enter-N-Go™™ Keyless Enter-N-Go™™ .........13
Passive Entry ..............13
Lane Change Assist ............30
LATCH (Lower Anchors and Tether for CHildren) ...........18,19,21
Liftgate, Power ...............10
Lights Tire Pressure Monitoring (TPMS) . . .92
Turn Signal ..............30
Warning (Instrument Cluster
Description) ..............8
Locks Liftgate
, Tailgate............10
Luggage Rack (Roof Rack) ........90
Maintenance Record ...........124
Maintenance Schedule ..........120
Malfunction Indicator Light (Check Engine) ............94
Media Center Radio ............51
Memory Seat ...............22
Mirrors Heated ............ .36, 37, 39
MOPAR® Accessories ..........132
Navigation .............. .57, 67
Navigation System (Uconnect® gps) ....58
Navigation Voice Prompt Volume . . .57, 67
New Vehicle Break-In Period ........30
Oil Change Indicator ...........95
Oil, Engine Capacity .............. .119
Oil Pressure Light .............94
Outlet Power .................88
Overheating, Engine ............96
INDEX
136