audio CHRYSLER TOWN AND COUNTRY 2015 5.G Owner's Manual
[x] Cancel search | Manufacturer: CHRYSLER, Model Year: 2015, Model line: TOWN AND COUNTRY, Model: CHRYSLER TOWN AND COUNTRY 2015 5.GPages: 164, PDF Size: 22.47 MB
Page 66 of 164
Clock Setting
1. Turn the radio on, then press the screen where the time is displayed.
2. Press the “User Clock” button on the touchscreen or the time display (Navigation radio only).
3.To adjust the hours, press either the “Hour Forward” or “Hour Backward” button on the touch-
screen.
4. To adjust the minutes, press either the “Minute Forward” or “Minute Backward” button on the
touchscreen.
5. To save the new time setting, press the screen where the word “Save” is displayed.
Menu
•PushtheMENUbuttononthefaceplatetoaccesstheSystemSetupmenuandtheMyFiles
menu.
•PushtheMENUbuttononthefaceplateinanactivemode(SAT,CD,AUX,etc.)tochange
mode specific settings.
Equalizer, Balance And Fade
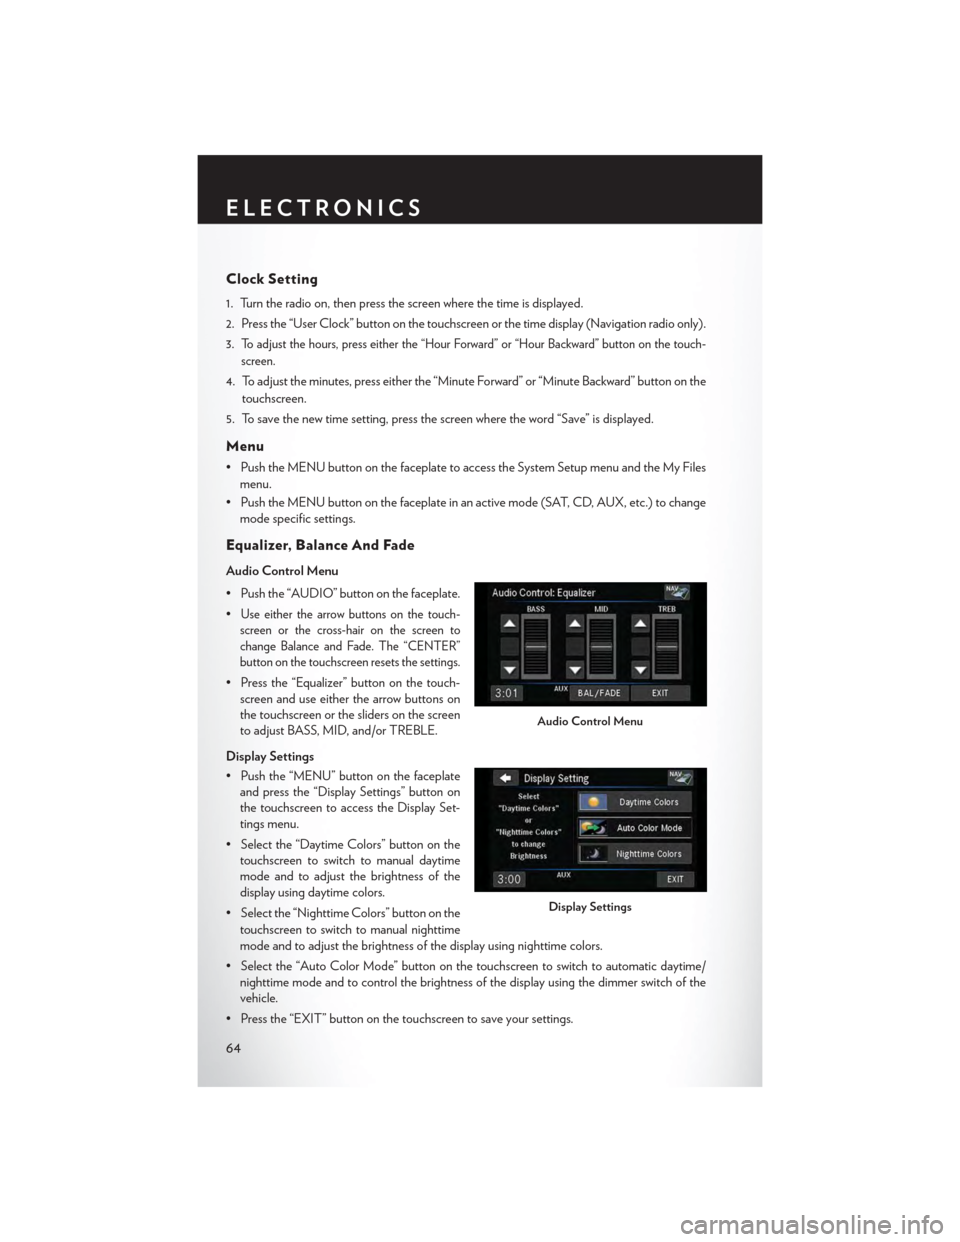
Audio Control Menu
• Push the “AUDIO” button on the faceplate.
•Use either the arrow buttons on the touch-
screen or the cross-hair on the screen to
change Balance and Fade. The “CENTER”
button on the touchscreen resets the settings.
• Press the “Equalizer” button on the touch-
screen and use either the arrow buttons on
the touchscreen or the sliders on the screen
to adjust BASS, MID, and/or TREBLE.
Display Settings
• Push the “MENU” button on the faceplate
and press the “Display Settings” button on
the touchscreen to access the Display Set-
tings menu.
• Select the “Daytime Colors” button on the
touchscreen to switch to manual daytime
mode and to adjust the brightness of the
display using daytime colors.
• Select the “Nighttime Colors” button on the
touchscreen to switch to manual nighttime
mode and to adjust the brightness of the display using nighttime colors.
•Selectthe“AutoColorMode”buttononthetouchscreentoswitchtoautomaticdaytime/
nighttime mode and to control the brightness of the display using the dimmer switch of the
vehicle.
•Pressthe“EXIT”buttononthetouchscreentosaveyoursettings.
Audio Control Menu
Display Settings
ELECTRONICS
64
Page 69 of 164
Audio Jack Operation
The AUX/Audio Jack provides a means to connect a portable audio device, such as an MP3
player or an iPod®, to the vehicle’s sound system. This requires the use of a 3.5 mm stereo audio
patch cable.
• Push the MEDIA button on the faceplate then the “AUX” button on the touchscreen tochange the mode to auxiliary device if the Audio Jack is connected, allowing the music fromyour portable device to play through the vehicle's speakers.
NOTE:
The functions of the portable device are controlled using the device itself, not the buttons on the
radio. However, the volume may be controlled using the radio or portable device.
Hard Disk Drive (HDD) Operation
•TheHardDiskDrive(HDD)modegivesyouaccesstotheaudiofilesontheinternalharddisk
drive. It functions similar to a CD player, with the exception that the internal HDD can hold
more tracks.
•Itisalsopossibletoimportdisplaypicturestotheinternalharddiskdrive.Thepicturescanbe
displayed on the right half of the radio screen.
• Before using the HDD mode, you will need to copy songs and pictures to the internal
hard drive. Songs and pictures can be added to the hard drive by using a CD or USB device
(e.g. thumb drive or memory stick).
NOTE:
• HDD supports only .jpg/JPEG formats for photos.
•WMA/MP3FilesandSelectiveSongsfromaCDcanalsobeaddedtotheHDD.Seethe
Uconnect® 430/430N Supplement Manual for more information.
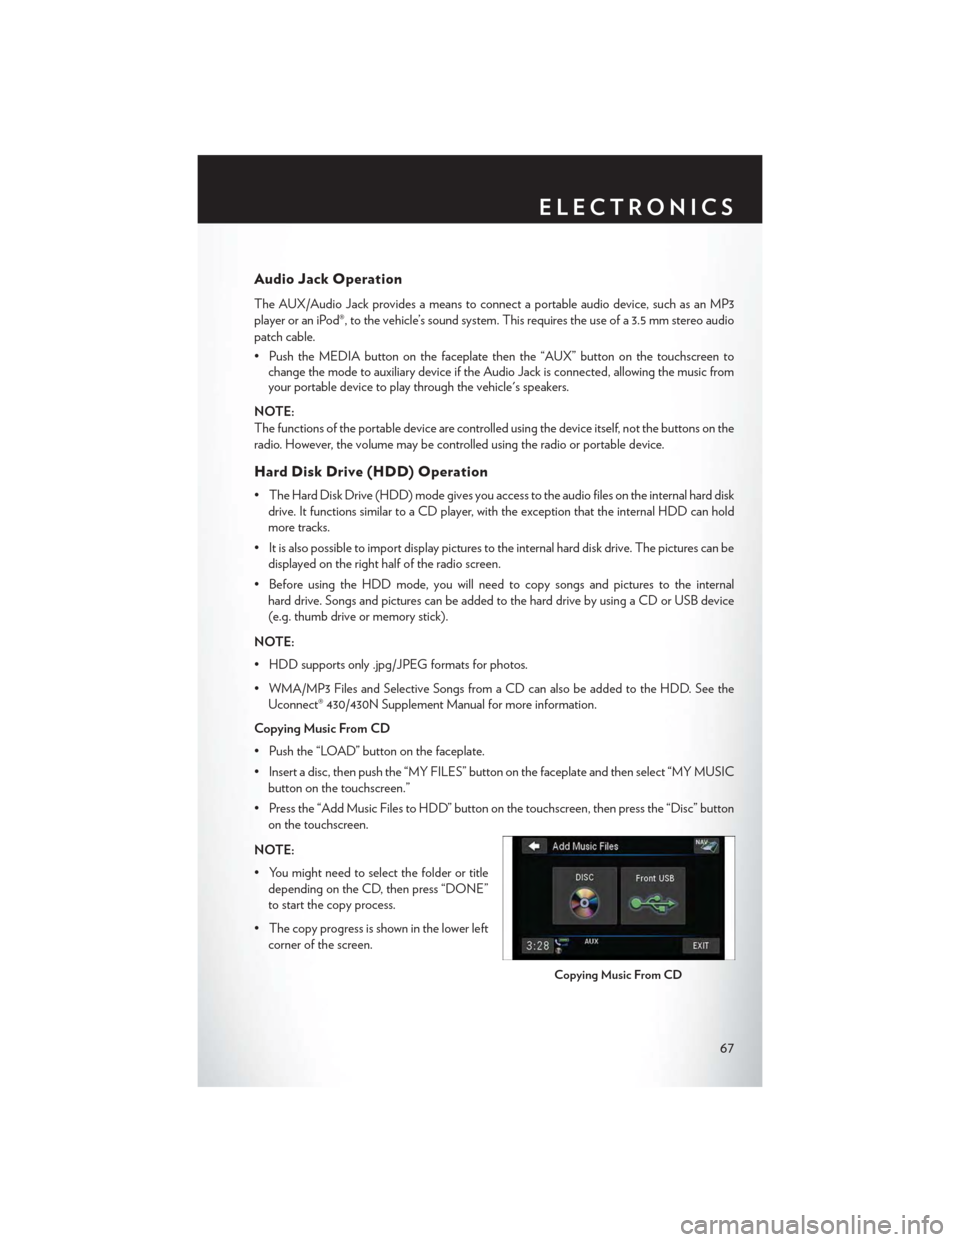
Copying Music From CD
• Push the “LOAD” button on the faceplate.
• Insert a disc, then push the “MY FILES” button on the faceplate and then select “MY MUSIC
button on the touchscreen.”
•Pressthe“AddMusicFilestoHDD”buttononthetouchscreen,thenpressthe“Disc”button
on the touchscreen.
NOTE:
• You might need to select the folder or title
depending on the CD, then press “DONE”
to start the copy process.
• The copy progress is shown in the lower left
corner of the screen.
Copying Music From CD
ELECTRONICS
67
Page 72 of 164
Cleaning Your Touchscreen Radio
• Do not spray any liquid or caustic chemicals directly on the screen. Use a clean and dry micro
fiber lens cleaning cloth to clean the touchscreen.
• If necessary, use a lint-free cloth dampened with a cleaning solution such as isopropyl alcohol
or an isopropyl alcohol and water solution ratio of 50:50. Always follow the solvent manufac-
turer's precautions and directions.
Garmin® Navigation
•Uconnect®430NintegratesGarmin’sconsumer-friendlynavigationintoyourvehicle.
Garmin® Navigation includes a database with over 6 million points of interest.
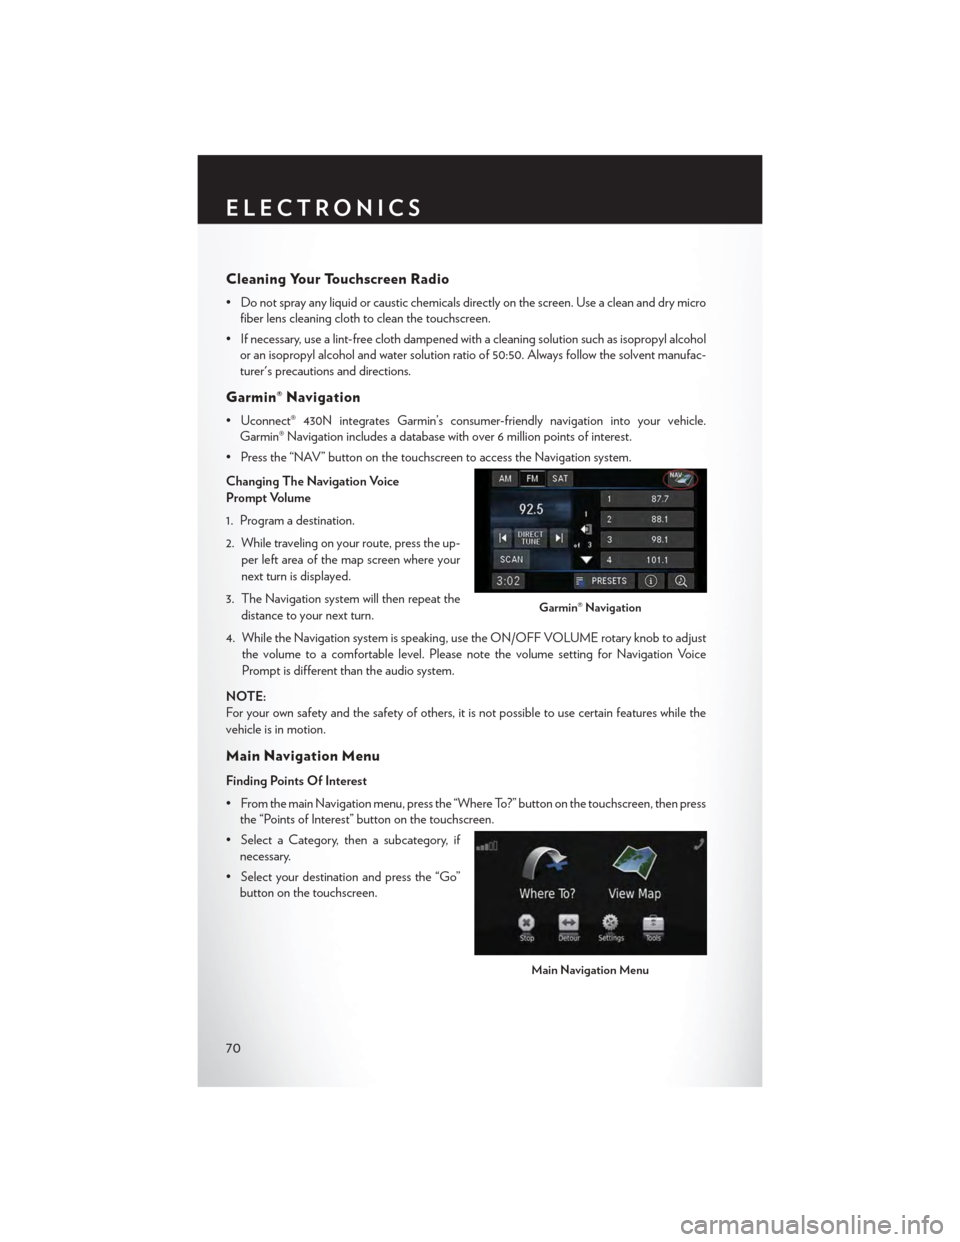
•Pressthe“NAV”buttononthetouchscreentoaccesstheNavigationsystem.
Changing The Navigation Voice
Prompt Volume
1. Program a destination.
2. While traveling on your route, press the up-
per left area of the map screen where your
next turn is displayed.
3. The Navigation system will then repeat the
distance to your next turn.
4. While the Navigation system is speaking, use the ON/OFF VOLUME rotary knob to adjust
the volume to a comfortable level. Please note the volume setting for Navigation Voice
Prompt is different than the audio system.
NOTE:
For your own safety and the safety of others, it is not possible to use certain features while the
vehicle is in motion.
Main Navigation Menu
Finding Points Of Interest
• From the main Navigation menu, press the “Where To?” button on the touchscreen, then press
the “Points of Interest” button on the touchscreen.
• Select a Category, then a subcategory, if
necessary.
•Selectyourdestinationandpressthe“Go”
button on the touchscreen.
Garmin® Navigation
Main Navigation Menu
ELECTRONICS
70
Page 78 of 164
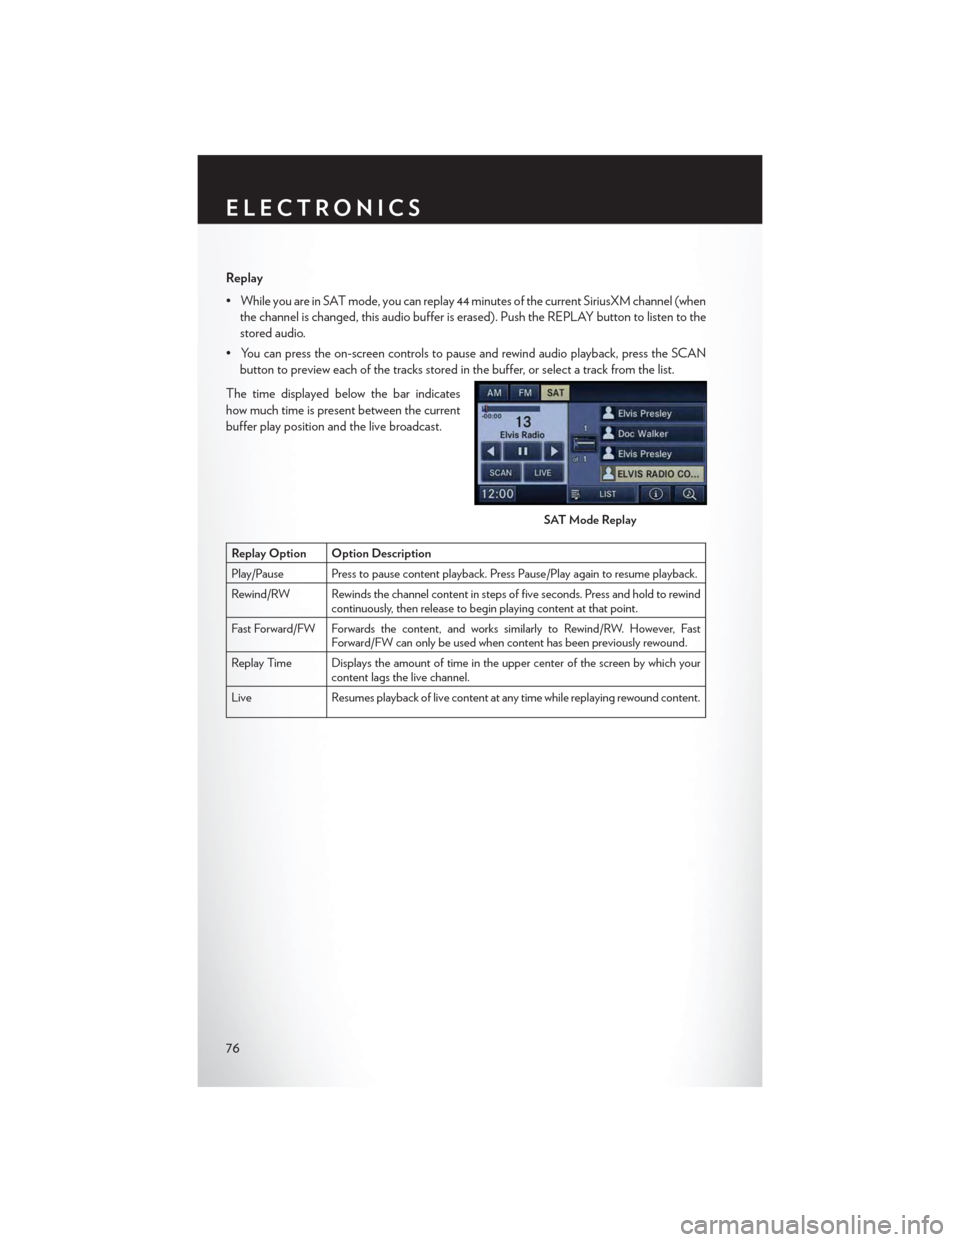
Replay
•WhileyouareinSATmode,youcanreplay44minutesofthecurrentSiriusXMchannel(when
the channel is changed, this audio buffer is erased). Push the REPLAY button to listen to the
stored audio.
•Youcanpresstheon-screencontrolstopauseandrewindaudioplayback,presstheSCAN
button to preview each of the tracks stored in the buffer, or select a track from the list.
The time displayed below the bar indicates
how much time is present between the current
buffer play position and the live broadcast.
Replay Option Option Description
Play/Pause Press to pause content playback. Press Pause/Play again to resume playback.
Rewind/RW Rewinds the channel content in steps of five seconds. Press and hold to rewindcontinuously, then release to begin playing content at that point.
Fast For ward/FW For wards the content, and works similarly to Rewind/RW. However, FastForward/FW can only be used when content has been previously rewound.
Replay Time Displays the amount of time in the upper center of the screen by which yourcontent lags the live channel.
Live Resumes playback of live content at any time while replaying rewound content.
SAT Mode Replay
ELECTRONICS
76
Page 80 of 164
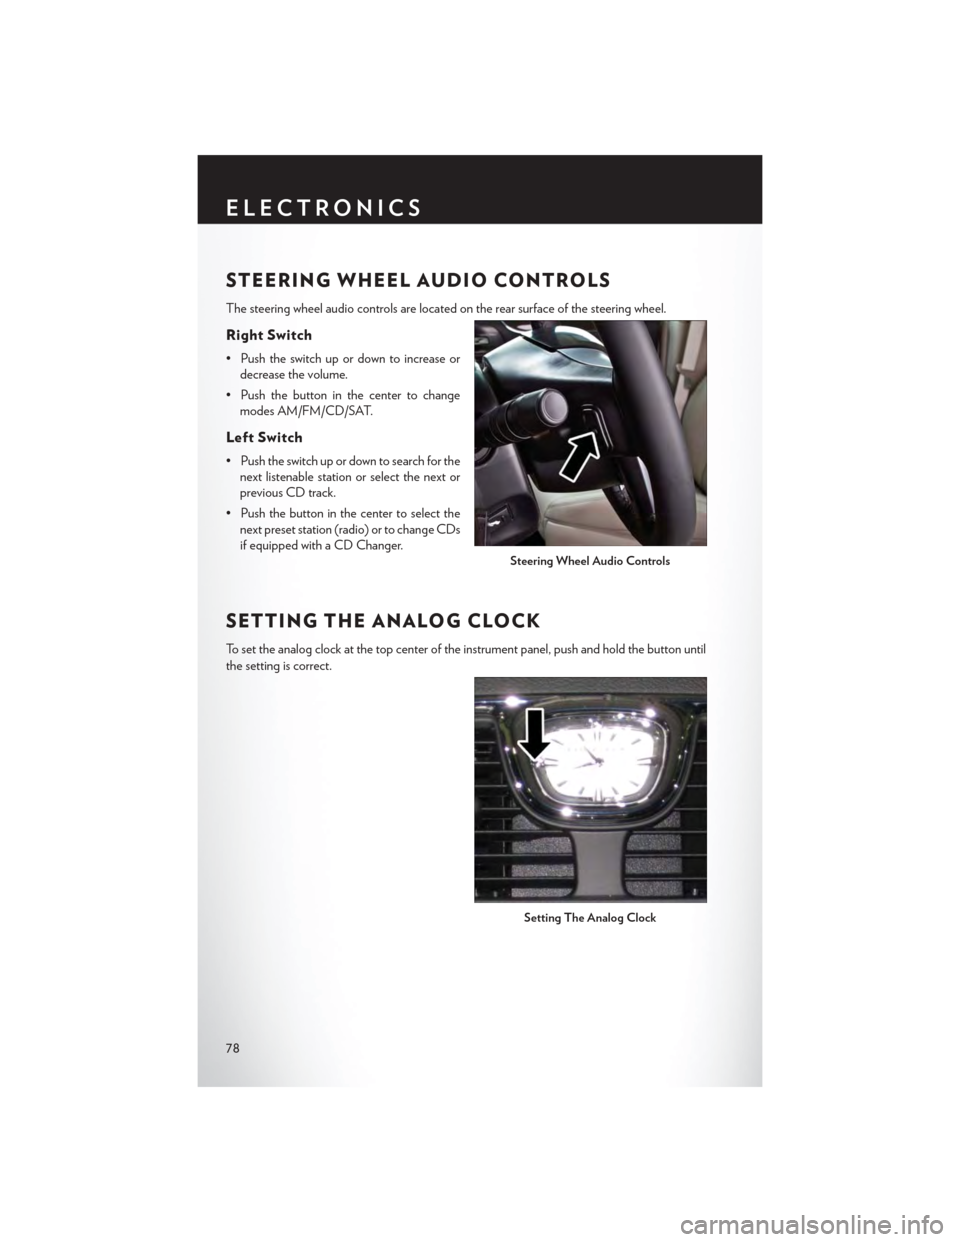
STEERING WHEEL AUDIO CONTROLS
The steering wheel audio controls are located on the rear surface of the steering wheel.
Right Switch
• Push the switch up or down to increase or
decrease the volume.
• Push the button in the center to change
modes AM/FM/CD/SAT.
Left Switch
• Push the switch up or down to search for the
next listenable station or select the next or
previous CD track.
• Push the button in the center to select the
next preset station (radio) or to change CDs
if equipped with a CD Changer.
SETTING THE ANALOG CLOCK
To s e t t h e a n a l o g c l o c k a t t h e t o p c e n t e r o f t h e i n s t r u m e n t p a n e l , p u s h a n d h o l d t h e b u t t o n u n t i l
the setting is correct.
Steering Wheel Audio Controls
Setting The Analog Clock
ELECTRONICS
78
Page 81 of 164
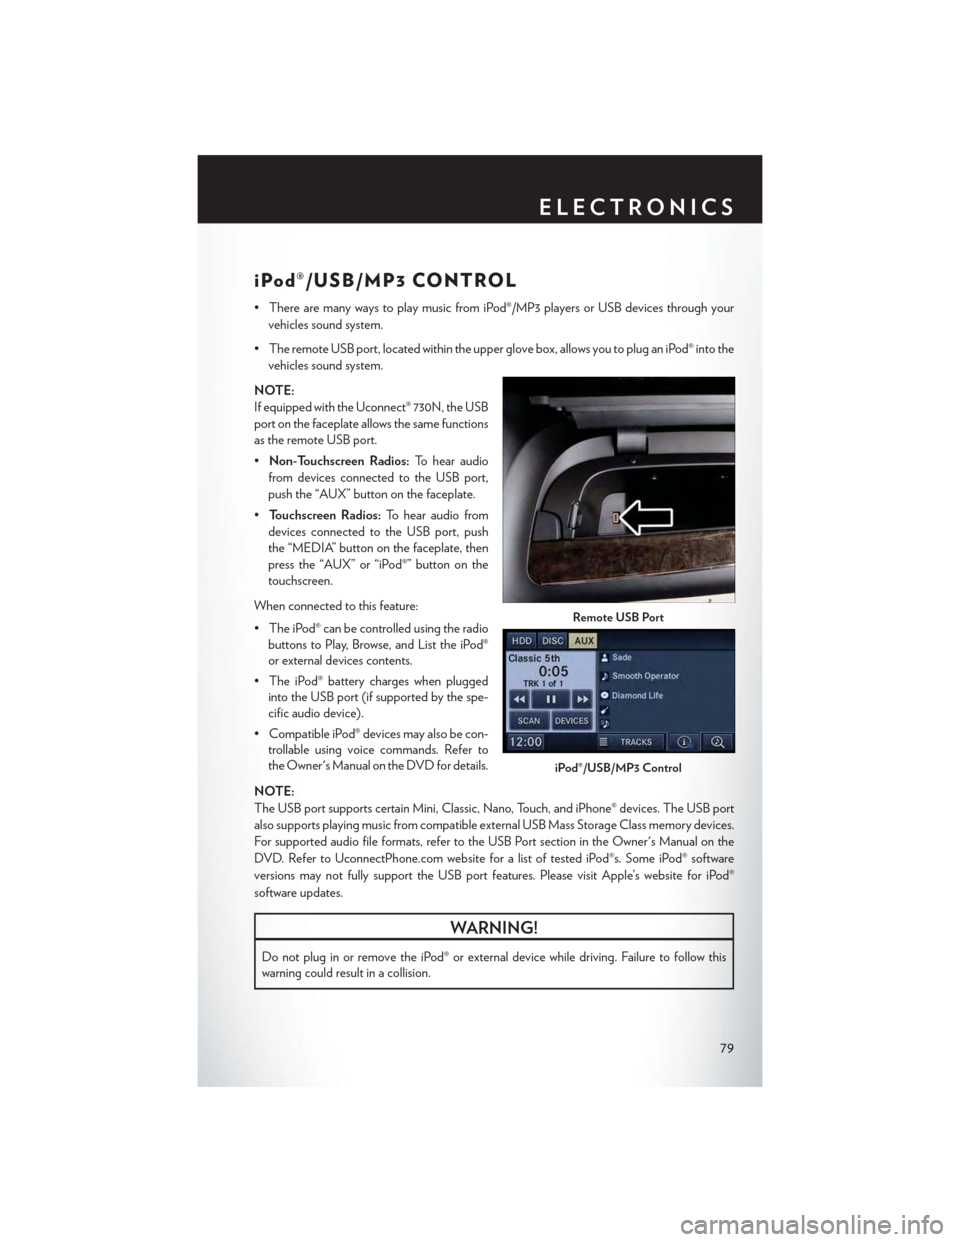
iPod®/USB/MP3 CONTROL
•TherearemanywaystoplaymusicfromiPod®/MP3playersorUSBdevicesthroughyour
vehicles sound system.
•TheremoteUSBport,locatedwithintheupperglovebox,allowsyoutopluganiPod®intothe
vehicles sound system.
NOTE:
If equipped with the Uconnect® 730N, the USB
port on the faceplate allows the same functions
as the remote USB port.
•Non-Touchscreen Radios:To hear audio
from devices connected to the USB port,
push the “AUX” button on the faceplate.
•To u c h s c r e e n R a d i o s :To hear audio from
devices connected to the USB port, push
the “MEDIA” button on the faceplate, then
press the “AUX” or “iPod®” button on the
touchscreen.
When connected to this feature:
• The iPod® can be controlled using the radio
buttons to Play, Browse, and List the iPod®
or external devices contents.
•TheiPod®batterychargeswhenplugged
into the USB port (if supported by the spe-
cific audio device).
•CompatibleiPod®devicesmayalsobecon-
trollable using voice commands. Refer to
the Owner's Manual on the DVD for details.
NOTE:
The USB port supports certain Mini, Classic, Nano, Touch, and iPhone® devices. The USB port
also supports playing music from compatible external USB Mass Storage Class memory devices.
For supported audio file formats, refer to the USB Port section in the Owner's Manual on the
DVD. Refer to UconnectPhone.com website for a list of tested iPod®s. Some iPod® software
versions may not fully support the USB port features. Please visit Apple’s website for iPod®
software updates.
WARNING!
Do not plug in or remove the iPod® or external device while driving. Failure to follow this
warning could result in a collision.
Remote USB Port
iPod®/USB/MP3 Control
ELECTRONICS
79
Page 84 of 164
Mute (Or Unmute) Microphone During Call
• During a call, push the “Voice Command” button.
• After the BEEP, say “mute” (or “mute off ”).
Tr a n s f e r O n g o i n g C a l l B e t w e e n H a n d s e t A n d Ve h i c l e
• During a call, push the “Voice Command” button.
• After the BEEP, say “transfer call.”
Changing The Volume
• Start a dialogue by pushing the “Phone” button,thenadjustthevolumeduringanormal
call.
•UsetheradioON/OFFVOLUMErotaryknobtoadjustthevolumetoacomfortablelevel
while the Uconnect® system is speaking. Please note the volume setting for Uconnect® is
different than the audio system.
WARNING!
•Anyvoicecommandedsystemshouldbeusedonlyinsafedrivingconditionsfollowing
applicable laws regarding phone use. Your attention should be focused on safely operating
the vehicle. Failure to do so may result in a collision causing you and others to be severely
injured or killed.
• In an emergency, to use Uconnect® Phone, your mobile phone must be:
• turned on,
• paired to Uconnect® Phone,
•andhavenetworkcoverage.
Uconnect® VOICE COMMAND
Vo i c e C o m m a n d O p e r a t i o n
•TheUconnect®VoiceCommandsystemallowsyoutocontrolyourAM,FMradio,satellite
radio, disc player, HDD, Uconnect® Phone, a memo recorder, and supported portable media
devices.
•Whenyoupushthe“VoiceCommand”buttonlocated on the radio faceplate or
steering wheel, you will hear a beep. The beep is your signal to give a command. If you do not
say a command within a few seconds, the system will present you with a list of options. If you
ever want to interrupt the system while it lists options, push the “Voice Command” button
,listenfortheBEEP,andsayyourcommand.
NOTE:
U.S. residents visit driveuconnect.com for more info on which voice command features apply to
your vehicle. Canadian residents visit driveuconnect.ca for more info on which voice command
features apply to your vehicle.
ELECTRONICS
82
Page 87 of 164
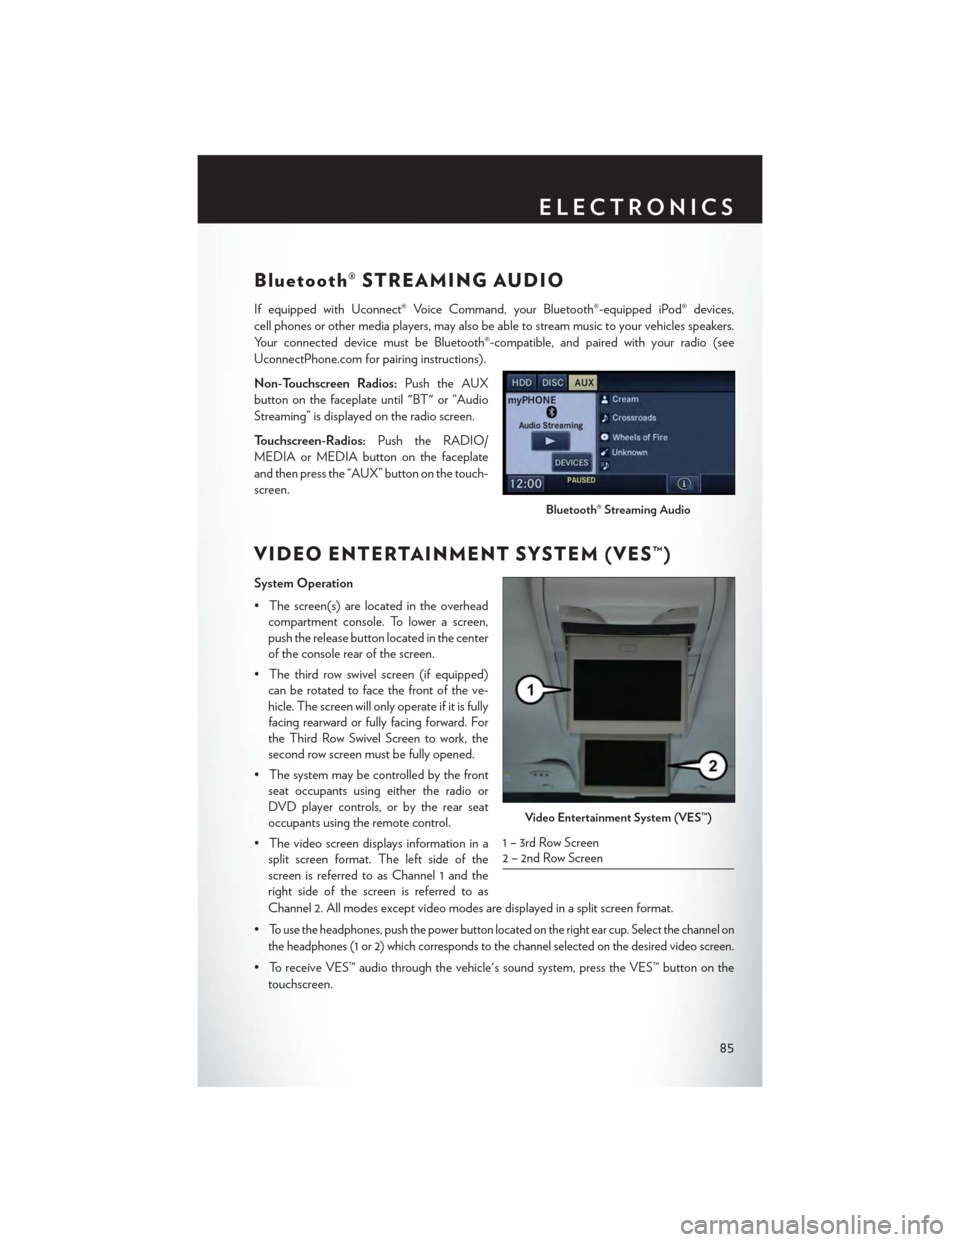
Bluetooth® STREAMING AUDIO
If equipped with Uconnect® Voice Command, your Bluetooth®-equipped iPod® devices,
cell phones or other media players, may also be able to stream music to your vehicles speakers.
Yo u r c o n n e c t e d d e v i c e m u s t b e B l u e t o o t h ® - c o m p a t i b l e , a n d p a i r e d w i t h y o u r r a d i o ( s e e
UconnectPhone.com for pairing instructions).
Non-Touchscreen Radios:Push the AUX
button on the faceplate until "BT" or “Audio
Streaming” is displayed on the radio screen.
To u c h s c r e e n - R a d i o s :Push the RADIO/
MEDIA or MEDIA button on the faceplate
and then press the “AUX” button on the touch-
screen.
VIDEO ENTERTAINMENT SYSTEM (VES™)
System Operation
•Thescreen(s)arelocatedintheoverhead
compartment console. To lower a screen,
push the release button located in the center
of the console rear of the screen.
•Thethirdrowswivelscreen(ifequipped)
can be rotated to face the front of the ve-
hicle. The screen will only operate if it is fully
facing rearward or fully facing forward. For
the Third Row Swivel Screen to work, the
second row screen must be fully opened.
•Thesystemmaybecontrolledbythefront
seat occupants using either the radio or
DVD player controls, or by the rear seat
occupants using the remote control.
•Thevideoscreendisplaysinformationina
split screen format. The left side of the
screen is referred to as Channel 1 and the
right side of the screen is referred to as
Channel 2. All modes except video modes are displayed in a split screen format.
•To use the headphones, push the power button located on the right ear cup. Select the channel on
the headphones (1 or 2) which corresponds to the channel selected on the desired video screen.
•ToreceiveVES™audiothroughthevehicle'ssoundsystem,presstheVES™buttononthe
touchscreen.
Bluetooth® Streaming Audio
Video Entertainment System (VES™)
1 – 3rd Row Screen2 – 2nd Row Screen
ELECTRONICS
85
Page 88 of 164
Operation Of The Touchscreen Radio/DVD Player/Blu-Ray Player
• To view a DVD push the OPEN/CLOSE button on the faceplate and insert the disc or insert
the disc into the optional DVD player. Playback will begin automatically after the DVD is
recognized by the disc drive. If playback does not begin automatically when the disc is inserted
into the DVD player push the PLAY button. If playback does not begin automatically after the
disc is inserted into the touchscreen radio follow these steps:
• Push the MENU button on the faceplate, then press the Rear VES™ button on the
touchscreen. If a chapter list appears on the right side of the screen, press the “HIDE LIST”
button on the touchscreen to display the Rear VES™ control screen.
• Touch the “1” button on the touchscreen to select an audio channel, then press the DISC
button on the touchscreen in the MEDIA column.
Operation Of The Remote Control
The remote control operates similarly to any DVD remote you may have used before and allows
the rear seat passengers to change stations, tracks, discs and audio/video modes.
The remote control is designed to control either channel by using the selector switch located on
the right side of the remote.
Connect the video game or other external media devices to the AUX jacks following the color
coding for the VES™ jacks.
•PushingthepowerbuttonwillturntheVES™systemON/OFF.
• Pushing the mode button causes the MODE SELECTION menu to appear on the VES™
screen. Use the remote control arrow buttons to scroll through the available modes, and then
push ENTER to select the desired mode.
Auxiliary Audio/Video Input Jacks
The AUX jacks are located on the drivers side rear trim panel behind the sliding door.
Connect the video game or other external media devices to the AUX jacks following the color
coding for the VES™ jacks.
Using either the touchscreen radio or remote control, select AUX from the REAR VES™
CONTROL or the MODE SELECTION screen.
Refer to the Uconnect® Multimedia – Video Entertainment System (VES™) section in the vehicle
Owner's Manual on the DVD for further details.
ELECTRONICS
86
Page 151 of 164
FREQUENTLY ASKED QUESTIONS
GETTING STARTED
How do I install my LATCH Equipped Child Seat? pg. 21
How do I program my Front Seat Memory? pg. 28
OPERATING YOUR VEHICLE
How does the Electronic Range Select (ERS) operate? pg. 43
ELECTRONICS
Which radio is in my vehicle?
• Uconnect® 130 pg. 58
• Uconnect® 130 WITH Sirius XM™ SATELLITE RADIO pg. 60
• Uconnect® 430/430N pg. 63
How do I activate the Audio Jack?
• Uconnect® 130 pg. 62
• Uconnect® 130 WITH SiriusXM™ pg. 62
• Uconnect® 430/430N pg. 67
How do I set the clock on my radio?
• Uconnect® 130 pg. 61
• Uconnect® 130 WITH SiriusXM™ pg. 61
• Uconnect® 430/430N pg. 64
How do I use the Navigation feature?
• Uconnect® 430/430N pg. 70
How do I pair my cell phone via Bluetooth® with the Uconnect® Hands-Free Voice Activation
System? pg. 80
How do I use my USB port to listen to audio through my touch-screen radio? pg. 79
What does the ECO message mean on the EVIC display? pg. 44
How do I configure my Universal Garage Door Opener (HomeLink®)? pg. 89
UTILITY
How do I know how much I can tow with my Chrysler Town & Country? pg. 96
FREQUENTLY ASKED QUESTIONS
149