steering CHRYSLER TOWN AND COUNTRY 2015 5.G Owner's Manual
[x] Cancel search | Manufacturer: CHRYSLER, Model Year: 2015, Model line: TOWN AND COUNTRY, Model: CHRYSLER TOWN AND COUNTRY 2015 5.GPages: 164, PDF Size: 22.47 MB
Page 80 of 164
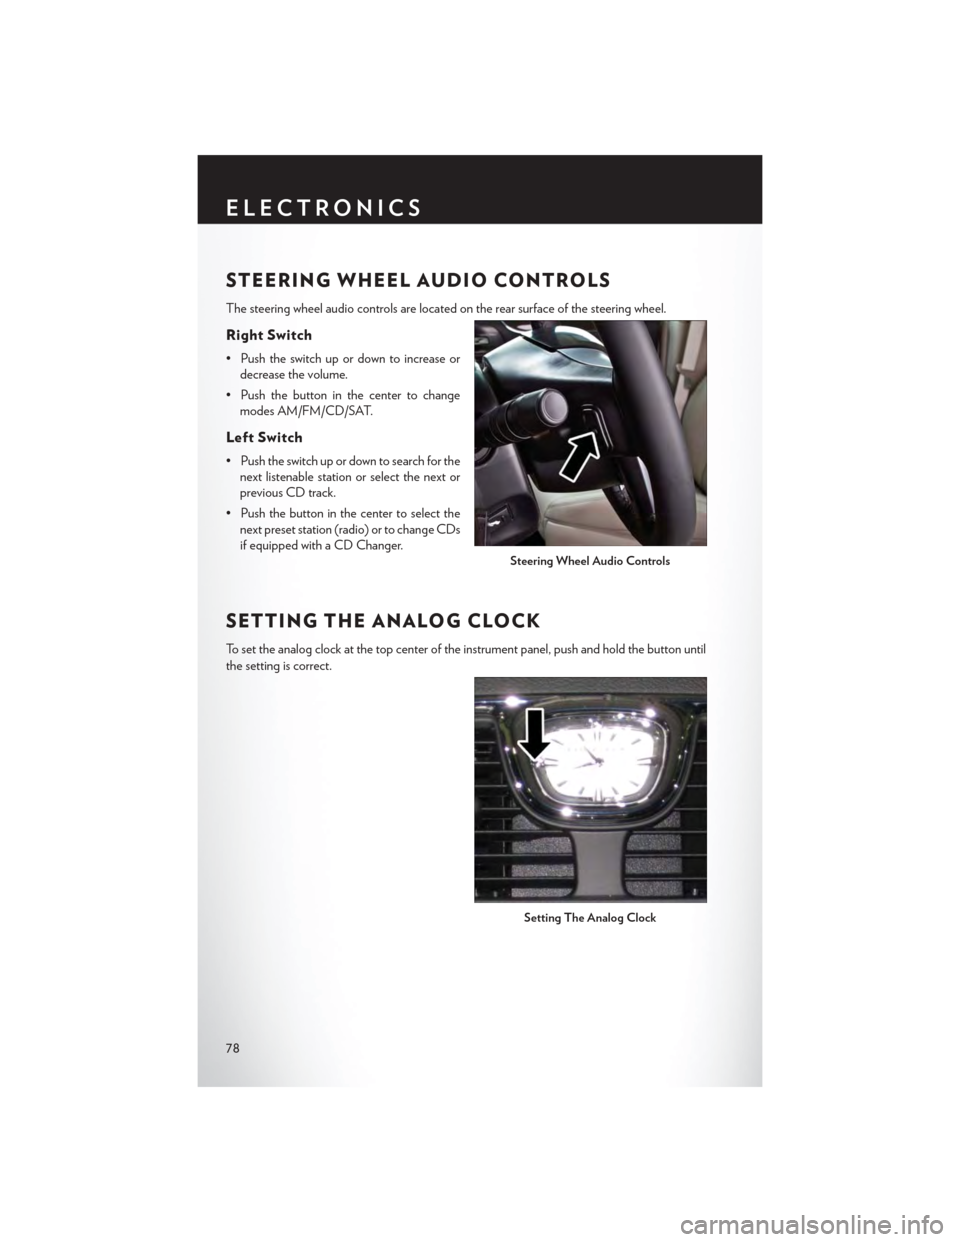
STEERING WHEEL AUDIO CONTROLS
The steering wheel audio controls are located on the rear surface of the steering wheel.
Right Switch
• Push the switch up or down to increase or
decrease the volume.
• Push the button in the center to change
modes AM/FM/CD/SAT.
Left Switch
• Push the switch up or down to search for the
next listenable station or select the next or
previous CD track.
• Push the button in the center to select the
next preset station (radio) or to change CDs
if equipped with a CD Changer.
SETTING THE ANALOG CLOCK
To s e t t h e a n a l o g c l o c k a t t h e t o p c e n t e r o f t h e i n s t r u m e n t p a n e l , p u s h a n d h o l d t h e b u t t o n u n t i l
the setting is correct.
Steering Wheel Audio Controls
Setting The Analog Clock
ELECTRONICS
78
Page 84 of 164
Mute (Or Unmute) Microphone During Call
• During a call, push the “Voice Command” button.
• After the BEEP, say “mute” (or “mute off ”).
Tr a n s f e r O n g o i n g C a l l B e t w e e n H a n d s e t A n d Ve h i c l e
• During a call, push the “Voice Command” button.
• After the BEEP, say “transfer call.”
Changing The Volume
• Start a dialogue by pushing the “Phone” button,thenadjustthevolumeduringanormal
call.
•UsetheradioON/OFFVOLUMErotaryknobtoadjustthevolumetoacomfortablelevel
while the Uconnect® system is speaking. Please note the volume setting for Uconnect® is
different than the audio system.
WARNING!
•Anyvoicecommandedsystemshouldbeusedonlyinsafedrivingconditionsfollowing
applicable laws regarding phone use. Your attention should be focused on safely operating
the vehicle. Failure to do so may result in a collision causing you and others to be severely
injured or killed.
• In an emergency, to use Uconnect® Phone, your mobile phone must be:
• turned on,
• paired to Uconnect® Phone,
•andhavenetworkcoverage.
Uconnect® VOICE COMMAND
Vo i c e C o m m a n d O p e r a t i o n
•TheUconnect®VoiceCommandsystemallowsyoutocontrolyourAM,FMradio,satellite
radio, disc player, HDD, Uconnect® Phone, a memo recorder, and supported portable media
devices.
•Whenyoupushthe“VoiceCommand”buttonlocated on the radio faceplate or
steering wheel, you will hear a beep. The beep is your signal to give a command. If you do not
say a command within a few seconds, the system will present you with a list of options. If you
ever want to interrupt the system while it lists options, push the “Voice Command” button
,listenfortheBEEP,andsayyourcommand.
NOTE:
U.S. residents visit driveuconnect.com for more info on which voice command features apply to
your vehicle. Canadian residents visit driveuconnect.ca for more info on which voice command
features apply to your vehicle.
ELECTRONICS
82
Page 89 of 164
ELECTRONIC VEHICLE INFORMATION
CENTER (EVIC)
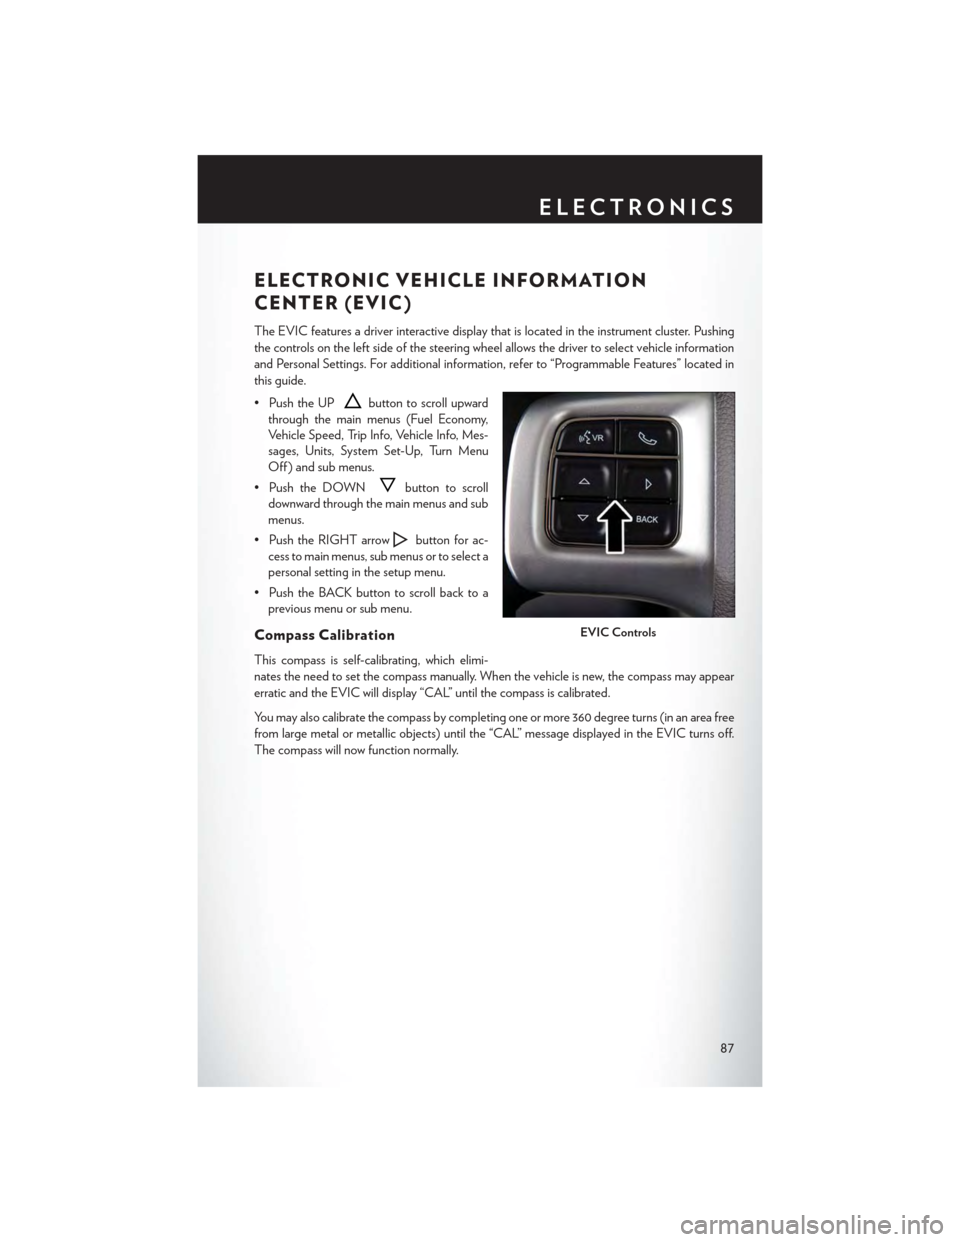
The EVIC features a driver interactive display that is located in the instrument cluster. Pushing
the controls on the left side of the steering wheel allows the driver to select vehicle information
and Personal Settings. For additional information, refer to “Programmable Features” located in
this guide.
• Push the UPbutton to scroll upward
through the main menus (Fuel Economy,
Vehicle Speed, Trip Info, Vehicle Info, Mes-
sages, Units, System Set-Up, Turn Menu
Off ) and sub menus.
• Push the DOWNbutton to scroll
downward through the main menus and sub
menus.
• Push the RIGHT arrowbutton for ac-
cess to main menus, sub menus or to select a
personal setting in the setup menu.
•PushtheBACKbuttontoscrollbacktoa
previous menu or sub menu.
Compass Calibration
This compass is self-calibrating, which elimi-
nates the need to set the compass manually. When the vehicle is new, the compass may appear
erratic and the EVIC will display “CAL” until the compass is calibrated.
Yo u m a y a l s o c a l i b r a t e t h e c o m p a s s b y c o m p l e t i n g o n e o r m o r e 3 6 0 d e g r e e t u r n s ( i n a n a r e a f r e e
from large metal or metallic objects) until the “CAL” message displayed in the EVIC turns off.
The compass will now function normally.
EVIC Controls
ELECTRONICS
87
Page 129 of 164

OPENING THE HOOD
1. Pull the hood release lever located on the
instrument panel, below the steering col-
umn.
2. Raise the hood and locate the safety catch
lever, in the middle of the hood opening.
3. Move the safety latch while lifting the hood
at the same time.
4. Insert the support rod into the slot on the
hood.
5. To close the hood, remove the support rod
and place it in the retaining clip, then lower
the hood slowly.
WARNING!
Be sure the hood is fully latched before driving your vehicle. If the hood is not fully latched, it
could open when the vehicle is in motion and block your vision. Failure to follow this warning
could result in serious injury or death.
Hood Release Lever
MAINTAINING YOUR VEHICLE
127
Page 131 of 164

6. Engine Oil Dipstick
7. Engine Oil Fill
8. Engine Coolant Pressure Cap
9. Washer Fluid Reservoir
10. Power Steering Fluid Reservoir
MAINTAINING YOUR VEHICLE
129
Page 133 of 164
CAUTION!
•Mixingofenginecoolant(antifreeze)otherthanspecifiedOrganicAdditiveTechnology
(OAT) engine coolant (antifreeze), may result in engine damage and may decrease
corrosion protection. Organic Additive Technology (OAT) engine coolant is different
and should not be mixed with Hybrid Organic Additive Technology (HOAT) engine
coolant (antifreeze) or any “globally compatible” coolant (antifreeze). If a non-OAT
engine coolant (antifreeze) is introduced into the cooling system in an emergency, the
cooling system will need to be drained, flushed, and refilled with fresh OAT coolant
(conforming to MS-12106), by an authorized dealer as soon as possible.
•Donotusewateraloneoralcohol-basedenginecoolant(antifreeze)products.Donotuse
additional rust inhibitors or antirust products, as they may not be compatible with the
radiator engine coolant and may plug the radiator.
•This vehicle has not been designed for use with propylene glycol-based engine coolant
(antifreeze). Use of propylene glycol-based engine coolant (antifreeze) is not recommended.
E-85 FLEXIBLE FUEL — (3.6L ENGINE ONLY )
Refer to your Owner's Manual on the DVD for further details.
CAUTION!
Only vehicles with the E-85 fuel filler door label or a yellow gas cap can operate on E-85.
Chassis
ComponentFluid, Lubricant, or Genuine Part
Automatic TransmissionUse Only ATF+4® Automatic Transmission Fluid. Failure to use ATF+4®fluid may affect the function or performance of your transmission. We rec-ommend MOPAR® ATF+4® Fluid.
Brake Master Cylinder We recommend you use MOPAR® DOT 3. If DOT 3 brake fluid is notavailable, then DOT 4 is acceptable.
Power Steering Reservoir We recommend you use MOPAR® Power Steering Fluid +4, MOPAR®ATF+4® Automatic Transmission Fluid.
MAINTAINING YOUR VEHICLE
131
Page 135 of 164
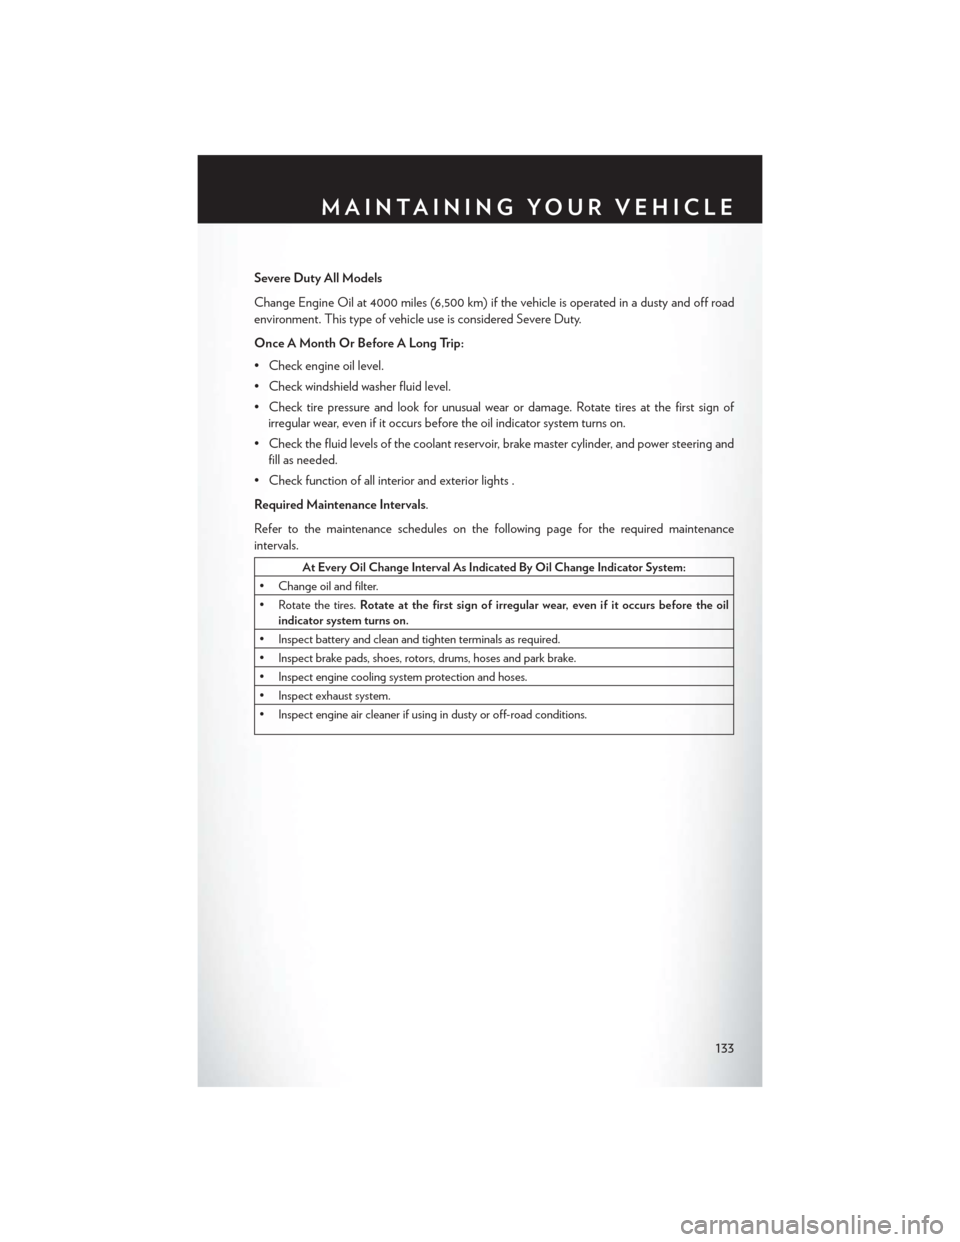
Severe Duty All Models
Change Engine Oil at 4000 miles (6,500 km) if the vehicle is operated in a dusty and off road
environment. This type of vehicle use is considered Severe Duty.
Once A Month Or Before A Long Trip:
•Checkengineoillevel.
•Checkwindshieldwasherfluidlevel.
• Check tire pressure and look for unusual wear or damage. Rotate tires at the first sign of
irregular wear, even if it occurs before the oil indicator system turns on.
•Checkthefluidlevelsofthecoolantreservoir,brakemastercylinder,andpowersteeringand
fill as needed.
• Check function of all interior and exterior lights .
Required Maintenance Intervals.
Refer to the maintenance schedules on the following page for the required maintenance
intervals.
At Every Oil Change Interval As Indicated By Oil Change Indicator System:
• Change oil and filter.
• Rotate the tires.Rotate at the first sign of irregular wear, even if it occurs before the oilindicator system turns on.
•Inspectbatteryandcleanandtightenterminalsasrequired.
•Inspectbrakepads,shoes,rotors,drums,hosesandparkbrake.
•Inspectenginecoolingsystemprotectionandhoses.
•Inspectexhaustsystem.
•Inspectengineaircleanerifusingindustyoroff-roadconditions.
MAINTAINING YOUR VEHICLE
133
Page 141 of 164
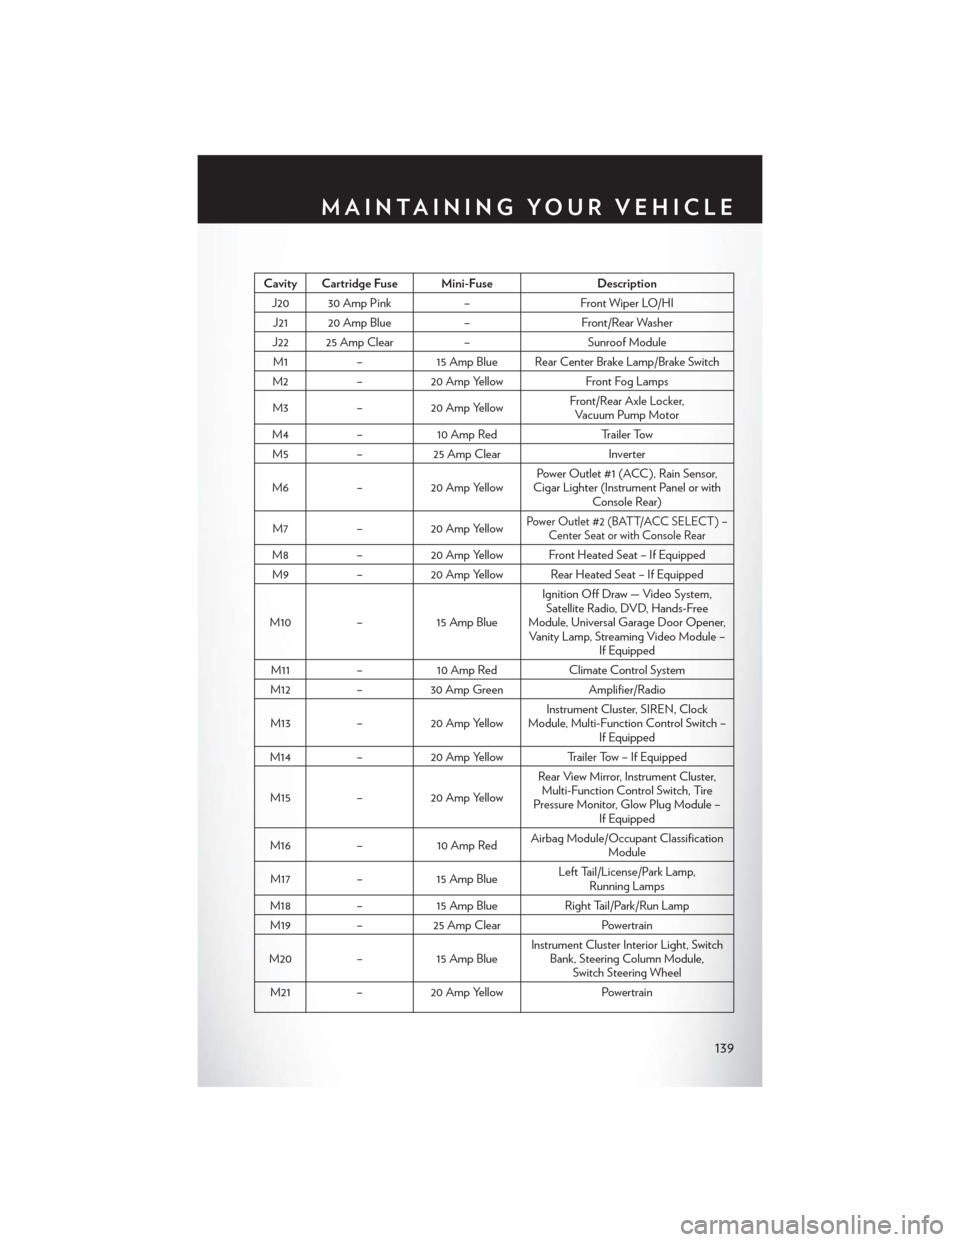
Cavity Cartridge Fuse Mini-FuseDescription
J20 30 Amp Pink–Front Wiper LO/HI
J21 20 Amp Blue–Front/Rear Washer
J22 25 Amp Clear–Sunroof Module
M1–15 Amp Blue Rear Center Brake Lamp/Brake Switch
M2–20 Amp YellowFront Fog Lamps
M3–20 Amp YellowFront/Rear Axle Locker,Vacuum Pump Motor
M4–10 Amp RedTr a i l e r To w
M5–25 Amp ClearInverter
M6–20 Amp YellowPower Outlet #1 (ACC ), Rain Sensor,Cigar Lighter (Instrument Panel or withConsole Rear)
M7–20 Amp YellowPower Outlet #2 (BATT/ACC SELECT ) –Center Seat or with Console Rear
M8–20 Amp Yellow Front Heated Seat – If Equipped
M9–20 Amp Yellow Rear Heated Seat – If Equipped
M10–15 Amp Blue
Ignition Off Draw — Video System,Satellite Radio, DVD, Hands-FreeModule, Universal Garage Door Opener,Vanity Lamp, Streaming Video Module –If Equipped
M11–10 Amp RedClimate Control System
M12–30 Amp GreenAmplifier/Radio
M13–20 Amp YellowInstrument Cluster, SIREN, ClockModule, Multi-Function Control Switch –If Equipped
M14–20 Amp YellowTrailer Tow – If Equipped
M15–20 Amp Yellow
Rear View Mirror, Instrument Cluster,Multi-Function Control Switch, TirePressure Monitor, Glow Plug Module –If Equipped
M16–10 Amp RedAirbag Module/Occupant ClassificationModule
M17–15 Amp BlueLeft Tail/License/Park Lamp,Running Lamps
M18–15 Amp BlueRight Tail/Park/Run Lamp
M19–25 Amp ClearPowertrain
M20–15 Amp BlueInstrument Cluster Interior Light, SwitchBank, Steering Column Module,Switch Steering Wheel
M21–20 Amp YellowPowertrain
MAINTAINING YOUR VEHICLE
139
Page 143 of 164

TIRE PRESSURES
Check the inflation pressure of each tire, including the spare tire, at least monthly and inflate to
the recommended pressure for your vehicle.
The tire pressures recommended for your vehicle are found on the “Tire and Loading Informa-
tion” label located on the driver’s side door opening.
NOTE:
Refer to the Owner's Manual on the DVD for
more information regarding tire warnings and
instructions.
WARNING!
•Overloadingofyourtiresisdangerous.Overloadingcancausetirefailure,affectvehicle
handling, and increase your stopping distance. Use tires of the recommended load
capacity for your vehicle.Neveroverloadthem.
• Improperly inflated tires are dangerous and can cause collisions. Under-inflation increases
tire flexing and can result in over-heating and tire failure. Over-inflation reduces a tire’s
ability to cushion shock. Objects on the road and chuck holes can cause damage that
results in tire failure. Unequal tire pressures can cause steering problems. You could lose
control of your vehicle. Over-inflated or under-inflated tires can affect vehicle handling
and can fail suddenly, resulting in loss of vehicle control. Always drive with each tire inflated
to the recommended cold tire inflation pressure.
Tire And Loading Information Location(Example)
MAINTAINING YOUR VEHICLE
141
Page 154 of 164
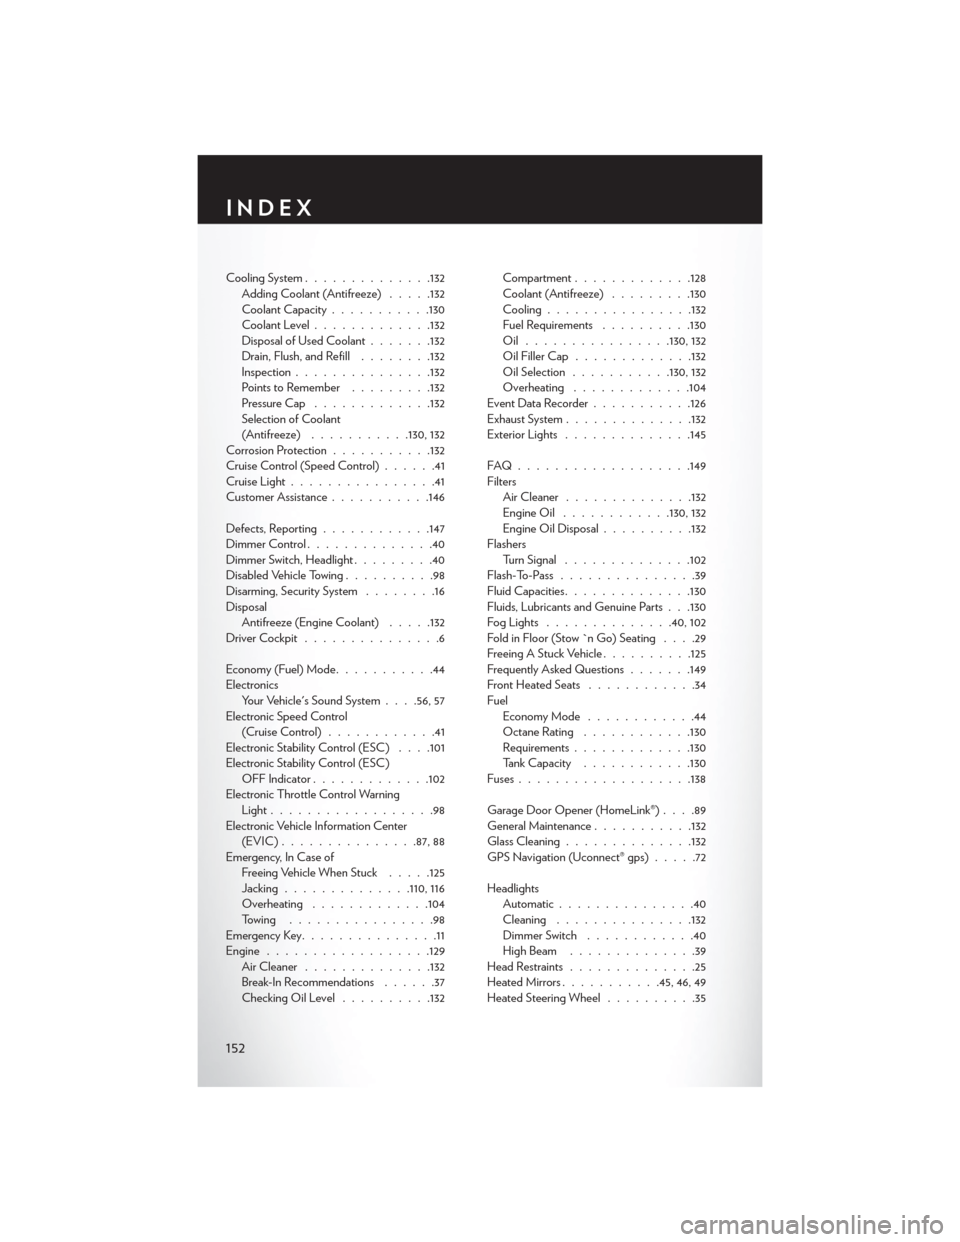
Cooling System..............132Adding Coolant (Antifreeze).....132Coolant Capacity...........130Coolant Level.............132Disposal of Used Coolant.......132Drain, Flush, and Refill........132Inspection...............132Points to Remember.........132Pressure Cap.............132Selection of Coolant(Antifreeze)...........130, 132Corrosion Protection...........132Cruise Control (Speed Control)......41Cruise Light................41Customer Assistance...........146
Defects, Reporting............147Dimmer Control..............40Dimmer Switch, Headlight.........40Disabled Vehicle Towing..........98Disarming, Security System........16DisposalAntifreeze (Engine Coolant).....132Driver Cockpit . . . . . . . . . . . . . . .6
Economy (Fuel) Mode...........44ElectronicsYo u r Ve h i c l e ' s S o u n d S y s t e m. . . .56, 57Electronic Speed Control(Cruise Control)............41Electronic Stability Control (ESC) . . . .101Electronic Stability Control (ESC)OFF Indicator.............102Electronic Throttle Control WarningLight . . . . . . . . . . . . . . . . . .98Electronic Vehicle Information Center(EVIC) . . . . . . . . . . . . . ..87, 88Emergency, In Case ofFreeing Vehicle When Stuck.....125Jacking..............110, 116Overheating.............104To w i n g . . . . . . . . . . . . . . . . 9 8Emergency Key...............11Engine . . . . . . . . . . . . . . . . ..129Air Cleaner..............132Break-In Recommendations......37Checking Oil Level..........132
Compartment.............128Coolant (Antifreeze).........130Cooling................132Fuel Requirements..........130Oil . . . . . . . . . . . . . . ..130, 132Oil Filler Cap.............132Oil Selection...........130, 132Overheating.............104Event Data Recorder . . . . . . . . . ..126Exhaust System..............132Exterior Lights..............145
FAQ . . . . . . . . . . . . . . . . . ..149FiltersAir Cleaner..............132Engine Oil............130, 132Engine Oil Disposal..........132FlashersTurn Signal..............102Flash-To-Pass...............39Fluid Capacities..............130Fluids, Lubricants and Genuine Parts . . .130Fog Lights . . . . . . . . . . . . ..40, 102Fold in Floor (Stow `n Go) Seating....29Freeing A Stuck Vehicle..........125Frequently Asked Questions.......149Front Heated Seats............34FuelEconomy Mode . . . . . . . . . . . .44Octane Rating............130Requirements.............130Ta n k C a p a c i t y............130Fuses...................138
Garage Door Opener (HomeLink®)....89General Maintenance...........132Glass Cleaning..............132GPS Navigation (Uconnect® gps).....72
HeadlightsAutomatic...............40Cleaning...............132Dimmer Switch............40High Beam . . . . . . . . . . . . . .39Head Restraints..............25Heated Mirrors...........45, 46, 49Heated Steering Wheel..........35
INDEX
152