engine CHRYSLER TOWN AND COUNTRY 2015 5.G Owner's Manual
[x] Cancel search | Manufacturer: CHRYSLER, Model Year: 2015, Model line: TOWN AND COUNTRY, Model: CHRYSLER TOWN AND COUNTRY 2015 5.GPages: 164, PDF Size: 22.47 MB
Page 109 of 164
If the sealant (white fluid) does not flow within0–10seconds through the Sealant Hose (6):
1. Press the Power Button (4) to turn Off the Tire Service Kit. Disconnect the Sealant Hose (6)
from the valve stem. Make sure the valve stem is free of debris. Reconnect the Sealant
Hose (6) to the valve stem. Check that the Mode Select Knob (5) is in the Sealant Mode
position and not Air Mode. Press the Power Button (4) to turn On the Tire Service Kit.
2. Connect the Power Plug (8) to a different 12 Volt power outlet in your vehicle or another
vehicle, if available. Make sure the engine is running before turning ON the Tire Service Kit.
3. The Sealant Bottle (1) may be empty due to previous use. Call for assistance.
NOTE:
If the Mode Select Knob (5) is on Air Mode and the pump is operating, air will dispense from the
Air Pump Hose (7) only, not the Sealant Hose (6).
If the sealant (white fluid) does flow through the Sealant Hose (6):
1. Continue to operate the pump until sealant is no longer flowing through the hose (typically
takes 30 - 70 seconds). As the sealant flows through the Sealant Hose (6), the Pressure Gauge
(3) can read as high as 70 psi (4.8 Bar). The Pressure Gauge (3) will decrease quickly from
approximately 70 psi (4.8 Bar) to the actual tire pressure when the Sealant Bottle (1) is empty.
2. The pump will start to inject air into the tire immediately after the Sealant Bottle (1) is empty.
Continue to operate the pump and inflate the tire to the pressure indicated on the tire pressure
label on the driver-side latch pillar (recommended pressure). Check the tire pressure by
looking at the Pressure Gauge (3).
If the tire does not inflate to at least 26 psi (1.8 Bar) pressure within 15 minutes:
The tire is too badly damaged. Do not attempt to drive the vehicle further. Call for assistance.
NOTE:
If the tire becomes over-inflated, press the Deflation Button to reduce the tire pressure to the
recommended inflation pressure before continuing.
If the tire inflates to the recommended pressure or is at least 26 psi (1.8 Bar) pressure within
15 minutes:
1. Press the Power Button (4) to turn off the Tire Service Kit.
2. Remove the Speed Limit sticker from the top of the Sealant Bottle (1) and place the sticker on
the instrument panel.
3. Immediately disconnect the Sealant Hose (6) from the valve stem, reinstall the cap on the
fitting at the end of the hose, and place the Tire Service Kit in the vehicle storage location.
Quickly proceed to (D) “Drive Vehicle.”
(D) Drive Vehicle:
Immediately after injecting sealant and inflating the tire, drive the vehicle 5 miles (8 km) or
10 minutes to ensure distribution of the Tire Service Kit Sealant within the tire. Do not exceed
55 mph (88 km/h).
WHAT TO DO IN EMERGENCIES
107
Page 123 of 164
WARNING!
•Donotattempttochangeatireonthesideofthevehicleclosetomovingtraffic.Pullfar
enough off the road to avoid the danger of being hit when operating the jack or changing
the wheel.
•Beingunderajacked-upvehicleisdangerous.Thevehiclecouldslipoffthejackandfallon
you. You could be crushed. Never put any part of your body under a vehicle that is on a
jack. If you need to get under a raised vehicle, take it to a service center where it can be
raised on a lift.
•Neverstartorruntheenginewhilethevehicleisonajack.
• The jack is designed to be used as a tool for changing tires only. The jack should not be
used to lift the vehicle for service purposes. The vehicle should be jacked on a firm level
surface only. Avoid ice or slippery areas.
•Carefullyfollowthesetirechangingwarningstohelppreventpersonalinjuryordamageto
your vehicle:
•Alwaysparkonafirm,levelsurfaceasfarfromtheedgeoftheroadwayaspossiblebefore
raising the vehicle.
• Turn on the Hazard Warning flasher.
• Block the wheel diagonally opposite the wheel to be raised.
•SettheparkingbrakefirmlyandsetanautomatictransmissioninPARK;amanual
transmission in REVERSE.
•Donotletanyonesitinthevehiclewhenitisonajack.
•Donotgetunderthevehiclewhenitisonajack.
•Onlyusethejackinthepositionsindicatedandforliftingthisvehicleduringatirechange.
•Ifworkingonorneararoadway,beextremelycarefulofmotortraffic.
•Toassurethatsparetires,flatorinflated,aresecurelystowed,sparesmustbestowedwith
the valve stem facing the ground.
•Raisingthevehiclehigherthannecessarycanmakethevehiclelessstable.Itcouldslipoff
the jack and hurt someone near it. Raise the vehicle only enough to remove the tire.
•Toavoidtheriskofforcingthevehicleoffthejack,donottightenthewheelnutsfullyuntil
the vehicle has been lowered. Failure to follow this warning may result in personal injury.
•Aloosetireorjackthrownforwardinacollisionorhardstopcouldendangertheoccupants
of the vehicle. Always stow the jack parts andthe spare tire in the places provided. Have
the deflated (flat) tire repaired or replaced immediately.
•Verifythatbothretainertabsofthewheelspacerhavebeenproperlyextendedthrough
the center of the wheel and spare tire/cover assembly. Failure to properly engage both
retainer tabs could result in loss of the spare tire and cover assembly, which will cause
vehicle damage and may cause loss of vehicle control.
WHAT TO DO IN EMERGENCIES
121
Page 124 of 164
JUMP-STARTING
If your vehicle has a discharged battery it can be jump-started using a set of jumper cables and a
battery in another vehicle or by using a portable battery booster pack.
Jump-starting can be dangerous if done improperly so please follow the procedures in this
section carefully.
NOTE:
When using a portable battery booster pack
follow the manufacturer’s operating instruc-
tions and precautions.
Preparations For Jump-Start
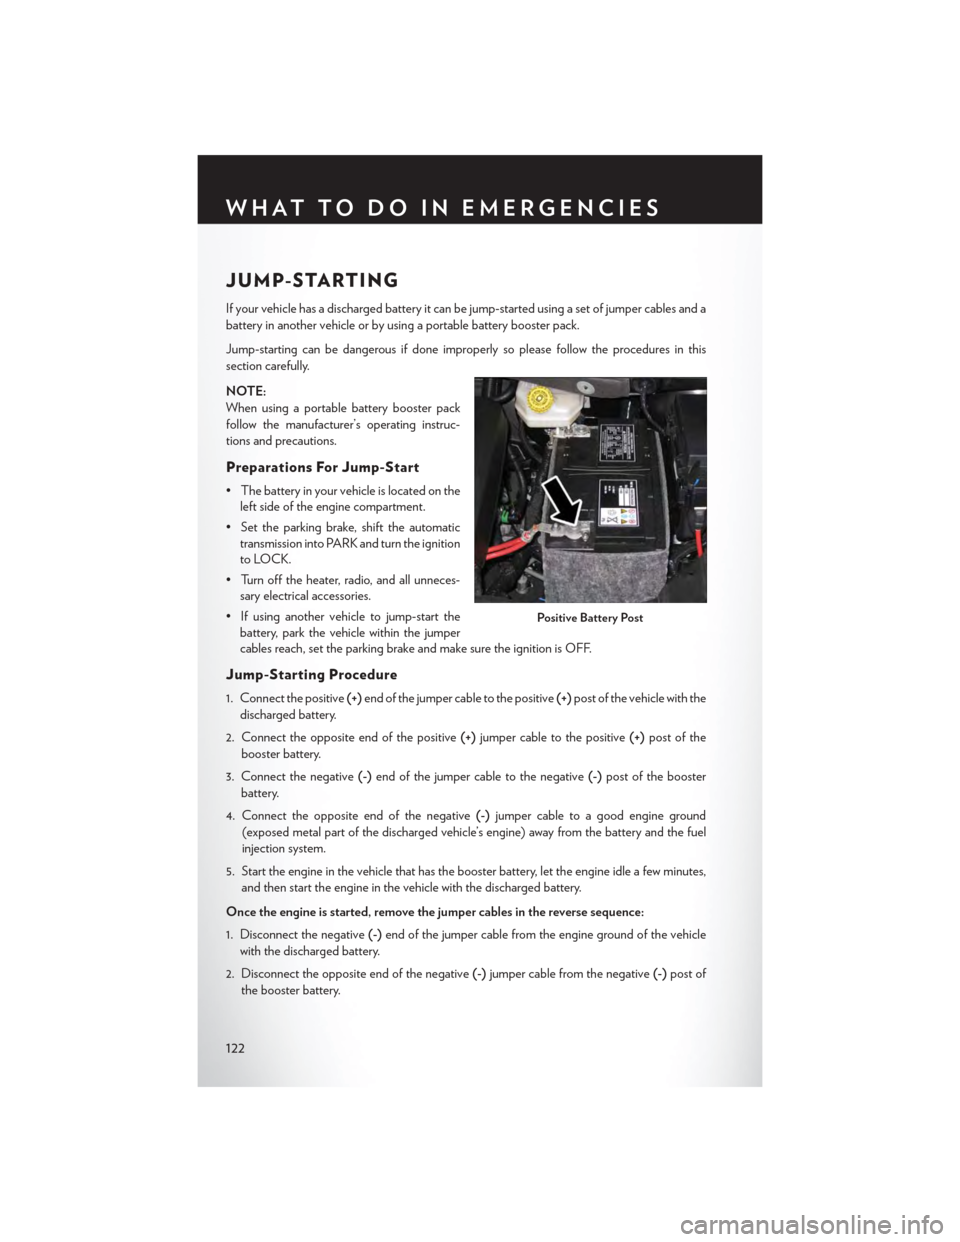
•Thebatteryinyourvehicleislocatedonthe
left side of the engine compartment.
•Settheparkingbrake,shifttheautomatic
transmission into PARK and turn the ignition
to LOCK.
• Turn off the heater, radio, and all unneces-
sary electrical accessories.
•Ifusinganothervehicletojump-startthe
battery, park the vehicle within the jumper
cables reach, set the parking brake and make sure the ignition is OFF.
Jump-Starting Procedure
1. Connect the positive(+)end of the jumper cable to the positive(+)post of the vehicle with the
discharged battery.
2. Connect the opposite end of the positive(+)jumper cable to the positive(+)post of the
booster battery.
3. Connect the negative(-)end of the jumper cable to the negative(-)post of the booster
battery.
4. Connect the opposite end of the negative(-)jumper cable to a good engine ground
(exposed metal part of the discharged vehicle’s engine) away from the battery and the fuel
injection system.
5. Start the engine in the vehicle that has the booster battery, let the engine idle a few minutes,
and then start the engine in the vehicle with the discharged battery.
Once the engine is started, remove the jumper cables in the reverse sequence:
1. Disconnect the negative(-)end of the jumper cable from the engine ground of the vehicle
with the discharged battery.
2. Disconnect the opposite end of the negative(-)jumper cable from the negative(-)post of
the booster battery.
Positive Battery Post
WHAT TO DO IN EMERGENCIES
122
Page 125 of 164
3. Disconnect the positive(+)end of the jumper cable from the positive(+)post of the booster
battery.
4. Disconnect the opposite end of the positive(+)jumper cable from the positive(+)post of the
vehicle with the discharged battery.
NOTE:
If frequent jump-starting is required to start your vehicle you should have the battery and
charging system inspected at your authorized dealer.
CAUTION!
•Donotuseaportablebatteryboosterpackoranyotherboostersourcewithasystem
voltage greater than 12 Volts or damage to the battery, starter motor, alternator or
electrical system may occur.
•Failuretofollowtheseprocedurescouldresultindamagetothechargingsystemofthe
booster vehicle or the discharged vehicle.
•Accessoriesthatcanbepluggedintothevehiclepoweroutletsdrawpowerfromthe
vehicle’s battery, even when not in use (e.g., cellular phones, etc.). Eventually, if plugged in
long enough, the vehicle’s battery discharges sufficiently to degrade battery life and/or
prevent the engine from starting.
WARNING!
•Whentemperaturesarebelowthefreezingpoint,electrolyteinadischargedbatterymay
freeze. Do not attempt jump-starting because the battery could rupture or explode and
cause personal injury. Battery temperature must be brought above the freezing point
before attempting a jump-start.
•Takecaretoavoidtheradiatorcoolingfanwheneverthehoodisraised.Itcanstartanytime
the ignition switch is on. You can be injured by moving fan blades.
•Removeanymetaljewelry,suchaswatchbandsorbracelets,thatmightmakean
inadvertent electrical contact. You could be severely injured.
•Batteriescontainsulfuricacidthatcanburnyourskinoreyesandgeneratehydrogengas
which is flammable and explosive. Keep open flames or sparks away from the battery.
•Donotallowvehiclestotoucheachotherasthiscouldestablishagroundconnectionand
personal injury could result.
• Failure to follow this procedure could result in personal injury or property damage due to
battery explosion.
•Donotconnectthecabletothenegativepost(-)ofthedischargedbattery.Theresulting
electrical spark could cause the battery to explode and could result in personal injury.
WHAT TO DO IN EMERGENCIES
123
Page 126 of 164

SHIFT LEVER OVERRIDE
If a malfunction occurs and the shift lever can-
not be moved out of the PARK position, you
can use the following procedure to temporarily
move the shift lever:
1. To access the shift lever override, remove
the cover located to the top right of the shift
lever in the instrument panel.
2. Firmly set the parking brake.
3. Turn the ignition switch to the ACC or ON
position without starting the engine.
4. Press and maintain firm pressure on the
brake pedal.
5.The override can be activated by pressing the
white-colored tab, which can be accessed
through the hole in the instrument panel.
6. Move the shift lever into the NEUTRAL position.
7. The vehicle may then be started in NEUTRAL.
8. Reinstall the override cover.
TOWING A DISABLED VEHICLE
To w i n g C o n d i t i o n W h e e l s O F F t h e G r o u n d A L L M O D E L S
Flat TowNONEIf transmission is operable:• Transmission inNEUTRAL•25 mph (40 km/h)maxspeed•15 miles (24 km)maxdistanceWheel liftRear
FrontOK
FlatbedALLBEST METHOD
Shift Lever Override
WHAT TO DO IN EMERGENCIES
124
Page 127 of 164

FREEING A STUCK VEHICLE
If your vehicle becomes stuck in mud, sand or snow, it can often be moved using a rocking motion.
Tu r n y o u r s t e e r i n g w h e e l r i g h t a n d l e f t t o c l e a r t h e a r e a a r o u n d t h e f r o n t w h e e l s . T h e n s h i f t b a c k
and forth between DRIVE and REVERSE while gently pressing the accelerator. Use the least
amount of accelerator pedal pressure that will maintain the rocking motion, without spinning the
wheels or racing the engine.
NOTE:
Press the "ESC Off" switch, to place the Electronic Stability Control (ESC ) system in "Partial
Off" mode before rocking the vehicle. Once the vehicle has been freed, press the "ESC Off"
switch again to restore "ESC On" mode.
CAUTION!
•When“rocking”astuckvehiclebyshiftingbetweenREVERSEandDRIVE,donotspin
the wheels faster than 15 mph (24 km/h), or drivetrain damage may result.
•Revvingtheengineorspinningthewheelstoofastmayleadtotransmissionoverheating
and failure. It can also damage the tires. Do not spin the wheels above 30 mph (48 km/h)
while in gear (no transmission shifting occurring).
WARNING!
Fast spinning tires can be dangerous. Forces generated by excessive wheel speeds may cause
tire damage or failure. A tire could explode and injure someone. Do not spin your vehicle's
wheels faster than 30 mph (48 km/h) when you are stuck. Do not let anyone near a spinning
wheel, no matter what the speed.
WHAT TO DO IN EMERGENCIES
125
Page 130 of 164
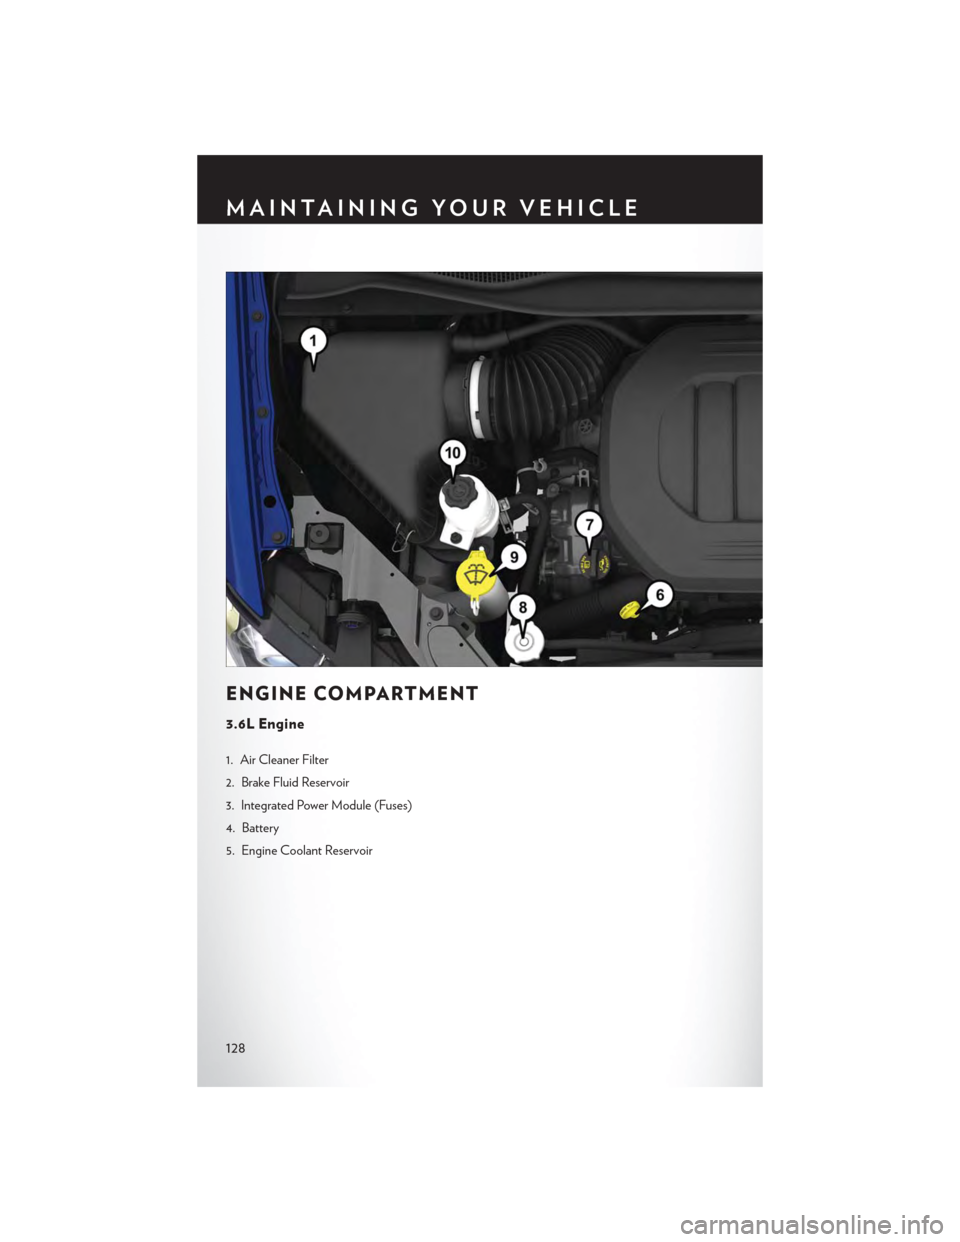
ENGINE COMPARTMENT
3.6L Engine
1. Air Cleaner Filter
2. Brake Fluid Reservoir
3. Integrated Power Module (Fuses)
4. Battery
5. Engine Coolant Reservoir
MAINTAINING YOUR VEHICLE
128
Page 131 of 164

6. Engine Oil Dipstick
7. Engine Oil Fill
8. Engine Coolant Pressure Cap
9. Washer Fluid Reservoir
10. Power Steering Fluid Reservoir
MAINTAINING YOUR VEHICLE
129
Page 132 of 164
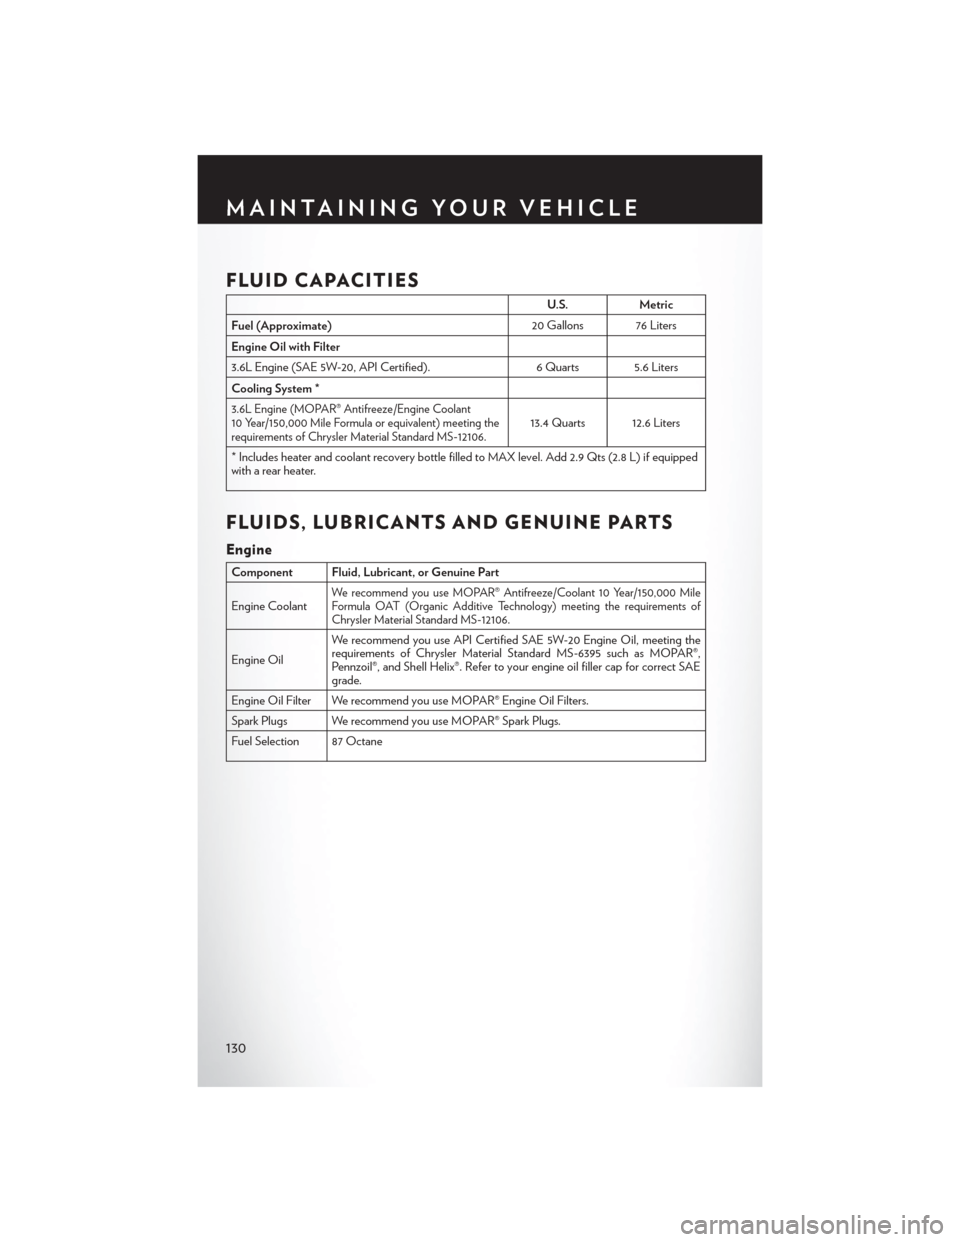
FLUID CAPACITIES
U.S.Metric
Fuel (Approximate)20 Gallons 76 Liters
Engine Oil with Filter
3.6L Engine (SAE 5W-20, API Certified).6 Quarts 5.6 Liters
Cooling System *
3.6L Engine (MOPAR® Antifreeze/Engine Coolant10 Year/150,000 Mile Formula or equivalent) meeting therequirements of Chrysler Material Standard MS-12106.13.4 Quarts 12.6 Liters
*IncludesheaterandcoolantrecoverybottlefilledtoMAXlevel.Add2.9Qts(2.8L)ifequippedwith a rear heater.
FLUIDS, LUBRICANTS AND GENUINE PARTS
Engine
Component Fluid, Lubricant, or Genuine Part
Engine CoolantWe r e c o m m e n d y o u u s e M O PA R ® A n t i f r e e z e / C o o l a n t 1 0 Ye a r/ 1 5 0 , 0 0 0 M i l eFormula OAT (Organic Additive Technology) meeting the requirements ofChrysler Material Standard MS-12106.
Engine Oil
We r e c o m m e n d y o u u s e A P I C e r t i f i e d S A E 5 W- 2 0 En g i n e O i l , m e e t i n g t h erequirements of Chrysler Material Standard MS-6395 such as MOPAR®,Pennzoil®, and Shell Helix®. Refer to your engine oil filler cap for correct SAEgrade.
Engine Oil Filter We recommend you use MOPAR® Engine Oil Filters.
Spark Plugs We recommend you use MOPAR® Spark Plugs.
Fuel Selection 87 Octane
MAINTAINING YOUR VEHICLE
130
Page 133 of 164
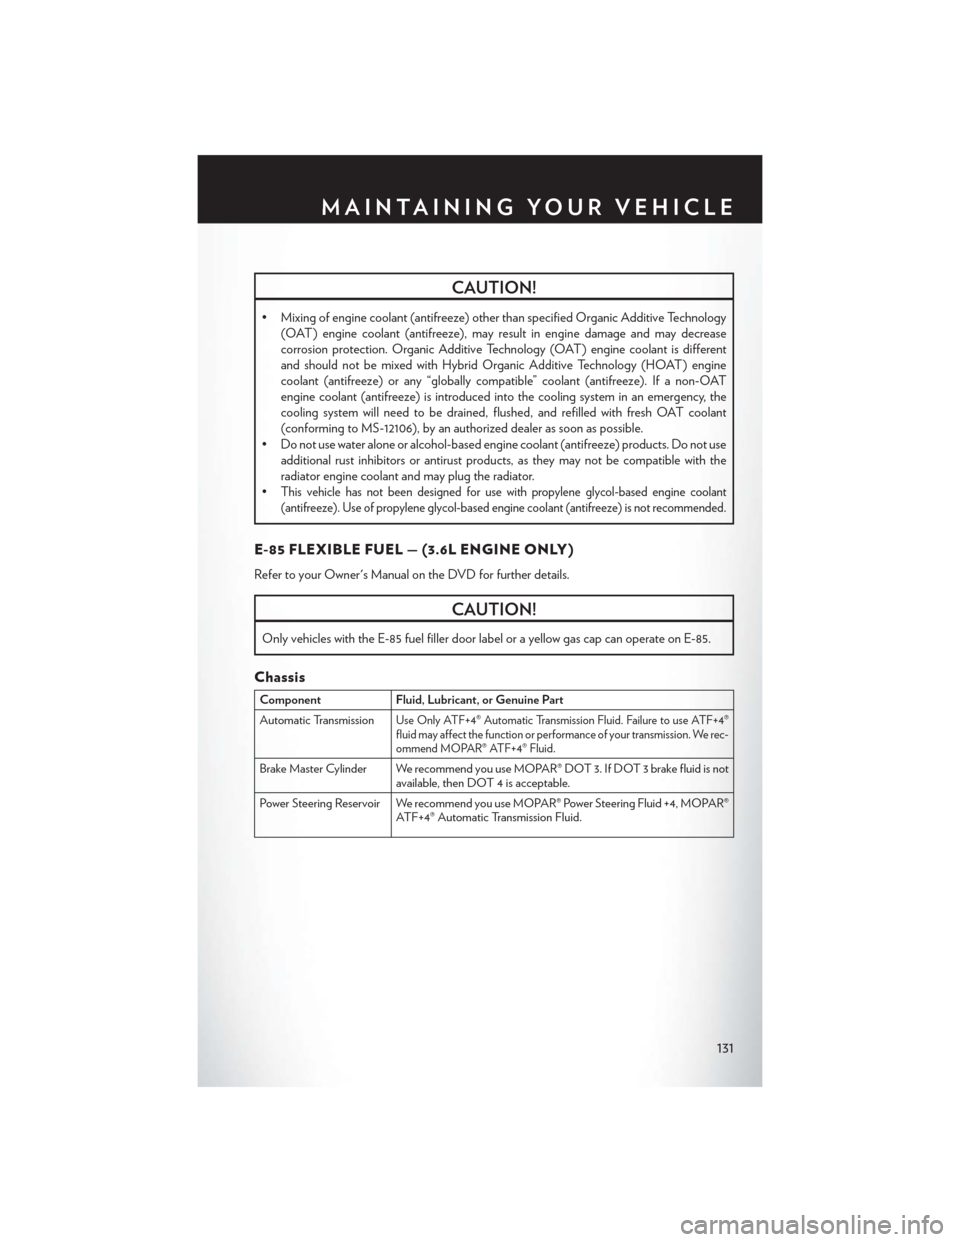
CAUTION!
•Mixingofenginecoolant(antifreeze)otherthanspecifiedOrganicAdditiveTechnology
(OAT) engine coolant (antifreeze), may result in engine damage and may decrease
corrosion protection. Organic Additive Technology (OAT) engine coolant is different
and should not be mixed with Hybrid Organic Additive Technology (HOAT) engine
coolant (antifreeze) or any “globally compatible” coolant (antifreeze). If a non-OAT
engine coolant (antifreeze) is introduced into the cooling system in an emergency, the
cooling system will need to be drained, flushed, and refilled with fresh OAT coolant
(conforming to MS-12106), by an authorized dealer as soon as possible.
•Donotusewateraloneoralcohol-basedenginecoolant(antifreeze)products.Donotuse
additional rust inhibitors or antirust products, as they may not be compatible with the
radiator engine coolant and may plug the radiator.
•This vehicle has not been designed for use with propylene glycol-based engine coolant
(antifreeze). Use of propylene glycol-based engine coolant (antifreeze) is not recommended.
E-85 FLEXIBLE FUEL — (3.6L ENGINE ONLY )
Refer to your Owner's Manual on the DVD for further details.
CAUTION!
Only vehicles with the E-85 fuel filler door label or a yellow gas cap can operate on E-85.
Chassis
ComponentFluid, Lubricant, or Genuine Part
Automatic TransmissionUse Only ATF+4® Automatic Transmission Fluid. Failure to use ATF+4®fluid may affect the function or performance of your transmission. We rec-ommend MOPAR® ATF+4® Fluid.
Brake Master Cylinder We recommend you use MOPAR® DOT 3. If DOT 3 brake fluid is notavailable, then DOT 4 is acceptable.
Power Steering Reservoir We recommend you use MOPAR® Power Steering Fluid +4, MOPAR®ATF+4® Automatic Transmission Fluid.
MAINTAINING YOUR VEHICLE
131