jacking CHRYSLER TOWN AND COUNTRY 2015 5.G User Guide
[x] Cancel search | Manufacturer: CHRYSLER, Model Year: 2015, Model line: TOWN AND COUNTRY, Model: CHRYSLER TOWN AND COUNTRY 2015 5.GPages: 164, PDF Size: 22.47 MB
Page 3 of 164

INTRODUCTION/WELCOME
WELCOME FROM CHRYSLERGROUP LLC . . . . . . . . . . . . . . . . . . 3
CONTROLS AT A GLANCE
DRIVER COCKPIT...............6INSTRUMENT CLUSTER...........8
GETTING STARTED
KEY FOB . . . . . . . . . . . . . . . . . . . . 10REMOTE START...............12KEYLESS ENTER-N-GO™..........12VEHICLE SECURITY ALARM........16SEAT BELT SYSTEMS.............17SUPPLEMENTAL RESTRAINTSYSTEM (SRS) — AIR BAGS.........18CHILD RESTRAINTS.............21HEAD RESTRAINTS.............25FRONT SEATS . . . . . . . . . . . . . . . . 27REAR SEATS..................29HEATED SEATS . . . . . . . . . . . . . . . . 34HEATED STEERING WHEEL........35TILT/TELESCOPING STEERINGCOLUMN . . . . . . . . . . . . . . . . . . . 35ADJUSTABLE PEDALS............36
OPERATING YOUR VEHICLE
ENGINE BREAK-INRECOMMENDATIONS............37TURN SIGNAL/WIPER/WASHER/HIGHBEAM LEVER.................38HEADLIGHT SWITCH AND HALOLIGHT SWITCH . . . . . . . . . . . . . . . . 40ELECTRONIC SPEED CONTROL......41ELECTRONIC RANGE SELECTION (ERS) . . 43FUEL ECONOMY (ECON) MODE.....44MANUAL CLIMATE CONTROLS......45THREE ZONE MANUAL CLIMATECONTROLS..................46THREE ZONE AUTOMATICTEMPERATURE CONTROLS (ATC)....48PA R K S E N S E ® R E A R PA R K A S S I S T.....51PA R K V I E W ® R E A R B AC K- U P C A M E R A . . 5 1BLIND SPOT MONITORING WITHREAR CROSS PATH . .............51POWER SLIDING SIDE DOORS .......52POWER LIFTGATE . . . . . . . . . . . . . . 52POWER SUNROOF.............53WIND BUFFETING..............55
ELECTRONICS
YO U R V E H I C L E ' S S O U N D SYS T E M....56Uconnect® 130..................58Uconnect® 130 WITH SiriusXM SATELLITERADIO.....................60Uconnect® 430/430N..............63
SiriusXM SATELLITE RADIO/TRAVELLINK . . . . . . . . . . . . . . . . . . . . . . . 73STEERING WHEEL AUDIO CONTROLS..78SETTING THE ANALOG CLOCK . . . . . 78iPod®/USB/MP3 CONTROL.........79Uconnect® Phone ................80Uconnect® VOICE COMMAND . . . . . . . 82Bluetooth® STREAMING AUDIO . . . . . . 85VIDEO ENTERTAINMENTSYSTEM (VES™)................85ELECTRONIC VEHICLE INFORMATIONCENTER (EVIC) ................87PROGRAMMABLE FEATURES.......88UNIVERSAL GARAGE DOOR OPENER(HomeLink®)..................89POWER INVERTER..............92POWER OUTLETS..............93
UTILITY
IN-FLOOR STORAGE — STOW'N GO® . . 95ROOF LUGGAGE RACK..........95TRAILER TOWING WEIGHTS(MAXIMUM TRAILER WEIGHTRATINGS) . . . . . . . . . . . . . . . . . . . 96RECREATIONAL TOWING(BEHIND MOTORHOME, ETC.)......97
WHAT TO DO IN EMERGENCIES
ROADSIDE ASSISTANCE..........98INSTRUMENT CLUSTER WARNINGLIGHTS . . . . . . . . . . . . . . . . . . . . . 98INSTRUMENT CLUSTER INDICATORLIGHTS . . . . . . . . . . . . . . . . . . . . 102IF YOUR ENGINE OVERHEATS . . . . . . 104TIRE SERVICE KIT . . . . . . . . . . . . . . 104JACKING AND TIRE CHANGING . . . . . 110JUMP-STARTING..............122SHIFT LEVER OVERRIDE..........124TOWING A DISABLED VEHICLE.....124FREEING A STUCK VEHICLE . ......125EVENT DATA RECORDER (EDR).....126
MAINTAINING YOUR VEHICLE
OPENING THE HOOD...........127ENGINE COMPARTMENT.........128FLUID CAPACITIES . . . . . . . . . . . . . 130FLUIDS, LUBRICANTS ANDGENUINE PARTS . .............130MAINTENANCE PROCEDURES . . . . . . 132MAINTENANCE SCHEDULE . . .....132MAINTENANCE RECORD.........136FUSES.....................137TIRE PRESSURES...............141SPARE TIRES — IF EQUIPPED.......142ADDING FUEL................143WHEEL AND WHEEL TRIM CARE . . . . . 144REPLACEMENT BULBS...........145
TA B L E O F CO N T E N TS
Page 112 of 164

JACKING AND TIRE CHANGING
Jack Location
Yo u r v e h i c l e m a y b e e q u i p p e d w i t h j a c k i n g a n d t i r e c h a n g i n g e q u i p m e n t .
The jack, jack handle and winch handle tools are stowed behind the rear left side trim panel in the
rear cargo area. Turn the two cover latches to release the cover.
Remove the pouch containing the scissors jack, jack handle, and tools.
Spare Tire Removal
The spare tire is stowed inside a protective cover located under the center of the vehicle between
the front doors by means of a cable winch mechanism. The “spare tire drive” nut is located on the
floor, under a plastic cap at the front of the floor console or under front super console forward bin
liner.
To A c c e s s S p a r e T i r e W i n c h D r i v e N u t
To a c c e s s t h e s p a r e t i r e w i n c h d r i v e n u t a n d l o w e r t h e s p a r e t i r e , y o u w i l l n e e d t o r e f e r t o o n e o f
the following center console configurations.
Jack Location
WHAT TO DO IN EMERGENCIES
110
Page 117 of 164

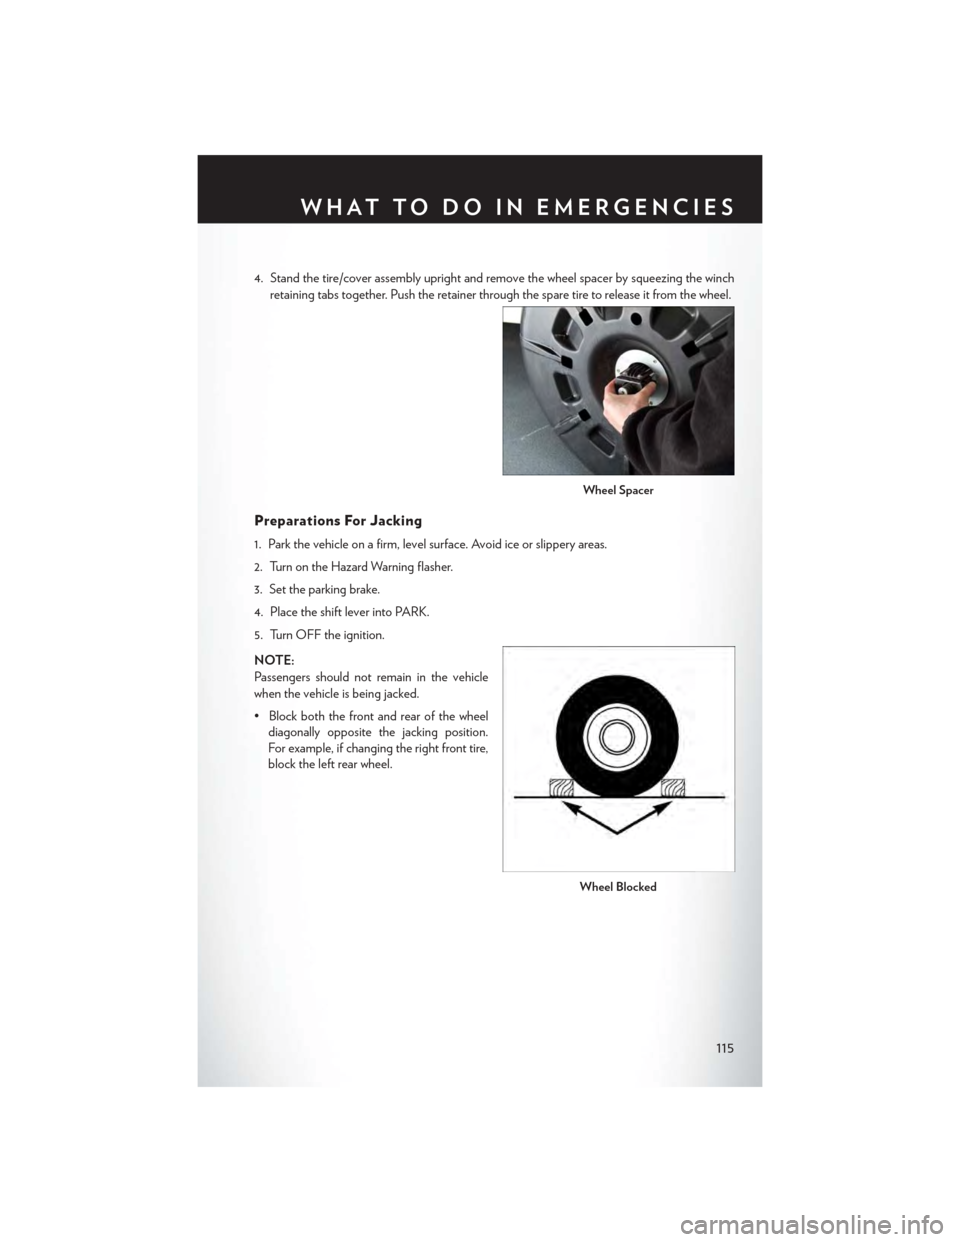
4. Stand the tire/cover assembly upright and remove the wheel spacer by squeezing the winch
retaining tabs together. Push the retainer through the spare tire to release it from the wheel.
Preparations For Jacking
1. Park the vehicle on a firm, level surface. Avoid ice or slippery areas.
2. Turn on the Hazard Warning flasher.
3. Set the parking brake.
4. Place the shift lever into PARK.
5. Turn OFF the ignition.
NOTE:
Passengers should not remain in the vehicle
when the vehicle is being jacked.
• Block both the front and rear of the wheel
diagonally opposite the jacking position.
For example, if changing the right front tire,
block the left rear wheel.
Wheel Spacer
Wheel Blocked
WHAT TO DO IN EMERGENCIES
115
Page 118 of 164

Jacking Instructions
1. Loosen (but do not remove) the wheel lug
nuts by turning them to the left one turn
while the wheel is still on the ground.
2. There are two jack engagement locations on each side of the vehicle body. These locations are
on the sill flange of the vehicle body.
Warning Label
Jack Engagement Locations
WHAT TO DO IN EMERGENCIES
116
Page 119 of 164

Rear jack locations are between a pair of down-facing tabs on the sill flange of the vehicle
side body.
Front jack location is on the sill flange of the vehicle body and is located 6 in (150 mm) from
door edge.
NOTE:
In some situations the jack may need to be
placed on its side in order to be pushed under
the vehicle. Return the jack to its correct orien-
tation once it is under the vehicle.
3. Place the wrench on the jack screw and turn to the right until the jack head is properly engaged
in the described location.Do not raise the vehicle until you are sure the jack is securely
engaged.
4. Raise the vehicle by turning the jack screw to the right, using the swivel wrench. Raise the
vehicle only until the tire just clears the surface and enough clearance is obtained to install the
spare tire. Minimum tire lift provides maximum stability.
5. Remove the wheel lug nuts, for vehicles with wheel covers, remove the cover from the wheel
by hand. Do not pry the wheel cover off. Then pull the wheel off the hub.
Rear Jacking Location Engaged
Front Jacking Location Engaged
WHAT TO DO IN EMERGENCIES
117
Page 122 of 164

Ve h i c l e s W i t h o u t W h e e l C o v e r s
1. Mount the road tire on the axle.
2. Install the remaining lug nuts with the cone shaped end of the nut toward the wheel. Lightly
tighten the lug nuts.
3. Lower the vehicle to the ground by turning the jack handle counterclockwise.
4. Finish tightening the lug nuts. Push down on the wrench while at the end of the handle for
increased leverage. Tighten the lug nuts in a star pattern until each nut has been tightened
twice. The correct tightness of each lug nut is 100 ft/lbs (135 N·m). If in doubt about the
correct tightness, have them checked with a torque wrench by your authorized dealer or
service station.
5. After 25 miles (40 km) check the lug nut torque with a torque wrench to ensure that all lug nuts
are properly seated against the wheel.
CAUTION!
• The winch mechanism is designed for use with the winch T-handle only. Use of air wrench
or other power tools is not recommended and can damage the winch.
•Donotattempttoraisethevehiclebyjackingonlocationsotherthanthoseindicatedin
the Jacking Instructions for this vehicle.
•Besuretomountthesparetirewiththevalvestemfacingoutward.Thevehiclecouldbe
damaged if the spare tire is mounted incorrectly.
•Thecompactsparetire/coverassemblymustbeusedwhenthecompactsparetireis
stored. Failure to use this cover could drastically reduce the life of the compact spare tire.
•Thewinchmechanismisdesignedspecificallytostowacompactsparetireonly.Donot
attempt to use the winch to stow the full size flat tire, or any other full-size tire. Vehicle
damage may result.
WHAT TO DO IN EMERGENCIES
120
Page 154 of 164

Cooling System..............132Adding Coolant (Antifreeze).....132Coolant Capacity...........130Coolant Level.............132Disposal of Used Coolant.......132Drain, Flush, and Refill........132Inspection...............132Points to Remember.........132Pressure Cap.............132Selection of Coolant(Antifreeze)...........130, 132Corrosion Protection...........132Cruise Control (Speed Control)......41Cruise Light................41Customer Assistance...........146
Defects, Reporting............147Dimmer Control..............40Dimmer Switch, Headlight.........40Disabled Vehicle Towing..........98Disarming, Security System........16DisposalAntifreeze (Engine Coolant).....132Driver Cockpit . . . . . . . . . . . . . . .6
Economy (Fuel) Mode...........44ElectronicsYo u r Ve h i c l e ' s S o u n d S y s t e m. . . .56, 57Electronic Speed Control(Cruise Control)............41Electronic Stability Control (ESC) . . . .101Electronic Stability Control (ESC)OFF Indicator.............102Electronic Throttle Control WarningLight . . . . . . . . . . . . . . . . . .98Electronic Vehicle Information Center(EVIC) . . . . . . . . . . . . . ..87, 88Emergency, In Case ofFreeing Vehicle When Stuck.....125Jacking..............110, 116Overheating.............104To w i n g . . . . . . . . . . . . . . . . 9 8Emergency Key...............11Engine . . . . . . . . . . . . . . . . ..129Air Cleaner..............132Break-In Recommendations......37Checking Oil Level..........132
Compartment.............128Coolant (Antifreeze).........130Cooling................132Fuel Requirements..........130Oil . . . . . . . . . . . . . . ..130, 132Oil Filler Cap.............132Oil Selection...........130, 132Overheating.............104Event Data Recorder . . . . . . . . . ..126Exhaust System..............132Exterior Lights..............145
FAQ . . . . . . . . . . . . . . . . . ..149FiltersAir Cleaner..............132Engine Oil............130, 132Engine Oil Disposal..........132FlashersTurn Signal..............102Flash-To-Pass...............39Fluid Capacities..............130Fluids, Lubricants and Genuine Parts . . .130Fog Lights . . . . . . . . . . . . ..40, 102Fold in Floor (Stow `n Go) Seating....29Freeing A Stuck Vehicle..........125Frequently Asked Questions.......149Front Heated Seats............34FuelEconomy Mode . . . . . . . . . . . .44Octane Rating............130Requirements.............130Ta n k C a p a c i t y............130Fuses...................138
Garage Door Opener (HomeLink®)....89General Maintenance...........132Glass Cleaning..............132GPS Navigation (Uconnect® gps).....72
HeadlightsAutomatic...............40Cleaning...............132Dimmer Switch............40High Beam . . . . . . . . . . . . . .39Head Restraints..............25Heated Mirrors...........45, 46, 49Heated Steering Wheel..........35
INDEX
152
Page 156 of 164

Lift Gate . . . . . . . . . . . . . . . .10Outlet (Auxiliary Electrical Outlet). . .93Seats..................27Power Steering Fluid...........131Preparation for Jacking..........115PretensionersSeat Belts...............17Programmable Electronic Features.....88
Radio Operation............59, 61Rain Sensitive Wiper System........38Rear Camera . . . . . . . . . . . . . . . .51Rear Cross Path . . . . . . . . . . . . . .51Rear Heated Seats.............34Rear ParkSense System...........51Recreational Towing............97Refrigerant................132Remote Keyless Entry (RKE)Lock The Doors . . . . . . . . . . . .10Remote Keyless Entry (RKE)......10Unlock The Doors...........10Remote Starting System..........12Replacement Bulbs............145Reporting Safety Defects.........147Restraint, Head..............25Rocking Vehicle When Stuck.......125Roof Rack (Luggage Rack)........95
Satellite Radio (Uconnect® studios). . .60, 62Schedule, Maintenance..........132Seat Belt Maintenance..........132Seat Belts.................17Adjustable Shoulder Belt........17Pretensioners.............17Reminder...............100Seat Belt Warning...........17Seats....................27Adjustment..............27Fold in Floor (Stow `n Go)......29Lumbar Support . . . . . . . . . . . .27Manual.................27Memory . . . . . . . . . . . . . . . .28Power . . . . . . . . . . . . . . . . .27Stow `n Go (Fold in Floor) . . . . . .29Security Alarm..............102Security Alarm.............16Selection of Coolant (Antifreeze).....130
Setting the Clock.............78Shift Lever Override...........124Signals, Turn..............38, 102Sirius Satellite Radio............73SIRIUS Travel Link.............73Spare Tire . . . . . . . . . . ..110, 142, 143Spark Plugs................130Speed ControlAccel/Decel..............41Cancel . . . . . . . . . . . . . . . . .42Resume................42Set . . . . . . . . . . . . . . . . . . .41StartingRemote . . . . . . . . . . . . . . . .12SteeringTilt Column..............35Wheel, Heated............35Steering Wheel Audio Controls......78Stow `n Go (Fold in Floor) Seats.....29Stuck, Freeing...............125Sun Roof . . . . . . . . . . . . . . . . . .53Supplemental Restraint System -Airbag . . . . . . . . . . . . . . . . .18
Tether Anchor, Child Restraint.......22Tilt Steering Column............35Ti re sAir Pressure..............141Changing...............110Compact Spare . . . . . . . . . . . .142Jacking..............110, 116Spare Tire . . . . . . . . . . . . . ..110Tire Service Kit............104, 105To u c h s c r e e n R a d i oCleaning Your Touchscreen Radio . . .70To w i n g . . . . . . . . . . . . . . . . . . . 9 6Disabled Vehicle...........124Recreational..............97Trailer TowingTrailer and Tongue Weight.......96Trailer Weight...............96TransmissionFluid...............131, 132Maintenance.............132Turn Signals..............38, 102
Uconnect® Voice Command........82
INDEX
154