warning light CHRYSLER TOWN AND COUNTRY 2015 5.G User Guide
[x] Cancel search | Manufacturer: CHRYSLER, Model Year: 2015, Model line: TOWN AND COUNTRY, Model: CHRYSLER TOWN AND COUNTRY 2015 5.GPages: 164, PDF Size: 22.47 MB
Page 3 of 164

INTRODUCTION/WELCOME
WELCOME FROM CHRYSLERGROUP LLC . . . . . . . . . . . . . . . . . . 3
CONTROLS AT A GLANCE
DRIVER COCKPIT...............6INSTRUMENT CLUSTER...........8
GETTING STARTED
KEY FOB . . . . . . . . . . . . . . . . . . . . 10REMOTE START...............12KEYLESS ENTER-N-GO™..........12VEHICLE SECURITY ALARM........16SEAT BELT SYSTEMS.............17SUPPLEMENTAL RESTRAINTSYSTEM (SRS) — AIR BAGS.........18CHILD RESTRAINTS.............21HEAD RESTRAINTS.............25FRONT SEATS . . . . . . . . . . . . . . . . 27REAR SEATS..................29HEATED SEATS . . . . . . . . . . . . . . . . 34HEATED STEERING WHEEL........35TILT/TELESCOPING STEERINGCOLUMN . . . . . . . . . . . . . . . . . . . 35ADJUSTABLE PEDALS............36
OPERATING YOUR VEHICLE
ENGINE BREAK-INRECOMMENDATIONS............37TURN SIGNAL/WIPER/WASHER/HIGHBEAM LEVER.................38HEADLIGHT SWITCH AND HALOLIGHT SWITCH . . . . . . . . . . . . . . . . 40ELECTRONIC SPEED CONTROL......41ELECTRONIC RANGE SELECTION (ERS) . . 43FUEL ECONOMY (ECON) MODE.....44MANUAL CLIMATE CONTROLS......45THREE ZONE MANUAL CLIMATECONTROLS..................46THREE ZONE AUTOMATICTEMPERATURE CONTROLS (ATC)....48PA R K S E N S E ® R E A R PA R K A S S I S T.....51PA R K V I E W ® R E A R B AC K- U P C A M E R A . . 5 1BLIND SPOT MONITORING WITHREAR CROSS PATH . .............51POWER SLIDING SIDE DOORS .......52POWER LIFTGATE . . . . . . . . . . . . . . 52POWER SUNROOF.............53WIND BUFFETING..............55
ELECTRONICS
YO U R V E H I C L E ' S S O U N D SYS T E M....56Uconnect® 130..................58Uconnect® 130 WITH SiriusXM SATELLITERADIO.....................60Uconnect® 430/430N..............63
SiriusXM SATELLITE RADIO/TRAVELLINK . . . . . . . . . . . . . . . . . . . . . . . 73STEERING WHEEL AUDIO CONTROLS..78SETTING THE ANALOG CLOCK . . . . . 78iPod®/USB/MP3 CONTROL.........79Uconnect® Phone ................80Uconnect® VOICE COMMAND . . . . . . . 82Bluetooth® STREAMING AUDIO . . . . . . 85VIDEO ENTERTAINMENTSYSTEM (VES™)................85ELECTRONIC VEHICLE INFORMATIONCENTER (EVIC) ................87PROGRAMMABLE FEATURES.......88UNIVERSAL GARAGE DOOR OPENER(HomeLink®)..................89POWER INVERTER..............92POWER OUTLETS..............93
UTILITY
IN-FLOOR STORAGE — STOW'N GO® . . 95ROOF LUGGAGE RACK..........95TRAILER TOWING WEIGHTS(MAXIMUM TRAILER WEIGHTRATINGS) . . . . . . . . . . . . . . . . . . . 96RECREATIONAL TOWING(BEHIND MOTORHOME, ETC.)......97
WHAT TO DO IN EMERGENCIES
ROADSIDE ASSISTANCE..........98INSTRUMENT CLUSTER WARNINGLIGHTS . . . . . . . . . . . . . . . . . . . . . 98INSTRUMENT CLUSTER INDICATORLIGHTS . . . . . . . . . . . . . . . . . . . . 102IF YOUR ENGINE OVERHEATS . . . . . . 104TIRE SERVICE KIT . . . . . . . . . . . . . . 104JACKING AND TIRE CHANGING . . . . . 110JUMP-STARTING..............122SHIFT LEVER OVERRIDE..........124TOWING A DISABLED VEHICLE.....124FREEING A STUCK VEHICLE . ......125EVENT DATA RECORDER (EDR).....126
MAINTAINING YOUR VEHICLE
OPENING THE HOOD...........127ENGINE COMPARTMENT.........128FLUID CAPACITIES . . . . . . . . . . . . . 130FLUIDS, LUBRICANTS ANDGENUINE PARTS . .............130MAINTENANCE PROCEDURES . . . . . . 132MAINTENANCE SCHEDULE . . .....132MAINTENANCE RECORD.........136FUSES.....................137TIRE PRESSURES...............141SPARE TIRES — IF EQUIPPED.......142ADDING FUEL................143WHEEL AND WHEEL TRIM CARE . . . . . 144REPLACEMENT BULBS...........145
TA B L E O F CO N T E N TS
Page 10 of 164

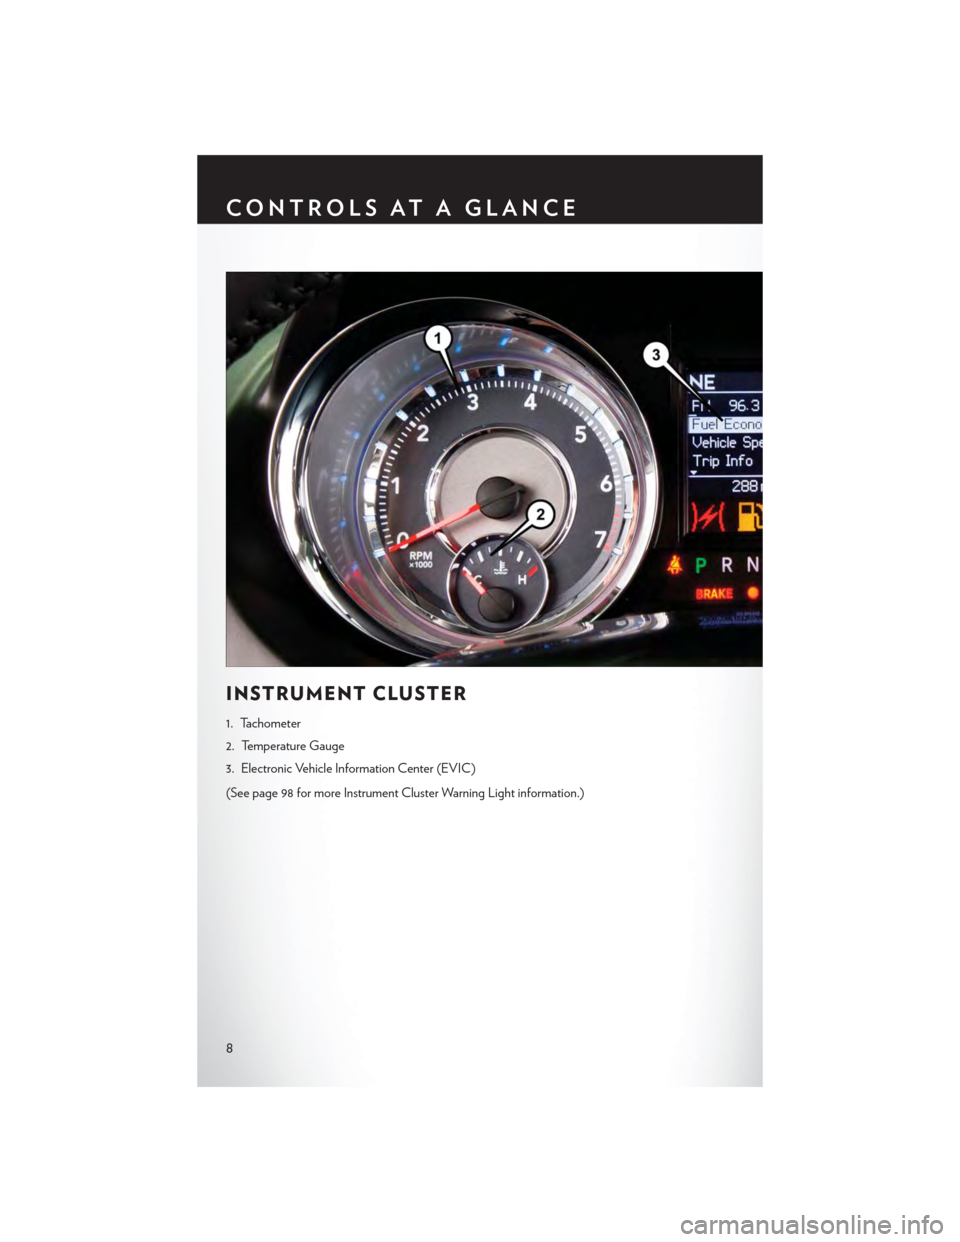
INSTRUMENT CLUSTER
1. Tachometer
2. Temperature Gauge
3. Electronic Vehicle Information Center (EVIC)
(See page 98 for more Instrument Cluster Warning Light information.)
CONTROLS AT A GLANCE
8
Page 20 of 164

SUPPLEMENTAL RESTRAINT SYSTEM (SRS) —
AIR BAGS
Air Bag System Components
Yo u r v e h i c l e m a y b e e q u i p p e d w i t h t h e f o l l o w i n g a i r b a g s y s t e m c o m p o n e n t s :
•OccupantRestraintController(ORC)
• Air Bag Warning Light
• Steering Wheel and Column
• Instrument Panel
•KneeImpactBolsters
• Advanced Front Air Bags
• Supplemental Side Air Bags
• Supplemental Knee Air Bags
•FrontandSideImpactSensors
• Seat Belt Pretenioners
• Seat Belt Buckle Switch
• Seat Track Position Sensors
Advanced Front Air Bags
•ThisvehiclehasAdvancedFrontAirBagsforboththedriverandfrontpassengerasa
supplement to the seat belt restraint systems. The Advanced Front Air Bags will not deploy in
every type of collision.
•AdvancedFrontAirBagsaredesignedtoprovideadditionalprotectionbysupplementingthe
seat belts. Advanced Front Air Bags are not expected to reduce the risk of injury in rear, side,
or rollover collisions.
•TheAdvancedFrontAirBagswillnotdeployinallfrontalcollisions,includingsomethatmay
produce substantial vehicle damage — for example, some pole collisions, truck underrides, and
angle offset collisions.
•Ontheotherhand,dependingonthetypeandlocationofimpact,AdvancedFrontAirBags
may deploy in crashes with little vehicle front-end damage but that produce a severe initial
deceleration.
•Becauseairbagsensorsmeasurevehicledecelerationovertime,vehiclespeedanddamageby
themselves are not good indicators of whether or not an air bag should have deployed.
•Seatbeltsarenecessaryforyourprotectioninallcollisions,andalsoareneededtohelpkeep
you in position, away from an inflating air bag.
•Theairbagsmustbereadytoinflateforyourprotectioninacollision.TheOccupantRestraint
Controller (ORC) monitors the internal circuits and interconnecting wiring associated with air
bag system electrical components.
GETTING STARTED
18
Page 21 of 164

•TheORCturnsontheAirBagWarningLightintheinstrumentpanelforapproximatelyfour
to eight seconds for a self-check when the ignition switch is first turned to the ON/RUN
position. After the self-check, the Air Bag Warning Light will turn off. If the ORC detects a
malfunction in any part of the system, it turns on the Air Bag Warning Light, either momen-
tarily or continuously. A single chime will sound to alert you if the light comes on again after
initial startup.
•TheORCmonitorsthereadinessoftheelectronicpartsoftheairbagsystemwheneverthe
ignition switch is in the START or ON/RUN position. If the ignition switch is in the OFF
position or in the ACC position, the air bag system is not on and the air bags will not inflate.
•IftheAirBagWarningLightintheinstrumentpanelisnotonduringthefourtoeightseconds
when the ignition switch is first turned to the ON/RUN position, stays on, or turns on while
driving, have the vehicle serviced by an authorized service center immediately.
NOTE:
If the speedometer, tachometer, or any engine related gauges are not working, the Occupant
Restraint Controller (ORC ) may also be disabled. In this condition the air bags may not be ready
to inflate for your protection. Have an authorized dealer service the air bag system immediately.
•Afteranycollision,thevehicleshouldbetakentoanauthorizeddealerimmediately.
•Donotdriveyourvehicleaftertheairbagshave deployed. If you are involved in another
collision, the air bags will not be in place to protect you.
•Ifitisnecessarytomodifytheairbagsystemforpersonswithdisabilities,contactyour
authorized dealer.
•RefertotheOwner'sManualontheDVDforfurtherdetailsregardingtheSupplemental
Restraint System (SRS).
Supplemental Knee Air Bags
This vehicle is equipped with a Supplemental Driver Knee Air Bag mounted in the instrument
panel below the steering column. The Supplemental Driver Knee Air Bag provides enhanced
protection during a frontal impact by working together with the seat belts, pretensioners, and
Advanced Front Air Bags.
WARNING!
•Relyingontheairbagsalonecouldleadtomoresevereinjuriesinacollision.Theairbags
work with your seat belt to restrain you properly. In some collisions, the air bags won't
deploy at all. Always wear your seat beltseven though you have air bags.
•BeingtooclosetothesteeringwheelorinstrumentpanelduringAdvancedFrontAirBag
deployment could cause serious injury, including death. Air bags need room to inflate. Sit
back, comfortably extending your arms to reach the steering wheel or instrument panel.
•Noobjectsshouldbeplacedoverorneartheairbagontheinstrumentpanelorsteering
wheel because any such objects could cause harm if the vehicle is in a collision severe
enough to cause the air bag to inflate.
GETTING STARTED
19
Page 53 of 164

PA R K S E N S E ® R E A R PA R K A S S I S T
If an object is detected behind the rear bumper while the vehicle is in REVERSE, a warning will
display in the instrument cluster and a tone will sound, (closer the object the faster the tone) that
changes speed depending on the distance of the object from the bumper, will sound.
When the Instrument Cluster reads either “Clean Sensor” or “Blinded”, clean off the bumper
sensors to see if the condition is corrected.
PA R K V I E W ® R E A R B AC K- U P C A M E R A
Yo u c a n s e e a n o n - s c r e e n i m a g e o f t h e r e a r o f y o u r v e h i c l e w h e n e v e r t h e s h i f t l e v e r i s p u t i n t o
REVERSE. The ParkView® Rear Back-Up Camera image will be displayed on the radio display
screen, located on the center stack of the instrument panel.
If the radio display screen appears foggy, clean the camera lens located on the liftgate.
Refer to your Owner's Manual on the DVD for further details.
WARNING!
Drivers must be careful when backing up; even when using the ParkView® Rear Back-Up
Camera. Always check carefully behind your vehicle, and be sure to check for pedestrians,
animals, other vehicles, obstructions, or blind spots before backing up. You must continue to
pay attention while backing up. Failure to do so can result in serious injury or death.
BLIND SPOT MONITORING WITH REAR
CROSS PATH
The Blind Spot Monitoring (BSM) system uses two radar-based sensors, located inside the rear
bumper fascia, to detect Highway licensable vehicles (automobiles, trucks, motorcycles etc.) that
enter the blind spot zones from the rear/front/side of the vehicle.
The Blind Spot Monitoring (BSM) system warning light, located in the outside mirrors, will
illuminate if a vehicle moves into a blind spot zone.
The BSM system can also be configured to sound an audible (chime) alert and mute the radio to
notify you of objects that have entered the detection zones.
Refer to your Owner's Manual on the DVD for further details.
OPERATING YOUR VEHICLE
51
Page 93 of 164

Programming A Non-Rolling Code
NOTE:
For programming Garage Door Openers manufactured before 1995.
1. Turn the ignition switch to the ON/RUN position.
2. Place the hand-held transmitter 1 to 3 inches (3 to 8 cm) away from the HomeLink® button you
wish to program while keeping the HomeLink® indicator light in view.
3. Push and hold the HomeLink® button you want to program while you push and hold the
hand-held transmitter button.
4. Continue to hold both buttons and observe the indicator light. The HomeLink® indicator will
flash slowly and then rapidly after HomeLink® has received the frequency signal from the
hand-held transmitter. Release both buttons after the indicator light changes from slow to
rapid.
5. Push and hold the programmed HomeLink® button and observe the indicator light. If the
indicator light stays on constantly, programming is complete and the garage door (or device)
should activate when the HomeLink® button is pushed.
6. To program the two remaining HomeLink® buttons, repeat each step for each remaining
button. DO NOT erase the channels.
Using HomeLink®
To o p e r a t e , p u s h a n d r e l e a s e t h e p r o g r a m m e d H o m e L i n k ® b u t t o n . A c t i v a t i o n w i l l n o w o c c u r f o r
the programmed device (e.g., garage door opener, gate operator, security system, entry door
lock, home/office lighting, etc.). The hand-held transmitter of the device may also be used at any
time.
WARNING!
•Yourmotorizeddoororgatewillopenandclosewhileyouareprogrammingtheuniversal
transceiver. Do not program the transceiver if people or pets are in the path of the door
or gate.
•Donotrunyourvehicleinaclosedgarageorconfinedareawhileprogrammingthe
transceiver. Exhaust gas from your vehicle contains Carbon Monoxide (CO) which is
odorless and colorless. Carbon Monoxide is poisonous when inhaled and can cause you
and others to be severely injured or killed.
ELECTRONICS
91
Page 100 of 164

ROADSIDE ASSISTANCE
Dial toll-free 1-800-521-2779 for U.S. Residents or 1-800-363-4869 for Canadian Residents.
•Provideyourname,vehicleidentificationnumber,licenseplatenumber,andyourlocation,
including the telephone number from which you are calling.
• Briefly describe the nature of the problem and answer a few simple questions.
•Youwillbegiventhenameoftheserviceproviderandanestimatedtimeofarrival.Ifyoufeel
you are in an “unsafe situation”, please let us know. With your consent, we will contact local
police or safety authorities.
INSTRUMENT CLUSTER WARNING LIGHTS
-LowFuelWarningLight
This warning light indicates when the fuel level reaches approximately 2.0 gal (7.8 L), this light will
turn on and a single chime will sound.
-ChargingSystemLight
This light shows the status of the electrical charging system. If the charging system light remains
on, it means that the vehicle is experiencing a problem with the charging system.
We r e c o m m e n d y o u d o n o t c o n t i n u e d r i v i n g i f t h e c h a r g i n g s y s t e m l i g h t i s o n . H a v e t h e v e h i c l e
serviced immediately.
-OilPressureWarningLight
This light indicates low engine oil pressure. If the light turns on while driving, stop the vehicle and
shut off the engine as soon as possible. A chime will sound when this light turns on.
We r e c o m m e n d y o u d o n o t o p e r a t e t h e v e h i c l e o r e n g i n e d a m a g e w i l l o c c u r. H a v e t h e v e h i c l e
serviced immediately.
-Anti-LockBrake(ABS)Light
This light monitors the Anti-Lock Brake System (ABS).
If the light is not on during starting, stays on, or turns on while driving, we recommend you contact
the nearest authorized dealer and have the vehicle serviced immediately.
-AirBagWarningLight
If the light is not on during starting, stays on, or turns on while driving, have the vehicle serviced
by an authorized dealer immediately.
-ElectronicThrottleControl(ETC)IndicatorLight
This light informs you of a problem with the system.
If a problem is detected, the light will come on while the engine is running. Cycle the ignition
when the vehicle has completely stopped and the shift lever is placed in the PARK position; the
light should turn off.
WHAT TO DO IN EMERGENCIES
98
Page 102 of 164

NOTE:
Tire pressures change by approximately 1 psi (7 kPa) per 12° F (7° C) of air temperature change.
Keep this in mind when checking tire pressure inside a garage, especially in the Winter. Example:
If garage temperature is 68°F (20°C) and the outside temperature is 32°F (0°C), then the cold
tire inflation pressure should be increased by 3 psi (21 kPa), which equals 1 psi (7 kPa) for every
12°F (7°C) for this outside temperature condition.
CAUTION!
The TPMS has been optimized for the original equipment tires and wheels. TPMS pressures
and warning have been established for the tire size equipped on your vehicle. Undesirable
system operation or sensor damage may result when using replacement equipment that is not
of the same size, type, and/or style. Aftermarket wheels can cause sensor damage. Do not use
tire sealant from a can, or balance beads if your vehicle is equipped with a TPMS, as damage
to the sensors may result.
-EngineTemperatureWarningLight
•Thislightwarnsofanoverheatedenginecondition.
•Ifthelightturnsonorflashescontinuouslywhiledriving,safelypulloverandstopthevehicle.
If the A/C system is on, turn it off. Also, shift the transmission into NEUTRAL and idle the
vehicle. If the temperature reading does not return to normal, turn the engine off immediately
and call for service.
•Werecommendthatyoudonotoperatethevehicleorenginedamagewilloccur.Havethe
vehicle serviced immediately.
WARNING!
Ahotenginecoolingsystemisdangerous.Youorotherscouldbebadlyburnedbysteamor
boiling coolant.
-SeatBeltReminderLight
When the ignition switch is first turned to the ON/RUN position, this light will turn on for four to
eight seconds as a bulb check. During the bulb check, if the driver's seat belt is unbuckled, a
chime will sound. After the bulb check or when driving, if the driver or front passenger seat belt
remains unbuckled, the Seat Belt Indicator Light will flash or remain on continuously. Refer to
“Seat Belt Systems” in “Things To Know Before Starting” in the OM on your DVD for further
information.
-BrakeWarningLight
This light monitors various brake functions, including brake fluid level and parking brake appli-
cation. If the brake light turns on it may indicate that the parking brake is applied, that the brake
fluid level is low, or that there is a problem with the anti-lock brake system reservoir.
WHAT TO DO IN EMERGENCIES
100
Page 103 of 164

If the light remains on when the parking brake has been disengaged, and the fluid level is at the
full mark on the master cylinder reservoir, it indicates a possible brake hydraulic system malfunc-
tion or that a problem with the Brake Booster has been detected by the Anti-Lock Brake System
(ABS)/Electronic Stability Control (ESC) system. In this case, the light will remain on until the
condition has been corrected. If the problem is related to the brake booster, the ABS pump will
run when applying the brake and a brake pedal pulsation may be felt during each stop.
The dual brake system provides a reserve braking capacity in the event of a failure to a portion of
the hydraulic system. A leak in either half of the dual brake system is indicated by the Brake
Wa r n i n g L i g h t , w h i c h w i l l t u r n o n w h e n t h e b r a k e f l u i d l e v e l i n t h e m a s t e r c y l i n d e r h a s d r o p p e d
below a specified level. The light will remain on until the cause is corrected.
Ve h i c l e s e q u i p p e d w i t h t h e A n t i - L o c k B r a k e S y s t e m ( A B S ) , a r e a l s o e q u i p p e d w i t h E l e c t r o n i c
Brake Force Distribution (EBD). In the event of an EBD failure, the Brake Warning Light will turn
on along with the ABS Light. Immediate repair to the ABS system is required.
Operation of the Brake Warning Light can be checked by turning the ignition switch from the OFF
position to the ON/RUN position. The light should illuminate for approximately two seconds. The
light should then turn off unless the parking brake is applied or a brake fault is detected. If the light
does not illuminate, have the light inspected by an authorized dealer.
The light also will turn on when the parking brake is applied with the ignition switch in the
ON/RUN position.
NOTE:
This light shows only that the parking brake is applied. It does not show the degree of brake
application.
WARNING!
Driving a vehicle with the red brake light on is dangerous. Part of the brake system may have
failed. It will take longer to stop the vehicle. You could have a collision. Have the vehicle
checked immediately.
-MalfunctionIndicatorLight(MIL)
Certain conditions, such as a loose or missing gas cap, poor fuel quality, etc., may illuminate the
MIL after engine start. The vehicle should be serviced if the light stays on through several typical
driving cycles. In most situations, the vehicle will drive normally and not require towing.
If the MIL flashes when the engine is running, serious conditions may exist that could lead to
immediate loss of power or severe catalytic converter damage. We recommend you do not
operate the vehicle. Have the vehicle serviced immediately.
-ElectronicStabilityControl(ESC)IndicatorLight
If this indicator light flashes during acceleration, apply as little throttle as possible. While driving,
ease up on the accelerator. Adapt your speed and driving to the prevailing road conditions.
To i m p r o v e t h e v e h i c l e ' s t r a c t i o n w h e n s t a r t i n g o f f i n d e e p s n o w , s a n d o r g r a v e l , i t m a y b e
desirable to switch the ESC system off.
WHAT TO DO IN EMERGENCIES
101
Page 134 of 164

MAINTENANCE PROCEDURES
For information on the maintenance procedures for your vehicle, please refer to “Maintenance
Procedures” in “Maintaining Your Vehicle” in your Owner’s Manual or applicable supplement on
the DVD for further details.
MAINTENANCE SCHEDULE
Yo u r v e h i c l e i s e q u i p p e d w i t h a n a u t o m a t i c o i l c h a n g e i n d i c a t o r s y s t e m . T h e o i l c h a n g e i n d i c a t o r
system will remind you that it is time to take your vehicle in for scheduled maintenance.
Based on engine operation conditions, the oil change indicator message will illuminate. This
means that service is required for your vehicle. Operating conditions such as frequent short-trips,
trailer tow, extremely hot or cold ambient temperatures, and E85 fuel usage will influence when
the “Oil Change Required” message is displayed. Severe Operating Conditions can cause the
change oil message to illuminate as early as 3,500 miles (5,600 km) since last reset. Have your
vehicle serviced as soon as possible, within the next 500 miles (805 km).
Your authorized dealer will reset the oil change indicator message after completing the scheduled
oil change. If a scheduled oil change is performed by someone other than your authorized dealer,
the message can be reset by referring to the steps described under “Instrument Cluster Warning
Lights” in “What To Do In Emergencies” in this guide or “Electronic Vehicle Information Center
(EVIC)” in “Understanding Your Instrument Panel” in your Owners Manual on the DVD for
further information.
NOTE:
Under no circumstances should oil change intervals exceed 10,000 miles (16,000 km) or twelve
months, whichever comes first.
MAINTAINING YOUR VEHICLE
132