wheel size CHRYSLER VOYAGER 1996 Service Manual
[x] Cancel search | Manufacturer: CHRYSLER, Model Year: 1996, Model line: VOYAGER, Model: CHRYSLER VOYAGER 1996Pages: 1938, PDF Size: 55.84 MB
Page 36 of 1938
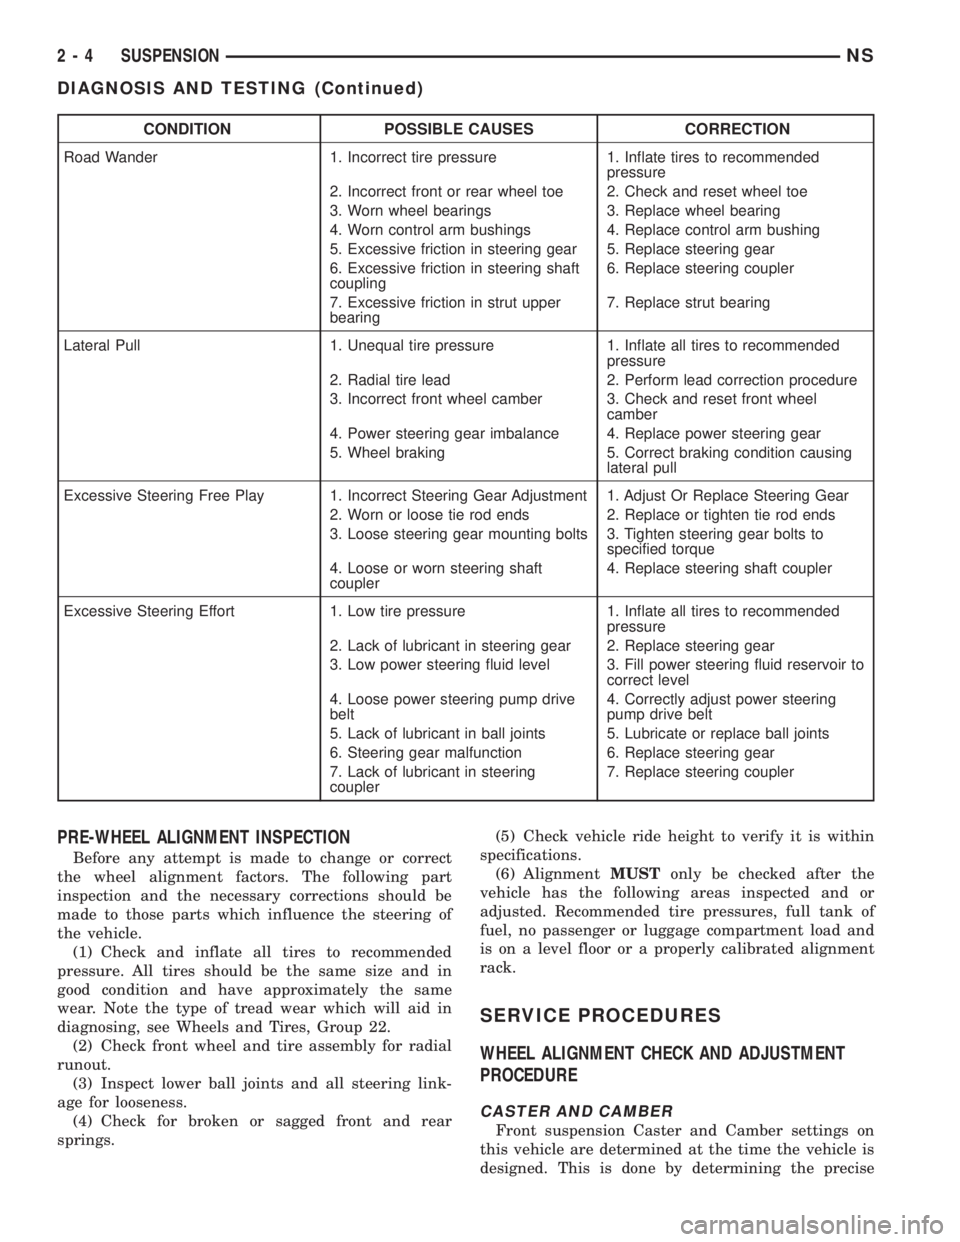
CONDITION POSSIBLE CAUSES CORRECTION
Road Wander 1. Incorrect tire pressure 1. Inflate tires to recommended
pressure
2. Incorrect front or rear wheel toe 2. Check and reset wheel toe
3. Worn wheel bearings 3. Replace wheel bearing
4. Worn control arm bushings 4. Replace control arm bushing
5. Excessive friction in steering gear 5. Replace steering gear
6. Excessive friction in steering shaft
coupling6. Replace steering coupler
7. Excessive friction in strut upper
bearing7. Replace strut bearing
Lateral Pull 1. Unequal tire pressure 1. Inflate all tires to recommended
pressure
2. Radial tire lead 2. Perform lead correction procedure
3. Incorrect front wheel camber 3. Check and reset front wheel
camber
4. Power steering gear imbalance 4. Replace power steering gear
5. Wheel braking 5. Correct braking condition causing
lateral pull
Excessive Steering Free Play 1. Incorrect Steering Gear Adjustment 1. Adjust Or Replace Steering Gear
2. Worn or loose tie rod ends 2. Replace or tighten tie rod ends
3. Loose steering gear mounting bolts 3. Tighten steering gear bolts to
specified torque
4. Loose or worn steering shaft
coupler4. Replace steering shaft coupler
Excessive Steering Effort 1. Low tire pressure 1. Inflate all tires to recommended
pressure
2. Lack of lubricant in steering gear 2. Replace steering gear
3. Low power steering fluid level 3. Fill power steering fluid reservoir to
correct level
4. Loose power steering pump drive
belt4. Correctly adjust power steering
pump drive belt
5. Lack of lubricant in ball joints 5. Lubricate or replace ball joints
6. Steering gear malfunction 6. Replace steering gear
7. Lack of lubricant in steering
coupler7. Replace steering coupler
PRE-WHEEL ALIGNMENT INSPECTION
Before any attempt is made to change or correct
the wheel alignment factors. The following part
inspection and the necessary corrections should be
made to those parts which influence the steering of
the vehicle.
(1) Check and inflate all tires to recommended
pressure. All tires should be the same size and in
good condition and have approximately the same
wear. Note the type of tread wear which will aid in
diagnosing, see Wheels and Tires, Group 22.
(2) Check front wheel and tire assembly for radial
runout.
(3) Inspect lower ball joints and all steering link-
age for looseness.
(4) Check for broken or sagged front and rear
springs.(5) Check vehicle ride height to verify it is within
specifications.
(6) AlignmentMUSTonly be checked after the
vehicle has the following areas inspected and or
adjusted. Recommended tire pressures, full tank of
fuel, no passenger or luggage compartment load and
is on a level floor or a properly calibrated alignment
rack.
SERVICE PROCEDURES
WHEEL ALIGNMENT CHECK AND ADJUSTMENT
PROCEDURE
CASTER AND CAMBER
Front suspension Caster and Camber settings on
this vehicle are determined at the time the vehicle is
designed. This is done by determining the precise
2 - 4 SUSPENSIONNS
DIAGNOSIS AND TESTING (Continued)
Page 40 of 1938
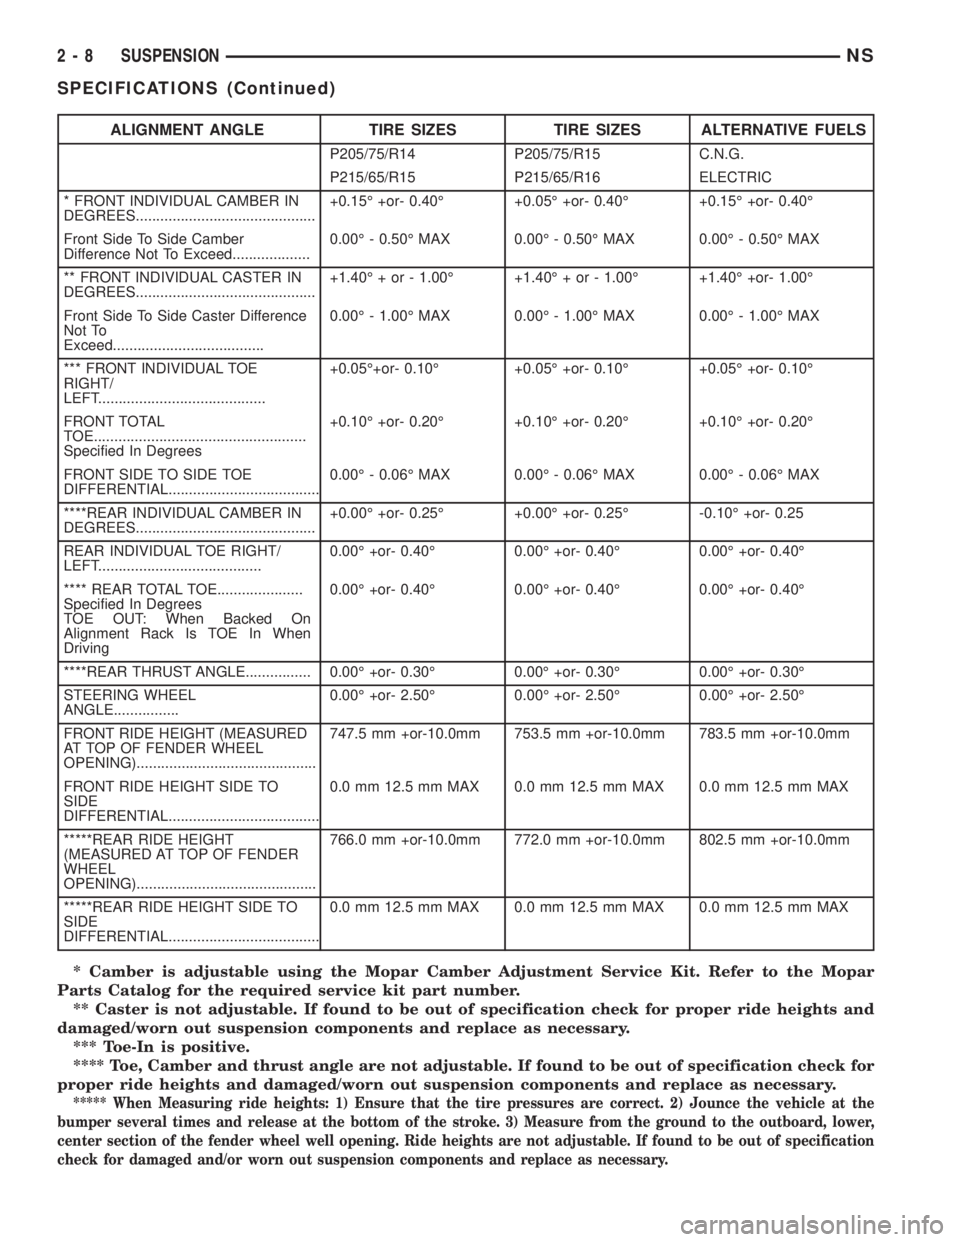
* Camber is adjustable using the Mopar Camber Adjustment Service Kit. Refer to the Mopar
Parts Catalog for the required service kit part number.
** Caster is not adjustable. If found to be out of specification check for proper ride heights and
damaged/worn out suspension components and replace as necessary.
*** Toe-In is positive.
**** Toe, Camber and thrust angle are not adjustable. If found to be out of specification check for
proper ride heights and damaged/worn out suspension components and replace as necessary.
***** When Measuring ride heights: 1) Ensure that the tire pressures are correct. 2) Jounce the vehicle at the
bumper several times and release at the bottom of the stroke. 3) Measure from the ground to the outboard, lower,
center section of the fender wheel well opening. Ride heights are not adjustable. If found to be out of specification
check for damaged and/or worn out suspension components and replace as necessary.
ALIGNMENT ANGLE TIRE SIZES TIRE SIZES ALTERNATIVE FUELS
P205/75/R14 P205/75/R15 C.N.G.
P215/65/R15 P215/65/R16 ELECTRIC
* FRONT INDIVIDUAL CAMBER IN
DEGREES............................................+0.15É +or- 0.40É +0.05É +or- 0.40É +0.15É +or- 0.40É
Front Side To Side Camber
Difference Not To Exceed...................0.00É - 0.50É MAX 0.00É - 0.50É MAX 0.00É - 0.50É MAX
** FRONT INDIVIDUAL CASTER IN
DEGREES............................................+1.40É + or - 1.00É +1.40É + or - 1.00É +1.40É +or- 1.00É
Front Side To Side Caster Difference
Not To
Exceed.....................................0.00É - 1.00É MAX 0.00É - 1.00É MAX 0.00É - 1.00É MAX
*** FRONT INDIVIDUAL TOE
RIGHT/
LEFT.........................................+0.05É+or- 0.10É +0.05É +or- 0.10É +0.05É +or- 0.10É
FRONT TOTAL
TOE....................................................
Specified In Degrees+0.10É +or- 0.20É +0.10É +or- 0.20É +0.10É +or- 0.20É
FRONT SIDE TO SIDE TOE
DIFFERENTIAL.....................................0.00É - 0.06É MAX 0.00É - 0.06É MAX 0.00É - 0.06É MAX
****REAR INDIVIDUAL CAMBER IN
DEGREES............................................+0.00É +or- 0.25É +0.00É +or- 0.25É -0.10É +or- 0.25
REAR INDIVIDUAL TOE RIGHT/
LEFT........................................0.00É +or- 0.40É 0.00É +or- 0.40É 0.00É +or- 0.40É
**** REAR TOTAL TOE.....................
Specified In Degrees
TOE OUT: When Backed On
Alignment Rack Is TOE In When
Driving0.00É +or- 0.40É 0.00É +or- 0.40É 0.00É +or- 0.40É
****REAR THRUST ANGLE................ 0.00É +or- 0.30É 0.00É +or- 0.30É 0.00É +or- 0.30É
STEERING WHEEL
ANGLE................0.00É +or- 2.50É 0.00É +or- 2.50É 0.00É +or- 2.50É
FRONT RIDE HEIGHT (MEASURED
AT TOP OF FENDER WHEEL
OPENING)............................................747.5 mm +or-10.0mm 753.5 mm +or-10.0mm 783.5 mm +or-10.0mm
FRONT RIDE HEIGHT SIDE TO
SIDE
DIFFERENTIAL.....................................0.0 mm 12.5 mm MAX 0.0 mm 12.5 mm MAX 0.0 mm 12.5 mm MAX
*****REAR RIDE HEIGHT
(MEASURED AT TOP OF FENDER
WHEEL
OPENING)............................................766.0 mm +or-10.0mm 772.0 mm +or-10.0mm 802.5 mm +or-10.0mm
*****REAR RIDE HEIGHT SIDE TO
SIDE
DIFFERENTIAL.....................................0.0 mm 12.5 mm MAX 0.0 mm 12.5 mm MAX 0.0 mm 12.5 mm MAX
2 - 8 SUSPENSIONNS
SPECIFICATIONS (Continued)
Page 42 of 1938
Mc PHERSON STRUT ASSEMBLY
The front suspension of the vehicle is supported by
coil springs positioned around the strut assembly.
The springs are contained between an upper seat,
located just below the top strut mount assembly and
a lower spring seat on the strut fluid reservoir.
The top of each strut assembly is bolted to the
upper fender reinforcement (strut tower) through a
rubber isolated mount.
The bottom of the strut assembly attaches to the
steering knuckle with two through bolts. Caster is a
fixed setting on all vehicles and is not adjustable
when an alignment is performed. In the event the
camber setting on a vehicle requires adjustment, a
service strut is available which will provide a method
by which the camber can be adjusted.
The strut assemblies on this vehicle are inter-con-
nected by the front stabilizer bar through 2 link
assemblies attaching the struts to the stabilizer bar.
STEERING KNUCKLE
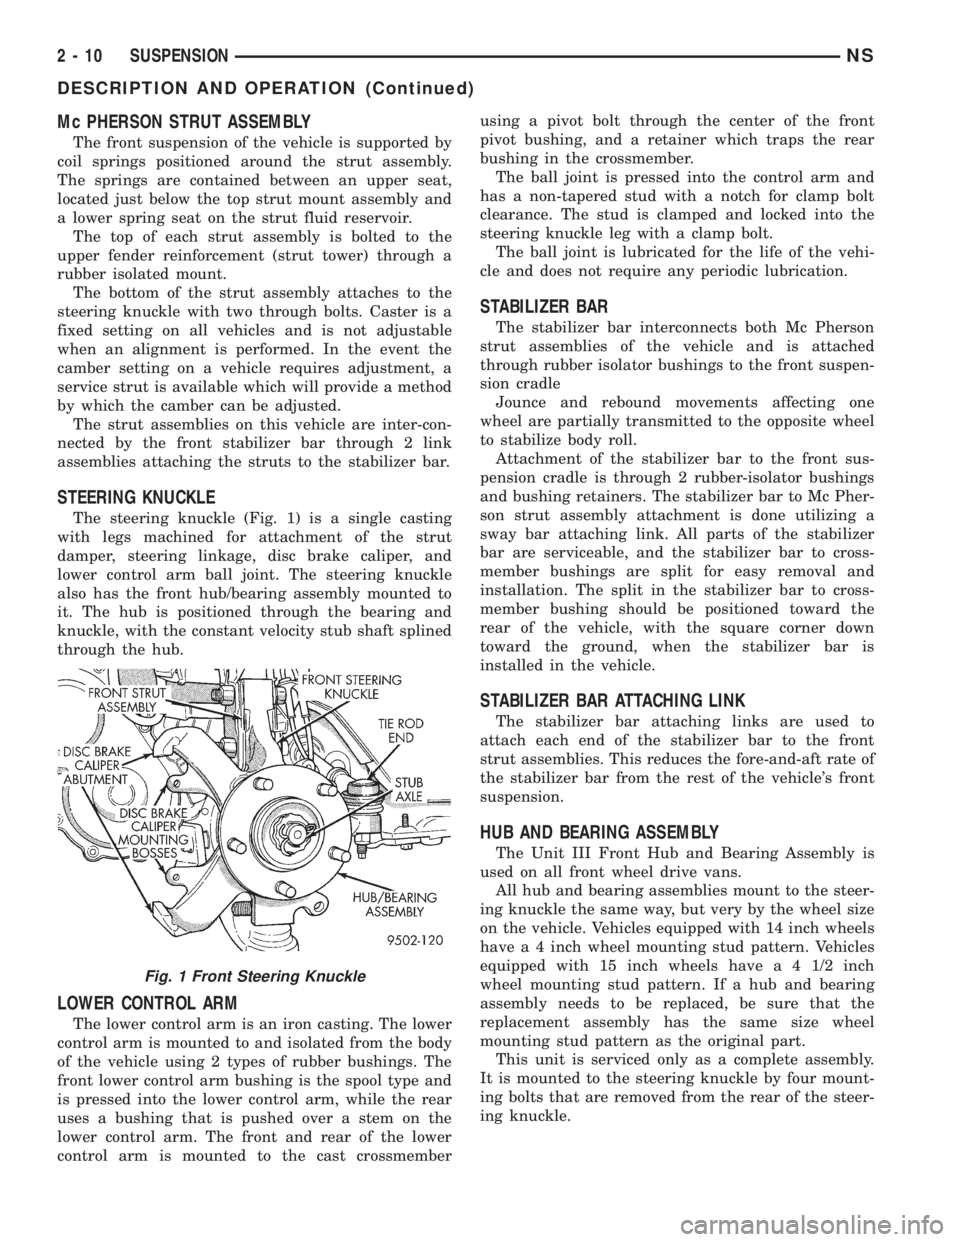
The steering knuckle (Fig. 1) is a single casting
with legs machined for attachment of the strut
damper, steering linkage, disc brake caliper, and
lower control arm ball joint. The steering knuckle
also has the front hub/bearing assembly mounted to
it. The hub is positioned through the bearing and
knuckle, with the constant velocity stub shaft splined
through the hub.
LOWER CONTROL ARM
The lower control arm is an iron casting. The lower
control arm is mounted to and isolated from the body
of the vehicle using 2 types of rubber bushings. The
front lower control arm bushing is the spool type and
is pressed into the lower control arm, while the rear
uses a bushing that is pushed over a stem on the
lower control arm. The front and rear of the lower
control arm is mounted to the cast crossmemberusing a pivot bolt through the center of the front
pivot bushing, and a retainer which traps the rear
bushing in the crossmember.
The ball joint is pressed into the control arm and
has a non-tapered stud with a notch for clamp bolt
clearance. The stud is clamped and locked into the
steering knuckle leg with a clamp bolt.
The ball joint is lubricated for the life of the vehi-
cle and does not require any periodic lubrication.
STABILIZER BAR
The stabilizer bar interconnects both Mc Pherson
strut assemblies of the vehicle and is attached
through rubber isolator bushings to the front suspen-
sion cradle
Jounce and rebound movements affecting one
wheel are partially transmitted to the opposite wheel
to stabilize body roll.
Attachment of the stabilizer bar to the front sus-
pension cradle is through 2 rubber-isolator bushings
and bushing retainers. The stabilizer bar to Mc Pher-
son strut assembly attachment is done utilizing a
sway bar attaching link. All parts of the stabilizer
bar are serviceable, and the stabilizer bar to cross-
member bushings are split for easy removal and
installation. The split in the stabilizer bar to cross-
member bushing should be positioned toward the
rear of the vehicle, with the square corner down
toward the ground, when the stabilizer bar is
installed in the vehicle.
STABILIZER BAR ATTACHING LINK
The stabilizer bar attaching links are used to
attach each end of the stabilizer bar to the front
strut assemblies. This reduces the fore-and-aft rate of
the stabilizer bar from the rest of the vehicle's front
suspension.
HUB AND BEARING ASSEMBLY
The Unit III Front Hub and Bearing Assembly is
used on all front wheel drive vans.
All hub and bearing assemblies mount to the steer-
ing knuckle the same way, but very by the wheel size
on the vehicle. Vehicles equipped with 14 inch wheels
have a 4 inch wheel mounting stud pattern. Vehicles
equipped with 15 inch wheels have a 4 1/2 inch
wheel mounting stud pattern. If a hub and bearing
assembly needs to be replaced, be sure that the
replacement assembly has the same size wheel
mounting stud pattern as the original part.
This unit is serviced only as a complete assembly.
It is mounted to the steering knuckle by four mount-
ing bolts that are removed from the rear of the steer-
ing knuckle.
Fig. 1 Front Steering Knuckle
2 - 10 SUSPENSIONNS
DESCRIPTION AND OPERATION (Continued)
Page 45 of 1938
instructions included with the thread insert for the
detailed procedure used for the installation of the
thread insert.
NOTE: The thread inserts for this application are
for the repair of M8x1.25 and M10x1.5 threads. Be
sure the correct tools are used for the required
thread insert size.
TOOL REQUIREMENT FOR M8x1.25 Thread
²8.3mm (5/16 in.) Drill Bit
²120É Countersink
²Heli-CoiltTap #4863-8
²Heli-CoiltGage #4624-8
²Heli-CoiltHand Inserting Tool 7751-8
²Needle Nose Pliers ± For Removal Of Thread
Insert Driving Tang
TOOL REQUIREMENT FOR M10x1.5 Thread
²10.5mm (25/64 in.) Drill Bit
²120É Countersink
²Heli-CoiltTap #4863-10
²Heli-CoiltGage #4624-10
²Heli-CoiltHand Inserting Tool 7751-10
²Needle Nose Pliers ± For Removal Of Thread
Insert Driving Tang
REMOVAL AND INSTALLATION
Mc PHERSON STRUT
REMOVAL
WARNING: DO NOT REMOVE THE NUT FROM THE
STRUT ROD WHILE STRUT ASSEMBLY IS
INSTALLED IN VEHICLE, OR BEFORE STRUT
ASSEMBLY SPRING IS COMPRESSED.
(1) Raise vehicle on jack stands or centered on a
frame contact type hoist. See Hoisting in the Lubri-
cation and Maintenance section of this service man-
ual, for the required lifting procedure to be used for
this vehicle.
(2) Remove the wheel and tire assembly from loca-
tion on front of vehicle requiring strut removal.
(3) If both strut assemblies are to be removed,
mark the strut assemblies right or left according to
which side of the vehicle they were removed from.
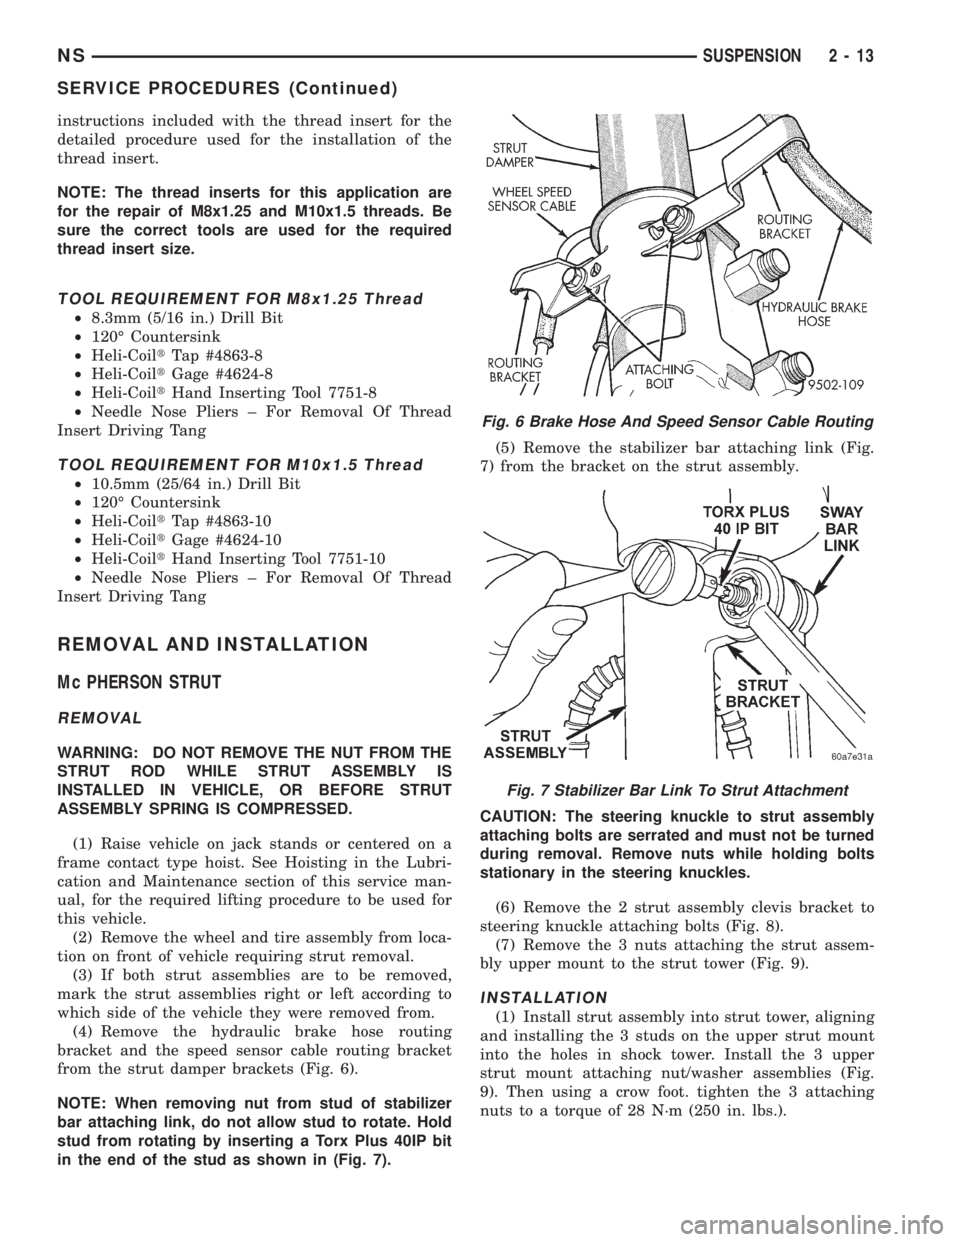
(4) Remove the hydraulic brake hose routing
bracket and the speed sensor cable routing bracket
from the strut damper brackets (Fig. 6).
NOTE: When removing nut from stud of stabilizer
bar attaching link, do not allow stud to rotate. Hold
stud from rotating by inserting a Torx Plus 40IP bit
in the end of the stud as shown in (Fig. 7).(5) Remove the stabilizer bar attaching link (Fig.
7) from the bracket on the strut assembly.
CAUTION: The steering knuckle to strut assembly
attaching bolts are serrated and must not be turned
during removal. Remove nuts while holding bolts
stationary in the steering knuckles.
(6) Remove the 2 strut assembly clevis bracket to
steering knuckle attaching bolts (Fig. 8).
(7) Remove the 3 nuts attaching the strut assem-
bly upper mount to the strut tower (Fig. 9).
INSTALLATION
(1) Install strut assembly into strut tower, aligning
and installing the 3 studs on the upper strut mount
into the holes in shock tower. Install the 3 upper
strut mount attaching nut/washer assemblies (Fig.
9). Then using a crow foot. tighten the 3 attaching
nuts to a torque of 28 N´m (250 in. lbs.).
Fig. 6 Brake Hose And Speed Sensor Cable Routing
Fig. 7 Stabilizer Bar Link To Strut Attachment
NSSUSPENSION 2 - 13
SERVICE PROCEDURES (Continued)
Page 51 of 1938
LOWER CONTROL ARM
REMOVE
(1) Raise vehicle on jack stands or centered on a
frame contact type hoist. See Hoisting in the Lubri-
cation and Maintenance section of this manual, for
the required lifting procedure to be used for this
vehicle.
(2) Remove wheel and tire assembly from the side
of vehicle requiring service to the lower control arm.
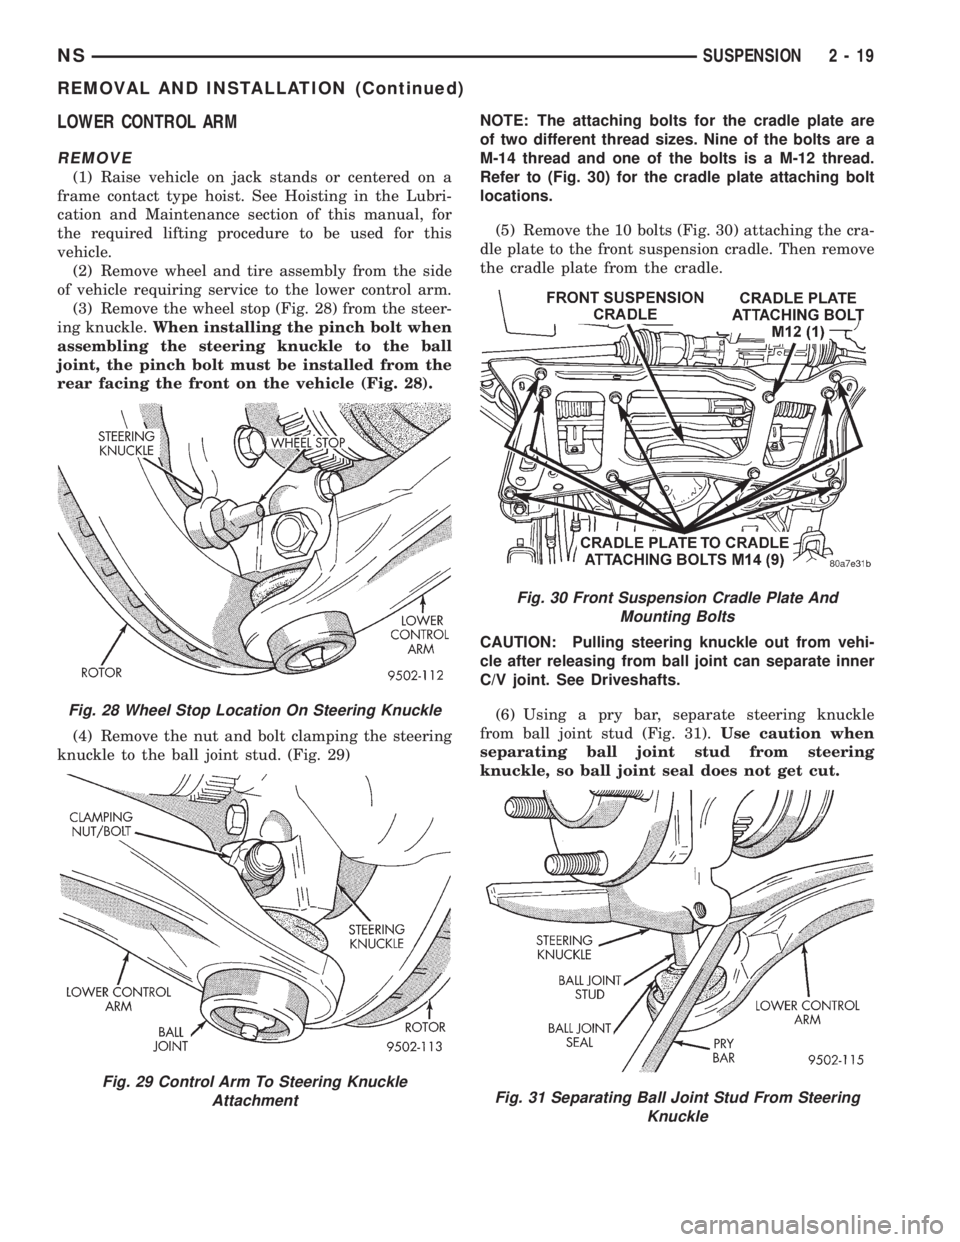
(3) Remove the wheel stop (Fig. 28) from the steer-
ing knuckle.When installing the pinch bolt when
assembling the steering knuckle to the ball
joint, the pinch bolt must be installed from the
rear facing the front on the vehicle (Fig. 28).
(4) Remove the nut and bolt clamping the steering
knuckle to the ball joint stud. (Fig. 29)NOTE: The attaching bolts for the cradle plate are
of two different thread sizes. Nine of the bolts are a
M-14 thread and one of the bolts is a M-12 thread.
Refer to (Fig. 30) for the cradle plate attaching bolt
locations.
(5) Remove the 10 bolts (Fig. 30) attaching the cra-
dle plate to the front suspension cradle. Then remove
the cradle plate from the cradle.
CAUTION: Pulling steering knuckle out from vehi-
cle after releasing from ball joint can separate inner
C/V joint. See Driveshafts.
(6) Using a pry bar, separate steering knuckle
from ball joint stud (Fig. 31).Use caution when
separating ball joint stud from steering
knuckle, so ball joint seal does not get cut.
Fig. 28 Wheel Stop Location On Steering Knuckle
Fig. 29 Control Arm To Steering Knuckle
Attachment
Fig. 30 Front Suspension Cradle Plate And
Mounting Bolts
Fig. 31 Separating Ball Joint Stud From Steering
Knuckle
NSSUSPENSION 2 - 19
REMOVAL AND INSTALLATION (Continued)
Page 82 of 1938
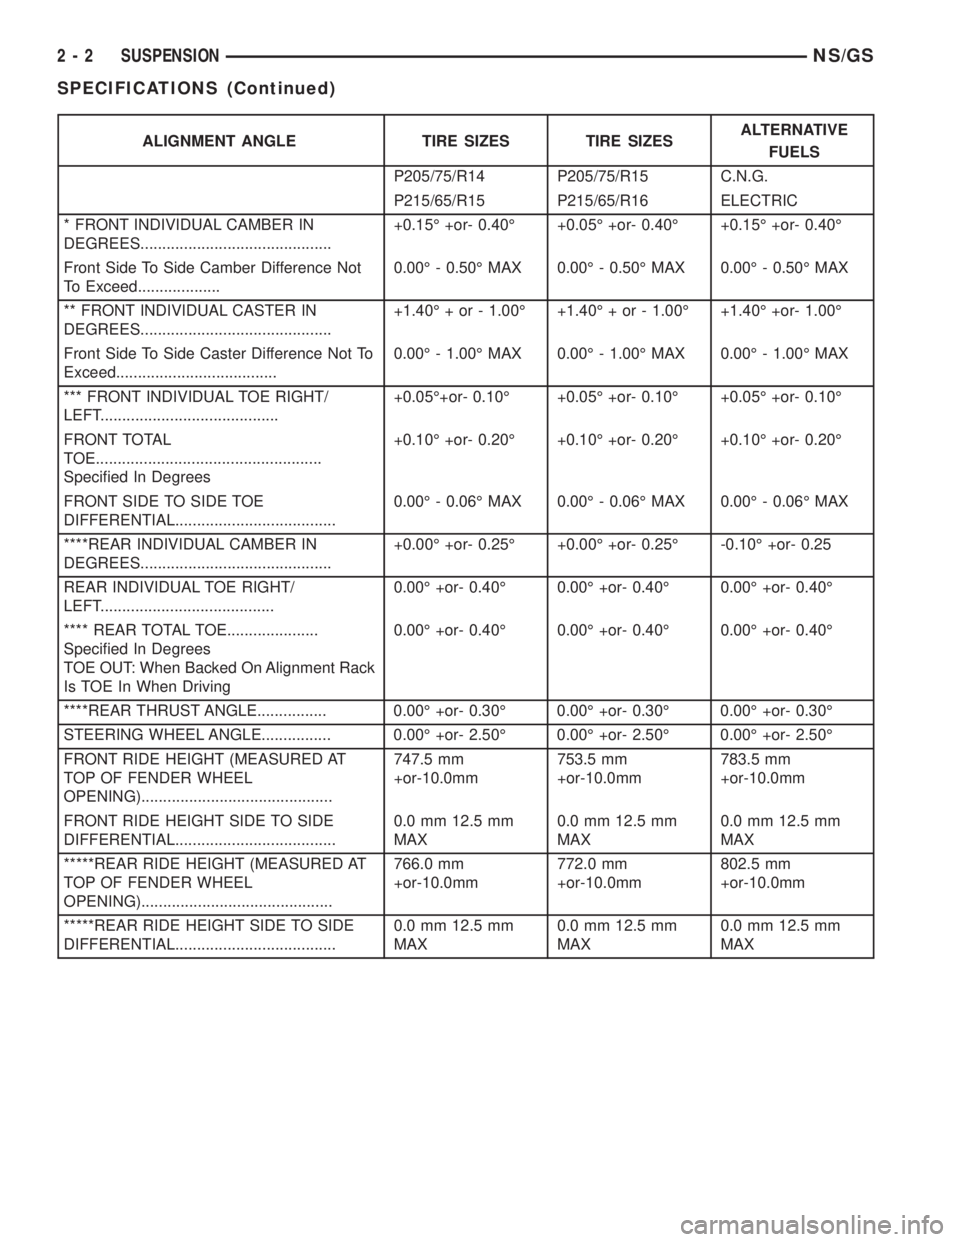
ALIGNMENT ANGLE TIRE SIZES TIRE SIZESALTERNATIVE
FUELS
P205/75/R14 P205/75/R15 C.N.G.
P215/65/R15 P215/65/R16 ELECTRIC
* FRONT INDIVIDUAL CAMBER IN
DEGREES............................................+0.15É +or- 0.40É +0.05É +or- 0.40É +0.15É +or- 0.40É
Front Side To Side Camber Difference Not
To Exceed...................0.00É - 0.50É MAX 0.00É - 0.50É MAX 0.00É - 0.50É MAX
** FRONT INDIVIDUAL CASTER IN
DEGREES............................................+1.40É + or - 1.00É +1.40É + or - 1.00É +1.40É +or- 1.00É
Front Side To Side Caster Difference Not To
Exceed.....................................0.00É - 1.00É MAX 0.00É - 1.00É MAX 0.00É - 1.00É MAX
*** FRONT INDIVIDUAL TOE RIGHT/
LEFT.........................................+0.05É+or- 0.10É +0.05É +or- 0.10É +0.05É +or- 0.10É
FRONT TOTAL
TOE....................................................
Specified In Degrees+0.10É +or- 0.20É +0.10É +or- 0.20É +0.10É +or- 0.20É
FRONT SIDE TO SIDE TOE
DIFFERENTIAL.....................................0.00É - 0.06É MAX 0.00É - 0.06É MAX 0.00É - 0.06É MAX
****REAR INDIVIDUAL CAMBER IN
DEGREES............................................+0.00É +or- 0.25É +0.00É +or- 0.25É -0.10É +or- 0.25
REAR INDIVIDUAL TOE RIGHT/
LEFT........................................0.00É +or- 0.40É 0.00É +or- 0.40É 0.00É +or- 0.40É
**** REAR TOTAL TOE.....................
Specified In Degrees
TOE OUT: When Backed On Alignment Rack
Is TOE In When Driving0.00É +or- 0.40É 0.00É +or- 0.40É 0.00É +or- 0.40É
****REAR THRUST ANGLE................ 0.00É +or- 0.30É 0.00É +or- 0.30É 0.00É +or- 0.30É
STEERING WHEEL ANGLE................ 0.00É +or- 2.50É 0.00É +or- 2.50É 0.00É +or- 2.50É
FRONT RIDE HEIGHT (MEASURED AT
TOP OF FENDER WHEEL
OPENING)............................................747.5 mm
+or-10.0mm753.5 mm
+or-10.0mm783.5 mm
+or-10.0mm
FRONT RIDE HEIGHT SIDE TO SIDE
DIFFERENTIAL.....................................0.0 mm 12.5 mm
MAX0.0 mm 12.5 mm
MAX0.0 mm 12.5 mm
MAX
*****REAR RIDE HEIGHT (MEASURED AT
TOP OF FENDER WHEEL
OPENING)............................................766.0 mm
+or-10.0mm772.0 mm
+or-10.0mm802.5 mm
+or-10.0mm
*****REAR RIDE HEIGHT SIDE TO SIDE
DIFFERENTIAL.....................................0.0 mm 12.5 mm
MAX0.0 mm 12.5 mm
MAX0.0 mm 12.5 mm
MAX
2 - 2 SUSPENSIONNS/GS
SPECIFICATIONS (Continued)
Page 126 of 1938

caliper adapter and hub/bearing are squarely seated
against the axle. Then tighten the hub/bearing
mounting bolts to a torque of 129 N´m (95 ft. lbs.).
(3) Install driveshaft in hub/bearing and on output
shaft of rear drive line module. Driveshaft is
installed by first sliding the outer joint of the drive-
shaft into the hub/bearing and then compressing the
inner joint on the driveshaft and installing it on the
output shaft the drive line module.
(4) Install rotor on hub/bearing.
(5) Carefully lower disc brake caliper and brake
shoes over rotor and onto caliper adapter by revers-
ing the removal procedure (Fig. 92).
CAUTION: When installing guide pin bolts extreme
caution should be taken not to crossthread the cal-
iper guide pin bolts.
(6) Install the disc brake caliper guide pin bolts
(Fig. 91). Tighten the guide pin bolts to a torque of
22 N´m (192 in. lbs.).
(7) Clean all foreign material off the threads of the
outer C/V joint stub shaft. Install the washer and
hub nut (Fig. 88) on the stub shaft of the outer C/V
joint.
(8) Lower vehicle.
(9) Set the park brake.This is required to keep
the driveshaft from rotating when tightening
and torquing the hub nut and driveshaft inner
joint to driveline module mounting nuts.
(10) Raise vehicle.
(11) Tighten the driveshaft inner joint to drive line
module output shaft mounting bolts (Fig. 89) to a
torque of 61 N´m (45 ft. lbs.).
(12) Tighten the outer C/V joint hub nut (Fig. 88)
to a torque of 244 N´m (180 ft. lbs.).
(13) Install the spring washer (Fig. 87) on the stub
shaft of the outer C/V joint.
(14) Install the nut retainer and cotter pin (Fig.
86) on the stub shaft of the outer C/V joint.
(15) Install the wheel speed sensor on the hub/
bearing and adapter. Install the wheel speed sensor
attaching bolt (Fig. 90). Tighten the wheel speed sen-
sor attaching bolt to a torque of 12 N´m (105 in. lbs).
(16) Install wheel and tire.
(17) Tighten the wheel mounting stud nuts in
proper sequence until all nuts are torqued to half
specification. Then repeat the tightening sequence to
the full specified torque of 129 N´m (95 ft. lbs.).
(18) Remove jackstands or lower hoist.
CAUTION: Before moving vehicle, pump the brake
pedal several times to insure the vehicle has a firm
brake pedal to adequately stop vehicle.
(19) Road test vehicle to ensure proper operation
of the brake system.MASTER CYLINDER
CAUTION: Different types of master cylinders are
used on this vehicle. Vehicles equipped with trac-
tion control use a center port master cylinder. Vehi-
cles not equipped with traction control use a
compensating port master cylinder. Be sure to ver-
ify if the vehicle is equipped with traction control
and that the correct replacement master cylinder is
used. Also, vehicles that are equipped with four
wheel disc brakes have a master with a different
size piston bore than the other master cylinders. If
a new master cylinder is being installed, be sure
the correct master cylinder is used for the type of
brake system the vehicle is equipped with.
REMOVE
CAUTION: Vacuum in the power brake booster
must be pumped down (removed) before removing
master cylinder from power brake booster. This is
necessary to prevent the power brake booster from
sucking in any contamination as the master cylin-
der is removed. This can be done simply by pump-
ing the brake pedal, with the vehicle's engine not
running, until a firm feeling brake pedal is achieved.
(1) With engine not running, pump the brake
pedal until a firm pedal is achieved (4-5 strokes).
CAUTION: Before removing the master cylinder
filler tube from the brake fluid reservoir, the filler
tube, brake fluid reservoir and master cylinder must
be thoroughly cleaned. This must be done to pre-
vent dirt particles from falling into the brake fluid
reservoir and entering the brakes hydraulic system.
(2) Thoroughly clean all surfaces of the filler neck,
brake fluid reservoir, and master cylinder. Use only a
solvent such as Mopar Brake Parts Cleaner or an
equivalent.
(3) Remove master cylinder filler tube from brake
fluid reservoir by pushing down and rotating (Fig.
97). Then remove the cap from the removed filler
tube and install it on the master cylinder reservoir.
(4) Remove vehicle wiring harness connector, from
the brake fluid level sensor, in master cylinder brake
fluid reservoir (Fig. 98).
(5) Disconnect the primary and secondary brake
tubes from the master cylinder housing (Fig. 99).
Install sealing plugs in the open brake tube outlets
on master cylinder assembly.
5 - 44 BRAKESNS
REMOVAL AND INSTALLATION (Continued)
Page 172 of 1938
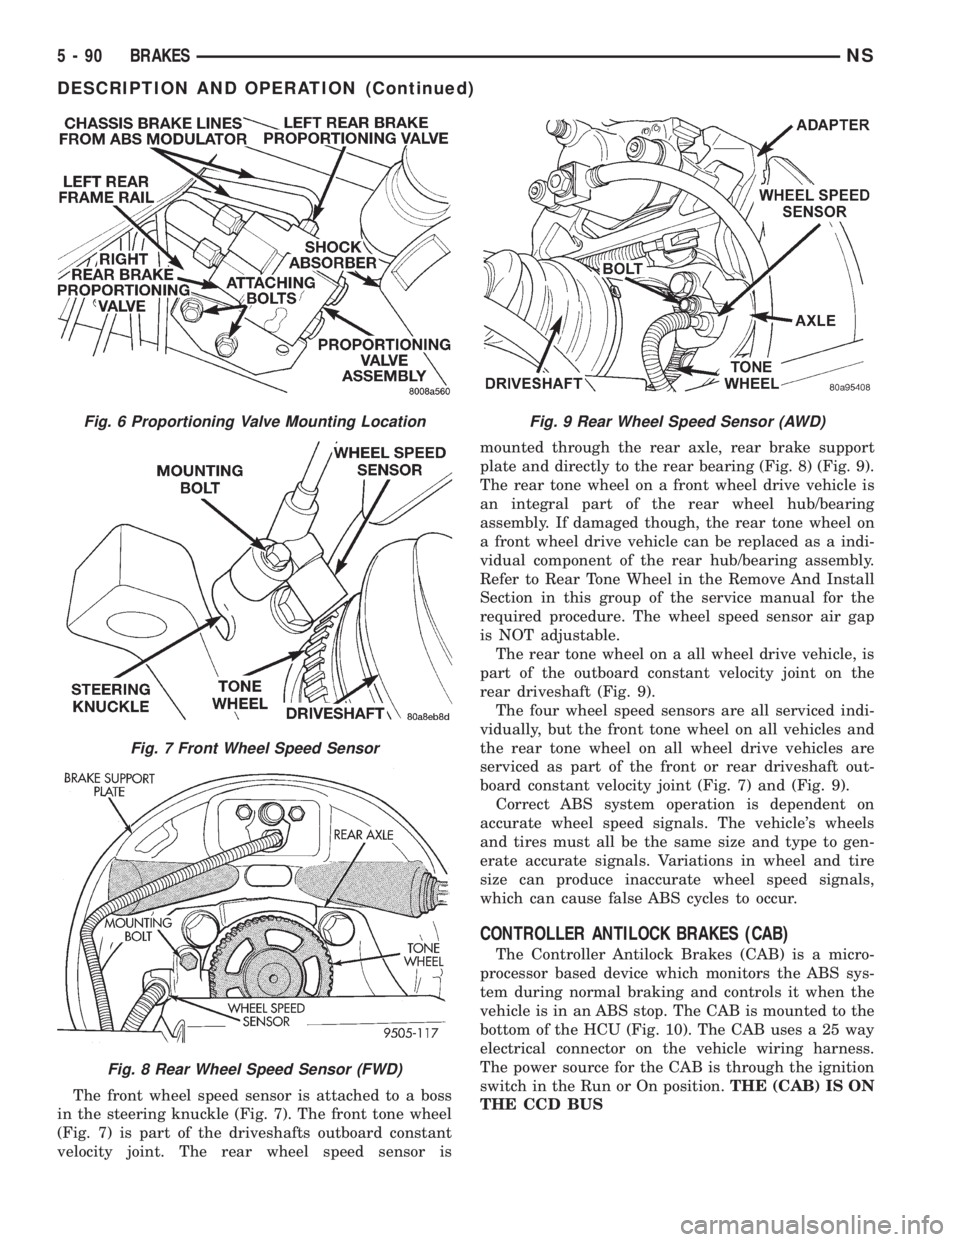
The front wheel speed sensor is attached to a boss
in the steering knuckle (Fig. 7). The front tone wheel
(Fig. 7) is part of the driveshafts outboard constant
velocity joint. The rear wheel speed sensor ismounted through the rear axle, rear brake support
plate and directly to the rear bearing (Fig. 8) (Fig. 9).
The rear tone wheel on a front wheel drive vehicle is
an integral part of the rear wheel hub/bearing
assembly. If damaged though, the rear tone wheel on
a front wheel drive vehicle can be replaced as a indi-
vidual component of the rear hub/bearing assembly.
Refer to Rear Tone Wheel in the Remove And Install
Section in this group of the service manual for the
required procedure. The wheel speed sensor air gap
is NOT adjustable.
The rear tone wheel on a all wheel drive vehicle, is
part of the outboard constant velocity joint on the
rear driveshaft (Fig. 9).
The four wheel speed sensors are all serviced indi-
vidually, but the front tone wheel on all vehicles and
the rear tone wheel on all wheel drive vehicles are
serviced as part of the front or rear driveshaft out-
board constant velocity joint (Fig. 7) and (Fig. 9).
Correct ABS system operation is dependent on
accurate wheel speed signals. The vehicle's wheels
and tires must all be the same size and type to gen-
erate accurate signals. Variations in wheel and tire
size can produce inaccurate wheel speed signals,
which can cause false ABS cycles to occur.
CONTROLLER ANTILOCK BRAKES (CAB)
The Controller Antilock Brakes (CAB) is a micro-
processor based device which monitors the ABS sys-
tem during normal braking and controls it when the
vehicle is in an ABS stop. The CAB is mounted to the
bottom of the HCU (Fig. 10). The CAB uses a 25 way
electrical connector on the vehicle wiring harness.
The power source for the CAB is through the ignition
switch in the Run or On position.THE (CAB) IS ON
THE CCD BUS
Fig. 6 Proportioning Valve Mounting Location
Fig. 7 Front Wheel Speed Sensor
Fig. 8 Rear Wheel Speed Sensor (FWD)
Fig. 9 Rear Wheel Speed Sensor (AWD)
5 - 90 BRAKESNS
DESCRIPTION AND OPERATION (Continued)
Page 1062 of 1938
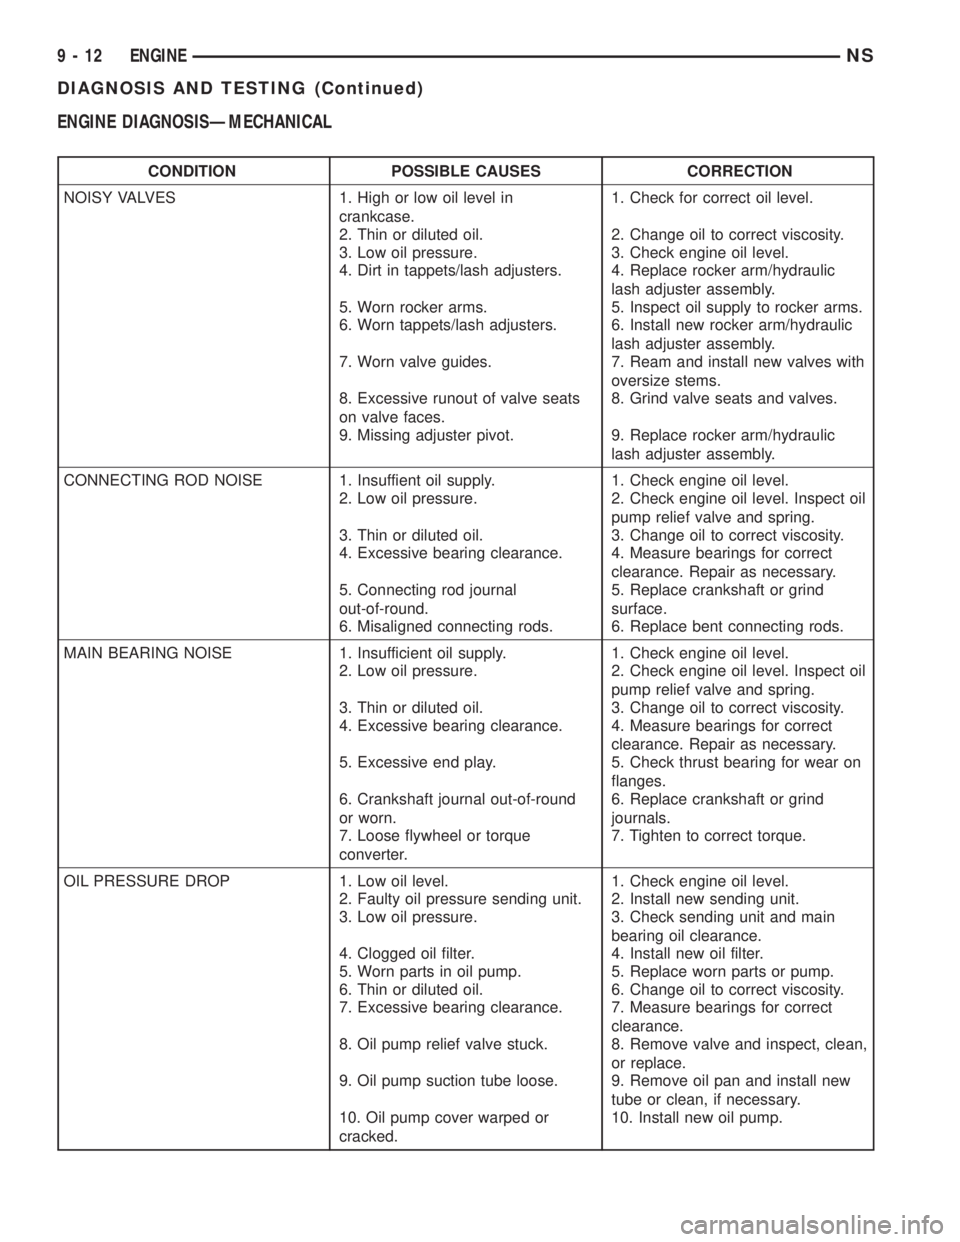
ENGINE DIAGNOSISÐMECHANICAL
CONDITION POSSIBLE CAUSES CORRECTION
NOISY VALVES 1. High or low oil level in
crankcase.1. Check for correct oil level.
2. Thin or diluted oil. 2. Change oil to correct viscosity.
3. Low oil pressure. 3. Check engine oil level.
4. Dirt in tappets/lash adjusters. 4. Replace rocker arm/hydraulic
lash adjuster assembly.
5. Worn rocker arms. 5. Inspect oil supply to rocker arms.
6. Worn tappets/lash adjusters. 6. Install new rocker arm/hydraulic
lash adjuster assembly.
7. Worn valve guides. 7. Ream and install new valves with
oversize stems.
8. Excessive runout of valve seats
on valve faces.8. Grind valve seats and valves.
9. Missing adjuster pivot. 9. Replace rocker arm/hydraulic
lash adjuster assembly.
CONNECTING ROD NOISE 1. Insuffient oil supply. 1. Check engine oil level.
2. Low oil pressure. 2. Check engine oil level. Inspect oil
pump relief valve and spring.
3. Thin or diluted oil. 3. Change oil to correct viscosity.
4. Excessive bearing clearance. 4. Measure bearings for correct
clearance. Repair as necessary.
5. Connecting rod journal
out-of-round.5. Replace crankshaft or grind
surface.
6. Misaligned connecting rods. 6. Replace bent connecting rods.
MAIN BEARING NOISE 1. Insufficient oil supply. 1. Check engine oil level.
2. Low oil pressure. 2. Check engine oil level. Inspect oil
pump relief valve and spring.
3. Thin or diluted oil. 3. Change oil to correct viscosity.
4. Excessive bearing clearance. 4. Measure bearings for correct
clearance. Repair as necessary.
5. Excessive end play. 5. Check thrust bearing for wear on
flanges.
6. Crankshaft journal out-of-round
or worn.6. Replace crankshaft or grind
journals.
7. Loose flywheel or torque
converter.7. Tighten to correct torque.
OIL PRESSURE DROP 1. Low oil level. 1. Check engine oil level.
2. Faulty oil pressure sending unit. 2. Install new sending unit.
3. Low oil pressure. 3. Check sending unit and main
bearing oil clearance.
4. Clogged oil filter. 4. Install new oil filter.
5. Worn parts in oil pump. 5. Replace worn parts or pump.
6. Thin or diluted oil. 6. Change oil to correct viscosity.
7. Excessive bearing clearance. 7. Measure bearings for correct
clearance.
8. Oil pump relief valve stuck. 8. Remove valve and inspect, clean,
or replace.
9. Oil pump suction tube loose. 9. Remove oil pan and install new
tube or clean, if necessary.
10. Oil pump cover warped or
cracked.10. Install new oil pump.
9 - 12 ENGINENS
DIAGNOSIS AND TESTING (Continued)
Page 1243 of 1938
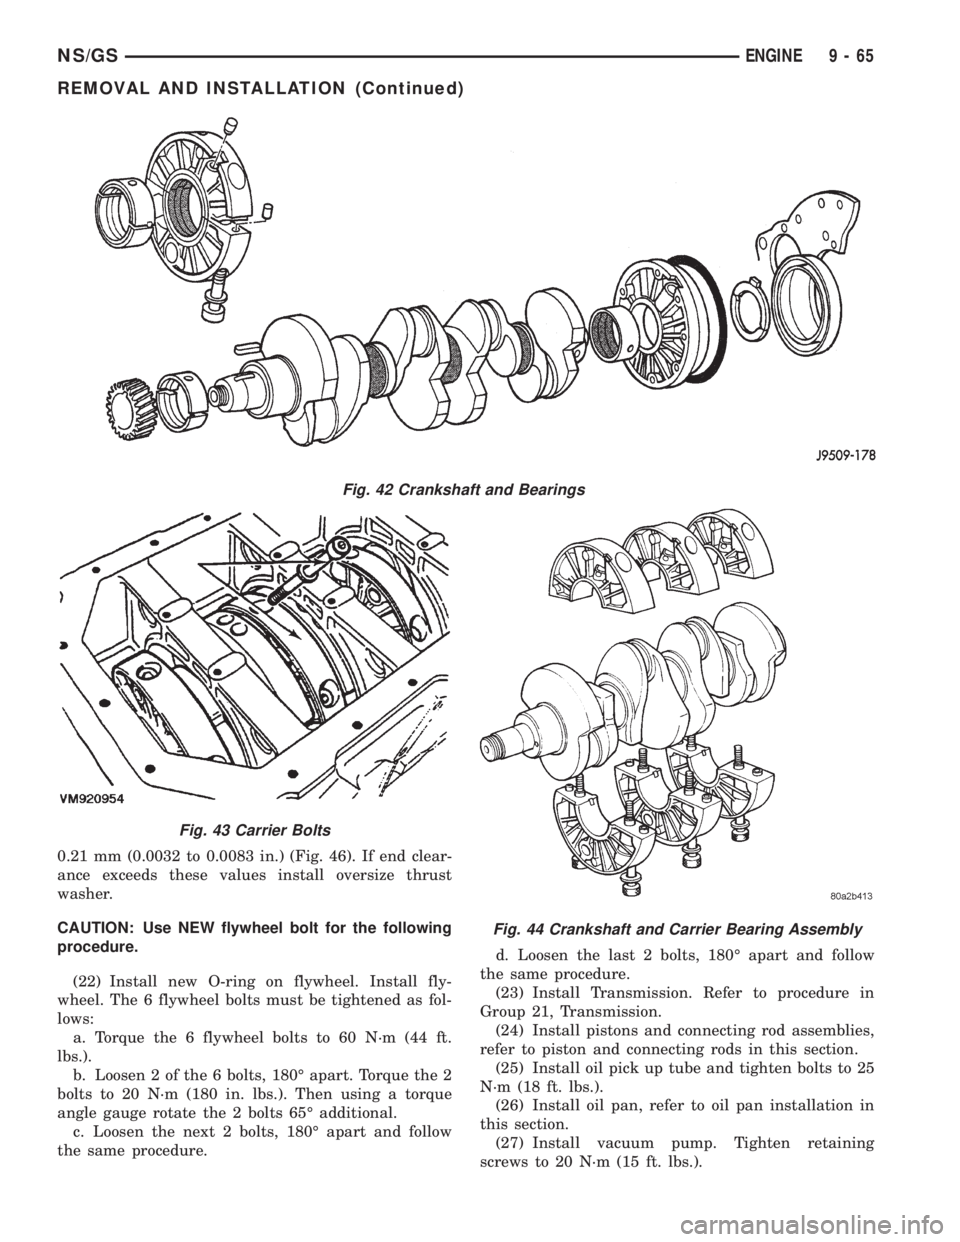
0.21 mm (0.0032 to 0.0083 in.) (Fig. 46). If end clear-
ance exceeds these values install oversize thrust
washer.
CAUTION: Use NEW flywheel bolt for the following
procedure.
(22) Install new O-ring on flywheel. Install fly-
wheel. The 6 flywheel bolts must be tightened as fol-
lows:
a. Torque the 6 flywheel bolts to 60 N´m (44 ft.
lbs.).
b. Loosen 2 of the 6 bolts, 180É apart. Torque the 2
bolts to 20 N´m (180 in. lbs.). Then using a torque
angle gauge rotate the 2 bolts 65É additional.
c. Loosen the next 2 bolts, 180É apart and follow
the same procedure.d. Loosen the last 2 bolts, 180É apart and follow
the same procedure.
(23) Install Transmission. Refer to procedure in
Group 21, Transmission.
(24) Install pistons and connecting rod assemblies,
refer to piston and connecting rods in this section.
(25) Install oil pick up tube and tighten bolts to 25
N´m (18 ft. lbs.).
(26) Install oil pan, refer to oil pan installation in
this section.
(27) Install vacuum pump. Tighten retaining
screws to 20 N´m (15 ft. lbs.).
Fig. 42 Crankshaft and Bearings
Fig. 43 Carrier Bolts
Fig. 44 Crankshaft and Carrier Bearing Assembly
NS/GSENGINE 9 - 65
REMOVAL AND INSTALLATION (Continued)