audio CHRYSLER VOYAGER 2004 Owner's Manual
[x] Cancel search | Manufacturer: CHRYSLER, Model Year: 2004, Model line: VOYAGER, Model: CHRYSLER VOYAGER 2004Pages: 2585, PDF Size: 62.54 MB
Page 418 of 2585
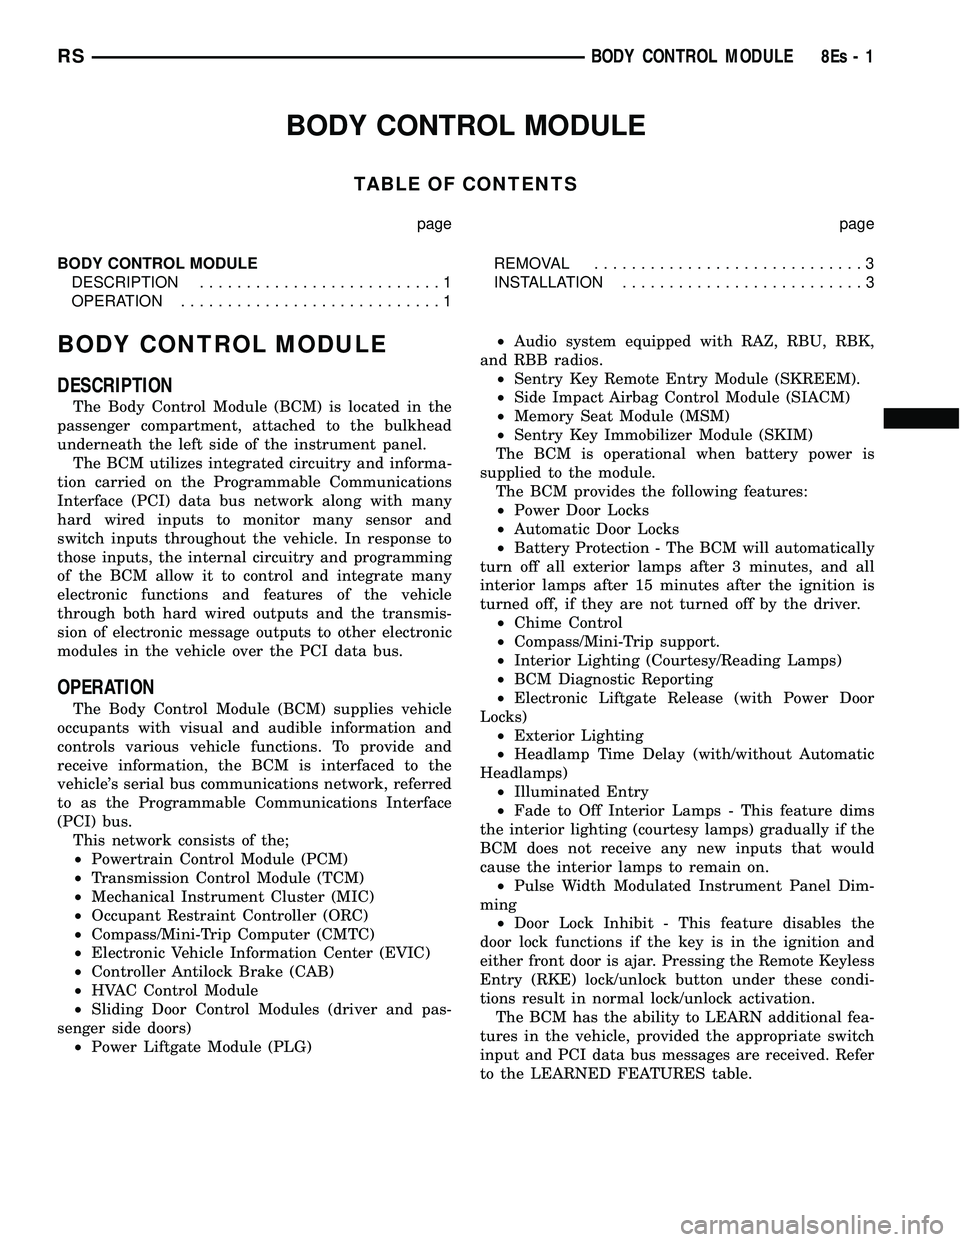
BODY CONTROL MODULE
TABLE OF CONTENTS
page page
BODY CONTROL MODULE DESCRIPTION ..........................1
OPERATION ............................1 REMOVAL
.............................3
INSTALLATION ..........................3
BODY CONTROL MODULE
DESCRIPTION
The Body Control Module (BCM) is located in the
passenger compartment, attached to the bulkhead
underneath the left side of the instrument panel. The BCM utilizes integrated circuitry and informa-
tion carried on the Programmable Communications
Interface (PCI) data bus network along with many
hard wired inputs to monitor many sensor and
switch inputs throughout the vehicle. In response to
those inputs, the internal circuitry and programming
of the BCM allow it to control and integrate many
electronic functions and features of the vehicle
through both hard wired outputs and the transmis-
sion of electronic message outputs to other electronic
modules in the vehicle over the PCI data bus.
OPERATION
The Body Control Module (BCM) supplies vehicle
occupants with visual and audible information and
controls various vehicle functions. To provide and
receive information, the BCM is interfaced to the
vehicle's serial bus communications network, referred
to as the Programmable Communications Interface
(PCI) bus. This network consists of the;
² Powertrain Control Module (PCM)
² Transmission Control Module (TCM)
² Mechanical Instrument Cluster (MIC)
² Occupant Restraint Controller (ORC)
² Compass/Mini-Trip Computer (CMTC)
² Electronic Vehicle Information Center (EVIC)
² Controller Antilock Brake (CAB)
² HVAC Control Module
² Sliding Door Control Modules (driver and pas-
senger side doors) ² Power Liftgate Module (PLG) ²
Audio system equipped with RAZ, RBU, RBK,
and RBB radios. ² Sentry Key Remote Entry Module (SKREEM).
² Side Impact Airbag Control Module (SIACM)
² Memory Seat Module (MSM)
² Sentry Key Immobilizer Module (SKIM)
The BCM is operational when battery power is
supplied to the module. The BCM provides the following features:
² Power Door Locks
² Automatic Door Locks
² Battery Protection - The BCM will automatically
turn off all exterior lamps after 3 minutes, and all
interior lamps after 15 minutes after the ignition is
turned off, if they are not turned off by the driver. ² Chime Control
² Compass/Mini-Trip support.
² Interior Lighting (Courtesy/Reading Lamps)
² BCM Diagnostic Reporting
² Electronic Liftgate Release (with Power Door
Locks) ² Exterior Lighting
² Headlamp Time Delay (with/without Automatic
Headlamps) ² Illuminated Entry
² Fade to Off Interior Lamps - This feature dims
the interior lighting (courtesy lamps) gradually if the
BCM does not receive any new inputs that would
cause the interior lamps to remain on. ² Pulse Width Modulated Instrument Panel Dim-
ming ² Door Lock Inhibit - This feature disables the
door lock functions if the key is in the ignition and
either front door is ajar. Pressing the Remote Keyless
Entry (RKE) lock/unlock button under these condi-
tions result in normal lock/unlock activation. The BCM has the ability to LEARN additional fea-
tures in the vehicle, provided the appropriate switch
input and PCI data bus messages are received. Refer
to the LEARNED FEATURES table.
RS BODY CONTROL MODULE8Es-1
Page 419 of 2585
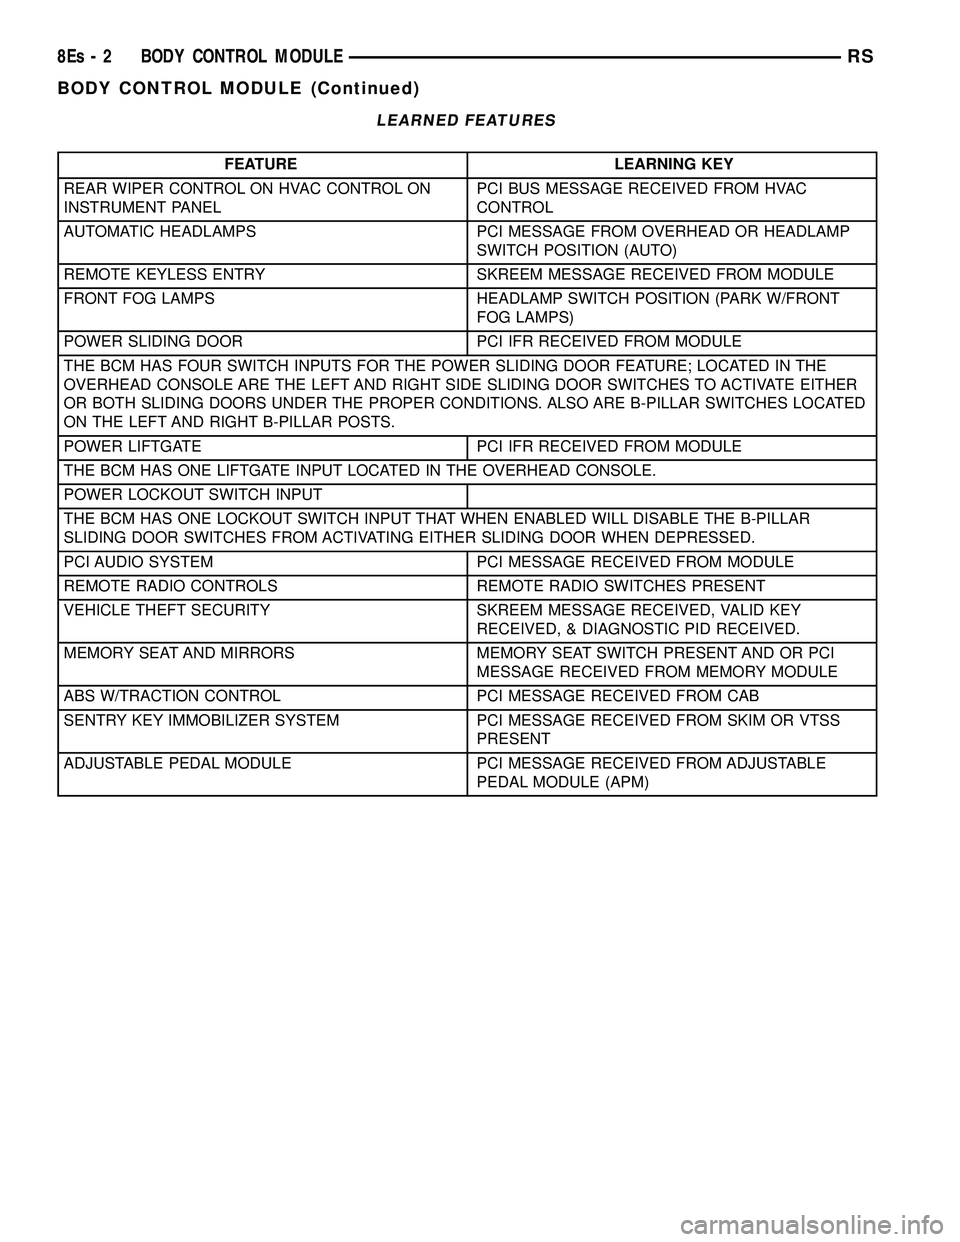
LEARNED FEATURES
FEATURE LEARNING KEY
REAR WIPER CONTROL ON HVAC CONTROL ON
INSTRUMENT PANEL PCI BUS MESSAGE RECEIVED FROM HVAC
CONTROL
AUTOMATIC HEADLAMPS PCI MESSAGE FROM OVERHEAD OR HEADLAMP SWITCH POSITION (AUTO)
REMOTE KEYLESS ENTRY SKREEM MESSAGE RECEIVED FROM MODULE
FRONT FOG LAMPS HEADLAMP SWITCH POSITION (PARK W/FRONT FOG LAMPS)
POWER SLIDING DOOR PCI IFR RECEIVED FROM MODULE
THE BCM HAS FOUR SWITCH INPUTS FOR THE POWER SLIDING DOOR FEATURE; LOCATED IN THE
OVERHEAD CONSOLE ARE THE LEFT AND RIGHT SIDE SLIDING DOOR SWITCHES TO ACTIVATE EITHER
OR BOTH SLIDING DOORS UNDER THE PROPER CONDITIONS. ALSO ARE B-PILLAR SWITCHES LOCATED
ON THE LEFT AND RIGHT B-PILLAR POSTS.
POWER LIFTGATE PCI IFR RECEIVED FROM MODULE
THE BCM HAS ONE LIFTGATE INPUT LOCATED IN THE OVERHEAD CONSOLE.
POWER LOCKOUT SWITCH INPUT
THE BCM HAS ONE LOCKOUT SWITCH INPUT THAT WHEN ENABLED WILL DISABLE THE B-PILLAR
SLIDING DOOR SWITCHES FROM ACTIVATING EITHER SLIDING DOOR WHEN DEPRESSED.
PCI AUDIO SYSTEM PCI MESSAGE RECEIVED FROM MODULE
REMOTE RADIO CONTROLS REMOTE RADIO SWITCHES PRESENT
VEHICLE THEFT SECURITY SKREEM MESSAGE RECEIVED, VALID KEY RECEIVED, & DIAGNOSTIC PID RECEIVED.
MEMORY SEAT AND MIRRORS MEMORY SEAT SWITCH PRESENT AND OR PCI MESSAGE RECEIVED FROM MEMORY MODULE
ABS W/TRACTION CONTROL PCI MESSAGE RECEIVED FROM CAB
SENTRY KEY IMMOBILIZER SYSTEM PCI MESSAGE RECEIVED FROM SKIM OR VTSS PRESENT
ADJUSTABLE PEDAL MODULE PCI MESSAGE RECEIVED FROM ADJUSTABLE PEDAL MODULE (APM)
8Es - 2 BODY CONTROL MODULERS
BODY CONTROL MODULE (Continued)
Page 704 of 2585
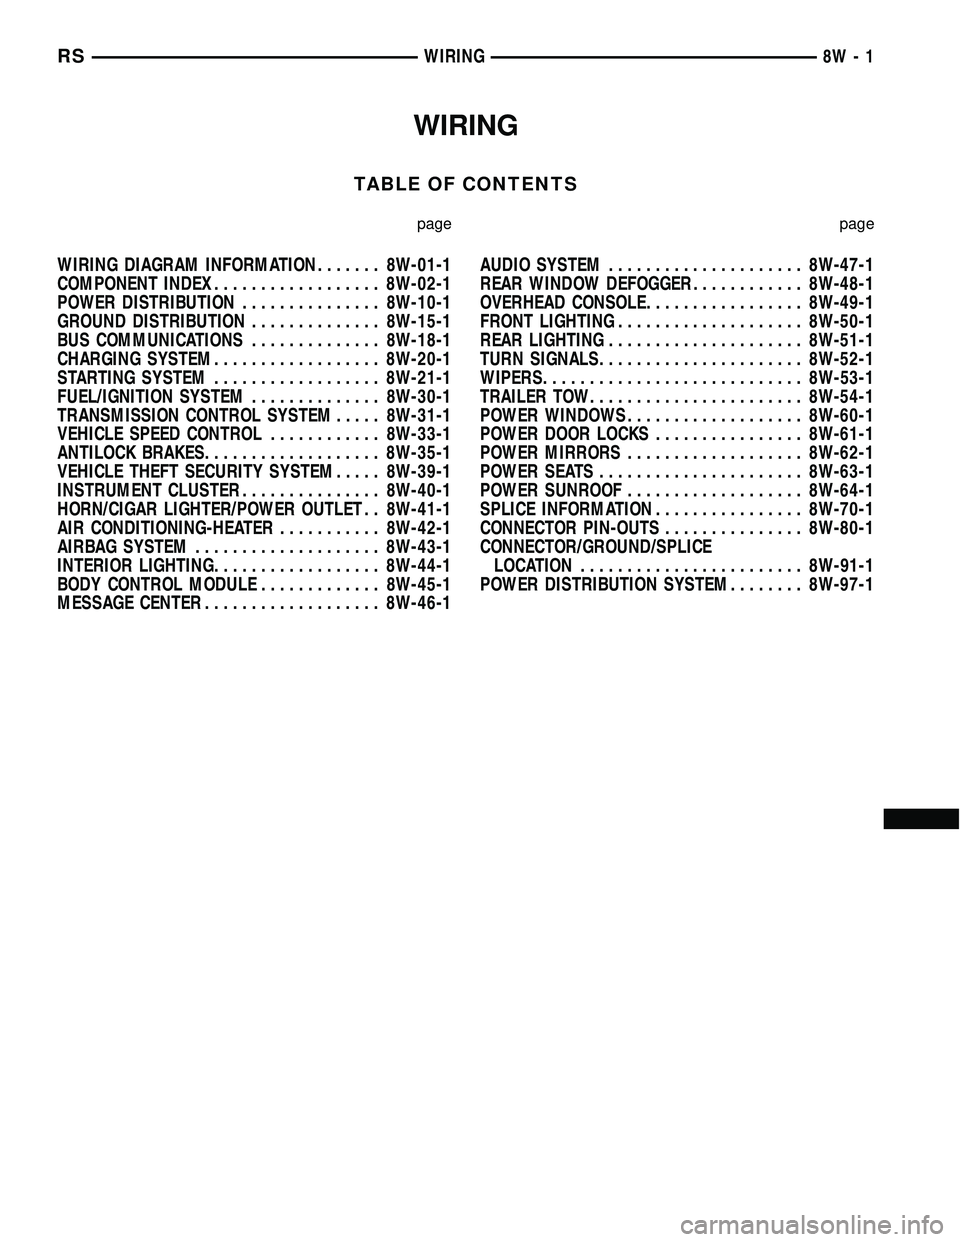
WIRING
TABLE OF CONTENTS
page page
WIRING DIAGRAM INFORMATION....... 8W-01-1
COMPONENT INDEX.................. 8W-02-1
POWER DISTRIBUTION............... 8W-10-1
GROUND DISTRIBUTION.............. 8W-15-1
BUS COMMUNICATIONS.............. 8W-18-1
CHARGING SYSTEM.................. 8W-20-1
STARTING SYSTEM.................. 8W-21-1
FUEL/IGNITION SYSTEM.............. 8W-30-1
TRANSMISSION CONTROL SYSTEM..... 8W-31-1
VEHICLE SPEED CONTROL............ 8W-33-1
ANTILOCK BRAKES................... 8W-35-1
VEHICLE THEFT SECURITY SYSTEM..... 8W-39-1
INSTRUMENT CLUSTER............... 8W-40-1
HORN/CIGAR LIGHTER/POWER OUTLET . . 8W-41-1
AIR CONDITIONING-HEATER........... 8W-42-1
AIRBAG SYSTEM.................... 8W-43-1
INTERIOR LIGHTING.................. 8W-44-1
BODY CONTROL MODULE............. 8W-45-1
MESSAGE CENTER................... 8W-46-1AUDIO SYSTEM..................... 8W-47-1
REAR WINDOW DEFOGGER............ 8W-48-1
OVERHEAD CONSOLE................. 8W-49-1
FRONT LIGHTING.................... 8W-50-1
REAR LIGHTING..................... 8W-51-1
TURN SIGNALS...................... 8W-52-1
WIPERS............................ 8W-53-1
TRAILER TOW....................... 8W-54-1
POWER WINDOWS................... 8W-60-1
POWER DOOR LOCKS................ 8W-61-1
POWER MIRRORS................... 8W-62-1
POWER SEATS...................... 8W-63-1
POWER SUNROOF................... 8W-64-1
SPLICE INFORMATION................ 8W-70-1
CONNECTOR PIN-OUTS............... 8W-80-1
CONNECTOR/GROUND/SPLICE
LOCATION........................ 8W-91-1
POWER DISTRIBUTION SYSTEM........ 8W-97-1 RSWIRING
8W-1
Page 711 of 2585
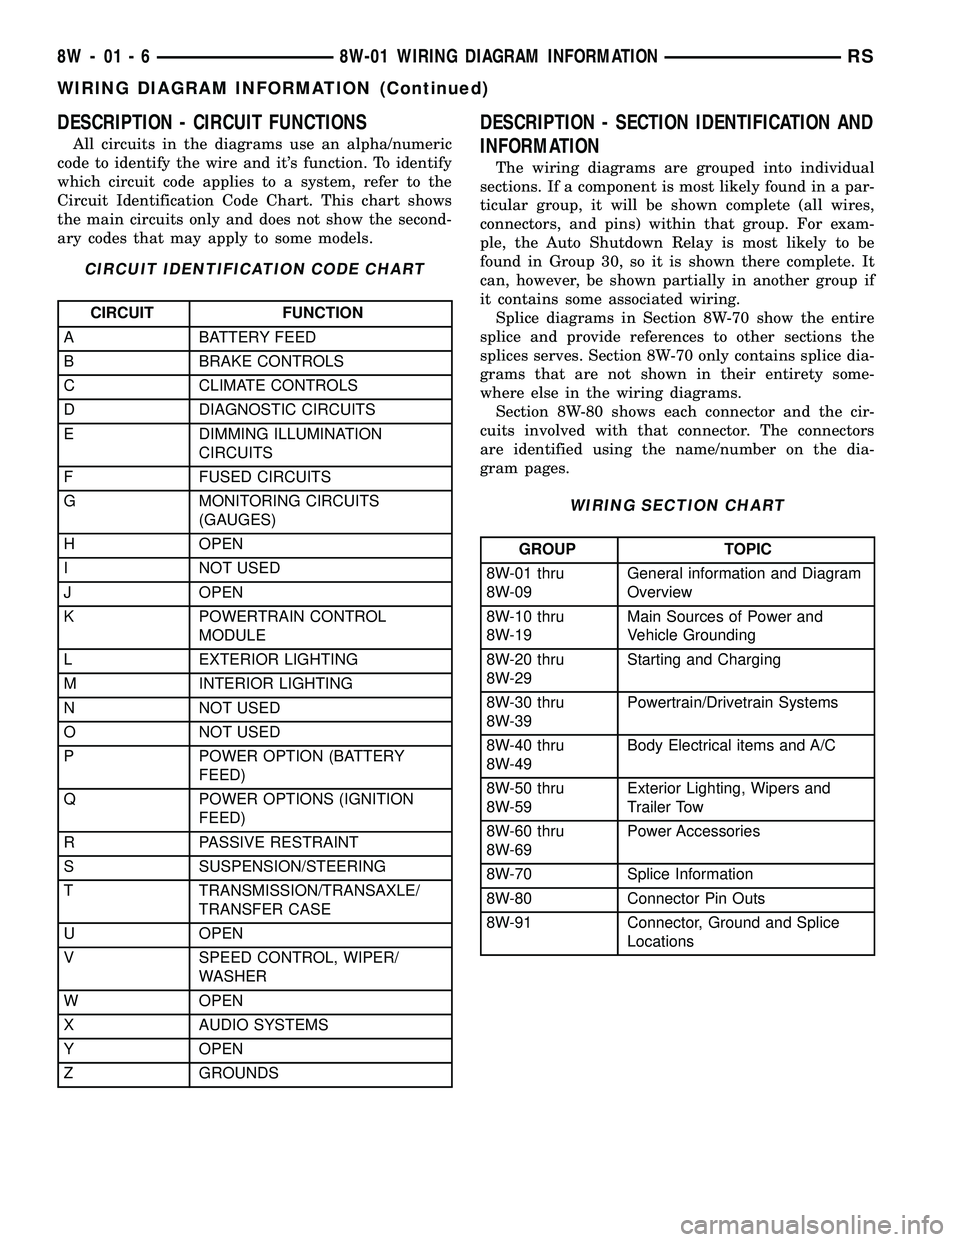
DESCRIPTION - CIRCUIT FUNCTIONS
All circuits in the diagrams use an alpha/numeric
code to identify the wire and it's function. To identify
which circuit code applies to a system, refer to the
Circuit Identification Code Chart. This chart shows
the main circuits only and does not show the second-
ary codes that may apply to some models.
CIRCUIT IDENTIFICATION CODE CHART
CIRCUIT FUNCTION
A BATTERY FEED
B BRAKE CONTROLS
C CLIMATE CONTROLS
D DIAGNOSTIC CIRCUITS
E DIMMING ILLUMINATION
CIRCUITS
F FUSED CIRCUITS
G MONITORING CIRCUITS
(GAUGES)
H OPEN
I NOT USED
J OPEN
K POWERTRAIN CONTROL
MODULE
L EXTERIOR LIGHTING
M INTERIOR LIGHTING
N NOT USED
O NOT USED
P POWER OPTION (BATTERY
FEED)
Q POWER OPTIONS (IGNITION
FEED)
R PASSIVE RESTRAINT
S SUSPENSION/STEERING
T TRANSMISSION/TRANSAXLE/
TRANSFER CASE
U OPEN
V SPEED CONTROL, WIPER/
WASHER
W OPEN
X AUDIO SYSTEMS
Y OPEN
Z GROUNDS
DESCRIPTION - SECTION IDENTIFICATION AND
INFORMATION
The wiring diagrams are grouped into individual
sections. If a component is most likely found in a par-
ticular group, it will be shown complete (all wires,
connectors, and pins) within that group. For exam-
ple, the Auto Shutdown Relay is most likely to be
found in Group 30, so it is shown there complete. It
can, however, be shown partially in another group if
it contains some associated wiring.
Splice diagrams in Section 8W-70 show the entire
splice and provide references to other sections the
splices serves. Section 8W-70 only contains splice dia-
grams that are not shown in their entirety some-
where else in the wiring diagrams.
Section 8W-80 shows each connector and the cir-
cuits involved with that connector. The connectors
are identified using the name/number on the dia-
gram pages.
WIRING SECTION CHART
GROUP TOPIC
8W-01 thru
8W-09General information and Diagram
Overview
8W-10 thru
8W-19Main Sources of Power and
Vehicle Grounding
8W-20 thru
8W-29Starting and Charging
8W-30 thru
8W-39Powertrain/Drivetrain Systems
8W-40 thru
8W-49Body Electrical items and A/C
8W-50 thru
8W-59Exterior Lighting, Wipers and
Trailer Tow
8W-60 thru
8W-69Power Accessories
8W-70 Splice Information
8W-80 Connector Pin Outs
8W-91 Connector, Ground and Splice
Locations
8W - 01 - 6 8W-01 WIRING DIAGRAM INFORMATIONRS
WIRING DIAGRAM INFORMATION (Continued)
Page 980 of 2585

8W-47 AUDIO SYSTEM
Component Page
Accessory Relay................... 8W-47-2, 6
Antenna........................... 8W-47-6
Body Control Module............. 8W-47-2, 6, 8
CD Changer.................... 8W-47-12, 13
Clockspring........................ 8W-47-8
DVD Screen....................... 8W-47-15
DVD/CD Changer................ 8W-47-14, 15
Front Cigar Lighter................ 8W-47-2, 6
Front Control Module............. 8W-47-2, 6, 7
Fuse 5.......................... 8W-47-2, 6
Fuse 14....................... 8W-47-2, 7, 14
G200............................. 8W-47-14
G202...................... 8W-47-2, 6, 10, 11Component Page
Integrated Power Module....... 8W-47-2, 6, 7, 14
Left Door Speaker............. 8W-47-3, 4, 9, 10
Left Instrument Panel Speaker..... 8W-47-3, 4, 9
Left Rear Pillar Speaker.............. 8W-47-11
Left Rear Speaker............... 8W-47-5, 7, 11
Left Remote Radio Switch............. 8W-47-8
Name Brand Speaker Relay............ 8W-47-7
Radio..... 8W-47-2, 3, 4, 5, 6, 7, 10, 11, 12, 13, 14
Right Door Speaker........... 8W-47-3, 4, 9, 10
Right Instrument Panel Speaker.... 8W-47-3, 4, 9
Right Rear Pillar Speaker............ 8W-47-11
Right Rear Speaker............. 8W-47-5, 7, 11
Right Remote Radio Switch............ 8W-47-8
RS8W-47 AUDIO SYSTEM8W-47-1
Page 1151 of 2585

CAMSHAFT POSITION SENSOR (DIESEL) - BLACK 3 WAY
CAV CIRCUIT FUNCTION
1 K944 20BK/GY CAMSHAFT POSITION SENSOR GROUND
2 K44 20DB/GY CAMSHAFT POSITION SENSOR SIGNAL
3 K342 16BR/WT ECM/PCM RELAY OUTPUT
CAMSHAFT POSITION SENSOR (GAS) - BLACK 3 WAY
CAV CIRCUIT FUNCTION
1 F855 18PK/YL 5 VOLT SUPPLY
2 K900 20DB/DG SENSOR GROUND
3 K44 18DB/GY CMP SIGNAL
CD CHANGER-8WAY
CAV CIRCUIT FUNCTION
1 X40 22GY/WT (EXCEPT EXPORT) AUDIO OUT RIGHT
1 X40 20GY/WT (EXPORT) AUDIO OUT RIGHT
2 E14 22OR/TN (EXCEPT EXPORT) PANEL LAMPS DRIVER
2 E14 18OR/TN (EXPORT) PANEL LAMPS DRIVER
3 D25 20WT/VT (EXCEPT EXPORT) PCI BUS
3 D25 20VT/YL (EXPORT) PCI BUS
4 X112 20DG/GY (EXCEPT EXPORT) IGNITION SWITCH SIGNAL
4 X112 20RD (EXPORT) IGNITION SWITCH SIGNAL
5 X41 22DG/WT (EXCEPT EXPORT) AUDIO OUT LEFT
5 X41 20DG/WT (EXPORT) AUDIO OUT LEFT
6 X140 22GY/OR (EXCEPT EXPORT) COMMON AUDIO
6 Z140 18BK/OR (EXPORT) GROUND
7 Z141 18BK/TN GROUND
8 X160 20GY/YL FUSED B(+)
CENTER HIGH MOUNTED STOP LAMP - BLACK 2 WAY
CAV CIRCUIT FUNCTION
1 Z350 20BK/TN GROUND
2 L50 18WT/TN (DIESEL) PRIMARY BRAKE SWITCH SIGNAL
2 L50 18WT/TN (GAS) BRAKE LAMP SWITCH OUTPUT
8W - 80 - 56 8W-80 CONNECTOR PIN-OUTSRS
Page 1161 of 2585
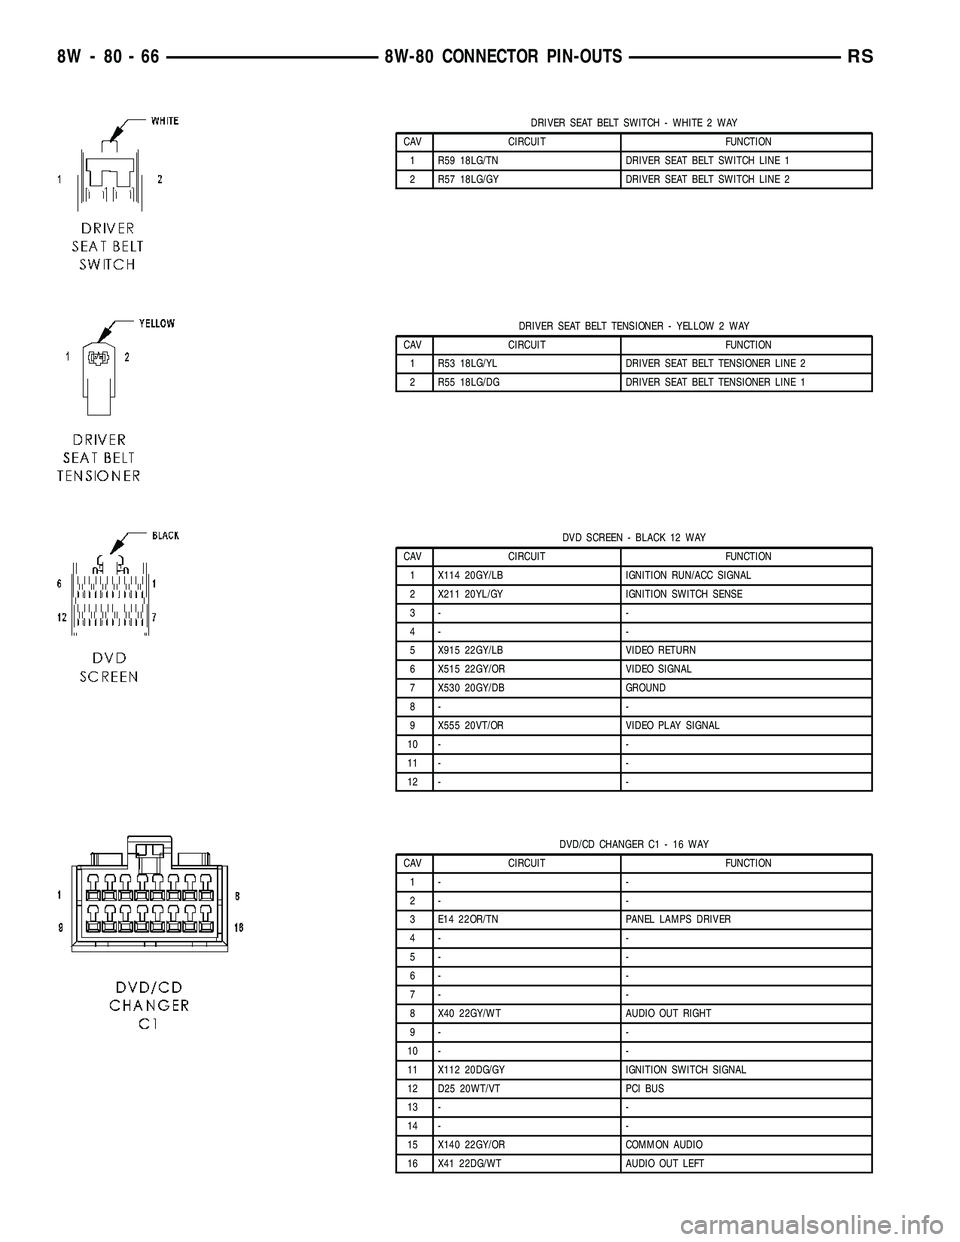
DRIVER SEAT BELT SWITCH - WHITE 2 WAY
CAV CIRCUIT FUNCTION
1 R59 18LG/TN DRIVER SEAT BELT SWITCH LINE 1
2 R57 18LG/GY DRIVER SEAT BELT SWITCH LINE 2
DRIVER SEAT BELT TENSIONER - YELLOW 2 WAY
CAV CIRCUIT FUNCTION
1 R53 18LG/YL DRIVER SEAT BELT TENSIONER LINE 2
2 R55 18LG/DG DRIVER SEAT BELT TENSIONER LINE 1
DVD SCREEN - BLACK 12 WAY
CAV CIRCUIT FUNCTION
1 X114 20GY/LB IGNITION RUN/ACC SIGNAL
2 X211 20YL/GY IGNITION SWITCH SENSE
3- -
4- -
5 X915 22GY/LB VIDEO RETURN
6 X515 22GY/OR VIDEO SIGNAL
7 X530 20GY/DB GROUND
8- -
9 X555 20VT/OR VIDEO PLAY SIGNAL
10 - -
11 - -
12 - -
DVD/CD CHANGER C1 - 16 WAY
CAV CIRCUIT FUNCTION
1- -
2- -
3 E14 22OR/TN PANEL LAMPS DRIVER
4- -
5- -
6- -
7- -
8 X40 22GY/WT AUDIO OUT RIGHT
9- -
10 - -
11 X112 20DG/GY IGNITION SWITCH SIGNAL
12 D25 20WT/VT PCI BUS
13 - -
14 - -
15 X140 22GY/OR COMMON AUDIO
16 X41 22DG/WT AUDIO OUT LEFT
8W - 80 - 66 8W-80 CONNECTOR PIN-OUTSRS
Page 1211 of 2585

RADIO C1 - 22 WAY
CAV CIRCUIT FUNCTION
1 A114 16GY/RD FUSED B(+) (I.O.D.)
2 F306 18DB/PK FUSED ACCESSORY RELAY OUTPUT
3 E14 20OR/TN PANEL LAMPS DRIVER
4- -
5- -
6- -
7 X54 20GY (EXCEPT LOWLINE 1) RIGHT FRONT SPEAKER (+)
7 X154 20GY/YL (LOWLINE 1) RIGHT INSTRUMENT PANEL SPEAKER (+)
8 X56 20GY/BR (EXCEPT LOWLINE 1) RIGHT FRONT SPEAKER (-)
8 X156 20GY/LB (LOWLINE 1) RIGHT INSTRUMENT PANEL SPEAKER (-)
9 X55 20DG/BR (EXCEPT LOWLINE 1) LEFT FRONT SPEAKER (-)
9 X155 20DG/LB (LOWLINE 1) LEFT INSTRUMENT PANEL SPEAKER (-)
10 X53 20DG (EXCEPT LOWLINE 1) LEFT FRONT SPEAKER (+)
10 X153 20DG/YL (LOWLINE 1) LEFT INSTRUMENT PANEL SPEAKER (+)
11 Z514 16BK/LG GROUND
12 A114 16GY/RD FUSED B(+) (I.O.D.)
13 X60 20GY/YL RADIO 12 VOLT OUTPUT
14 D25 20WT/VT PCI BUS
15 - -
16 - -
17 - -
18 X51 22DG/DB LEFT REAR SPEAKER (+)
19 X57 22DG/OR LEFT REAR SPEAKER (-)
20 X58 22GY/OR RIGHT REAR SPEAKER (-)
21 X52 22GY/DB RIGHT REAR SPEAKER (+)
22 Z515 16BK GROUND
RADIO C2 (CD CHANGER)-8WAY
CAV CIRCUIT FUNCTION
1 X40 22GY/WT (EXCEPT EXPORT) AUDIO OUT RIGHT
1 X40 20GY/WT (EXPORT) AUDIO OUT RIGHT
2 X140 22GY/OR (EXCEPT EXPORT) COMMON AUDIO
2 Z140 18BK/OR (EXPORT) GROUND
3 X235 20GY/LB (EXCEPT EXPORT) SHIELD
4 D25 20WT/VT (EXCEPT EXPORT) PCI BUS
4 D25 20VT/YL (EXPORT) PCI BUS
5 X112 20DG/GY (EXCEPT EXPORT) IGNITION SWITCH SIGNAL
5 X112 20RD (EXPORT) IGNITION SWITCH SIGNAL
6 X41 22DG/WT (EXCEPT EXPORT) AUDIO OUT LEFT
6 X41 20DG/WT (EXPORT) AUDIO OUT LEFT
7 Z141 20BK/TN (EXCEPT EXPORT) GROUND
7 Z141 18BK/TN (EXPORT) GROUND
8- -
9 E14 22OR/TN (EXCEPT EXPORT) PANEL LAMPS DRIVER
9 E14 18OR/TN (EXPORT) PANEL LAMPS DRIVER
10 X160 20GY/YL FUSED B(+)
8W - 80 - 116 8W-80 CONNECTOR PIN-OUTSRS
Page 1212 of 2585

RADIO C2 (DVD/CD CHANGER) - DK. GRAY 10 WAY
CAV CIRCUIT FUNCTION
1 X40 22GY/WT AUDIO OUT RIGHT
2 X140 22GY/OR COMMON AUDIO
3 X235 20GY/LB SHIELD
4 D25 20WT/VT PCI BUS
5 X112 20DG/GY IGNITION SWITCH SIGNAL
6 X41 22DG/WT AUDIO OUT LEFT
7- -
8- -
9 E14 22OR/TN PANEL LAMPS DRIVER
10 - -
REAR A/C-HEATER UNIT (3 ZONE MTC) - LT. GREEN 10 WAY
CAV CIRCUIT FUNCTION
1 C53 20LB REAR MODE DOOR DRIVER
2 C154 20LB/OR REAR COMMON DOOR DRIVER
3 C51 12LB/BR FUSED REAR BLOWER MOTOR RELAY OUTPUT
4 C152 16LB/LG REAR BLOWER MOTOR MED
5 C151 18LB/DG REAR BLOWER MOTOR LOW
6 C153 12DB/OR REAR BLOWER MOTOR HIGH
7 C54 20LB/YL REAR BLEND DOOR DRIVER
8 C154 20LB/OR REAR COMMON DOOR DRIVER
9- -
10 - -
REAR AUTO TEMP CONTROL SWITCH (3 ZONE ATC) - BLACK 13 WAY
CAV CIRCUIT FUNCTION
1 F504 20GY/PK FUSED IGNITION SWITCH OUTPUT (RUN)
2 Z27 18BK/DG GROUND
3 D22 22WT/TN KDB CLOCK
4 D17 22WT/DG KDB DATA
5 E10 20OR/DG PANEL LAMPS DRIVER
6- -
7- -
8- -
9- -
10 - -
11 - -
12 - -
13 - -
RS8W-80 CONNECTOR PIN-OUTS8W - 80 - 117
Page 1569 of 2585
CAUTION: Do not bump or hammer on steering col-
umn or steering column shaft when removing steer-
ing wheel from steering column shaft.
CAUTION: When installing steering wheel puller
bolts in steering wheel, do not thread bolt into
steering wheel more than a half inch. If bolts are
threaded into the steering wheel more than a half
inch they will contact and damage the clockspring.
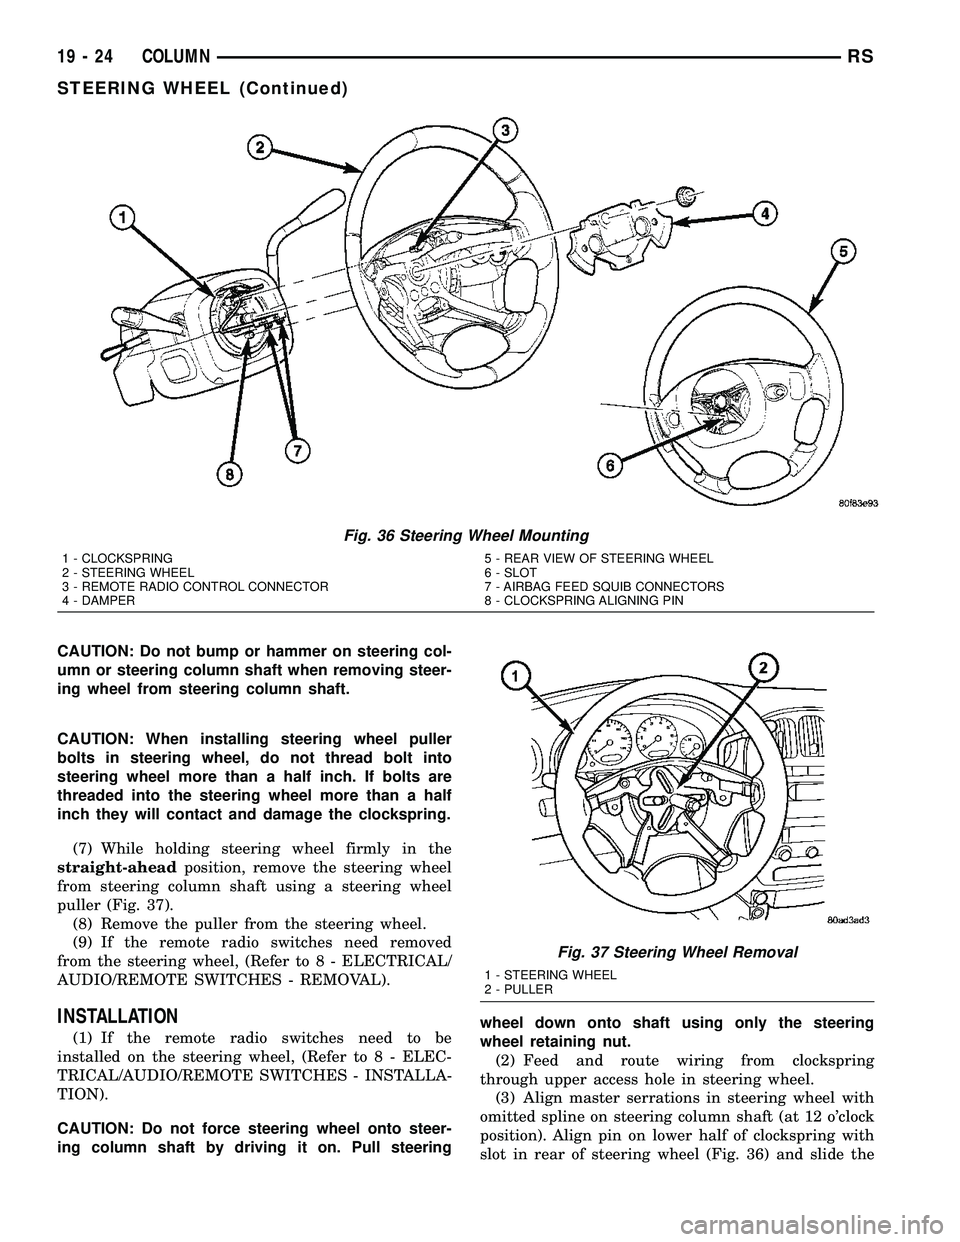
(7) While holding steering wheel firmly in the
straight-aheadposition, remove the steering wheel
from steering column shaft using a steering wheel
puller (Fig. 37).
(8) Remove the puller from the steering wheel.
(9) If the remote radio switches need removed
from the steering wheel, (Refer to 8 - ELECTRICAL/
AUDIO/REMOTE SWITCHES - REMOVAL).
INSTALLATION
(1) If the remote radio switches need to be
installed on the steering wheel, (Refer to 8 - ELEC-
TRICAL/AUDIO/REMOTE SWITCHES - INSTALLA-
TION).
CAUTION: Do not force steering wheel onto steer-
ing column shaft by driving it on. Pull steeringwheel down onto shaft using only the steering
wheel retaining nut.
(2) Feed and route wiring from clockspring
through upper access hole in steering wheel.
(3) Align master serrations in steering wheel with
omitted spline on steering column shaft (at 12 o'clock
position). Align pin on lower half of clockspring with
slot in rear of steering wheel (Fig. 36) and slide the
Fig. 36 Steering Wheel Mounting
1 - CLOCKSPRING
2 - STEERING WHEEL
3 - REMOTE RADIO CONTROL CONNECTOR
4 - DAMPER5 - REAR VIEW OF STEERING WHEEL
6 - SLOT
7 - AIRBAG FEED SQUIB CONNECTORS
8 - CLOCKSPRING ALIGNING PIN
Fig. 37 Steering Wheel Removal
1 - STEERING WHEEL
2 - PULLER
19 - 24 COLUMNRS
STEERING WHEEL (Continued)