check engine CHRYSLER VOYAGER 2020 Owner's Manual
[x] Cancel search | Manufacturer: CHRYSLER, Model Year: 2020, Model line: VOYAGER, Model: CHRYSLER VOYAGER 2020Pages: 516, PDF Size: 28.69 MB
Page 233 of 516
STARTING AND OPERATING231
(Continued)
(Continued)
PARK (P)
This range supplements the parking brake by
locking the transmission. The engine can be
started in this range. Never attempt to use
PARK while the vehicle is in motion. Apply the
parking brake when exiting the vehicle in this
range.
When parking on a level surface, you may shift
the transmission into PARK first, and then apply
the parking brake.
When parking on a hill, apply the parking brake
before shifting the transmission to PARK. As an
added precaution, turn the front wheels toward
the curb on a downhill grade and away from the
curb on an uphill grade.
When exiting the vehicle, always:
Apply the parking brake.
Shift the transmission into PARK.
Turn the ignition OFF.
Remove the key fob from the vehicle.
WARNING!
Never use the PARK position as a substi
-
tute for the parking brake. Always apply the
parking brake fully when exiting the vehicle
to guard against vehicle movement and
possible injury or damage.
Your vehicle could move and injure you and
others if it is not in PARK. Check by trying to
move the transmission gear selector out of
PARK with the brake pedal released. Make
sure the transmission is in PARK before
exiting the vehicle.
The transmission may not engage PARK if
the vehicle is moving. Always bring the
vehicle to a complete stop before shifting to
PARK, and verify that the transmission gear
position indicator solidly indicates PARK (P)
without blinking. Ensure that the vehicle is
completely stopped, and the PARK position
is properly indicated, before exiting the
vehicle.
It is dangerous to shift out of PARK or
NEUTRAL if the engine speed is higher than
idle speed. If your foot is not firmly pressing
the brake pedal, the vehicle could accel -
erate quickly forward or in reverse. You
could lose control of the vehicle and hit
someone or something. Only shift into gear
when the engine is idling normally and your
foot is firmly pressing the brake pedal.
Unintended movement of a vehicle could
injure those in or near the vehicle. As with
all vehicles, you should never exit a vehicle
while the engine is running. Before exiting a
vehicle, always come to a complete stop,
then apply the parking brake, shift the
transmission into PARK, and turn the igni -
tion OFF. When the ignition is in the OFF
mode, the transmission is locked in PARK,
securing the vehicle against unwanted
movement.
When exiting the vehicle, always make sure
the ignition is in the OFF mode, remove the
key fob from the vehicle, and lock the
vehicle.
WARNING! (Continued)
5
20_RU_OM_EN_US_t.book Page 231
Page 237 of 516
STARTING AND OPERATING235
STOP/START SYSTEM — IF EQUIPPED
The Stop/Start function is developed to reduce
fuel consumption. The system will stop the
engine automatically during a vehicle stop if the
required conditions are met. Releasing the
brake pedal, pressing the accelerator pedal or
shifting out of DRIVE (D) will automatically
re-start the engine.
This vehicle has been upgraded with a heavy
duty starter, enhanced battery, and other
upgraded engine parts to handle the additional
engine starts.
Auto Stop/Start
The Stop/Start feature is enabled
after every normal customer engine
start. At that time, the system will go
into STOP/START READY and if all
other conditions are met, can go into a STOP/
START AUTOSTOP ACTIVE.
To Activate Auto STOP/START, The Following
Must Occur:
The system must be in STOP/START READY
state. A STOP/START READY message will be
displayed in the instrument cluster within the Stop/Start section. Refer to “Instrument
Cluster Display” in “Getting To Know Your
Instrument Panel” for further information.
The vehicle must be completely stopped.
The shifter must be in a forward gear and the
brake pedal depressed.
The engine will shut down, the tachometer will
move to the zero position and the Stop/Start
telltale will illuminate indicating you are in
Autostop. Customer settings will be maintained
throughout the Auto Stop/Start process.
Possible Reasons The Engine Does Not
Autostop
Prior to engine shut down, the system will check
many safety and comfort conditions for Stop/
Start and ensure they are fulfilled. Detailed
information about the operation of the Stop/
Start system may be viewed in the instrument
cluster display Stop/Start screen. In the
following situations the engine will not stop:
If Stop/Start is manually disabled by the
Stop/Start OFF button.
Driver’s seat belt is not buckled.
Driver’s door is not closed.
Battery temperature is too warm or cold.
Battery charge is low. During this time a
message will display "Stop/Start Not Ready
Battery Charging".
The vehicle is on a steep grade.
Cabin heating or cooling is in process and an
acceptable cabin temperature has not been
achieved.
HVAC is set to full defrost mode at a high
blower speed.
HVAC set to MAX A/C.
Engine has not reached normal operating
temperature.
The transmission is not in a forward gear.
Hood is open.
Brake pedal is not pressed with sufficient
pressure.
5
20_RU_OM_EN_US_t.book Page 235
Page 239 of 516
STARTING AND OPERATING237
while exiting. These interior warnings will
occur regardless of whether the key fob
remains in the vehicle or is removed.
For the exterior of the vehicle, the horn will
sound three times if the fob is removed from
the vehicle and the vehicle is in the “READY”
mode.
Please consider this feature when intentionally
running the vehicle for extended periods of time
over one hour. To restart the vehicle, follow the
normal vehicle starting process.
NOTE:
If the vehicle is left in the ACC or RUN (engine
not running) position and the transmission is in
PARK, the system will automatically time out
(shut down) after an initial 30 minutes of inac -
tivity, followed by the additional amount of time
for power accessory delay selected in the radio
settings menu. Once the vehicle times out, it will
switch to the OFF position.
To Manually Turn On The Stop/Start System
After turning off the Stop/Start system, push
the Stop/Start OFF switch again (located on the
instrument panel). The light on the switch will
turn off.
System Malfunction
If there is a malfunction in the Stop/Start
system, the system will not shut down the
engine. A “SERVICE STOP/START SYSTEM”
message will appear in the instrument cluster
display and the Stop/Start telltale will remain
yellow. Refer to “Instrument Cluster Display” in
“Getting To Know Your Instrument Panel” for
further information.
If the “SERVICE STOP/START SYSTEM”
message appears in the instrument cluster
display, have the system checked by an
authorized dealer.
SPEED CONTROL — IF EQUIPPED
When engaged, the Speed Control takes over
accelerator operations at speeds greater than
25 mph (40 km/h).
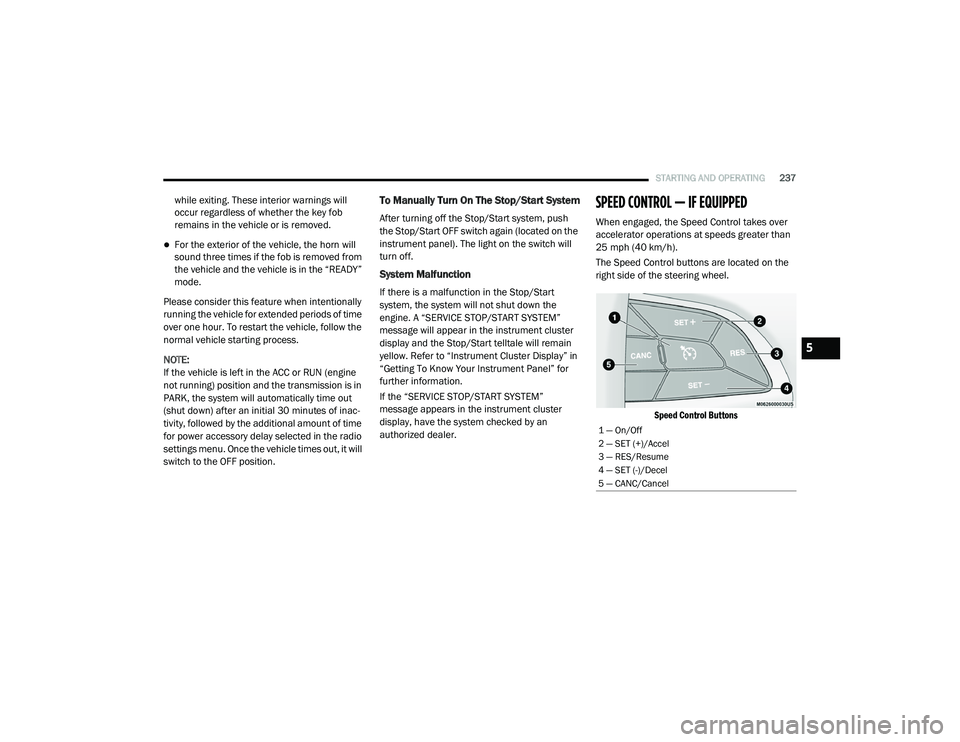
The Speed Control buttons are located on the
right side of the steering wheel.
Speed Control Buttons
1 — On/Off
2 — SET (+)/Accel
3 — RES/Resume
4 — SET (-)/Decel
5 — CANC/Cancel
5
20_RU_OM_EN_US_t.book Page 237
Page 288 of 516

286STARTING AND OPERATING
(Continued)
Rear Cross Path ViewPressing the Rear Cross Path soft key
will give the driver a wider angle view of
the rear camera system. The Top view
will be disabled when this is selected
Front View The Front view will show you what is
immediately in front of the vehicle and
is always paired with the Top view of
the vehicle.
Front Cross Path View
Pressing the Front Cross Path soft key will
give the driver a wider angle view of the
front camera system. The Top view will be
disabled when this is selected.
Deactivation
The system can be deactivated in the following
conditions:
The speed of the vehicle reaches greater
than 8 mph (13 km/h).
The vehicle shifted into PARK from a different
gear.
If the vehicle is in any gear other than
REVERSE, press the “X” button.
The camera delay system is turned off manu -
ally through the Uconnect settings menu.
Refer to “Uconnect Settings” in “Multimedia”
for further information.
NOTE:
If snow, ice, mud, or any foreign substance
builds up on the camera lenses, clean the
lenses, rinse with water, and dry with a soft
cloth. Do not cover the lenses.
If a malfunction with the system has
occurred, see an authorized dealer.REFUELING THE VEHICLE
There is no fuel filler cap. Two flapper doors
inside the pipe seal the system.
WARNING!
Drivers must be careful when backing up even
when using the Surround View Camera. Always
check carefully behind your vehicle, and be
sure to check for pedestrians, animals, other
vehicles, obstructions, or blind spots before
backing up. You are responsible for the safety
of your surroundings and must continue to pay
attention while backing up. Failure to do so can
result in serious injury or death.
CAUTION!
To avoid vehicle damage, Surround View
should only be used as a parking aid. The
Surround View camera is unable to view
every obstacle or object in your drive path.
To avoid vehicle damage, the vehicle must
be driven slowly when using Surround View
to be able to stop in time when an obstacle
is seen. It is recommended that the driver
look frequently over his/her shoulder when
using Surround View.
WARNING!
Never have any smoking materials lit in or
near the vehicle when the fuel door is open
or the tank is being filled.
Never add fuel when the engine is running.
This is in violation of most state and federal
fire regulations and may cause the
“Malfunction Indicator Light” to turn on.
20_RU_OM_EN_US_t.book Page 286
Page 302 of 516
300STARTING AND OPERATING
(Continued)
(Continued)
Flowing/Rising Water
Shallow Standing Water
Although your vehicle is capable of driving
through shallow standing water, consider the
following Warnings and Cautions before doing so.
WARNING!
Do not drive on or across a road or path
where water is flowing and/or rising (as in
storm run-off). Flowing water can wear away
the road or path's surface and cause your
vehicle to sink into deeper water.
Furthermore, flowing and/or rising water can
carry your vehicle away swiftly. Failure to
follow this warning may result in injuries that
are serious or fatal to you, your passengers,
and others around you.
WARNING!
Driving through standing water limits your
vehicle’s traction capabilities. Do not
exceed 5 mph (8 km/h) when driving
through standing water.
Driving through standing water limits your
vehicle’s braking capabilities, which
increases stopping distances. Therefore,
after driving through standing water, drive
slowly and lightly press on the brake pedal
several times to dry the brakes.
Failure to follow these warnings may result
in injuries that are serious or fatal to you,
your passengers, and others around you.
CAUTION!
Always check the depth of the standing
water before driving through it. Never drive
through standing water that is deeper than
the bottom of the tire rims mounted on the
vehicle.
Determine the condition of the road or the
path that is under water and if there are any
obstacles in the way before driving through
the standing water.
WARNING! (Continued)
Do not exceed 5 mph (8 km/h) when
driving through standing water. This will
minimize wave effects.
Driving through standing water may cause
damage to your vehicle’s drivetrain compo -
nents. Always inspect your vehicle’s fluids
(i.e., engine oil, transmission, axle, etc.) for
signs of contamination (i.e., fluid that is
milky or foamy in appearance) after driving
through standing water. Do not continue to
operate the vehicle if any fluid appears
contaminated, as this may result in further
damage. Such damage is not covered by
the New Vehicle Limited Warranty.
Getting water inside your vehicle’s engine
can cause it to lock up and stall out, and
cause serious internal damage to the
engine. Such damage is not covered by the
New Vehicle Limited Warranty.
CAUTION! (Continued)
20_RU_OM_EN_US_t.book Page 300
Page 313 of 516
IN CASE OF EMERGENCY311
(Continued)
4. Remove/replace bulb(s).
5. Reinstall the socket(s).
6. Reverse process to reinstall the liftgate trim.
Rear Bodyside Mounted Taillamps
1. Raise the liftgate.
2. Remove two torx head screws on the bodyside lamp using a T30 screwdriver.
3. Remove lamp from vehicle body and locate bulb socket on rear of lamp. Rotate socket
counterclockwise.
4. Remove/replace bulb(s).
5. Reinstall the socket(s).
6. Reverse process to reinstall the lamp onto vehicle.
Center High Mounted Stop Lamp (CHMSL)
The center high-mounted stop lamp is an LED
assembly. See an authorized dealer for
replacement.
Rear License Lamp
The rear license lamps are LED. See an
authorized dealer for replacement.
FUSES
General Information
The fuses protect electrical systems against
excessive current.
When a device does not work, you must check
the fuse element inside the blade fuse for a
break/melt.
WARNING!
When replacing a blown fuse, always use
an appropriate replacement fuse with the
same amp rating as the original fuse. Never
replace a fuse with another fuse of higher
amp rating. Never replace a blown fuse with
metal wires or any other material. Do not
place a fuse inside a circuit breaker cavity
or vice versa. Failure to use proper fuses
may result in serious personal injury, fire
and/or property damage.
Before replacing a fuse, make sure that the
ignition is off and that all the other services
are switched off and/or disengaged.
If the replaced fuse blows again, contact an
authorized dealer.
If a general protection fuse for safety
systems (air bag system, braking system),
power unit systems (engine system, trans -
mission system) or steering system blows,
contact an authorized dealer.
WARNING! (Continued)
6
20_RU_OM_EN_US_t.book Page 311
Page 347 of 516
345
SERVICING AND MAINTENANCE
SCHEDULED SERVICING
Your vehicle is equipped with an automatic oil
change indicator system. The oil change
indicator system will remind you that it is time to
take your vehicle in for scheduled maintenance.
Based on engine operation conditions, the oil
change indicator message will illuminate. This
means that service is required for your vehicle.
Operating conditions such as frequent short-trips,
trailer tow, extremely hot or cold ambient
temperatures will influence when the “Oil Change
Required” message is displayed. Severe
Operating Conditions can cause the change oil
message to illuminate as early as 3,500 miles
(5,600 km) since last reset. Have your vehicle
serviced as soon as possible, within the next
500 miles (805 km).
An authorized dealer will reset the oil change
indicator message after completing the
scheduled oil change. If a scheduled oil change
is performed by someone other than an
authorized dealer, the message can be reset by
referring to “Instrument Cluster Display” in
“Getting To Know Your Instrument Panel”.NOTE:
Under no circumstances should oil change
intervals exceed 10,000 miles (16,000 km),
12 months or 350 hours of engine run time,
whichever comes first. The 350 hours of engine
run or idle time is generally only a concern for
fleet customers.
Severe Duty All Models
Change Engine Oil at 4,000 miles (6,500 km) or
350 hours of engine run time if the vehicle is
operated in a dusty and off road environment or
is operated predominately at idle or only very
low engine RPM. This type of vehicle use is
considered Severe Duty.
Once A Month Or Before A Long Trip:Check engine oil level
Check windshield washer fluid level
Check tire pressure and look for unusual
wear or damage. Rotate tires at the first sign
of irregular wear, even if it occurs before the
oil indicator system turns on
Check the fluid levels of the coolant reservoir
and brake master cylinder, fill as needed
Check function of all interior and exterior
lights
Maintenance Plan
Required Maintenance Intervals
Refer to the required maintenance intervals.
7
20_RU_OM_EN_US_t.book Page 345
Page 352 of 516
350SERVICING AND MAINTENANCE
Checking Oil Level
To assure proper engine lubrication, the engine
oil must be maintained at the correct level.
Check the oil level at regular intervals, such as
every fuel stop. The best time to check the
engine oil level is about five minutes after a fully
warmed engine is shut off.
Checking the oil while the vehicle is on level
ground will improve the accuracy of the oil level
readings. Maintain the oil level between the
MIN and MAX markings on the dipstick. Adding
one quart or one liter of oil when the reading is
at the MIN mark will result in a MAX reading on
these engines.
Adding Washer Fluid
The fluid reservoir is located in the front of the
engine compartment. Be sure to check the fluid
level in the reservoir at regular intervals. Fill the
reservoir with windshield washer solvent (not
radiator antifreeze) and operate the system for
a few seconds to flush out the residual washer
fluid.
When refilling the washer fluid reservoir, take
some washer fluid, apply it to a cloth or towel,
and wipe clean the wiper blades; this will help
blade performance.
To prevent freeze-up of your windshield washer
system in cold weather, select a solution or
mixture that meets or exceeds the temperature
range of your climate. This rating information
can be found on most washer fluid containers.
Maintenance-Free Battery
Your vehicle is equipped with a
maintenance-free battery. You will never have
to add water, nor is periodic maintenance
required.
CAUTION!
Overfilling or underfilling will cause oil aera -
tion, or loss of oil pressure. This could
damage your engine.
Never use Non-Detergent Oil or Straight
Mineral Oil in the engine or damage may
result.
WARNING!
Commercially available windshield washer
solvents are flammable. They could ignite and
burn you. Care must be exercised when filling
or working around the washer solution.
WARNING!
Battery fluid is a corrosive acid solution and
can burn or even blind you. Do not allow
battery fluid to contact your eyes, skin, or
clothing. Do not lean over a battery when
attaching clamps. If acid splashes in eyes
or on skin, flush the area immediately with
large amounts of water. Refer to “Jump
Starting Procedure” in “In Case Of Emer -
gency” for further information.
Battery gas is flammable and explosive.
Keep flame or sparks away from the
battery. Do not use a booster battery or any
other booster source with an output greater
than 12 Volts. Do not allow cable clamps to
touch each other.
Battery posts, terminals, and related acces -
sories contain lead and lead compounds.
Wash hands after handling.
20_RU_OM_EN_US_t.book Page 350
Page 363 of 516
SERVICING AND MAINTENANCE361
Cooling System Engine Coolant Checks
Check the engine coolant (antifreeze)
protection every 12 months (before the onset of
freezing weather, where applicable). If the
engine coolant (antifreeze) is dirty, the system
should be drained, flushed, and refilled with
fresh OAT coolant (conforming to MS.90032) by
an authorized dealer. Check the front of the A/
C condenser for any accumulation of bugs,
leaves, etc. If dirty, clean by gently spraying
water from a garden hose vertically down the
face of the condenser.
Check the engine cooling system hoses for
brittle rubber, cracking, tears, cuts, and
tightness of the connection at the coolant
recovery bottle and radiator. Inspect the entire
system for leaks. DO NOT REMOVE THE
COOLANT PRESSURE CAP WHEN THE COOLING
SYSTEM IS HOT.
Cooling System — Drain, Flush And Refill
NOTE:
Some vehicles require special tools to add
coolant properly. Failure to fill these systems
properly could lead to severe internal engine
damage. If any coolant is needed to be added to
the system please contact an authorized
dealer.
If the engine coolant (antifreeze) is dirty or
contains visible sediment, have an authorized
dealer clean and flush with OAT coolant
(antifreeze) (conforming to MS.90032).
Refer to the “Maintenance Plan” in this section
for the proper maintenance intervals.
Selection Of Coolant
Refer to “Fluids And Lubricants” in “Technical
Specifications” for further information.
NOTE:
Mixing of engine coolant (antifreeze) other
than specified Organic Additive Technology
(OAT) engine coolant (antifreeze), may result
in engine damage and may decrease corro-
sion protection. Organic Additive Technology
(OAT) engine coolant is different and should
not be mixed with Hybrid Organic Additive
WARNING!
You or others can be badly burned by hot
engine coolant (antifreeze) or steam from
your radiator. If you see or hear steam
coming from under the hood, do not open
the hood until the radiator has had time to
cool. Never open a cooling system pressure
cap when the radiator or coolant bottle is
hot.
Keep hands, tools, clothing, and jewelry
away from the radiator cooling fan when
the hood is raised. The fan starts automati -
cally and may start at any time, whether the
engine is running or not.
When working near the radiator cooling fan,
disconnect the fan motor lead or turn the
ignition to the OFF mode. The fan is
temperature controlled and can start at any
time the ignition is in the ON mode.7
20_RU_OM_EN_US_t.book Page 361
Page 365 of 516
SERVICING AND MAINTENANCE363
Cooling System Pressure Cap
The cap must be fully tightened to prevent loss
of engine coolant (antifreeze), and to ensure
that engine coolant (antifreeze) will return to
the radiator from the coolant expansion bottle/
recovery tank if so equipped.
The cap should be inspected and cleaned if
there is any accumulation of foreign material on
the sealing surfaces.
Disposal Of Used Coolant
Used ethylene glycol-based coolant (antifreeze) is
a regulated substance requiring proper disposal.
Check with your local authorities to determine the
disposal rules for your community. To prevent
ingestion by animals or children, do not store
ethylene glycol-based coolant in open containers
or allow it to remain in puddles on the ground. If
ingested by a child or pet, seek emergency
assistance immediately. Clean up any ground
spills immediately.
Coolant Level
The coolant expansion bottle provides a quick
visual method for determining that the coolant
level is adequate. With the engine off and cold,
the level of the coolant (antifreeze) in the bottle
should be between the “MAX” and “MIN” lines
marked on the bottle.
As long as the engine operating temperature is
satisfactory, the coolant bottle need only be
checked once a month.
When additional coolant (antifreeze) is needed
to maintain the proper level, it should be added
to the coolant bottle. Do not overfill.
See an authorized dealer for service.
Points To Remember
NOTE:
When the vehicle is stopped after a few miles/
kilometers of operation, you may observe vapor
coming from the front of the engine compart -
ment. This is normally a result of moisture from
rain, snow, or high humidity accumulating on
the radiator and being vaporized when the ther -
mostat opens, allowing hot engine coolant (anti -
freeze) to enter the radiator.
If an examination of your engine compartment
shows no evidence of radiator or hose leaks,
the vehicle may be safely driven. The vapor will
soon dissipate.
Do not overfill the coolant expansion bottle.
Check the coolant freeze point in the radiator
and in the coolant expansion bottle. If engine
coolant (antifreeze) needs to be added, the
contents of the coolant expansion bottle
must also be protected against freezing.
If frequent engine coolant (antifreeze) addi-
tions are required, the cooling system should
be pressure tested for leaks.
WARNING!
Do not open hot engine cooling system.
Never add engine coolant (antifreeze) when
the engine is overheated. Do not loosen or
remove the cap to cool an overheated
engine. Heat causes pressure to build up in
the cooling system. To prevent scalding or
injury, do not remove the pressure cap
while the system is hot or under pressure.
Do not use a pressure cap other than the
one specified for your vehicle. Personal
injury or engine damage may result.
7
20_RU_OM_EN_US_t.book Page 363