key CHRYSLER VOYAGER 2020 Workshop Manual
[x] Cancel search | Manufacturer: CHRYSLER, Model Year: 2020, Model line: VOYAGER, Model: CHRYSLER VOYAGER 2020Pages: 516, PDF Size: 28.69 MB
Page 268 of 516

266STARTING AND OPERATING
Enabling And Disabling ParkSense
ParkSense can be enabled and
disabled with the ParkSense switch,
located on the switch panel below the
Uconnect display.
When the ParkSense switch is pushed to
disable the system, the instrument cluster will
display the “PARKSENSE OFF” message for
approximately five seconds. Refer to
“Instrument Cluster Display” in “Getting To
Know Your Instrument Panel” for further
information. When the gear selector is moved to
REVERSE and the system is disabled, the
instrument cluster display will show the
“PARKSENSE OFF” message for as long as the
vehicle is in REVERSE.
The ParkSense switch LED will be on when
ParkSense is disabled or requires service. The
ParkSense switch LED will be off when the
system is enabled. If the ParkSense switch is
pushed, and requires service, the ParkSense
switch LED will blink momentarily, and then the
LED will be on. NOTE:
When KeySense feature is present, the Park
-
Sense System will reject customer input to turn
the system off via the hard switch. The instru -
ment cluster display will show "KeySense in Use
Selected Feature Cannot be Disabled" message.
Service The ParkSense Park Assist System
During vehicle start-up, when the ParkSense
System has detected a faulted condition, the
instrument cluster will actuate a single chime,
once per ignition cycle, and it will display the
"PARKSENSE UNAVAILABLE WIPE REAR
SENSORS", "PARKSENSE UNAVAILABLE WIPE
FRONT SENSORS", or the "PARKSENSE
UNAVAILABLE SERVICE REQUIRED" message for
five seconds. When the gear selector is moved to
REVERSE and the system has detected a faulted
condition, the instrument cluster display will
show a "PARKSENSE UNAVAILABLE WIPE REAR
SENSORS", "PARKSENSE UNAVAILABLE WIPE
FRONT SENSORS" or "PARKSENSE UNAVAILABLE
SERVICE REQUIRED" pop up message for five
seconds. After five seconds, a vehicle graphic will
be displayed with a "WIPE OFF" or “SERVICE”
overlay, depending on the location and fault type.
The system will continue to provide arc alerts for
the side that is functioning properly. These arc alerts will interrupt the "PARKSENSE
UNAVAILABLE WIPE REAR SENSORS",
"PARKSENSE UNAVAILABLE WIPE FRONT
SENSORS", or "PARKSENSE UNAVAILABLE
SERVICE REQUIRED" messages if an object is
detected within the five second pop-up duration.
The vehicle graphic will remain displayed for as
long as the vehicle is in REVERSE.
Refer to “Instrument Cluster Display” in
“Getting To Know Your Instrument Panel” for
further information.
If "PARKSENSE UNAVAILABLE WIPE REAR
SENSORS" or "PARKSENSE UNAVAILABLE WIPE
FRONT SENSORS" appears in the instrument
cluster display make sure the outer surface and
the underside of the rear fascia/bumper and/or
front fascia/bumper is clean and clear of snow,
ice, mud, dirt or other obstruction and then
cycle the ignition. If the message continues to
appear see an authorized dealer.
If the "PARKSENSE UNAVAILABLE SERVICE
REQUIRED" message appears in the instrument
cluster display, see an authorized dealer.
20_RU_OM_EN_US_t.book Page 266
Page 269 of 516
STARTING AND OPERATING267
Cleaning The ParkSense System
Clean the ParkSense sensors with water, car
wash soap and a soft cloth. Do not use rough or
hard cloths. Do not scratch or poke the sensors.
Otherwise, you could damage the sensors.
ParkSense System Usage Precautions
NOTE:
Ensure that the front and rear bumper are free
of snow, ice, mud, dirt, and debris to keep the
ParkSense system operating properly.
Construction equipment, large trucks, and
other vibrations could affect the performance
of ParkSense.
When you turn ParkSense off, the instrument
cluster will display “PARKSENSE OFF.”
Furthermore, once you turn ParkSense off, it
remains off until you turn it on again, even if
you cycle the ignition key.
When you move the gear selector to the
REVERSE position and ParkSense is turned
off, the instrument cluster will display “PARK -
SENSE OFF” for five seconds while the
vehicle is in REVERSE.
ParkSense, when on, will reduce the volume
of the radio when it is sounding a tone.
Clean the ParkSense sensors regularly,
taking care not to scratch or damage them.
The sensors must not be covered with ice,
snow, slush, mud, dirt or debris. Failure to do
so can result in the system not working prop -
erly. The ParkSense system might not detect
an obstacle behind or in front of the appro -
priate fascia/bumper, or it could provide a
false indication that an obstacle is behind or
in front of the appropriate fascia/bumper.
Use the ParkSense switch to turn the Park -
Sense system off if objects such as bicycle
carriers, trailer hitches, etc. are placed within
12 inches (30 cm) from the rear fascia/
bumper. Failure to do so can result in the
system misinterpreting a close object as a
sensor problem, causing the “PARKSENSE
UNAVAILABLE SERVICE REQUIRED” message
to be displayed in the instrument cluster.
ParkSense should be disabled when the lift -
gate is in the open position.
There may be a delay in the object detection
rate if the object is moving. This may cause the
automatic braking application to be delayed.
WARNING!
Drivers must be careful when backing up
even when using ParkSense. Always check
carefully behind your vehicle, look behind
you, and be sure to check for pedestrians,
animals, other vehicles, obstructions, and
blind spots before backing up. You are
responsible for safety and must continue to
pay attention to your surroundings. Failure
to do so can result in serious injury or
death.
Before using ParkSense, it is strongly
recommended that the ball mount and
hitch ball assembly is disconnected from
the vehicle when the vehicle is not used for
towing. Failure to do so can result in injury
or damage to vehicles or obstacles
because the hitch ball will be much closer
to the obstacle than the rear fascia when
the loudspeaker sounds the continuous
tone. Also, the sensors could detect the ball
mount and hitch ball assembly, depending
on its size and shape, giving a false indica -
tion that an obstacle is behind the vehicle.5
20_RU_OM_EN_US_t.book Page 267
Page 287 of 516
STARTING AND OPERATING285
The following table shows the approximate
distances for each zone:
Modes Of Operation
“Manual” activation of the Surround View
camera is selected by pressing the Surround
View Camera soft key located in the “Controls”
screen within the Uconnect system. Top View
The Top view will show in the Uconnect System
with Rear View and Front View in a split view
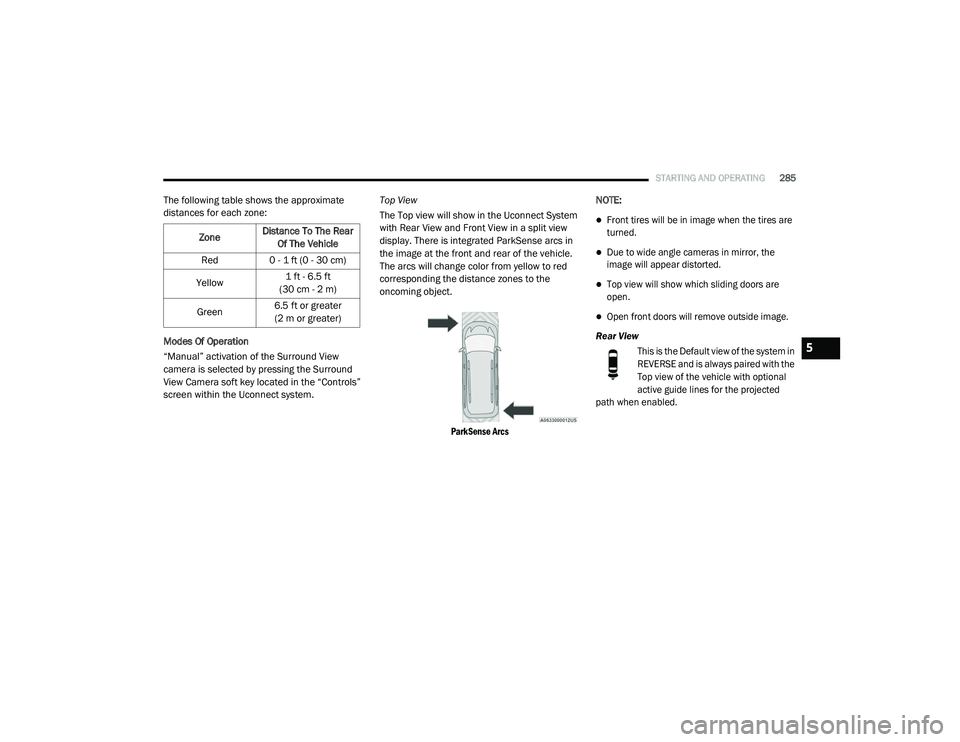
display. There is integrated ParkSense arcs in
the image at the front and rear of the vehicle.
The arcs will change color from yellow to red
corresponding the distance zones to the
oncoming object.
ParkSense Arcs
NOTE:
Front tires will be in image when the tires are
turned.
Due to wide angle cameras in mirror, the
image will appear distorted.
Top view will show which sliding doors are
open.
Open front doors will remove outside image.
Rear View This is the Default view of the system in
REVERSE and is always paired with the
Top view of the vehicle with optional
active guide lines for the projected
path when enabled.
Zone
Distance To The Rear
Of The Vehicle
Red 0 - 1 ft (0 - 30 cm)
Yellow 1 ft - 6.5 ft
(30 cm - 2 m)
Green 6.5 ft or greater
(2 m or greater)
5
20_RU_OM_EN_US_t.book Page 285
Page 288 of 516

286STARTING AND OPERATING
(Continued)
Rear Cross Path ViewPressing the Rear Cross Path soft key
will give the driver a wider angle view of
the rear camera system. The Top view
will be disabled when this is selected
Front View The Front view will show you what is
immediately in front of the vehicle and
is always paired with the Top view of
the vehicle.
Front Cross Path View
Pressing the Front Cross Path soft key will
give the driver a wider angle view of the
front camera system. The Top view will be
disabled when this is selected.
Deactivation
The system can be deactivated in the following
conditions:
The speed of the vehicle reaches greater
than 8 mph (13 km/h).
The vehicle shifted into PARK from a different
gear.
If the vehicle is in any gear other than
REVERSE, press the “X” button.
The camera delay system is turned off manu -
ally through the Uconnect settings menu.
Refer to “Uconnect Settings” in “Multimedia”
for further information.
NOTE:
If snow, ice, mud, or any foreign substance
builds up on the camera lenses, clean the
lenses, rinse with water, and dry with a soft
cloth. Do not cover the lenses.
If a malfunction with the system has
occurred, see an authorized dealer.REFUELING THE VEHICLE
There is no fuel filler cap. Two flapper doors
inside the pipe seal the system.
WARNING!
Drivers must be careful when backing up even
when using the Surround View Camera. Always
check carefully behind your vehicle, and be
sure to check for pedestrians, animals, other
vehicles, obstructions, or blind spots before
backing up. You are responsible for the safety
of your surroundings and must continue to pay
attention while backing up. Failure to do so can
result in serious injury or death.
CAUTION!
To avoid vehicle damage, Surround View
should only be used as a parking aid. The
Surround View camera is unable to view
every obstacle or object in your drive path.
To avoid vehicle damage, the vehicle must
be driven slowly when using Surround View
to be able to stop in time when an obstacle
is seen. It is recommended that the driver
look frequently over his/her shoulder when
using Surround View.
WARNING!
Never have any smoking materials lit in or
near the vehicle when the fuel door is open
or the tank is being filled.
Never add fuel when the engine is running.
This is in violation of most state and federal
fire regulations and may cause the
“Malfunction Indicator Light” to turn on.
20_RU_OM_EN_US_t.book Page 286
Page 317 of 516
IN CASE OF EMERGENCY315
F42 40 Amp Green –Folding Seat Module
F43 –20 Amp Yellow Fuel Pump Motor
F44 30 Amp Pink –CBC Feed #1 (Interior Lights)
F45 30 Amp Pink –Power Inverter
F46 30 Amp Pink –Driver Door Module
F47 30 Amp Pink –Passenger Door Module
F48 ––Not Used
F49 25 Amp Clear –RR Sliding Door Module-LT
F50 25 Amp Clear –RR Door Module-RT
F51 30 Amp Pink –Front Wiper
F52 30 Amp Pink –Brake Vacuum Pump
F53 ––Not Used
F54 40 Amp Green –ESP-ECU And Valves
F55A –15 Amp BlueRadio Frequency HUB/ Keyless
Ignition System (KIN) / (Electronic Steering Lock-BUX ONLY)
F55B –15 Amp BlueDVD / Video Routing Module (VRM
F56A –10 Amp RedFront and Rear HVAC Control
Module / Occupant Classification
Module (OCM)/Electronic Steering Lock (ESL)
F56B –10 Amp Red ESP/ESC
CavityCartridge Fuse Blade FuseDescription
6
20_RU_OM_EN_US_t.book Page 315
Page 345 of 516
IN CASE OF EMERGENCY343
(Continued)
NOTE:
Ensure that the towing service tow hooks are
properly seated and secured in the attach -
ment points.
This recovery tow feature should be used by
a trained professional only.
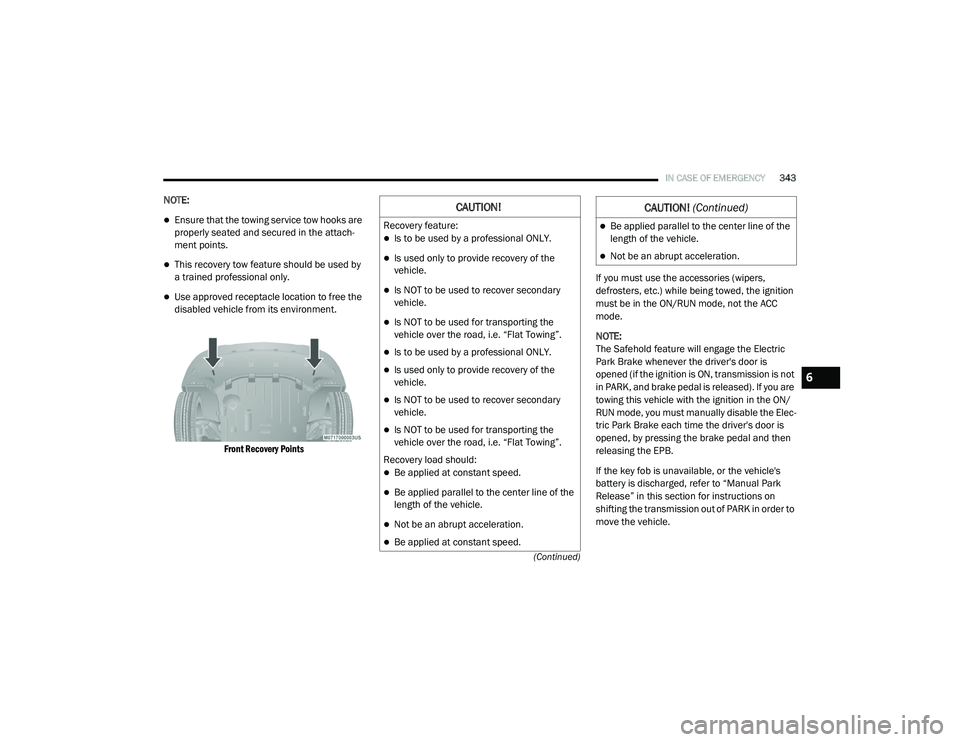
Use approved receptacle location to free the
disabled vehicle from its environment.
Front Recovery Points
If you must use the accessories (wipers,
defrosters, etc.) while being towed, the ignition
must be in the ON/RUN mode, not the ACC
mode.
NOTE:
The Safehold feature will engage the Electric
Park Brake whenever the driver's door is
opened (if the ignition is ON, transmission is not
in PARK, and brake pedal is released). If you are
towing this vehicle with the ignition in the ON/
RUN mode, you must manually disable the Elec
-
tric Park Brake each time the driver's door is
opened, by pressing the brake pedal and then
releasing the EPB.
If the key fob is unavailable, or the vehicle's
battery is discharged, refer to “Manual Park
Release” in this section for instructions on
shifting the transmission out of PARK in order to
move the vehicle.
CAUTION!
Recovery feature:
Is to be used by a professional ONLY.
Is used only to provide recovery of the
vehicle.
Is NOT to be used to recover secondary
vehicle.
Is NOT to be used for transporting the
vehicle over the road, i.e. “Flat Towing”.
Is to be used by a professional ONLY.
Is used only to provide recovery of the
vehicle.
Is NOT to be used to recover secondary
vehicle.
Is NOT to be used for transporting the
vehicle over the road, i.e. “Flat Towing”.
Recovery load should:
Be applied at constant speed.
Be applied parallel to the center line of the
length of the vehicle.
Not be an abrupt acceleration.
Be applied at constant speed.
Be applied parallel to the center line of the
length of the vehicle.
Not be an abrupt acceleration.
CAUTION! (Continued)
6
20_RU_OM_EN_US_t.book Page 343
Page 401 of 516
MULTIMEDIA399
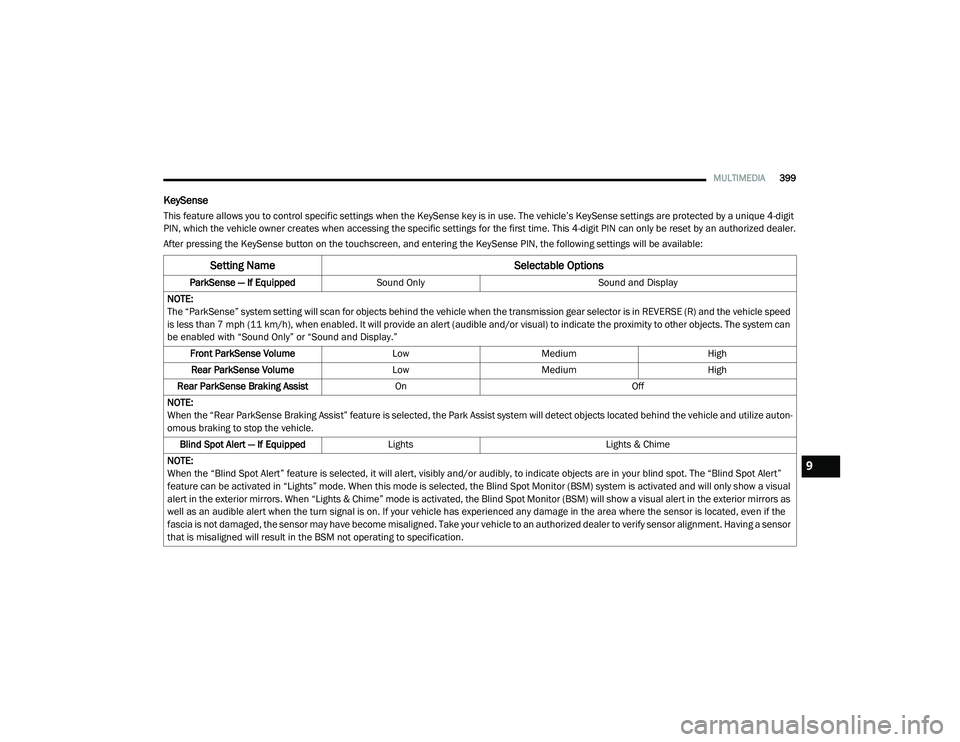
KeySense
This feature allows you to control specific settings when the KeySense key is in use. The vehicle’s KeySense settings are protected by a unique 4-digit
PIN, which the vehicle owner creates when accessing the specific settings for the first time. This 4-digit PIN can only be reset by an authorized dealer.
After pressing the KeySense button on the touchscreen, and entering the KeySense PIN, the following settings will be available:
Setting Name Selectable Options
ParkSense — If EquippedSound Only Sound and Display
NOTE:
The “ParkSense” system setting will scan for objects behind the vehicle when the transmission gear selector is in REVERSE (R) and the vehicle speed
is less than 7 mph (11 km/h), when enabled. It will provide an alert (audible and/or visual) to indicate the proximity to other objects. The system can be enabled with “Sound Only” or “Sound and Display.”
Front ParkSense Volume LowMedium High
Rear ParkSense Volume LowMedium High
Rear ParkSense Braking Assist On Off
NOTE:
When the “Rear ParkSense Braking Assist” feature is selected, the Park Assist system will detect objects located behind the vehicle and utilize auton -
omous braking to stop the vehicle.
Blind Spot Alert — If Equipped Lights Lights & Chime
NOTE:
When the “Blind Spot Alert” feature is selected, it will alert, visibly and/or audibly, to indicate objects are in your blind spot. The “Blind Spot Alert”
feature can be activated in “Lights” mode. When this mode is selected, the Blind Spot Monitor (BSM) system is activated and will only show a visual
alert in the exterior mirrors. When “Lights & Chime” mode is activated, the Blind Spot Monitor (BSM) will show a visual alert in the exterior mirrors as
well as an audible alert when the turn signal is on. If your vehicle has experienced any damage in the area where the sensor is located, even if the
fascia is not damaged, the sensor may have become misaligned. Take your vehicle to an authorized dealer to verify sensor alignment. Having a sensor
that is misaligned will result in the BSM not operating to specification.
9
20_RU_OM_EN_US_t.book Page 399
Page 407 of 516
MULTIMEDIA405
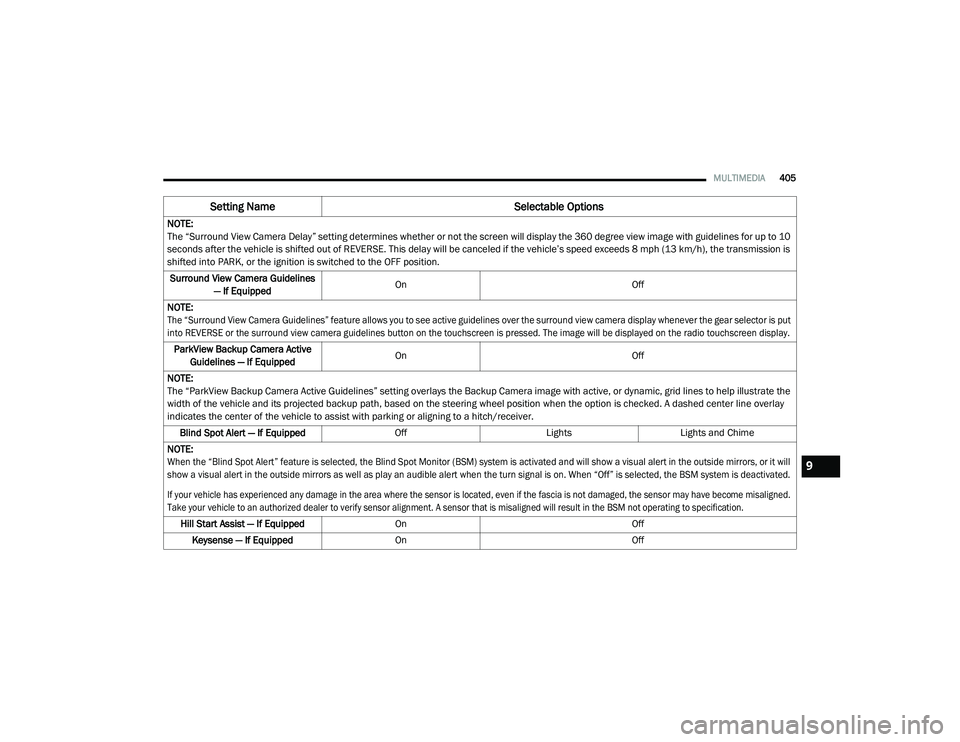
NOTE:
The “Surround View Camera Delay” setting determines whether or not the screen will display the 360 degree view image with guidelines for up to 10
seconds after the vehicle is shifted out of REVERSE. This delay will be canceled if the vehicle’s speed exceeds 8 mph (13 km/h), the transmission is
shifted into PARK, or the ignition is switched to the OFF position.
Surround View Camera Guidelines — If Equipped On
Off
NOTE:
The “Surround View Camera Guidelines” feature allows you to see active guidelines over the surround view camera display whenever the gear selector is put
into REVERSE or the surround view camera guidelines button on the touchscreen is pressed. The image will be displayed on the radio touchscreen display.
ParkView Backup Camera Active Guidelines — If Equipped On
Off
NOTE:
The “ParkView Backup Camera Active Guidelines” setting overlays the Backup Camera image with active, or dynamic, grid lines to help illustrate the
width of the vehicle and its projected backup path, based on the steering wheel position when the option is checked. A dashed center line overlay
indicates the center of the vehicle to assist with parking or aligning to a hitch/receiver. Blind Spot Alert — If Equipped OffLightsLights and Chime
NOTE:
When the “Blind Spot Alert” feature is selected, the Blind Spot Monitor (BSM) system is activated and will show a visual alert in the outside mirrors, or it will
show a visual alert in the outside mirrors as well as play an audible alert when the turn signal is on. When “Off” is selected, the BSM system is deactivated.
If your vehicle has experienced any damage in the area where the sensor is located, even if the fascia is not damaged, the sensor may have become misaligned.
Take your vehicle to an authorized dealer to verify sensor alignment. A sensor that is misaligned will result in the BSM not operating to specification.
Hill Start Assist — If Equipped On Off
Keysense — If Equipped On Off
Setting Name Selectable Options
9
20_RU_OM_EN_US_t.book Page 405
Page 409 of 516
MULTIMEDIA407
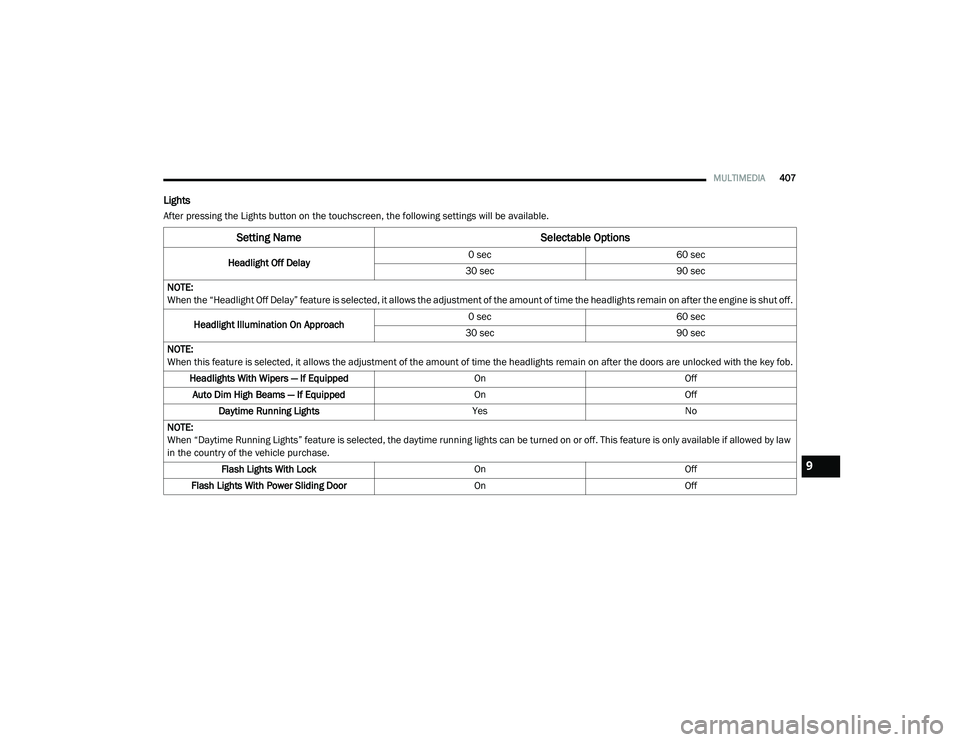
Lights
After pressing the Lights button on the touchscreen, the following settings will be available.
Setting Name Selectable Options
Headlight Off Delay0 sec
60 sec
30 sec 90 sec
NOTE:
When the “Headlight Off Delay” feature is selected, it allows the adjustment of the amount of time the headlights remain on after the engine is shut off.
Headlight Illumination On Approach 0 sec
60 sec
30 sec 90 sec
NOTE:
When this feature is selected, it allows the adjustment of the amount of time the headlights remain on after the doors are unlocked with the key fob. Headlights With Wipers — If Equipped OnOff
Auto Dim High Beams — If Equipped OnOff
Daytime Running Lights YesNo
NOTE:
When “Daytime Running Lights” feature is selected, the daytime running lights can be turned on or off. This feature is only available if allowed by law
in the country of the vehicle purchase. Flash Lights With Lock OnOff
Flash Lights With Power Sliding Door OnOff
9
20_RU_OM_EN_US_t.book Page 407
Page 410 of 516
408MULTIMEDIA
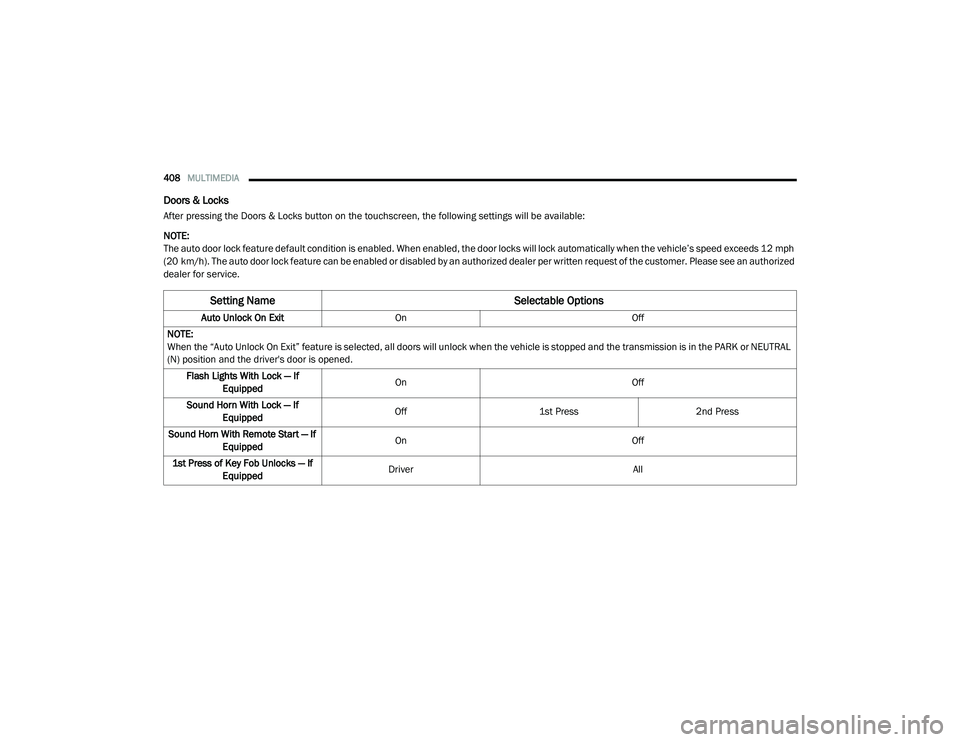
Doors & Locks
After pressing the Doors & Locks button on the touchscreen, the following settings will be available:
NOTE:
The auto door lock feature default condition is enabled. When enabled, the door locks will lock automatically when the vehicle’s speed exceeds 12 mph
(20 km/h). The auto door lock feature can be enabled or disabled by an authorized dealer per written request of the customer. Please see an authorized
dealer for service.
Setting Name Selectable Options
Auto Unlock On ExitOn Off
NOTE:
When the “Auto Unlock On Exit” feature is selected, all doors will unlock when the vehicle is stopped and the transmission is in the PARK or NEUTRAL
(N) position and the driver's door is opened. Flash Lights With Lock — If Equipped On
Off
Sound Horn With Lock — If Equipped Off
1st Press 2nd Press
Sound Horn With Remote Start — If Equipped On
Off
1st Press of Key Fob Unlocks — If Equipped Driver
All
20_RU_OM_EN_US_t.book Page 408