belt CHRYSLER VOYAGER 2020 Owners Manual
[x] Cancel search | Manufacturer: CHRYSLER, Model Year: 2020, Model line: VOYAGER, Model: CHRYSLER VOYAGER 2020Pages: 516, PDF Size: 28.69 MB
Page 6 of 516
4
GETTING TO KNOW YOUR INSTRUMENT PANEL
INSTRUMENT CLUSTER..................................... 125
Instrument Cluster Descriptions ...............126
INSTRUMENT CLUSTER DISPLAY ................... 127
Instrument Cluster Display Location And
Controls ......................................................128 Oil Life Reset ..............................................129
Fuel And Oil Refresh Mode .......................129
KeySense Cluster Messages —
If Equipped .................................................130 Instrument Cluster Display Menu Items ..131
Battery Saver On/Battery Saver Mode
Message — Electrical Load Reduction
Actions — If Equipped ................................138 Instrument Cluster Display Programmable
Features Screen Setup.............................. 139
TRIP COMPUTER ............................................... 140
WARNING LIGHTS AND MESSAGES ............... 141
Red Warning Lights....................................141
Yellow Warning Lights ...............................144
Yellow Indicator Lights...............................147
Green Indicator Lights ...............................148
Blue Indicator Lights ..................................149White Indicator Lights................................149
ONBOARD DIAGNOSTIC SYSTEM — OBD II .... 150
Onboard Diagnostic System (OBD II)
Cybersecurity..............................................150
EMISSIONS INSPECTION AND MAINTENANCE
PROGRAMS ........................................................ 151
SAFETY
SAFETY FEATURES .............................................152 Anti-Lock Brake System (ABS) ................. 152
Electronic Brake Control (EBC) System ... 153
AUXILIARY DRIVING SYSTEMS.........................159 Blind Spot Monitoring (BSM) —
If Equipped ................................................. 159 Forward Collision Warning (FCW) With
Mitigation — If Equipped............................ 164 Tire Pressure Monitoring
System (TPMS) .......................................... 167
OCCUPANT RESTRAINT SYSTEMS .................. 171 Occupant Restraint Systems Features .... 171
Important Safety Precautions ................... 172
Seat Belt Systems ..................................... 172
Supplemental Restraint Systems (SRS)... 184
Child Restraints ......................................... 198
Transporting Pets ...................................... 215
SAFETY TIPS ....................................................... 216 Transporting Passengers .......................... 216Exhaust Gas .............................................. 216
Safety Checks You Should Make Inside
The Vehicle ................................................ 217 Periodic Safety Checks You Should Make
Outside The Vehicle ................................... 218
STARTING AND OPERATING
STARTING THE ENGINE .....................................219 Normal Starting.......................................... 219Cold Weather Operation (Below –22°F
Or −30°C) ................................................. 223 After Starting — Warming Up The
Engine ........................................................ 223 If Engine Fails To Start ............................. 223
To Turn Off The Engine Using ENGINE
START/STOP Button .................................. 223
ENGINE BLOCK HEATER — IF EQUIPPED ....... 224
ENGINE BREAK-IN RECOMMENDATIONS ...... 224
PARK BRAKE...................................................... 225 Electric Park Brake (EPB) ......................... 225
AUTOMATIC TRANSMISSION ........................... 228 Ignition Park Interlock ............................... 229Brake/Transmission Shift Interlock
System........................................................ 229 Nine-Speed Automatic Transmission ...... 230
Gear Ranges .............................................. 230
ACTIVE NOISE CANCELLATION ........................ 234
POWER STEERING............................................. 234
STOP/START SYSTEM — IF EQUIPPED ........... 235
Auto Stop/Start.......................................... 235
Possible Reasons The Engine Does Not
Autostop ..................................................... 235 To Start The Engine While In Auto
Stop/Start .................................................. 236 To Manually Turn Off The Stop/Start
System........................................................ 236 To Manually Turn On The Stop/Start
System........................................................ 237 System Malfunction................................... 237
20_RU_OM_EN_US_t.book Page 4
Page 8 of 516
6
IN CASE OF EMERGENCY
HAZARD WARNING FLASHERS ....................... 301
ASSIST AND SOS MIRROR — IF EQUIPPED.... 301
General Information ..................................305
BULB REPLACEMENT ....................................... 306
Replacement Bulbs ...................................306
Replacing Exterior Bulbs ...........................308
FUSES .................................................................. 311
General Information ..................................311Fuse Location.............................................312Underhood Fuses.......................................312
JACKING AND TIRE CHANGING —
IF EQUIPPED ....................................................... 320
Jack And Spare Tire Location....................320
Equipment Removal .................................320
Preparations For Jacking ..........................321
Jacking Instructions ..................................322Road Tire Installation ................................325Portable Air Compressor — If Equipped....327
Tire Service Kit For Inflating Tire —
If Equipped .................................................328 Return Inflatable Spare Tire ......................330
TIRE SERVICE KIT — IF EQUIPPED ................... 330
JUMP STARTING................................................. 337
Preparations For Jump Start .....................337Jump Starting Procedure...........................338
REFUELING IN EMERGENCY ............................ 339
IF YOUR ENGINE OVERHEATS .......................... 339 MANUAL PARK RELEASE ................................. 340
FREEING A STUCK VEHICLE .............................341
TOWING A DISABLED VEHICLE .......................342
ENHANCED ACCIDENT RESPONSE SYSTEM
(EARS) .................................................................344
EVENT DATA RECORDER (EDR) .......................344
SERVICING AND MAINTENANCE
SCHEDULED SERVICING .................................. 345
Maintenance Plan ..................................... 345
ENGINE COMPARTMENT ................................... 349
3.6L Engine ................................................ 349
Checking Oil Level ..................................... 350
Adding Washer Fluid ................................. 350
Maintenance-Free Battery ....................... 350
Pressure Washing...................................... 351
DEALER SERVICE ..............................................351
Engine Oil .................................................. 351
Engine Oil Filter .......................................... 352Engine Air Cleaner ..................................... 353
Accessory Drive Belt Inspection ............... 353
Air Conditioner Maintenance .................... 354
Body Lubrication ........................................ 356
Windshield Wiper Blades .......................... 356Exhaust System ........................................ 359
Cooling System .......................................... 361Brake System ............................................ 364Automatic Transmission ........................... 365 RAISING THE VEHICLE ...................................... 366
TIRES .................................................................. 366
Tire Safety Information.............................. 366
Tires — General Information .................... 374Tire Types ................................................... 378
Spare Tires — If Equipped ......................... 379
Wheel And Wheel Trim Care ..................... 381
Tire Chains (Traction Devices) ................. 382
Tire Rotation Recommendations.............. 382
DEPARTMENT OF TRANSPORTATION UNIFORM
TIRE QUALITY GRADES .................................... 383
Treadwear .................................................. 383
Traction Grades ......................................... 383Temperature Grades ................................. 384
STORING THE VEHICLE ..................................... 384
BODYWORK ........................................................ 385
Protection From Atmospheric Agents....... 385
Body And Underbody Maintenance .......... 385Preserving The Bodywork.......................... 385
INTERIORS ......................................................... 386
Seats And Fabric Parts .............................. 386
Plastic And Coated Parts........................... 387
Leather Parts ............................................. 387
Glass Surfaces .......................................... 387
20_RU_OM_EN_US_t.book Page 6
Page 13 of 516
11
VEHICLE MODIFICATIONS/ALTERATIONS
WARNING!
Any modifications or alterations to this vehicle could seriously affect its roadworthiness and safety and may lead to a collision resulting in serious
injury or death.
WARNING!
To prevent SERIOUS INJURY or DEATH when using “Track-Use” parts and equipment:
NEVER use any “Track-Use” equipment on public roads. FCA US LLC does not authorize the use of “Track-Use” equipment on public roads.
The intended use of “Track-Use” parts is for race vehicles on race tracks. To help ensure the safety of the race driver, engineers should supervise
the installation of “Track-Use” parts.
FCA US LLC does not authorize the installation or use of any part noted as “Track-Use” on any new vehicle prior to its first retail sale.
WARNING!
To prevent SERIOUS INJURY or DEATH:
ALWAYS remove any “Track-Use” equipment before driving on public roads.
ALWAYS properly use your three-point seat belts when driving on public roads.
In a collision, you and your passengers can suffer much greater injuries if you are not properly buckled up. You can strike the interior of your vehicle
or other passengers, or you can be thrown out of the vehicle.
1
20_RU_OM_EN_US_t.book Page 11
Page 19 of 516
GETTING TO KNOW YOUR VEHICLE17
Duplication of key fobs may be performed at an
authorized dealer. This procedure consists of
programming a blank key fob to the vehicle
electronics. A blank key fob is one that has
never been programmed.
NOTE:
When having the Sentry Key Immobilizer
System serviced, bring all vehicle keys with you
to an authorized dealer.
KeySense Features — If Equipped
This feature provides the vehicle owner with the
ability to customize vehicle settings that can be
applied to determine the driving experience for
other drivers of the vehicle. The vehicle settings
are protected by a unique 4-digit PIN, which the
vehicle owner creates when accessing the
specific settings for the first time.
KeySense also has additional features that are
always enabled when the specific key is in use
that cannot be set by the vehicle owner. While
this specific key fob is in use, the vehicle will
respond accordingly to the customized vehicle settings and mandatory features. This includes
enhanced driving assistance features,
increased driver alerts, and the locking of
certain optional features.
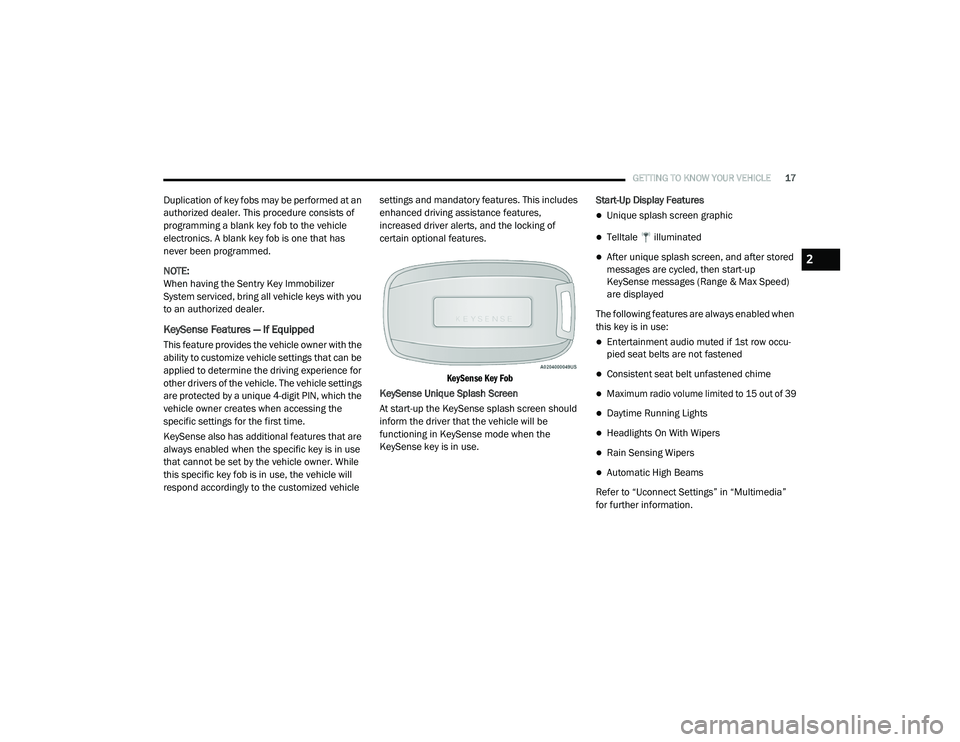
KeySense Key Fob
KeySense Unique Splash Screen
At start-up the KeySense splash screen should
inform the driver that the vehicle will be
functioning in KeySense mode when the
KeySense key is in use. Start-Up Display Features
Unique splash screen graphic
Telltale illuminated
After unique splash screen, and after stored
messages are cycled, then start-up
KeySense messages (Range & Max Speed)
are displayed
The following features are always enabled when
this key is in use:
Entertainment audio muted if 1st row occu -
pied seat belts are not fastened
Consistent seat belt unfastened chime
Maximum radio volume limited to 15 out of 39
Daytime Running Lights
Headlights On With Wipers
Rain Sensing Wipers
Automatic High Beams
Refer to “Uconnect Settings” in “Multimedia”
for further information.
2
20_RU_OM_EN_US_t.book Page 17
Page 37 of 516
GETTING TO KNOW YOUR VEHICLE35
(Continued)
3. Once the profile has been recalled, push and release the set (S) button on the
memory switch.
4. Push and release button (1) or (2) accordingly. “Memory Profile Set” (1 or 2)
will display in the instrument cluster.
5. Push and release the lock button on the key fob within 10 seconds.
NOTE:
Your key fob can be unlinked to your memory
settings by pushing the set (S) button, and then,
within 10 seconds, pushing the unlock button
on the key fob.
Memory Position Recall
NOTE:
The vehicle speed must be less than or equal to
5 mph (8 km/h) to recall memory positions. If a
recall is attempted when the vehicle speed is
greater than 5 mph (8 km/h), a message will be
displayed in the instrument cluster display. To recall the memory settings for driver one or
two, push the desired memory button (1 or 2) on
the driver's door or the unlock button on the key
fob linked to the desired memory position.
A recall can be cancelled by pushing any of the
memory buttons on the driver's door during a
recall (S, 1, or 2). When a recall is cancelled, the
driver's seat stops moving. A delay of one
second will occur before another recall can be
selected.
NOTE:
Pushing the mirror adjust switch will cancel the
memory mirror recall.
SEATS
Seats are a part of the Occupant Restraint
System of the vehicle.
Manual Adjustment (Front Seats) — If
Equipped
WARNING!
It is dangerous to ride in a cargo area,
inside or outside of a vehicle. In a collision,
people riding in these areas are more likely
to be seriously injured or killed.
Do not allow people to ride in any area of
your vehicle that is not equipped with seats
and seat belts. In a collision, people riding
in these areas are more likely to be seri
-
ously injured or killed.
Be sure everyone in your vehicle is in a seat
and using a seat belt properly.
WARNING!
Adjusting a seat while the vehicle is moving
is dangerous. The sudden movement of the
seat could cause you to lose control. The
seat belt might not be adjusted properly
and you could be injured. Adjust the seat
only while the vehicle is parked.
Do not ride with the seatback reclined so
that the shoulder belt is no longer resting
against your chest. In a collision you could
slide under the seat belt and be seriously or
even fatally injured. Use the recliner only
when the vehicle is parked.
WARNING! (Continued)
2
20_RU_OM_EN_US_t.book Page 35
Page 38 of 516
36GETTING TO KNOW YOUR VEHICLE
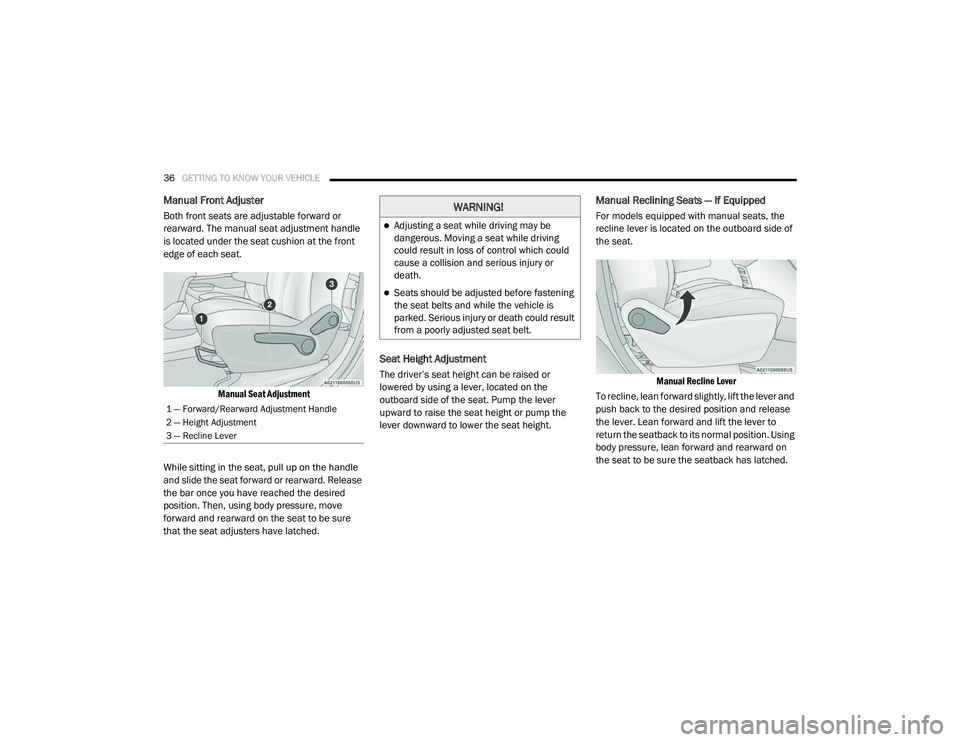
Manual Front Adjuster
Both front seats are adjustable forward or
rearward. The manual seat adjustment handle
is located under the seat cushion at the front
edge of each seat.
Manual Seat Adjustment
While sitting in the seat, pull up on the handle
and slide the seat forward or rearward. Release
the bar once you have reached the desired
position. Then, using body pressure, move
forward and rearward on the seat to be sure
that the seat adjusters have latched.
Seat Height Adjustment
The driver’s seat height can be raised or
lowered by using a lever, located on the
outboard side of the seat. Pump the lever
upward to raise the seat height or pump the
lever downward to lower the seat height.
Manual Reclining Seats — If Equipped
For models equipped with manual seats, the
recline lever is located on the outboard side of
the seat.
Manual Recline Lever
To recline, lean forward slightly, lift the lever and
push back to the desired position and release
the lever. Lean forward and lift the lever to
return the seatback to its normal position. Using
body pressure, lean forward and rearward on
the seat to be sure the seatback has latched.
1 — Forward/Rearward Adjustment Handle
2 — Height Adjustment
3 — Recline Lever
WARNING!
Adjusting a seat while driving may be
dangerous. Moving a seat while driving
could result in loss of control which could
cause a collision and serious injury or
death.
Seats should be adjusted before fastening
the seat belts and while the vehicle is
parked. Serious injury or death could result
from a poorly adjusted seat belt.
20_RU_OM_EN_US_t.book Page 36
Page 39 of 516
GETTING TO KNOW YOUR VEHICLE37
Manual Adjustment (Rear Seats) Manual Recline — Quad Seats
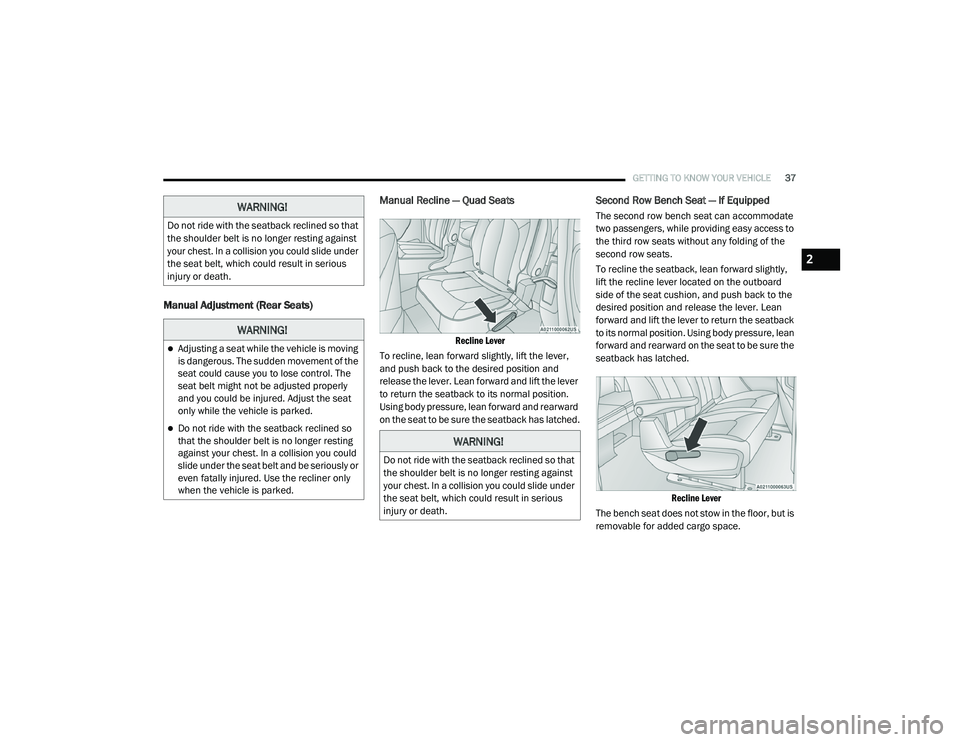
Recline Lever
To recline, lean forward slightly, lift the lever,
and push back to the desired position and
release the lever. Lean forward and lift the lever
to return the seatback to its normal position.
Using body pressure, lean forward and rearward
on the seat to be sure the seatback has latched.
Second Row Bench Seat — If Equipped
The second row bench seat can accommodate
two passengers, while providing easy access to
the third row seats without any folding of the
second row seats.
To recline the seatback, lean forward slightly,
lift the recline lever located on the outboard
side of the seat cushion, and push back to the
desired position and release the lever. Lean
forward and lift the lever to return the seatback
to its normal position. Using body pressure, lean
forward and rearward on the seat to be sure the
seatback has latched.
Recline Lever
The bench seat does not stow in the floor, but is
removable for added cargo space.WARNING!
Do not ride with the seatback reclined so that
the shoulder belt is no longer resting against
your chest. In a collision you could slide under
the seat belt, which could result in serious
injury or death.
WARNING!
Adjusting a seat while the vehicle is moving
is dangerous. The sudden movement of the
seat could cause you to lose control. The
seat belt might not be adjusted properly
and you could be injured. Adjust the seat
only while the vehicle is parked.
Do not ride with the seatback reclined so
that the shoulder belt is no longer resting
against your chest. In a collision you could
slide under the seat belt and be seriously or
even fatally injured. Use the recliner only
when the vehicle is parked.
WARNING!
Do not ride with the seatback reclined so that
the shoulder belt is no longer resting against
your chest. In a collision you could slide under
the seat belt, which could result in serious
injury or death.
2
20_RU_OM_EN_US_t.book Page 37
Page 50 of 516
48GETTING TO KNOW YOUR VEHICLE
(Continued)
6. To position the floor panel back into its original state, grab the bottom corner and
extend it outward.
Extend Panel
7. Lay the floor panel flat and push down until it clicks into position.
Push Down To Lock
8. Readjust the front seat as needed, and
replace the floor mat (if equipped).
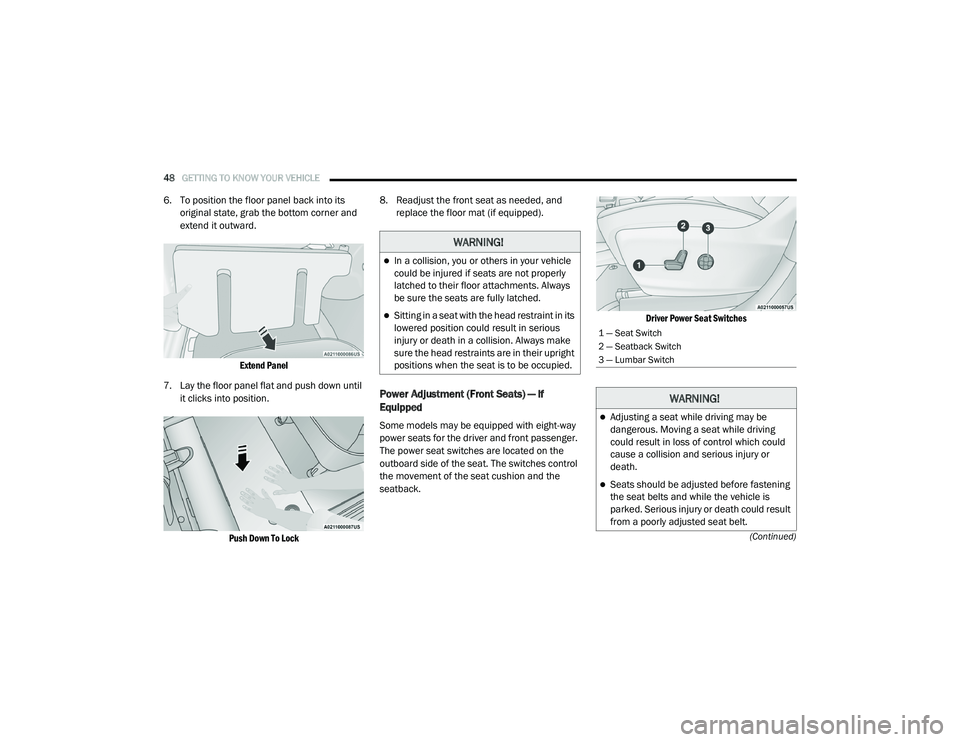
Power Adjustment (Front Seats) — If
Equipped
Some models may be equipped with eight-way
power seats for the driver and front passenger.
The power seat switches are located on the
outboard side of the seat. The switches control
the movement of the seat cushion and the
seatback.
Driver Power Seat Switches
WARNING!
In a collision, you or others in your vehicle
could be injured if seats are not properly
latched to their floor attachments. Always
be sure the seats are fully latched.
Sitting in a seat with the head restraint in its
lowered position could result in serious
injury or death in a collision. Always make
sure the head restraints are in their upright
positions when the seat is to be occupied.
1 — Seat Switch
2 — Seatback Switch
3 — Lumbar Switch
WARNING!
Adjusting a seat while driving may be
dangerous. Moving a seat while driving
could result in loss of control which could
cause a collision and serious injury or
death.
Seats should be adjusted before fastening
the seat belts and while the vehicle is
parked. Serious injury or death could result
from a poorly adjusted seat belt.
20_RU_OM_EN_US_t.book Page 48
Page 51 of 516
GETTING TO KNOW YOUR VEHICLE49
Adjusting The Seat Forward Or Rearward
The seat can be adjusted both forward and
rearward. Push the seat switch forward or
rearward, and the seat will move in the direction
of the switch. Release the switch when the
desired position has been reached.
Adjusting The Seat Up Or Down
The height of the seats can be adjusted up or
down. Pull upward or push downward on the
rear of seat switch, the seat will move in the
direction of the switch. Release the switch when
the desired position has been reached.
Tilting The Seat Up Or Down
The angle of the seat cushion can be adjusted
in two directions. Pull upward or push
downward on the front of the seat switch, the
front of the seat cushion will move in the
direction of the switch. Release the switch when
the desired position has been reached.
Reclining The Seatback
The angle of the seatback can be adjusted
forward or rearward. Push the seatback switch
forward or rearward, the seat will move in the
direction of the switch. Release the switch when
the desired position is reached.
Do not ride with the seatback reclined so
that the shoulder belt is no longer resting
against your chest. In a collision you could
slide under the seat belt, which could result
in serious injury or death.
CAUTION!
Do not place any article under a power seat
or impede its ability to move as it may cause
damage to the seat controls. Seat travel may
become limited if movement is stopped by an
obstruction in the seat's path.
WARNING! (Continued)WARNING!
Adjusting a seat while driving may be
dangerous. Moving a seat while driving
could result in loss of control which could
cause a collision and serious injury or
death.
Seats should be adjusted before fastening
the seat belts and while the vehicle is
parked. Serious injury or death could result
from a poorly adjusted seat belt.
Do not ride with the seatback reclined so
that the shoulder belt is no longer resting
against your chest. In a collision you could
slide under the seat belt, which could result
in serious injury or death.
CAUTION!
Do not place any article under a power seat
or impede its ability to move as it may cause
damage to the seat controls. Seat travel may
become limited if movement is stopped by an
obstruction in the seat's path.
2
20_RU_OM_EN_US_t.book Page 49
Page 52 of 516
50GETTING TO KNOW YOUR VEHICLE
Power Lumbar — If Equipped
Vehicles equipped with power driver or
passenger seats may be equipped with power
lumbar. The power lumbar switch is located on
the outboard side of the power seat. Push the
switch forward or rearward to increase or
decrease the lumbar support. Push the switch
upward or downward to raise or lower the
lumbar support.
Easy Entry/Exit Seat (Available With Memory
Settings Only)
This feature provides automatic driver seat
positioning to enhance driver mobility when
entering and exiting the vehicle.
The distance the driver seat moves depends on
where you have the driver seat positioned when
you place the vehicle’s ignition in the OFF
position.
When the ignition is placed in the OFF posi -
tion, the driver seat will move about
2.4 inches (60 mm) rearward if the driver seat position is greater than or equal to
2.7 inches (67.7 mm) forward of the rear stop. The seat will return to its previously set
position when the ignition is cycled out of the
OFF position.
When the ignition is placed in the OFF posi -
tion, the driver seat will move to a position
0.3 inches (7.7 mm) forward of the rear stop if the driver seat position is between 0.9 –
2.7 inches (22.7 – 67.7 mm) forward of the rear stop. The seat will return to its previously
set position when the ignition is cycled out of
the OFF position.
The Easy Entry/Easy Exit feature is disabled
when the driver seat position is less than
0.9 inches (22.7 mm) forward of the rear stop. At this position, there is no benefit to
the driver by moving the seat for Easy Exit or
Easy Entry.
Each stored memory setting will have an
associated Easy Entry and Easy Exit Position.
NOTE:
The Easy Entry/Easy Exit feature can be
enabled or disabled through the programmable
features in the instrument cluster display. For
further information, refer to “Instrument Cluster
Display” in “Getting To Know Your Instrument
Panel”.
Power Adjustment (Rear Seats) — If
Equipped
WARNING!
Adjusting a seat while driving may be
dangerous. Moving a seat while driving
could result in loss of control which could
cause a collision and serious injury or
death.
Seats should be adjusted before fastening
the seat belts and while the vehicle is
parked. Serious injury or death could result
from a poorly adjusted seat belt.
Do not ride with the seatback reclined so
that the shoulder belt is no longer resting
against your chest. In a collision you could
slide under the seat belt, which could result
in serious injury or death.
Do not place the seat belt webbing behind
the third row stow clip when using the seat
belt to restrain an occupant. The seat belt
will not be positioned properly on the occu -
pant and they could be more seriously
injured in an accident as a result.
20_RU_OM_EN_US_t.book Page 50