set clock CHRYSLER VOYAGER 2020 Owners Manual
[x] Cancel search | Manufacturer: CHRYSLER, Model Year: 2020, Model line: VOYAGER, Model: CHRYSLER VOYAGER 2020Pages: 516, PDF Size: 28.69 MB
Page 66 of 516
64GETTING TO KNOW YOUR VEHICLE
High/Low Beam Switch
When the headlights are turned on, pushing the
multifunction lever toward the instrument panel
will switch from low beams to high beams.
Pulling back to the neutral position returns the
headlights to the low beam operation.
Automatic High Beam — If Equipped
The Automatic High Beam system provides
increased forward lighting at night by
automating high beam control through the use
of a digital camera mounted on the windshield.
This camera detects vehicle specific light and
automatically switches from high beams to low
beams until the approaching vehicle is out of
view.
NOTE:
Broken, muddy, or obstructed headlights and
taillights of vehicles in the field of view will
cause headlights to remain on longer (closer to
the vehicle). Also, dirt, film and other obstruc -
tions on the windshield or camera lens will
cause the system to function improperly.
To Activate
1. Select “Automatic High Beams — ON” through the Uconnect system. Refer to
"Uconnect Settings” in “Multimedia” for
further information.
2. Rotate the headlight switch clockwise to the AUTO position.
3. Push the multifunction lever away from you to switch the headlights to the high beam
position. Refer to “Multifunction Lever” in
this section for further information.
NOTE:
This system will not activate until the vehicle is
at, or above 16 mph (25 km/h).
To Deactivate
Perform either of the following steps to
deactivate the Automatic High Beam system.
1. Select “Automatic High Beams — OFF” through the Uconnect System. Refer to
“Uconnect Settings” in “Multimedia” for
further information.
2. Pull the multifunction lever toward you to switch the headlights from the high beam to
the low beam position. 3. Rotate the headlight switch counter
-
clockwise from the AUTO to the on position.
NOTE:
Once active, the Automatic High Beam system
will stop functioning below 12 mph (20 km/h).
Flash-To-Pass
You can signal another vehicle with your
headlights by lightly pulling the multifunction
lever toward you. This will cause the high beam
headlights to turn on, and remain on, until the
lever is released.
Automatic Headlights — If Equipped
This system automatically turns your headlights
on or off based on ambient light levels. To turn
the system on, turn the headlight switch to the
extreme clockwise position aligning the
indicator with the AUTO on the headlight switch.
When the system is on, the Headlight Time
Delay feature is also on. This means your
headlights will stay on for up to 90 seconds
after the ignition is placed in the OFF position.
To turn the Automatic System off, turn the
headlight switch counterclockwise to the O (off)
position.
20_RU_OM_EN_US_t.book Page 64
Page 75 of 516
GETTING TO KNOW YOUR VEHICLE73
Faceplate Blower Knob
Touchscreen Blower Buttons Blower Control
Blower Control is used to regulate the amount of air forced through the climate system. There are seven blower speeds
available. The speeds can be selected using either the blower control knob on the faceplate or the buttons on the
touchscreen.
Faceplate: The blower speed increases as you turn the blower control knob clockwise from the lowest blower setting. The
blower speed decreases as you turn the blower control knob counterclockwise.
Touchscreen:
Use the small blower icon to reduce the blower setting and the large blower icon to increase the blower
setting. Blower speed can also be selected by pressing the blower bar area between the icons.
Faceplate Modes Control Knob Modes Control
Faceplate: Push the button in the center of the knob to change the airflow distribution mode.
Touchscreen:
Select Mode by pressing one of the Mode Buttons on the touchscreen. The airflow distribution mode can
be adjusted so air comes from the instrument panel outlets, floor outlets, defrost outlets and demist outlets. The Mode
settings are as follows:
Panel Mode Panel Mode
Air comes from the outlets in the instrument panel. Each of these outlets can be individually adjusted to direct the flow of
air. The air vanes of the center outlets and outboard outlets can be moved up and down or side to side to regulate airflow
direction. There is a shut off wheel located below the air vanes to shut off or adjust the amount of airflow from these
outlets.
Icon
Description
2
20_RU_OM_EN_US_t.book Page 73
Page 84 of 516
82GETTING TO KNOW YOUR VEHICLE
Driver And Passenger Temperature UP And DOWN Buttons
Provides the driver and passenger with independent temperature control. Push the red button on the faceplate or
touchscreen or press and slide the temperature bar towards the red arrow button on the touchscreen for warmer
temperature settings. Push the blue button on the faceplate or touchscreen or press and slide the temperature bar towards
the blue arrow button on the touchscreen for cooler temperature settings.
SYNC Button
Press the Sync button on the touchscreen to toggle the Sync feature On/Off. The Sync indicator is illuminated when this
feature is enabled. SYNC is used to synchronize the front and rear passenger temperature settings. Changing the front or
rear passenger temperature setting while in SYNC will automatically exit this feature.
NOTE:
The SYNC setting is only available on the touchscreen.
Faceplate Knob
Touchscreen Buttons Blower Control
Blower Control is used to regulate the amount of air forced through the climate system. There are seven blower speeds
available. The speeds can be selected using either the blower control knob on the faceplate or the buttons on the
touchscreen.
Faceplate: The blower speed increases as you turn the blower control knob clockwise from the lowest blower setting. The
blower speed decreases as you turn the blower control knob counterclockwise.
Touchscreen:
Use the small blower icon to reduce the blower setting and the large blower icon to increase the blower
setting. Blower speed can also be selected by pressing the blower bar area between the icons.
Icon Description
20_RU_OM_EN_US_t.book Page 82
Page 235 of 516
STARTING AND OPERATING233
If the transmission becomes extremely hot, the
“Transmission Temperature Warning Light” will
illuminate, a warning message will appear in the
instrument cluster, and the transmission may
operate differently until the transmission cools
down.
During cold temperatures, transmission
operation may be modified depending on
engine and transmission temperature as well
as vehicle speed. This feature improves warm
up time of the engine and transmission to
achieve maximum efficiency. Engagement of
the torque converter clutch, and shifts into 8th
or 9th gear, are inhibited until the transmission
fluid is warm refer to the “Note” under “Torque
Converter Clutch” in this section. Normal
operation will resume once the transmission
temperature has risen to a suitable level.
LOW (L)
Use this range for engine braking when
descending very steep grades. In this range, the
transmission will downshift for increased
engine braking. To access the LOW position,
push down on the gear selector and rotate it
fully clockwise.
Transmission Limp Home Mode
Transmission function is monitored
electronically for abnormal conditions. If a
condition is detected that could result in
transmission damage, Transmission Limp
Home Mode is activated. In this mode, the
transmission may operate only in a fixed gear,
or may remain in NEUTRAL. The Malfunction
Indicator Light (MIL) may be illuminated. Limp
Home Mode may allow the vehicle to be driven
to an authorized dealer for service without
damaging the transmission.
In the event of a momentary problem, the
transmission can be reset to regain all forward
gears by performing the following steps:
1. Stop the vehicle.
2. Shift the transmission into PARK, if
possible. If not, shift the transmission to
NEUTRAL.
3. Push and hold the ignition switch until the engine turns off.
4. Wait approximately 30 seconds. 5. Restart the engine.
6. Shift into the desired gear range. If the
problem is no longer detected, the
transmission will return to normal
operation.
NOTE:
Even if the transmission can be reset, we
recommend that you visit an authorized dealer
at your earliest possible convenience. An autho -
rized dealer has diagnostic equipment to
assess the condition of your transmission. If the
transmission cannot be reset, authorized dealer
service is required.
Torque Converter Clutch
A feature designed to improve fuel economy
has been included in the automatic
transmission on your vehicle. A clutch within the
torque converter engages automatically at
calibrated speeds. This may result in a slightly
different feeling or response during normal
operation in the upper gears. When the vehicle
speed drops or during some accelerations, the
clutch automatically disengages.
5
20_RU_OM_EN_US_t.book Page 233
Page 331 of 516
IN CASE OF EMERGENCY329
(Continued)
Whenever You Stop To Use Tire Service Kit:
1. Pull over to a safe location and turn on the vehicle’s Hazard Warning Flashers.
2. Verify that the valve stem (on the wheel with the deflated tire) is in a position that is near
to the ground. This will allow the Tire Service
Kit Hose to reach the valve stem and keep
the Tire Service Kit flat on the ground. This
will provide the best positioning of the kit
when running the air pump. Move the
vehicle as necessary to place the valve
stem in this position before proceeding.
3. Place the transmission in PARK (P) and cycle the ignition in the OFF position.
4. Ensure the park brake is engaged. Setting Up To Use Tire Service Kit:
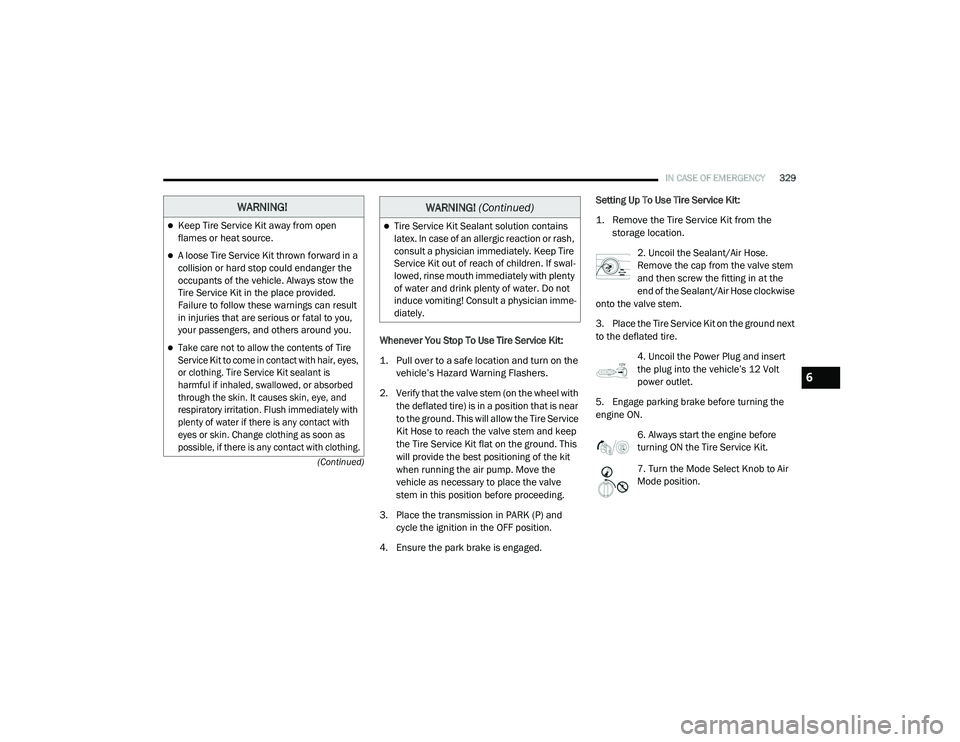
1. Remove the Tire Service Kit from the
storage location.
2. Uncoil the Sealant/Air Hose.
Remove the cap from the valve stem
and then screw the fitting in at the
end of the Sealant/Air Hose clockwise
onto the valve stem.
3. Place the Tire Service Kit on the ground next
to the deflated tire.
4. Uncoil the Power Plug and insert
the plug into the vehicle’s 12 Volt
power outlet.
5. Engage parking brake before turning the
engine ON. 6. Always start the engine before
turning ON the Tire Service Kit.
7. Turn the Mode Select Knob to Air
Mode position.
WARNING!
Keep Tire Service Kit away from open
flames or heat source.
A loose Tire Service Kit thrown forward in a
collision or hard stop could endanger the
occupants of the vehicle. Always stow the
Tire Service Kit in the place provided.
Failure to follow these warnings can result
in injuries that are serious or fatal to you,
your passengers, and others around you.
Take care not to allow the contents of Tire
Service Kit to come in contact with hair, eyes,
or clothing. Tire Service Kit sealant is
harmful if inhaled, swallowed, or absorbed
through the skin. It causes skin, eye, and
respiratory irritation. Flush immediately with
plenty of water if there is any contact with
eyes or skin. Change clothing as soon as
possible, if there is any contact with clothing.
Tire Service Kit Sealant solution contains
latex. In case of an allergic reaction or rash,
consult a physician immediately. Keep Tire
Service Kit out of reach of children. If swal -
lowed, rinse mouth immediately with plenty
of water and drink plenty of water. Do not
induce vomiting! Consult a physician imme -
diately.
WARNING! (Continued)
6
20_RU_OM_EN_US_t.book Page 329
Page 404 of 516
402MULTIMEDIA
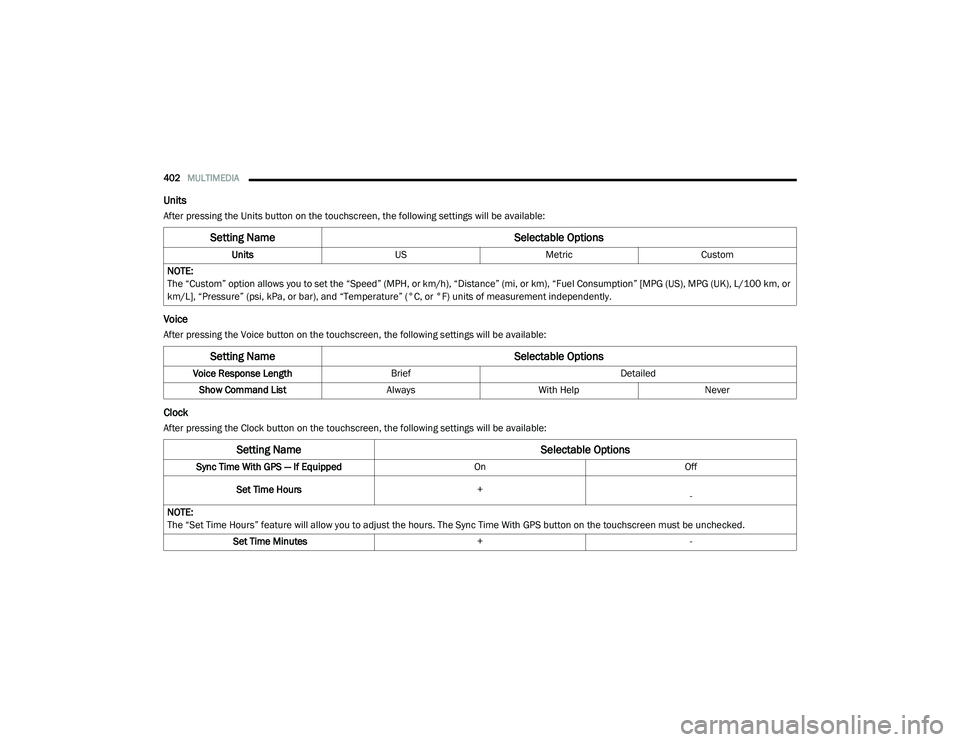
Units
After pressing the Units button on the touchscreen, the following settings will be available:
Voice
After pressing the Voice button on the touchscreen, the following settings will be available:
Clock
After pressing the Clock button on the touchscreen, the following settings will be available:
Setting Name Selectable Options
UnitsUSMetric Custom
NOTE:
The “Custom” option allows you to set the “Speed” (MPH, or km/h), “Distance” (mi, or km), “Fuel Consumption” [MPG (US), MPG (UK), L/100 km, or
km/L], “Pressure” (psi, kPa, or bar), and “Temperature” (°C, or °F) units of measurement independently.
Setting Name Selectable Options
Voice Response LengthBrief Detailed
Show Command List AlwaysWith Help Never
Setting Name Selectable Options
Sync Time With GPS — If Equipped OnOff
Set Time Hours +
-
NOTE:
The “Set Time Hours” feature will allow you to adjust the hours. The Sync Time With GPS button on the touchscreen must be unchecked. Set Time Minutes +-
20_RU_OM_EN_US_t.book Page 402
Page 423 of 516
MULTIMEDIA421
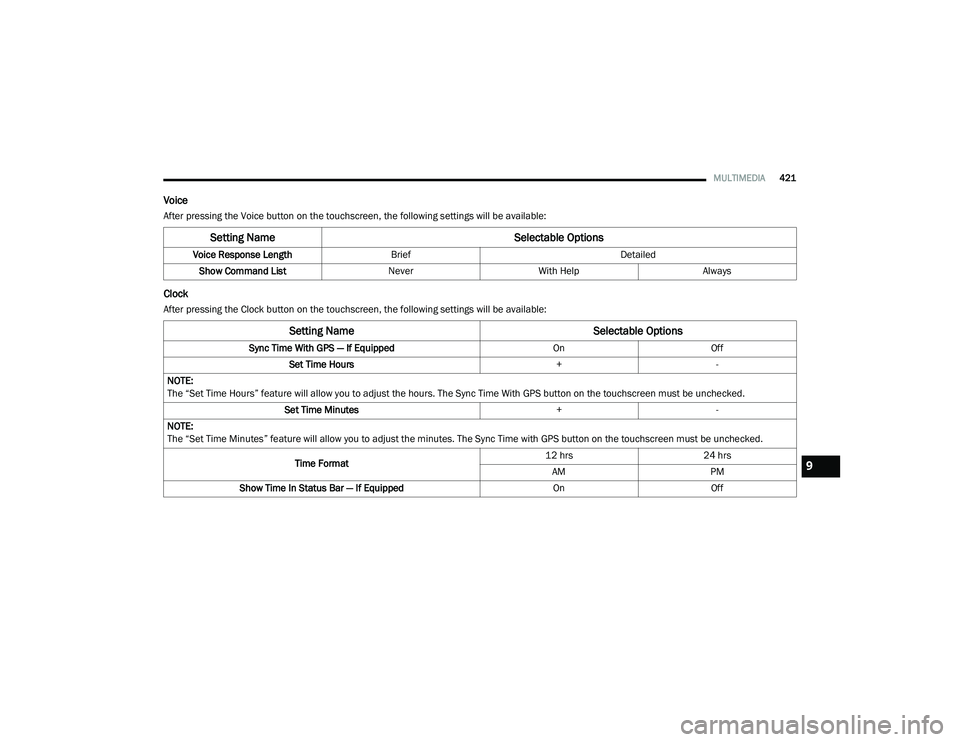
Voice
After pressing the Voice button on the touchscreen, the following settings will be available:
Clock
After pressing the Clock button on the touchscreen, the following settings will be available:
Setting Name Selectable Options
Voice Response LengthBrief Detailed
Show Command List NeverWith Help Always
Setting Name Selectable Options
Sync Time With GPS — If Equipped OnOff
Set Time Hours +-
NOTE:
The “Set Time Hours” feature will allow you to adjust the hours. The Sync Time With GPS button on the touchscreen must be unchecked. Set Time Minutes +-
NOTE:
The “Set Time Minutes” feature will allow you to adjust the minutes. The Sync Time with GPS button on the touchscreen must be unchecked.
Time Format 12 hrs
24 hrs
AM PM
Show Time In Status Bar — If Equipped OnOff
9
20_RU_OM_EN_US_t.book Page 421
Page 441 of 516
MULTIMEDIA439
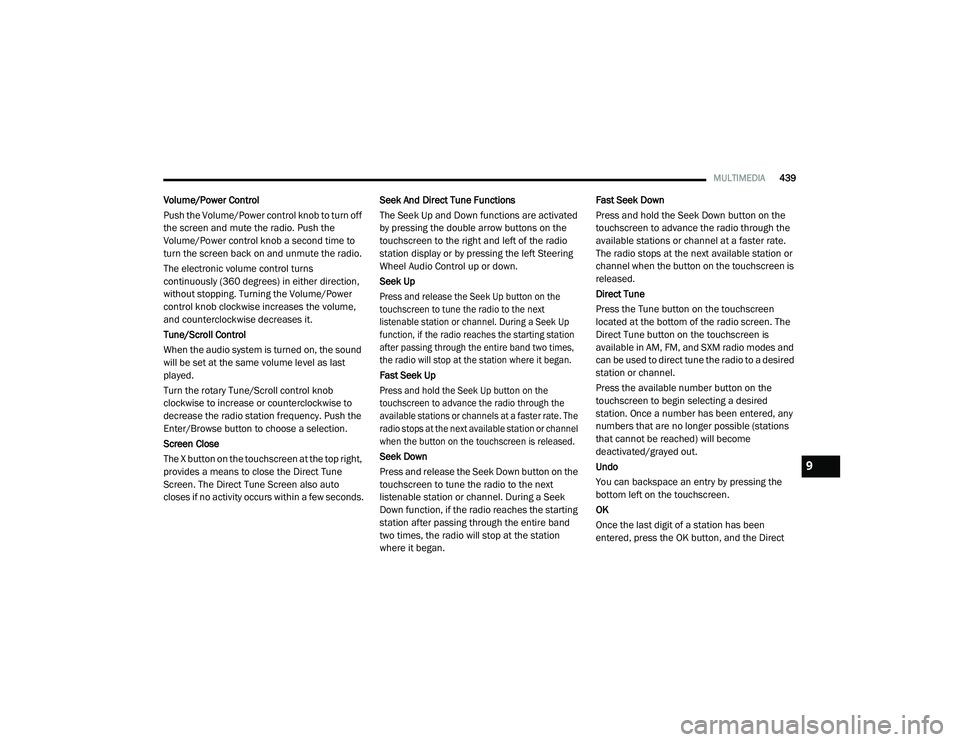
Volume/Power Control
Push the Volume/Power control knob to turn off
the screen and mute the radio. Push the
Volume/Power control knob a second time to
turn the screen back on and unmute the radio.
The electronic volume control turns
continuously (360 degrees) in either direction,
without stopping. Turning the Volume/Power
control knob clockwise increases the volume,
and counterclockwise decreases it.
Tune/Scroll Control
When the audio system is turned on, the sound
will be set at the same volume level as last
played.
Turn the rotary Tune/Scroll control knob
clockwise to increase or counterclockwise to
decrease the radio station frequency. Push the
Enter/Browse button to choose a selection.
Screen Close
The X button on the touchscreen at the top right,
provides a means to close the Direct Tune
Screen. The Direct Tune Screen also auto
closes if no activity occurs within a few seconds. Seek And Direct Tune Functions
The Seek Up and Down functions are activated
by pressing the double arrow buttons on the
touchscreen to the right and left of the radio
station display or by pressing the left Steering
Wheel Audio Control up or down.
Seek Up
Press and release the Seek Up button on the
touchscreen to tune the radio to the next
listenable station or channel. During a Seek Up
function, if the radio reaches the starting station
after passing through the entire band two times,
the radio will stop at the station where it began.
Fast Seek Up
Press and hold the Seek Up button on the
touchscreen to advance the radio through the
available stations or channels at a faster rate. The
radio stops at the next available station or channel
when the button on the touchscreen is released.
Seek Down
Press and release the Seek Down button on the
touchscreen to tune the radio to the next
listenable station or channel. During a Seek
Down function, if the radio reaches the starting
station after passing through the entire band
two times, the radio will stop at the station
where it began.Fast Seek Down
Press and hold the Seek Down button on the
touchscreen to advance the radio through the
available stations or channel at a faster rate.
The radio stops at the next available station or
channel when the button on the touchscreen is
released.
Direct Tune
Press the Tune button on the touchscreen
located at the bottom of the radio screen. The
Direct Tune button on the touchscreen is
available in AM, FM, and SXM radio modes and
can be used to direct tune the radio to a desired
station or channel.
Press the available number button on the
touchscreen to begin selecting a desired
station. Once a number has been entered, any
numbers that are no longer possible (stations
that cannot be reached) will become
deactivated/grayed out.
Undo
You can backspace an entry by pressing the
bottom left on the touchscreen.
OK
Once the last digit of a station has been
entered, press the OK button, and the Direct
9
20_RU_OM_EN_US_t.book Page 439
Page 469 of 516
MULTIMEDIA467
STEERING WHEEL AUDIO CONTROLS — IF
EQUIPPED
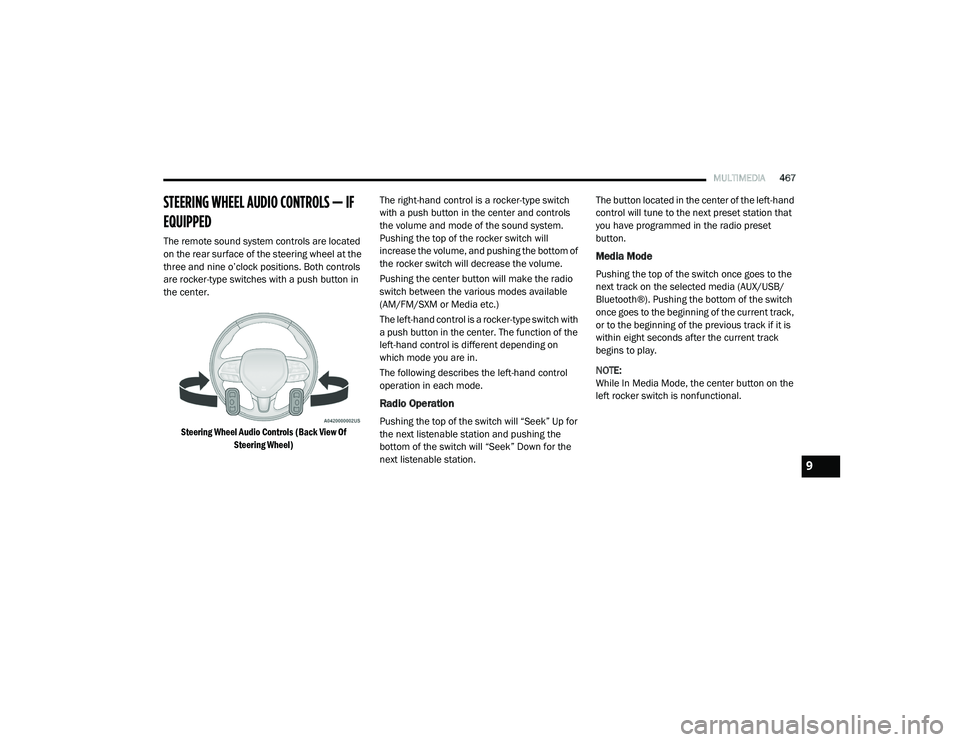
The remote sound system controls are located
on the rear surface of the steering wheel at the
three and nine o’clock positions. Both controls
are rocker-type switches with a push button in
the center.
Steering Wheel Audio Controls (Back View Of Steering Wheel)
The right-hand control is a rocker-type switch
with a push button in the center and controls
the volume and mode of the sound system.
Pushing the top of the rocker switch will
increase the volume, and pushing the bottom of
the rocker switch will decrease the volume.
Pushing the center button will make the radio
switch between the various modes available
(AM/FM/SXM or Media etc.)
The left-hand control is a rocker-type switch with
a push button in the center. The function of the
left-hand control is different depending on
which mode you are in.
The following describes the left-hand control
operation in each mode.
Radio Operation
Pushing the top of the switch will “Seek” Up for
the next listenable station and pushing the
bottom of the switch will “Seek” Down for the
next listenable station. The button located in the center of the left-hand
control will tune to the next preset station that
you have programmed in the radio preset
button.
Media Mode
Pushing the top of the switch once goes to the
next track on the selected media (AUX/USB/
Bluetooth®). Pushing the bottom of the switch
once goes to the beginning of the current track,
or to the beginning of the previous track if it is
within eight seconds after the current track
begins to play.
NOTE:
While In Media Mode, the center button on the
left rocker switch is nonfunctional.
9
20_RU_OM_EN_US_t.book Page 467
Page 476 of 516
474MULTIMEDIA
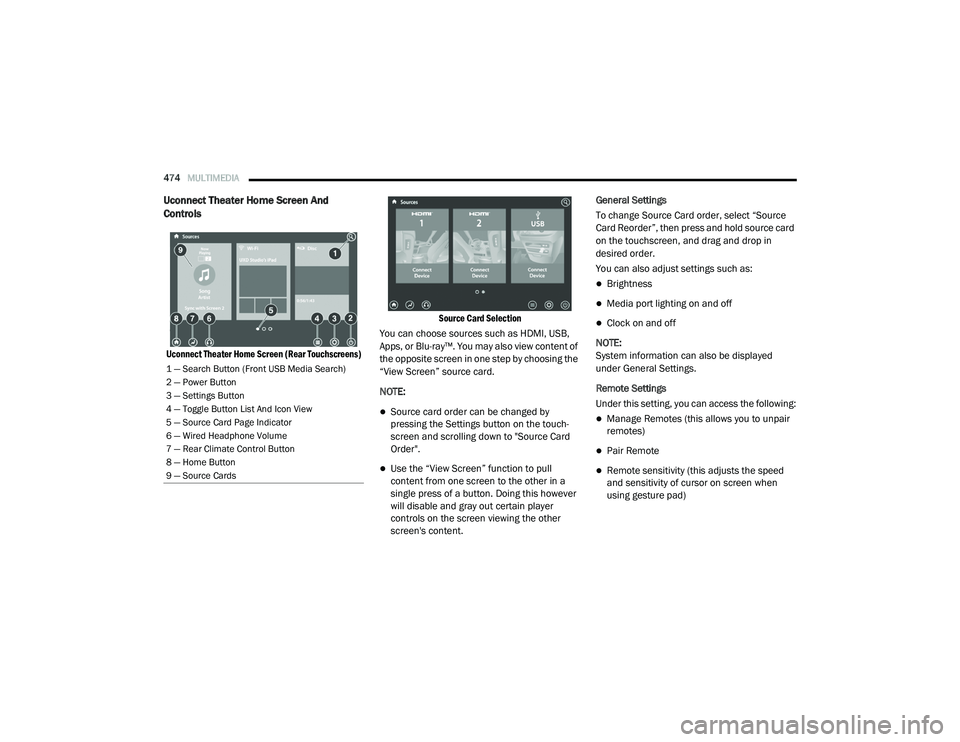
Uconnect Theater Home Screen And
Controls
Uconnect Theater Home Screen (Rear Touchscreens) Source Card Selection
You can choose sources such as HDMI, USB,
Apps, or Blu-ray™. You may also view content of
the opposite screen in one step by choosing the
“View Screen” source card.
NOTE:
Source card order can be changed by
pressing the Settings button on the touch -
screen and scrolling down to "Source Card
Order".
Use the “View Screen” function to pull
content from one screen to the other in a
single press of a button. Doing this however
will disable and gray out certain player
controls on the screen viewing the other
screen's content. General Settings
To change Source Card order, select “Source
Card Reorder”, then press and hold source card
on the touchscreen, and drag and drop in
desired order.
You can also adjust settings such as:
Brightness
Media port lighting on and off
Clock on and off
NOTE:
System information can also be displayed
under General Settings.
Remote Settings
Under this setting, you can access the following:
Manage Remotes (this allows you to unpair
remotes)
Pair Remote
Remote sensitivity (this adjusts the speed
and sensitivity of cursor on screen when
using gesture pad)
1 — Search Button (Front USB Media Search)
2 — Power Button
3 — Settings Button
4 — Toggle Button List And Icon View
5 — Source Card Page Indicator
6 — Wired Headphone Volume
7 — Rear Climate Control Button
8 — Home Button
9 — Source Cards
20_RU_OM_EN_US_t.book Page 474