brake light CHRYSLER VOYAGER 2021 Owners Manual
[x] Cancel search | Manufacturer: CHRYSLER, Model Year: 2021, Model line: VOYAGER, Model: CHRYSLER VOYAGER 2021Pages: 348, PDF Size: 18.73 MB
Page 10 of 348
8
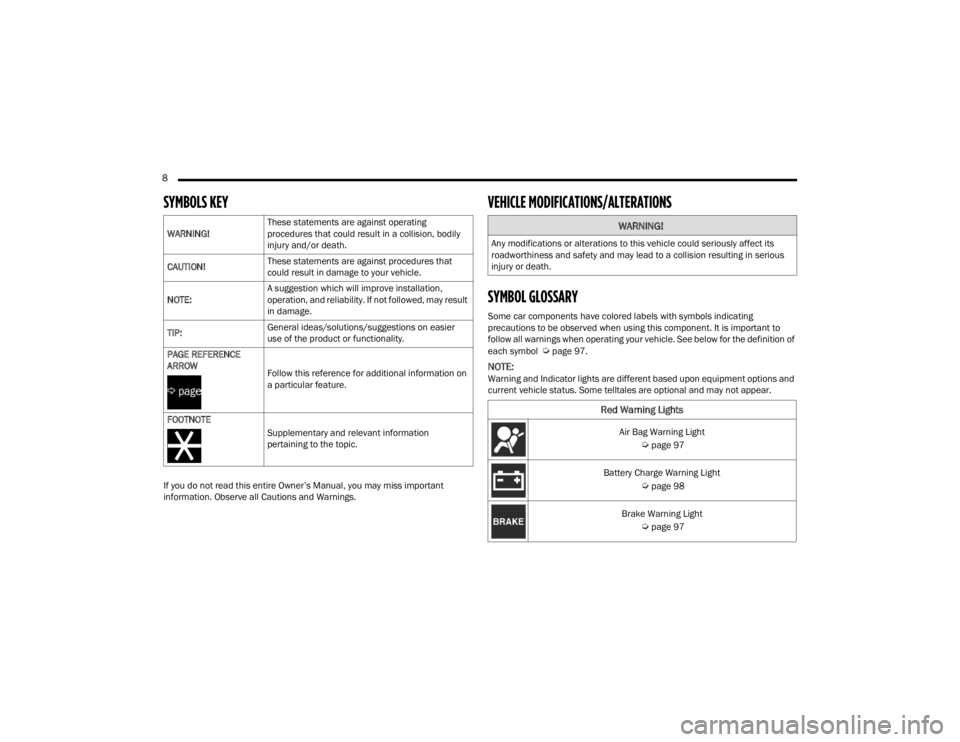
SYMBOLS KEY
If you do not read this entire Owner’s Manual, you may miss important
information. Observe all Cautions and Warnings.
VEHICLE MODIFICATIONS/ALTERATIONS
SYMBOL GLOSSARY
Some car components have colored labels with symbols indicating
precautions to be observed when using this component. It is important to
follow all warnings when operating your vehicle. See below for the definition of
each symbol
Úpage 97.
NOTE:Warning and Indicator lights are different based upon equipment options and
current vehicle status. Some telltales are optional and may not appear.
WARNING!
These statements are against operating
procedures that could result in a collision, bodily
injury and/or death.
CAUTION! These statements are against procedures that
could result in damage to your vehicle.
NOTE: A suggestion which will improve installation,
operation, and reliability. If not followed, may result
in damage.
TIP: General ideas/solutions/suggestions on easier
use of the product or functionality.
PAGE REFERENCE
ARROW Follow this reference for additional information on
a particular feature.
FOOTNOTE Supplementary and relevant information
pertaining to the topic.
WARNING!
Any modifications or alterations to this vehicle could seriously affect its
roadworthiness and safety and may lead to a collision resulting in serious
injury or death.
Red Warning Lights
Air Bag Warning Light
Úpage 97
Battery Charge Warning Light
Úpage 98
Brake Warning Light
Úpage 97
21_RUV_OM_EN_USC_t.book Page 8
Page 11 of 348
9
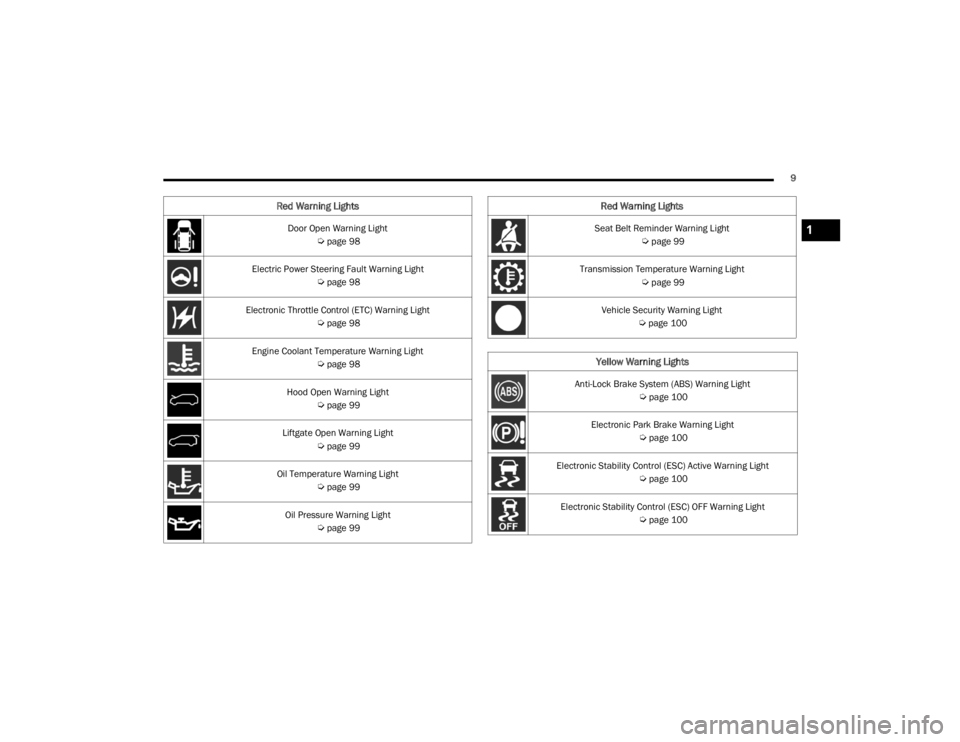
Door Open Warning Light
Úpage 98
Electric Power Steering Fault Warning Light
Úpage 98
Electronic Throttle Control (ETC) Warning Light
Úpage 98
Engine Coolant Temperature Warning Light
Úpage 98
Hood Open Warning Light
Úpage 99
Liftgate Open Warning Light
Úpage 99
Oil Temperature Warning Light
Úpage 99
Oil Pressure Warning Light
Úpage 99
Red Warning Lights
Seat Belt Reminder Warning Light
Úpage 99
Transmission Temperature Warning Light
Úpage 99
Vehicle Security Warning Light
Úpage 100
Yellow Warning Lights
Anti-Lock Brake System (ABS) Warning Light
Úpage 100
Electronic Park Brake Warning Light
Úpage 100
Electronic Stability Control (ESC) Active Warning Light
Úpage 100
Electronic Stability Control (ESC) OFF Warning Light
Úpage 100
Red Warning Lights
1
21_RUV_OM_EN_USC_t.book Page 9
Page 19 of 348
GETTING TO KNOW YOUR VEHICLE17
Remote Start is used to defrost windows in cold
weather and to reach a comfortable climate in all
ambient conditions before the customer enters the
vehicle.
NOTE:Obstructions between the vehicle and key fob may
reduce this range Úpage 331.
HOW TO USE REMOTE START
Push and release the Remote Start button on the
key fob twice within five seconds. The vehicle
doors will lock, the parking lights will flash, and the
horn will chirp twice (if programmed). Then, the
engine will start, and the vehicle will remain in the
Remote Start mode for a 15 minute cycle. Pushing the Remote Start button a third time shuts
the engine off.
To drive the vehicle, push the unlock button and
place the ignition in the ON/RUN position.
NOTE:
With Remote Start, the engine will only run for
15 minutes.
Remote Start can only be used twice.
If an engine fault is present or fuel level is
low, the vehicle will start and then shut down
in 10 seconds.
The parking lights will turn on and remain on
during Remote Start mode.
For security, power window operations are
disabled when the vehicle is in the Remote Start
mode.
The ignition must be placed in the ON/RUN posi
-
tion before the Remote Start sequence can be
repeated for a third cycle.
All of the following conditions must be met before
the engine will Remote Start:
Gear selector in PARK
Doors closed
Hood closed
Liftgate closed
Hazard switch off
Brake switch inactive (brake pedal not pressed)
Battery at an acceptable charge level
PANIC button not pushed
System not disabled from previous Remote
Start event
Vehicle Security system indicator flashing
Ignition in OFF position
Fuel level meets minimum requirement
Vehicle Security system is not signaling an intru -
sion
Malfunction Indicator Light (MIL) is not
illuminated
WARNING!
Do not start or run an engine in a closed
garage or confined area. Exhaust gas contains
Carbon Monoxide (CO) which is odorless and
colorless. Carbon Monoxide is poisonous and
can cause serious injury or death when
inhaled.
Keep key fobs away from children. Operation
of the Remote Start system, windows, door
locks or other controls could cause serious
injury or death.WARNING!
Do not start or run an engine in a closed
garage or confined area. Exhaust gas contains
Carbon Monoxide (CO) which is odorless and
colorless. Carbon Monoxide is poisonous and
can cause serious injury or death when
inhaled.
Keep key fobs away from children. Operation
of the Remote Start system, windows, door
locks or other controls could cause serious
injury or death.
2
21_RUV_OM_EN_USC_t.book Page 17
Page 56 of 348
54GETTING TO KNOW YOUR VEHICLE
DAYTIME RUNNING LIGHTS (DRLS) —
I
F EQUIPPED
The headlights or LED light bars on your vehicle will
illuminate when the engine is started. This
provides a constant lights on condition until the
ignition is placed in the OFF position. If the parking
brake is applied, the Daytime Running Lights
(DRLs) will turn off.
NOTE:
For vehicles sold in Canada, the Daytime
Running Lights will automatically deactivate
when the front fog lights are turned on.
If allowed by law in the country in which the
vehicle was purchased, the Daytime Running
Lights can be turned on and off using the
Uconnect system
Úpage 142.
On some vehicles, the Daytime Running Lights
may deactivate, or reduce intensity, on one side
of the vehicle (when a turn signal is activated on
that side), or on both sides of the vehicle (when
the hazard warning lights are activated).
HIGH/LOW BEAM SWITCH
Push the multifunction lever toward the instrument
panel to switch the headlights to high beams.
Pulling the multifunction lever back will turn the
low beams on.
FLASH-TO-PASS
You can signal another vehicle with your headlights
by lightly pulling the multifunction lever toward you.
This will cause the high beam headlights to turn on,
and remain on, until the lever is released.
AUTOMATIC HEADLIGHTS — IF EQUIPPED
This system automatically turns your headlights on
or off based on ambient light levels. To turn the
system on, turn the headlight switch to the extreme
clockwise position aligning the indicator with the
AUTO on the headlight switch. When the system is
on, the Headlight Time Delay feature is also on.
This means your headlights will stay on for up to
90 seconds after the ignition is placed in the OFF
position. To turn the Automatic System off, turn the
headlight switch counterclockwise to the O (off)
position.
NOTE:The engine must be running before the headlights
will come on in the Automatic mode.
HEADLIGHT TIME DELAY — IF EQUIPPED
This feature provides the safety of headlight
illumination for up to 90 seconds after exiting your
vehicle. To activate the delay feature, place the ignition in
the OFF position while the headlights are still on.
The 90 second delay interval begins when
headlight switch is turned off. If the headlights or
parking lights are turned back on or the ignition is
placed in the ON position, the delay will be
cancelled.
When exiting the vehicle the driver can choose
to have the headlights remain on for 30, 60, or
90 seconds or not remain on. You can change the
timer setting through the Uconnect system
Úpage 142.
If the headlights are turned off before the ignition,
they will turn off in the normal manner.
NOTE:The headlights must be turned off within
45 seconds of placing the ignition in the OFF
position to activate this feature.
LIGHTS-ON REMINDER
If the headlights or the parking lights are left on
after the ignition is placed in the OFF position, the
vehicle will chime when the driver's door is opened.
FRONT FOG LIGHTS — IF EQUIPPED
To activate the front fog lights, turn on the parking
lights or the low beam headlights and push the
headlight switch control knob. Pushing the
headlight switch control knob a second time will
turn the front fog lights off.
21_RUV_OM_EN_USC_t.book Page 54
Page 99 of 348
GETTING TO KNOW YOUR INSTRUMENT PANEL97
To Reset A Trip Function
Push and hold the OK button to reset the currently
displayed trip.
WARNING LIGHTS AND MESSAGES
The warning/indicator lights will illuminate in the
instrument panel together with a dedicated
message and/or acoustic signal when applicable.
These indications are indicative and precautionary
and as such must not be considered as exhaustive
and/or alternative to the information contained in
the Owner’s Manual, which you are advised to read
carefully in all cases. Always refer to the
information in this chapter in the event of a failure
indication. All active telltales will display first if
applicable. The system check menu may appear
different based upon equipment options and
current vehicle status. Some telltales are optional
and may not appear.
RED WARNING LIGHTS
Air Bag Warning Light
This warning light will illuminate to
indicate a fault with the air bag, and will
turn on for four to eight seconds as a bulb
check when the ignition is placed in the
ON/RUN or ACC/ON/RUN position. This light will
illuminate with a single chime when a fault with the
air bag has been detected, it will stay on until the fault is cleared. If the light is either not on during
startup, stays on, or turns on while driving, have
the system inspected at an authorized dealer as
soon as possible.
Brake Warning Light
This warning light monitors various brake
functions, including brake fluid level and
parking brake application. If the brake
light turns on it may indicate that the
parking brake is applied, that the brake fluid level
is low, or that there is a problem with the Anti-Lock
Brake System reservoir.
If the light remains on when the parking brake has
been disengaged, and the fluid level is at the full
mark on the master cylinder reservoir, it indicates
a possible brake hydraulic system malfunction or
that a problem with the Brake Booster has been
detected by the Anti-Lock Brake System (ABS) /
Electronic Stability Control (ESC) system. In this
case, the light will remain on until the condition has
been corrected. If the problem is related to the
brake booster, the ABS pump will run when
applying the brake, and a brake pedal pulsation
may be felt during each stop. The dual brake system provides a reserve braking
capacity in the event of a failure to a portion of the
hydraulic system. A leak in either half of the dual
brake system is indicated by the Brake Warning
Light, which will turn on when the brake fluid level
in the master cylinder has dropped below a
specified level.
The light will remain on until the cause is corrected.
NOTE:The light may flash momentarily during sharp
cornering maneuvers, which change fluid level
conditions. The vehicle should have service
performed, and the brake fluid level checked.
If brake failure is indicated, immediate repair is
necessary.
Vehicles equipped with the Anti-Lock Brake System
(ABS) are also equipped with Electronic Brake
Force Distribution (EBD). In the event of an EBD
failure, the Brake Warning Light will turn on along
with the ABS Light. Immediate repair to the ABS
system is required.
WARNING!
Driving a vehicle with the red brake light on is
dangerous. Part of the brake system may have
failed. It will take longer to stop the vehicle. You
could have a collision. Have the vehicle checked
immediately.
3
21_RUV_OM_EN_USC_t.book Page 97
Page 100 of 348

98GETTING TO KNOW YOUR INSTRUMENT PANEL
Operation of the Brake Warning Light can be
checked by turning the ignition switch from the OFF
position to the ON/RUN position. The light should
illuminate for approximately two seconds. The light
should then turn off unless the parking brake is
applied or a brake fault is detected. If the light does
not illuminate, have the light inspected by an
authorized dealer.
The light also will turn on when the parking brake
is applied with the ignition switch in the ON/RUN
position.
NOTE:This light shows only that the parking brake is
applied. It does not show the degree of brake appli -
cation.
Battery Charge Warning Light
This warning light will illuminate when the
battery is not charging properly. If it stays
on while the engine is running, there may
be a malfunction with the charging
system. Contact an authorized dealer as soon as
possible.
This indicates a possible problem with the
electrical system or a related component.
Door Open Warning Light — If Equipped
This warning light will illuminate when a
door is ajar/open and not fully closed.
This indicator will reflect which doors are
open.
NOTE:If the vehicle is moving, there will also be a single
chime.
Electric Power Steering (EPS) Fault
Warning Light
This warning light will turn on when
there's a fault with the EPS system
Úpage 118.
Electronic Throttle Control (ETC) Warning
Light
This warning light will illuminate to
indicate a problem with the ETC system.
If a problem is detected while the vehicle
is running, the light will either stay on or
flash depending on the nature of the problem.
Cycle the ignition when the vehicle is safely and completely stopped and the transmission is placed
in the PARK (P) position. The light should turn off.
If the light remains on with the vehicle running,
your vehicle will usually be drivable; however, see
an authorized dealer for service as soon as
possible.
NOTE:This light may turn on if the accelerator and brake
pedals are pressed at the same time.
If the light continues to flash when the vehicle is
running, immediate service is required and you
may experience reduced performance, an
elevated/rough idle, or engine stall and your
vehicle may require towing. The light will come
on when the ignition is placed in the ON/RUN or
ACC/ON/RUN position and remain on briefly as a
bulb check. If the light does not come on during
starting, have the system checked by an
authorized dealer.
Engine Coolant Temperature Warning
Light
This warning light warns of an
overheated engine condition. If the
engine coolant temperature is too high,
this indicator will illuminate and a single
chime will sound. If the temperature reaches the
upper limit, a continuous chime will sound for four
minutes or until the engine is able to cool;
whichever comes first.
WARNING!
Continued operation with reduced assist could
pose a safety risk to yourself and others. Service
should be obtained as soon as possible.
21_RUV_OM_EN_USC_t.book Page 98
Page 102 of 348
100GETTING TO KNOW YOUR INSTRUMENT PANEL
Vehicle Security Warning Light —
If Equipped
This warning light will flash at a fast rate
for approximately 15 seconds when the
vehicle security system is arming, and
then will flash slowly until the vehicle is
disarmed.
YELLOW WARNING LIGHTS
Anti-Lock Brake System (ABS) Warning
Light
This warning light monitors the ABS. The
light will turn on when the ignition is
placed in the ON/RUN or ACC/ON/RUN
position and may stay on for as long as
four seconds.
If the ABS light remains on or turns on while
driving, then the Anti-Lock portion of the brake
system is not functioning and service is required as
soon as possible. However, the conventional brake
system will continue to operate normally,
assuming the Brake Warning Light is not also on.
If the ABS light does not turn on when the ignition
is placed in the ON/RUN or ACC/ON/RUN position,
have the brake system inspected by an authorized
dealer.
Electronic Park Brake Warning Light
This warning light will illuminate to
indicate the Electronic Park Brake is not
functioning properly and service is
required. Contact an authorized dealer.
Electronic Stability Control (ESC) Active
Warning Light — If Equipped
This warning light will indicate when the
ESC system is Active. The ESC Indicator
Light in the instrument cluster will come
on when the ignition is placed in the ON/
RUN or ACC/ON/RUN position, and when ESC is
activated. It should go out with the engine running.
If the ESC Indicator Light comes on continuously
with the engine running, a malfunction has been
detected in the ESC system. If this warning light
remains on after several ignition cycles, and the
vehicle has been driven several miles (kilometers)
at speeds greater than 30 mph (48 km/h), see an
authorized dealer as soon as possible to have the
problem diagnosed and corrected.
The ESC OFF Indicator Light and the ESC Indi -
cator Light come on momentarily each time the
ignition is placed in the ON/RUN or ACC/ON/
RUN position.
The ESC system will make buzzing or clicking
sounds when it is active. This is normal; the
sounds will stop when ESC becomes inactive.
This light will come on when the vehicle is in an
ESC event.
Electronic Stability Control (ESC) OFF
Warning Light — If Equipped
This warning light indicates the ESC is off.
Each time the ignition is turned to ON/RUN or
ACC/ON/RUN, the ESC system will be on, even if it
was turned off previously.
Low Fuel Warning Light
When the fuel level reaches
approximately 1.85 gal (7 L) this warning
light will turn on, and remain on until fuel
is added.
A single warning chime will sound with Low Fuel
Warning.
Low Washer Fluid Warning Light —
If Equipped
This warning light will illuminate when the
windshield washer fluid is low.
21_RUV_OM_EN_USC_t.book Page 100
Page 113 of 348
STARTING AND OPERATING111
While cruising, brief full-throttle acceleration within
the limits of local traffic laws contributes to a good
break-in. Wide-open throttle acceleration in low
gear can be detrimental and should be avoided.
The engine oil installed in the engine at the factory
is a high-quality energy conserving type lubricant.
Oil changes should be consistent with anticipated
climate conditions under which vehicle operations
will occur. For the recommended viscosity and
quality grades
Úpage 277.
NOTE:A new engine may consume some oil during its first
few thousand miles (kilometers) of operation. This
should be considered a normal part of the break-in
and not interpreted as a problem.
PARKING BRAKE
ELECTRIC PARK BRAKE (EPB)
Your vehicle is equipped with an EPB that offers
simple operation, and some additional features
that make the parking brake more convenient and
useful. The parking brake is primarily intended to prevent
the vehicle from rolling while parked. Before
leaving the vehicle, make sure that the parking
brake is applied. Also, be certain to leave the
transmission in PARK.
You can engage the parking brake in two ways;
Manually, by applying the parking brake switch.
Automatically, by enabling the Auto Park Brake
feature in the customer programmable features
Úpage 142.
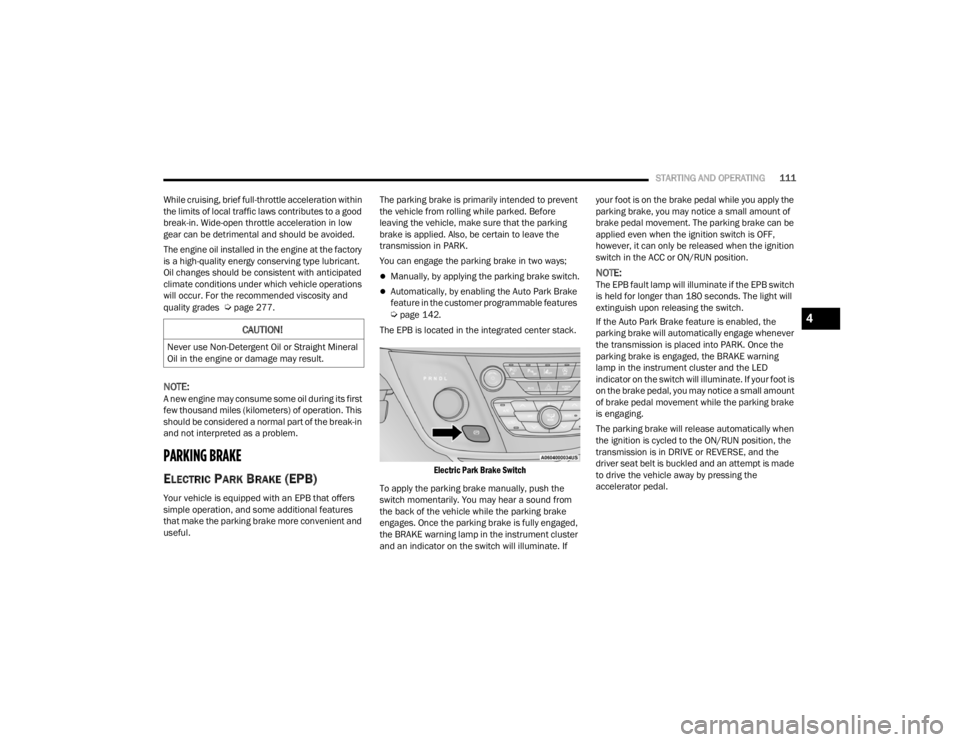
The EPB is located in the integrated center stack.
Electric Park Brake Switch
To apply the parking brake manually, push the
switch momentarily. You may hear a sound from
the back of the vehicle while the parking brake
engages. Once the parking brake is fully engaged,
the BRAKE warning lamp in the instrument cluster
and an indicator on the switch will illuminate. If your foot is on the brake pedal while you apply the
parking brake, you may notice a small amount of
brake pedal movement. The parking brake can be
applied even when the ignition switch is OFF,
however, it can only be released when the ignition
switch in the ACC or ON/RUN position.
NOTE:The EPB fault lamp will illuminate if the EPB switch
is held for longer than 180 seconds. The light will
extinguish upon releasing the switch.
If the Auto Park Brake feature is enabled, the
parking brake will automatically engage whenever
the transmission is placed into PARK. Once the
parking brake is engaged, the BRAKE warning
lamp in the instrument cluster and the LED
indicator on the switch will illuminate. If your foot is
on the brake pedal, you may notice a small amount
of brake pedal movement while the parking brake
is engaging.
The parking brake will release automatically when
the ignition is cycled to the ON/RUN position, the
transmission is in DRIVE or REVERSE, and the
driver seat belt is buckled and an attempt is made
to drive the vehicle away by pressing the
accelerator pedal.
CAUTION!
Never use Non-Detergent Oil or Straight Mineral
Oil in the engine or damage may result.
4
21_RUV_OM_EN_USC_t.book Page 111
Page 114 of 348
112STARTING AND OPERATING
(Continued)
To release the parking brake manually, the ignition
switch must be in the ON/RUN position. Press on
the brake pedal, then push the parking brake
switch momentarily. You may hear a sound from
the back of the vehicle while the parking brake
disengages. You may also notice a small amount of
movement in the brake pedal. Once the parking
brake is fully disengaged, the BRAKE warning lamp
in the instrument cluster and the LED indicator on
the switch will extinguish.
NOTE:When parking on a hill, it is important to turn the
front wheels toward the curb on a downhill grade
and away from the curb on an uphill grade. Apply
the parking brake before placing the gear selector
in PARK, otherwise the load on the transmission
locking mechanism may make it difficult to move
the gear selector out of PARK. The parking brake
should always be applied whenever the driver is
not in the vehicle.
If exceptional circumstances should make it
necessary to engage the parking brake while the
vehicle is in motion, push on the EPB switch for as
long as engagement is desired. The BRAKE
warning lamp will illuminate, and a continuous
chime will sound. The rear stop lamps will also be
illuminated automatically while the vehicle
remains in motion.
To disengage the parking brake while the vehicle is
in motion, release the switch. If the vehicle is
brought to a complete stop using the parking
brake, when the vehicle reaches approximately
3 mph (4.8 km/h), the parking brake will remain
engaged.
In the unlikely event of a malfunction of the EPB
system, a yellow EPB fault lamp will illuminate. This
may be accompanied by the BRAKE warning lamp
flashing. In this case, urgent service of the EPB
system is required. Do not rely on the parking
brake to hold the vehicle stationary.
WARNING!
Never use the PARK position as a substitute for
the parking brake. Always apply the parking
brake fully when parked to guard against vehicle
movement and possible injury or damage.
When exiting the vehicle, always make sure the
ignition is in the OFF mode, remove the key fob
from the vehicle, and lock your vehicle.
Never leave children alone in a vehicle, or with
access to an unlocked vehicle. Allowing children
to be in a vehicle unattended is dangerous for a
number of reasons. A child or others could be
seriously or fatally injured. Children should be
warned not to touch the parking brake, brake
pedal or the transmission gear selector.
Do not leave the key fob in or near the vehicle,
(or in a location accessible to children), and do
not leave the ignition in the ACC or ON/RUN
mode. A child could operate power windows,
other controls, or move the vehicle.
Be sure the parking brake is fully disengaged
before driving; failure to do so can lead to brake
failure and a collision.
Always fully apply the parking brake when
leaving your vehicle, or it may roll and cause
damage or injury. Also be certain to leave the
transmission in PARK. Failure to do so may allow
the vehicle to roll and cause damage or injury.
Driving the vehicle with the parking brake
engaged, or repeated use of the parking brake
to slow the vehicle may cause serious damage
to the brake system.
WARNING!CAUTION!
If the Brake System Warning Light remains on
with the parking brake released, a brake system
malfunction is indicated. Have the brake system
serviced by an authorized dealer immediately.
21_RUV_OM_EN_USC_t.book Page 112
Page 119 of 348
STARTING AND OPERATING117
The following indicators should be used to ensure
that you have properly engaged the transmission
into the PARK position:
Look at the transmission gear position display
and verify that it indicates the PARK position (P),
and is not blinking.
With brake pedal released, verify that the gear
selector will not move out of PARK.
REVERSE (R)
This range is for moving the vehicle backward.
Shift into REVERSE only after the vehicle has come
to a complete stop.
NEUTRAL (N)
Use this range when the vehicle is standing for
prolonged periods with the engine running. The
engine may be started in this range. Apply the
parking brake and shift the transmission into PARK
if you must exit the vehicle.
DRIVE (D)
This range should be used for most city and
highway driving. It provides the smoothest upshifts
and downshifts, and the best fuel economy. The
transmission automatically upshifts through all
forward gears. The DRIVE position provides
optimum driving characteristics under all normal
operating conditions.
If the transmission temperature exceeds normal
operating limits, the transmission controller may
modify the transmission shift schedule, reduce
engine torque, and/or expand the range of torque
converter clutch engagement. This is done to
prevent transmission damage due to overheating.
If the transmission becomes extremely hot, the
“Transmission Temperature Warning Light” will
illuminate, a warning message will appear in the
instrument cluster, and the transmission may
operate differently until the transmission cools
down. During cold temperatures, transmission operation
may be modified depending on engine and
transmission temperature as well as vehicle
speed. This feature improves warm up time of the
engine and transmission to achieve maximum
efficiency. Engagement of the torque converter
clutch, and shifts into EIGHTH or NINTH gear, are
inhibited until the transmission fluid is warm
Úpage 118. Normal operation will resume once
the transmission temperature has risen to a
suitable level.
LOW (L)
Use this range for engine braking when
descending very steep grades. In this range, the
transmission will downshift for increased engine
braking. To access the LOW position, push down
on the gear selector and rotate it fully clockwise.
Transmission Limp Home Mode
Transmission function is monitored electronically
for abnormal conditions. If a condition is detected
that could result in transmission damage,
Transmission Limp Home Mode is activated. In this
mode, the transmission may operate only in a fixed
gear, or may remain in NEUTRAL. The Malfunction
Indicator Light (MIL) may be illuminated. Limp
Home Mode may allow the vehicle to be driven to
an authorized dealer for service without damaging
the transmission.
WARNING!
Do not coast in NEUTRAL and never turn off the
ignition to coast down a hill. These are unsafe
practices that limit your response to changing
traffic or road conditions. You might lose control
of the vehicle and have a collision.
CAUTION!
Towing the vehicle, coasting, or driving for any
other reason with the transmission in NEUTRAL
can cause severe transmission damage.
If Recreational Towing
Úpage 138.
If Towing A Disabled Vehicle
Úpage 268.
4
21_RUV_OM_EN_USC_t.book Page 117