center console CHRYSLER VOYAGER 2021 Owners Manual
[x] Cancel search | Manufacturer: CHRYSLER, Model Year: 2021, Model line: VOYAGER, Model: CHRYSLER VOYAGER 2021Pages: 348, PDF Size: 18.73 MB
Page 52 of 348

50GETTING TO KNOW YOUR VEHICLE
UNIVERSAL GARAGE DOOR OPENER
(HOMELINK®) — IF EQUIPPED
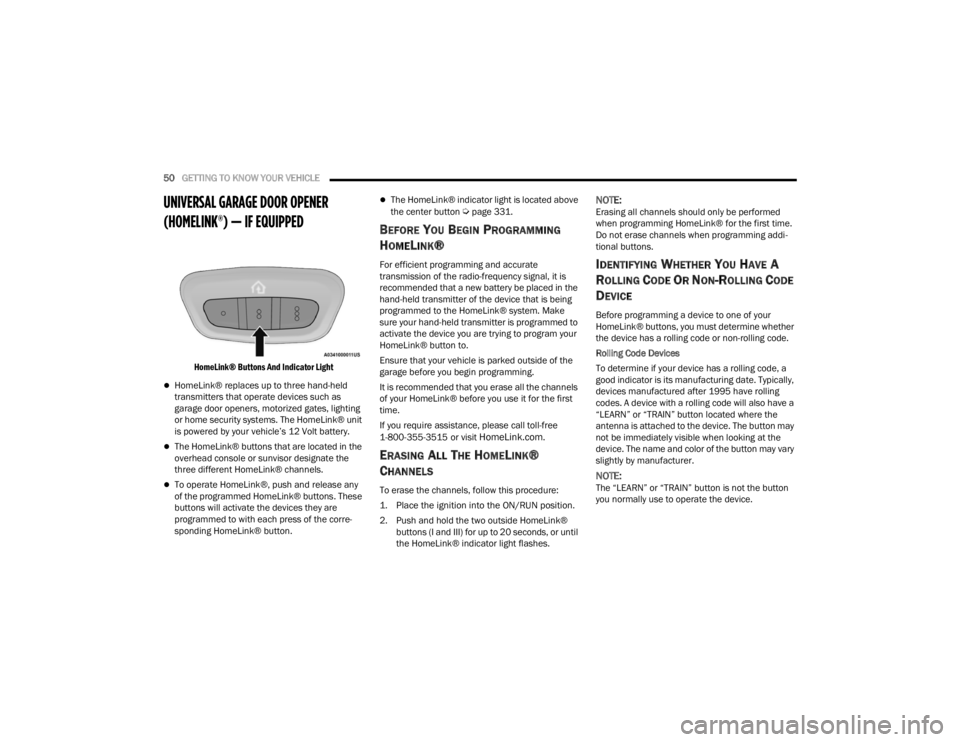
HomeLink® Buttons And Indicator Light
HomeLink® replaces up to three hand-held
transmitters that operate devices such as
garage door openers, motorized gates, lighting
or home security systems. The HomeLink® unit
is powered by your vehicle’s 12 Volt battery.
The HomeLink® buttons that are located in the
overhead console or sunvisor designate the
three different HomeLink® channels.
To operate HomeLink®, push and release any
of the programmed HomeLink® buttons. These
buttons will activate the devices they are
programmed to with each press of the corre -
sponding HomeLink® button.
The HomeLink® indicator light is located above
the center button Úpage 331.
BEFORE YOU BEGIN PROGRAMMING
H
OMELINK®
For efficient programming and accurate
transmission of the radio-frequency signal, it is
recommended that a new battery be placed in the
hand-held transmitter of the device that is being
programmed to the HomeLink® system. Make
sure your hand-held transmitter is programmed to
activate the device you are trying to program your
HomeLink® button to.
Ensure that your vehicle is parked outside of the
garage before you begin programming.
It is recommended that you erase all the channels
of your HomeLink® before you use it for the first
time.
If you require assistance, please call toll-free
1-800-355-3515 or visit
HomeLink.com.
ERASING ALL THE HOMELINK®
C
HANNELS
To erase the channels, follow this procedure:
1. Place the ignition into the ON/RUN position.
2. Push and hold the two outside HomeLink®
buttons (I and III) for up to 20 seconds, or until
the HomeLink® indicator light flashes.
NOTE:Erasing all channels should only be performed
when programming HomeLink® for the first time.
Do not erase channels when programming addi -
tional buttons.
IDENTIFYING WHETHER YOU HAVE A
R
OLLING CODE OR NON-ROLLING CODE
D
EVICE
Before programming a device to one of your
HomeLink® buttons, you must determine whether
the device has a rolling code or non-rolling code.
Rolling Code Devices
To determine if your device has a rolling code, a
good indicator is its manufacturing date. Typically,
devices manufactured after 1995 have rolling
codes. A device with a rolling code will also have a
“LEARN” or “TRAIN” button located where the
antenna is attached to the device. The button may
not be immediately visible when looking at the
device. The name and color of the button may vary
slightly by manufacturer.
NOTE:The “LEARN” or “TRAIN” button is not the button
you normally use to operate the device.
21_RUV_OM_EN_USC_t.book Page 50
Page 80 of 348

78GETTING TO KNOW YOUR VEHICLE
CIGAR LIGHTER — IF EQUIPPED
NOTE:Cigar lighters can be purchased at an authorized
dealer through Mopar® parts.
The cigar lighter is located at the bottom of the
instrument panel. Push lighter inward to heat.
After a few seconds, the lighter automatically
returns to its initial position and is ready to be
used.
SMOKER'S PACKAGE KIT — IF EQUIPPED
With the optional authorized dealer-installed
Smoker's Package Kit, a removable ash receiver is
inserted into one of the two cupholders in the
center floor console. To install the ash receiver,
align the receiver so the thumb grip on the lid is
facing rearward. Push the ash receiver into either
of the cup wells to secure. Pull upward on the ash
receiver to remove for cleaning and/or storage.
The left rear trim panel cupholder is designed to
accommodate a second ash receiver, if desired.
WINDOWS
POWER WINDOWS
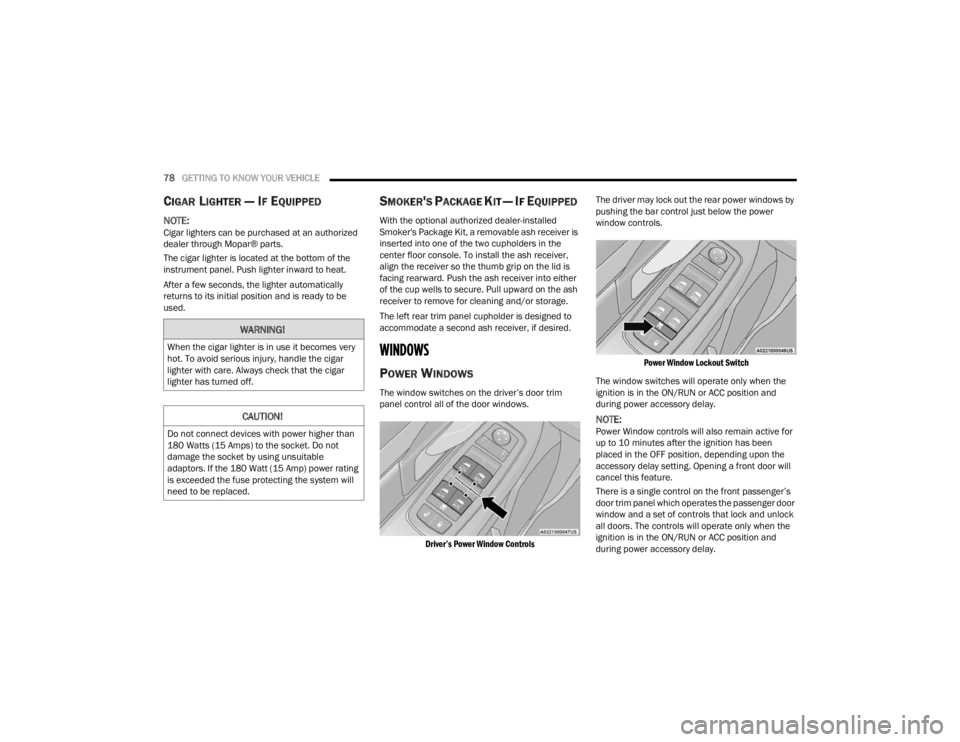
The window switches on the driver’s door trim
panel control all of the door windows.
Driver’s Power Window Controls
The driver may lock out the rear power windows by
pushing the bar control just below the power
window controls.
Power Window Lockout Switch
The window switches will operate only when the
ignition is in the ON/RUN or ACC position and
during power accessory delay.
NOTE:Power Window controls will also remain active for
up to 10 minutes after the ignition has been
placed in the OFF position, depending upon the
accessory delay setting. Opening a front door will
cancel this feature.
There is a single control on the front passenger’s
door trim panel which operates the passenger door
window and a set of controls that lock and unlock
all doors. The controls will operate only when the
ignition is in the ON/RUN or ACC position and
during power accessory delay.
WARNING!
When the cigar lighter is in use it becomes very
hot. To avoid serious injury, handle the cigar
lighter with care. Always check that the cigar
lighter has turned off.
CAUTION!
Do not connect devices with power higher than
180 Watts (15 Amps) to the socket. Do not
damage the socket by using unsuitable
adaptors. If the 180 Watt (15 Amp) power rating
is exceeded the fuse protecting the system will
need to be replaced.
21_RUV_OM_EN_USC_t.book Page 78
Page 117 of 348

STARTING AND OPERATING115
BRAKE/TRANSMISSION SHIFT
I
NTERLOCK (BTSI) SYSTEM
This vehicle is equipped with a BTSI that holds the
transmission gear selector in PARK unless the
brakes are applied. To shift the transmission out of
PARK, the engine must be running and the brake
pedal must be pressed. The brake pedal must also
be pressed to shift from NEUTRAL into DRIVE or
REVERSE when the vehicle is stopped or moving at
low speeds.
9-SPEED AUTOMATIC TRANSMISSION
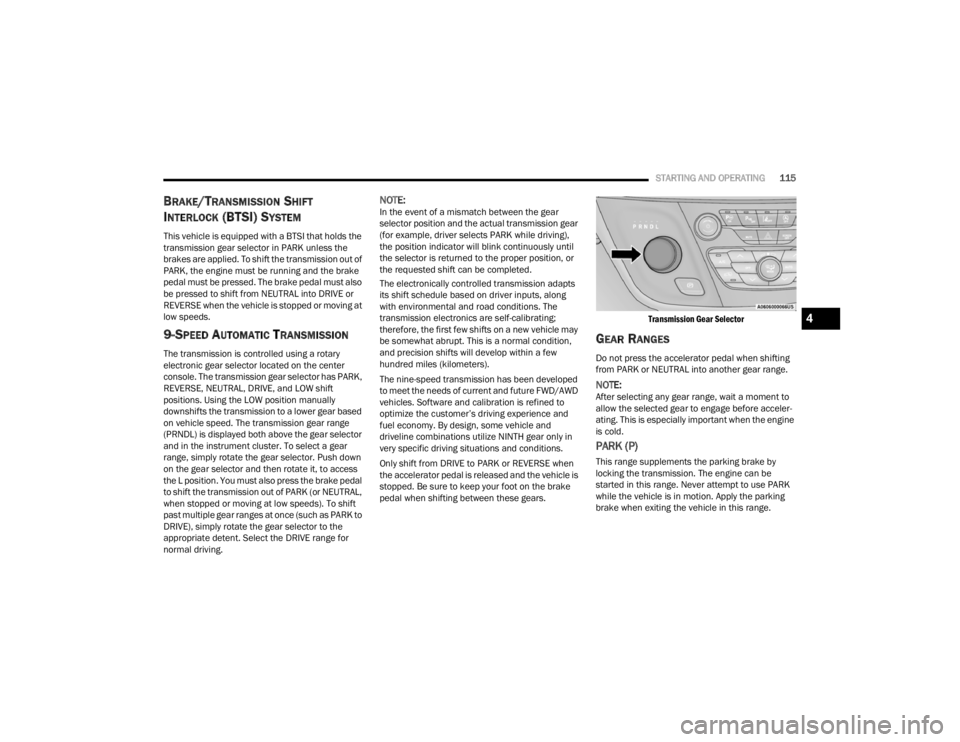
The transmission is controlled using a rotary
electronic gear selector located on the center
console. The transmission gear selector has PARK,
REVERSE, NEUTRAL, DRIVE, and LOW shift
positions. Using the LOW position manually
downshifts the transmission to a lower gear based
on vehicle speed. The transmission gear range
(PRNDL) is displayed both above the gear selector
and in the instrument cluster. To select a gear
range, simply rotate the gear selector. Push down
on the gear selector and then rotate it, to access
the L position. You must also press the brake pedal
to shift the transmission out of PARK (or NEUTRAL,
when stopped or moving at low speeds). To shift
past multiple gear ranges at once (such as PARK to
DRIVE), simply rotate the gear selector to the
appropriate detent. Select the DRIVE range for
normal driving.
NOTE:In the event of a mismatch between the gear
selector position and the actual transmission gear
(for example, driver selects PARK while driving),
the position indicator will blink continuously until
the selector is returned to the proper position, or
the requested shift can be completed.
The electronically controlled transmission adapts
its shift schedule based on driver inputs, along
with environmental and road conditions. The
transmission electronics are self-calibrating;
therefore, the first few shifts on a new vehicle may
be somewhat abrupt. This is a normal condition,
and precision shifts will develop within a few
hundred miles (kilometers).
The nine-speed transmission has been developed
to meet the needs of current and future FWD/AWD
vehicles. Software and calibration is refined to
optimize the customer’s driving experience and
fuel economy. By design, some vehicle and
driveline combinations utilize NINTH gear only in
very specific driving situations and conditions.
Only shift from DRIVE to PARK or REVERSE when
the accelerator pedal is released and the vehicle is
stopped. Be sure to keep your foot on the brake
pedal when shifting between these gears.
Transmission Gear Selector
GEAR RANGES
Do not press the accelerator pedal when shifting
from PARK or NEUTRAL into another gear range.
NOTE:After selecting any gear range, wait a moment to
allow the selected gear to engage before acceler
-
ating. This is especially important when the engine
is cold.
PARK (P)
This range supplements the parking brake by
locking the transmission. The engine can be
started in this range. Never attempt to use PARK
while the vehicle is in motion. Apply the parking
brake when exiting the vehicle in this range.
4
21_RUV_OM_EN_USC_t.book Page 115
Page 187 of 348

MULTIMEDIA185
Push and hold the VR button on the steering wheel,
or press and hold the Home button within Apple
CarPlay®, to activate Siri, which recognizes natural
voice commands to use a list of your iPhone’s®
features:
Phone
Music
Messages
Maps — If Equipped
Additional Apps — If Equipped
NOTE:Apple CarPlay® is a trademark of Apple® Inc.
iPhone® is a trademark of Apple® Inc., registered
in the US and other countries. Apple® terms of use
and privacy statements apply.
ANDROID AUTO™ AND APPLE
C
ARPLAY® TIPS AND TRICKS
Android Auto™ And Apple CarPlay® Automatic
Bluetooth® Pairing
After connecting to Android Auto™ or Apple
CarPlay® for the first time and undergoing the
setup procedure, the smartphone pairs to the
Uconnect system via Bluetooth® without any setup
required every time it is within range, if Bluetooth®
is turned on.
NOTE:Apple CarPlay® uses a USB connection while
Android Auto™ uses both USB and Bluetooth®
connections to function. The connected device is
unavailable to other devices when connected
using Android Auto™ or Apple CarPlay®.
Multiple Devices Connecting To The Uconnect
System — If Equipped
It is possible to have multiple devices connected to
the Uconnect system. For example, if using Android
Auto™/Apple CarPlay®, the connected device will
be used to place hands-free phone calls or send
hands-free text messages. However, another
device can also be paired to the Uconnect system,
via Bluetooth®, as an audio source, so the
passenger can stream music.
NOTE:Apple CarPlay® and Android Auto™ can only be
launched from the front and center console USB
ports.
RADIO OPERATION AND MOBILE PHONES
Under certain conditions, the mobile phone being
on in your vehicle can cause erratic or noisy
performance from your radio. This condition may
be lessened or eliminated by repositioning the
mobile phone within the vehicle. This condition is
not harmful to the radio. If your radio performance does not satisfactorily
improve from repositioning the mobile phone, it is
recommended that the volume be turned down or
off during mobile phone operation when not using
the Uconnect system.
REGULATORY AND SAFETY
I
NFORMATION
US/CANADA
Exposure to Radio Frequency Radiation
The radiated output power of the internal wireless
radio is far below the FCC and IC radio frequency
exposure limits. Nevertheless, the wireless radio
will be used in such a manner that the radio is
8 in (20 cm) or further from the human body.
The internal wireless radio operates within
guidelines found in radio frequency safety
standards and recommendations, which reflect
the consensus of the scientific community.
The radio manufacturer believes the internal
wireless radio is safe for use by consumers. The
level of energy emitted is far less than the
electromagnetic energy emitted by wireless
devices such as mobile phones. However, the use
of wireless radios may be restricted in some
situations or environments, such as aboard
airplanes. If you are unsure of restrictions, you are
encouraged to ask for authorization before turning
on the wireless radio
Úpage 331.
5
21_RUV_OM_EN_USC_t.book Page 185
Page 220 of 348

218SAFETY
Do not decrease OR increase the front passenger’s
seated weight on the front passenger seat
The front passenger’s seated weight must be
properly positioned on the front passenger seat.
Failure to do so may result in serious injury or
death. The OCS determines the most probable
classification of the occupant that it detects. The
OCS will detect the front passenger’s decreased or
increased seated weight, which may result in an
adjusted inflation rate of the Passenger Advanced
Front Air Bag in a collision. This does not mean that
the OCS is working improperly. Decreasing the
front passenger’s seated weight on the front
passenger seat may result in a reduced-power
deployment of the Passenger Advanced Front Air
Bag. Increasing the front passenger’s seated
weight on the front passenger seat may result in a
full-power deployment of the Passenger Advanced
Front Air Bag.
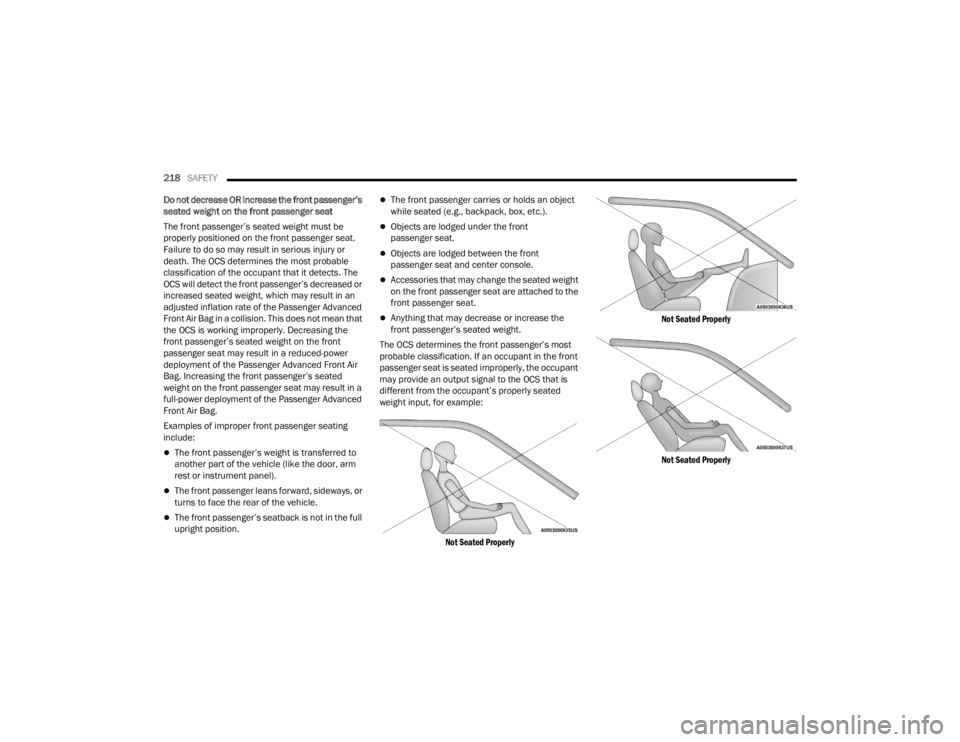
Examples of improper front passenger seating
include:
The front passenger’s weight is transferred to
another part of the vehicle (like the door, arm
rest or instrument panel).
The front passenger leans forward, sideways, or
turns to face the rear of the vehicle.
The front passenger’s seatback is not in the full
upright position.
The front passenger carries or holds an object
while seated (e.g., backpack, box, etc.).
Objects are lodged under the front
passenger seat.
Objects are lodged between the front
passenger seat and center console.
Accessories that may change the seated weight
on the front passenger seat are attached to the
front passenger seat.
Anything that may decrease or increase the
front passenger’s seated weight.
The OCS determines the front passenger’s most
probable classification. If an occupant in the front
passenger seat is seated improperly, the occupant
may provide an output signal to the OCS that is
different from the occupant’s properly seated
weight input, for example:
Not Seated Properly Not Seated Properly
Not Seated Properly
21_RUV_OM_EN_USC_t.book Page 218
Page 301 of 348

SERVICING AND MAINTENANCE299
BULB REPLACEMENT
Replacement Bulbs
NOTE:See an authorized dealer for LED bulb replacement.
Interior Bulbs
Lamps Bulb Number
Center & Rear Dome Lamp LED (Serviced at an authorized dealer)
Center & Rear Reading Lamps LED (Serviced at an authorized dealer)
Front Door Courtesy Lamp LED (Serviced at an authorized dealer)
Front Header Reading Lamps – If Equipped LED (Serviced at an authorized dealer)
Instrument Cluster Lamps LED (Serviced at an authorized dealer)
Liftgate Lamp(s) LED (Serviced at an authorized dealer)
Overhead Console Reading Lamps LED (Serviced at an authorized dealer)
Removable Console Lamp – If Equipped LED (Serviced at an authorized dealer)
Visor Vanity Lamps 6501966
8
21_RUV_OM_EN_USC_t.book Page 299