maintenance oil CHRYSLER VOYAGER 2022 Owners Manual
[x] Cancel search | Manufacturer: CHRYSLER, Model Year: 2022, Model line: VOYAGER, Model: CHRYSLER VOYAGER 2022Pages: 316, PDF Size: 17.41 MB
Page 5 of 316
3
EXTERIOR LIGHTS ................................................. 54 Multifunction Lever ..........................................54
Headlight Switch...............................................54
Daytime Running Lights (DRLs) —
If Equipped........................................................55
High/Low Beam Switch....................................55
Flash-To-Pass ..................................................55
Automatic Headlights — If Equipped ...............55
Headlight Time Delay — If Equipped ...............56
Lights-On Reminder..........................................56
Front Fog Lights — If Equipped ........................56
Turn Signals ......................................................56
Lane Change Assist — If Equipped ..................57
Battery Protection ...........................................57
INTERIOR LIGHTS .................................................. 57
Interior Courtesy Lights ...................................57
WINDSHIELD WIPER AND WASHERS ................ 58
Windshield Wiper Operation ............................58
Rear Wiper And Washer ...................................60
CLIMATE CONTROLS ............................................. 60
Manual Climate Control Descriptions And
Functions ..........................................................60
Operating Tips ..................................................65
INTERIOR STORAGE AND EQUIPMENT ............... 66
Storage..............................................................66
Sun Screens — If Equipped..............................69
USB/AUX Control .............................................69
Power Outlets ...................................................70 WINDOWS ...............................................................72
Power Windows ................................................72
Automatic Window Features ...........................73
Reset Auto Up...................................................74
Wind Buffeting ..................................................74
HOOD ...................................................................74
Opening.............................................................74
Closing ..............................................................75
LIFTGATE ................................................................. 75
To Unlock/Open The Liftgate...........................75
To Lock/Close The Liftgate ..............................76
Power Liftgate — If Equipped ...........................76
Cargo Area Features ....................................77
STOW ‘N PLACE ROOF RACK —
IF EQUIPPED ...........................................................77
Deploying The Crossbars .................................78
Stowing The Crossbars ....................................79
GETTING TO KNOW YOUR
INSTRUMENT PANEL
INSTRUMENT CLUSTER .........................................82Instrument Cluster Descriptions .....................83
INSTRUMENT CLUSTER .........................................84
Instrument Cluster Descriptions .....................85 INSTRUMENT CLUSTER DISPLAY ........................ 85
Instrument Cluster Display Location And
Controls............................................................. 86
Oil Life Reset .................................................... 87
KeySense Cluster Messages —
If Equipped .......................................................87
Instrument Cluster Display Menu Items ........ 88
Battery Saver On/Battery Saver Mode
Message — Electrical Load Reduction
Actions — If Equipped ...................................... 93
TRIP COMPUTER ................................................... 94
WARNING LIGHTS AND MESSAGES ................... 95
Red Warning Lights ..........................................95
Yellow Warning Lights ...................................... 98
Yellow Indicator Lights .................................. 101 Green Indicator Lights .................................. 101White Indicator Lights ................................... 101
Blue Indicator Lights ..................................... 101
ONBOARD DIAGNOSTIC SYSTEM — OBD II ...... 102
Onboard Diagnostic System
(OBD II) Cybersecurity ................................... 102
EMISSIONS INSPECTION AND
MAINTENANCE PROGRAMS............................... 103
22_RUVG_OM_EN_USC_t.book Page 3
Page 7 of 316
5
SAFETY
SAFETY FEATURES .............................................. 158Anti-Lock Brake System (ABS) ..................... 158
Rear Seat Reminder Alert (RSRA) ................ 159
Electronic Brake Control (EBC) System ...... 159
AUXILIARY DRIVING SYSTEMS .......................... 164
Blind Spot Monitoring (BSM) —
If Equipped..................................................... 164
Forward Collision Warning (FCW) With
Mitigation — If Equipped ............................... 168
Tire Pressure Monitoring System
(TPMS)............................................................ 171
OCCUPANT RESTRAINT SYSTEMS .................... 174
Occupant Restraint Systems Features ....... 174Important Safety Precautions....................... 174
Seat Belt Systems ........................................ 175
Supplemental Restraint Systems (SRS) ...... 184
Child Restraints ........................................... 197
SAFETY TIPS ......................................................213
Transporting Passengers .............................. 213Transporting Pets ....................................... 214
Safety Checks You Should Make
Inside The Vehicle ........................................ 214
Periodic Safety Checks You Should Make
Outside The Vehicle ...................................... 215Exhaust Gas ................................................... 216Carbon Monoxide Warnings ......................... 216
IN CASE OF EMERGENCY
HAZARD WARNING FLASHERS......................... 217
ASSIST AND SOS MIRROR — IF EQUIPPED ..... 217
JACKING AND TIRE CHANGING —
IF EQUIPPED ..................................................... 220 Preparations For Jacking ............................. 221
Jack And Spare Tire Location ....................... 221
Equipment Removal ..................................... 221
Jacking Instructions .................................... 223
Road Tire Installation .................................... 226
Portable Air Compressor —
If Equipped..................................................... 227Return Inflatable Spare Tire ....................... 228
TIRE SERVICE KIT — IF EQUIPPED .................... 228
JUMP STARTING .................................................. 234 Preparations For Jump Start ........................ 234
Jump Starting Procedure .............................. 235
REFUELING IN EMERGENCY –
IF EQUIPPED ....................................................... 236
IF YOUR ENGINE OVERHEATS ........................... 237
MANUAL PARK RELEASE .................................. 238
FREEING A STUCK VEHICLE .............................. 239
TOWING A DISABLED VEHICLE ......................... 240
ENHANCED ACCIDENT RESPONSE SYSTEM
(EARS) .................................................................. 242
EVENT DATA RECORDER (EDR) ........................ 242
SERVICING AND MAINTENANCE
SCHEDULED SERVICING ..................................... 243
Maintenance Plan ......................................... 244
ENGINE COMPARTMENT .................................... 247
3.6L Engine ................................................... 247
Checking Oil Level ......................................... 248
Adding Washer Fluid .................................... 248
Maintenance-Free Battery ........................... 248
Pressure Washing ......................................... 249
VEHICLE MAINTENANCE ..................................... 249
Engine Oil ...................................................... 249
Engine Oil Filter ........................................... 250
Engine Air Cleaner Filter ............................ 250
Accessory Drive Belt Inspection ................... 250Air Conditioner Maintenance ....................... 251
Body Lubrication ........................................... 253
Windshield Wiper Blades ............................. 253Exhaust System ............................................ 256
Cooling System.............................................. 258
Brake System ................................................ 261
Automatic Transmission .............................. 262
Fuses.............................................................. 263
Bulb Replacement ........................................ 272
22_RUVG_OM_EN_USC_t.book Page 5
Page 89 of 316
GETTING TO KNOW YOUR INSTRUMENT PANEL87
The instrument cluster display (base/premium
cluster) features a driver interactive display that is
located in the center of the instrument cluster, and
may include the following menu/submenu items:
Speedometer
Vehicle Info
Driver Assist — If Equipped
Fuel Economy
Trip (Trip A / Trip B)
Stop / Start — If Equipped
Audio
Messages
Screen Setup
OIL LIFE RESET
Your vehicle is equipped with an engine oil
change indicator system. The “Oil Change
Required” message will display for approxi -
mately five seconds after a single chime has
sounded, to indicate it is time to change the
engine oil. The engine oil change indicator
system is duty cycle based, which means the
engine oil change interval may fluctuate, depen -
dent upon your personal driving style.
Unless reset, this message will continue to
display each time the ignition is cycled to the
ON/RUN position.
To reset the oil change indicator after
performing the scheduled maintenance, refer to
the following procedure.
NOTE:This procedure should only be performed after
scheduled maintenance is completed. Resetting
oil life other than when associated with a
scheduled maintenance may result in damage due
to not properly maintaining the engine oil.
Oil Life Reset
1. Without pressing the brake pedal, push the ENGINE START/STOP button and place the
ignition in the ON/RUN position (do not start
the vehicle.)
2. Push the OK button to enter the instrument
cluster display menu screen.
3. Push and release the down arrow button to
access the ”Vehicle Info” menu screen.
4. Push the left arrow button or right arrow
button to access the “Oil Life” submenu.
5. Hold the OK button to reset the “Oil Life” to
100%.
6. Push the up arrow button to exit the
instrument cluster display menu screen. Secondary Method For Oil Life Reset Procedure
1. Without pushing the brake pedal, place the
ignition in the ON/RUN position (do not start
the engine).
2. Fully press the accelerator pedal, slowly, three times within 10 seconds.
3. Without pushing the brake pedal, place the ignition in the OFF position.
NOTE:If the indicator message illuminates when you start
the vehicle, the oil change indicator system did not
reset. If necessary, repeat this procedure.
KEYSENSE CLUSTER MESSAGES —
I
F EQUIPPED
When the KeySense key is in use there will be:
Continuous, dedicated telltale
Unique Display Splash Screen
With KeySense in use there will be multiple
associated messages shown in the following table:
3
22_RUVG_OM_EN_USC_t.book Page 87
Page 218 of 316
216SAFETY
EXHAUST GAS The best protection against carbon monoxide entry
into the vehicle body is a properly maintained
engine exhaust system.
Whenever a change is noticed in the sound of the
exhaust system, when exhaust fumes can be
detected inside the vehicle, or when the underside
or rear of the vehicle is damaged, have an
authorized dealer inspect the complete exhaust
system and adjacent body areas for broken,
damaged, deteriorated, or mispositioned parts.
Open seams or loose connections could permit
exhaust fumes to seep into the passenger
compartment. In addition, inspect the exhaust
system each time the vehicle is raised for
lubrication or oil change. Replace as required.CARBON MONOXIDE WARNINGS
WARNING!
Exhaust gases can injure or kill. They contain
carbon monoxide (CO), which is colorless and
odorless. Breathing it can make you
unconscious and can eventually poison you. To
avoid breathing (CO), follow these safety tips:
Do not run the engine in a closed garage or in
confined areas any longer than needed to
move your vehicle in or out of the area.
If you are required to drive with the trunk/lift -
gate/rear doors open, make sure that all
windows are closed and the climate control
BLOWER switch is set at high speed. DO NOT
use the recirculation mode.
If it is necessary to sit in a parked vehicle with
the engine running, adjust your heating or
cooling controls to force outside air into the
vehicle. Set the blower at high speed.
WARNING!
Carbon monoxide (CO) in exhaust gases is
deadly. Follow the precautions below to prevent
carbon monoxide poisoning:
Do not inhale exhaust gases. They contain
carbon monoxide, a colorless and odorless
gas, which can kill. Never run the engine in a
closed area, such as a garage, and never sit in
a parked vehicle with the engine running for
an extended period. If the vehicle is stopped in
an open area with the engine running for more
than a short period, adjust the ventilation
system to force fresh, outside air into the
vehicle.
Guard against carbon monoxide with proper
maintenance. Have the exhaust system
inspected every time the vehicle is raised.
Have any abnormal conditions repaired
promptly. Until repaired, drive with all side
windows fully open.
22_RUVG_OM_EN_USC_t.book Page 216
Page 245 of 316
243
SERVICING AND MAINTENANCE
SCHEDULED SERVICING
Your vehicle is equipped with an automatic oil
change indicator system. The oil change indicator
system will remind you that it is time to take your
vehicle in for scheduled maintenance.
Based on engine operation conditions, the oil
change indicator message will illuminate. This
means that service is required for your vehicle.
Operating conditions such as frequent short-trips,
trailer tow, extremely hot or cold ambient
temperatures will influence when the “Oil Change
Required” message is displayed. Have your vehicle
serviced as soon as possible, within the next
500 miles (805 km).An authorized dealer will reset the oil change
indicator message after completing the scheduled
oil change. If a scheduled oil change is performed
by someone other than an authorized dealer
Úpage 86.
NOTE:Under no circumstances should oil change
intervals exceed 10,000 miles (16,000 km),
12 months or 350 hours of engine run time,
whichever comes first. The 350 hours of engine
run or idle time is generally only a concern for fleet
customers.
Once A Month Or Before A Long Trip:
Check engine oil level.
Check windshield washer fluid level.
Check tire pressure and look for unusual wear
or damage. Rotate tires at the first sign of irreg
-
ular wear, even if it occurs before the oil indi -
cator system turns on.
Check the fluid levels of the coolant reservoir
and brake master cylinder, fill as needed.
Check function of all interior and exterior lights.
8
22_RUVG_OM_EN_USC_t.book Page 243
Page 246 of 316
244SERVICING AND MAINTENANCE
MAINTENANCE PLAN
Refer to the Maintenance Plan for required maintenance.
At Every Oil Change Interval As Indicated By Oil Change Indicator System:
Change oil and filter.
Rotate the tires at the first sign of irregular wear, even if it occurs before the oil indicator system turns on.
Inspect battery and clean and tighten terminals as required.
Inspect the CV/Universal joints.
Inspect brake pads, shoes, rotors, drums, hoses and parking brake.
Inspect engine cooling system protection and hoses.
Inspect exhaust system.
Inspect engine air cleaner filter if using in dusty or off-road conditions. If required, replace engine air cleaner filter.
22_RUVG_OM_EN_USC_t.book Page 244
Page 249 of 316
SERVICING AND MAINTENANCE247
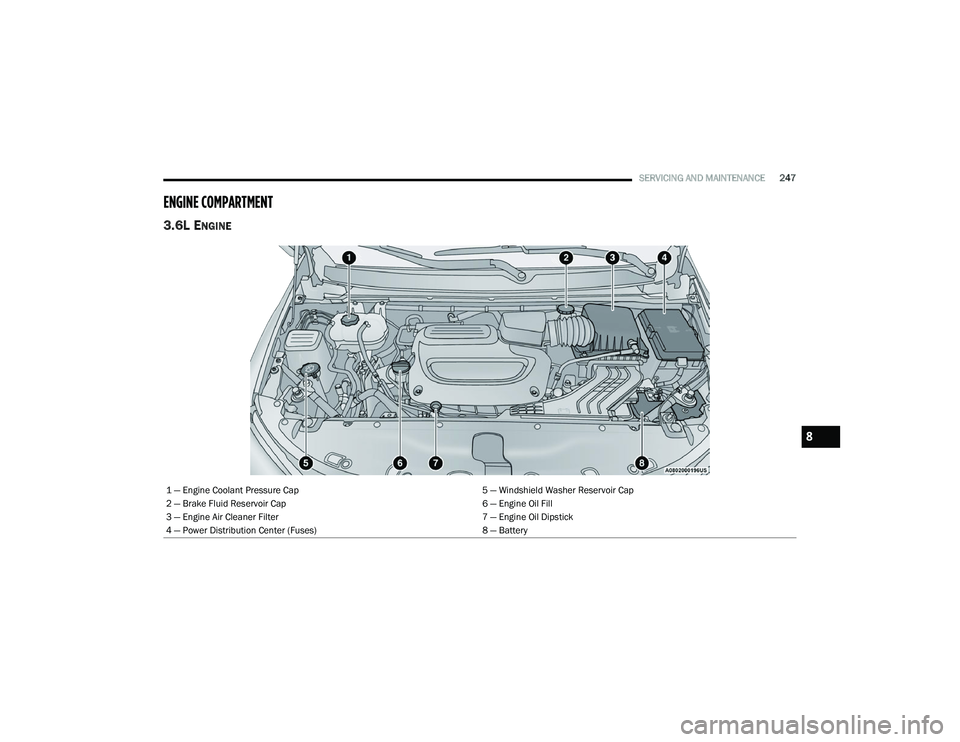
ENGINE COMPARTMENT
3.6L ENGINE
1 — Engine Coolant Pressure Cap 5 — Windshield Washer Reservoir Cap
2 — Brake Fluid Reservoir Cap 6 — Engine Oil Fill
3 — Engine Air Cleaner Filter 7 — Engine Oil Dipstick
4 — Power Distribution Center (Fuses) 8 — Battery
8
22_RUVG_OM_EN_USC_t.book Page 247
Page 250 of 316
248SERVICING AND MAINTENANCE
CHECKING OIL LEVEL
To ensure proper engine lubrication, the engine oil
must be maintained at the correct level. Check the
oil level at regular intervals, such as every fuel
stop. The best time to check the engine oil level is
about five minutes after a fully warmed up engine
is shut off.
Checking the oil while the vehicle is on level ground
will improve the accuracy of the oil level readings.
There are four possible dipstick types:
Crosshatched zone.
Crosshatched zone marked SAFE.
Crosshatched zone marked with MIN at the low
end of the range and MAX at the high end of the
range.
Crosshatched zone marked with dimples at the
MIN and the MAX ends of the range.
NOTE:Always maintain the oil level within the crosshatch
markings on the dipstick.
Adding 1 quart (1 liter) of oil when the reading is at
the low end of the dipstick range will raise the oil
level to the high end of the range marking.
ADDING WASHER FLUID
The fluid reservoir is located in the front of the
engine compartment. Be sure to check the fluid
level in the reservoir at regular intervals. Fill the
reservoir with windshield washer solvent (not
radiator antifreeze) and operate the system for a
few seconds to flush out the residual washer fluid.
When refilling the washer fluid reservoir, take
some washer fluid, apply it to a cloth or towel, and
wipe clean the wiper blades; this will help blade
performance.
To prevent freeze-up of your windshield washer
system in cold weather, select a solution or mixture
that meets or exceeds the temperature range of
your climate. This rating information can be found
on most washer fluid containers.
MAINTENANCE-FREE BATTERY
Your vehicle is equipped with a maintenance-free
battery. You will never have to add water, and
periodic maintenance is not required.
CAUTION!
Overfilling or underfilling the crankcase will
cause aeration or loss of oil pressure. This could
damage your engine.
WARNING!
Commercially available windshield washer
solvents are flammable. They could ignite and
burn you. Care must be exercised when filling or
working around the washer solution.
WARNING!
Battery fluid is a corrosive acid solution and
can burn or even blind you. Do not allow
battery fluid to contact your eyes, skin, or
clothing. Do not lean over a battery when
attaching clamps. If acid splashes in eyes or
on skin, flush the area immediately with large
amounts of water
Úpage 234.
Battery gas is flammable and explosive. Keep
flame or sparks away from the battery. Do not
use a booster battery or any other booster
source with an output greater than 12 Volts.
Do not allow cable clamps to touch each
other.
Battery posts, terminals, and related accesso -
ries contain lead and lead compounds. Wash
hands after handling.
22_RUVG_OM_EN_USC_t.book Page 248
Page 251 of 316
SERVICING AND MAINTENANCE249
PRESSURE WASHING
Cleaning the engine compartment with a high
pressure washer is not recommended.
VEHICLE MAINTENANCE
An authorized dealer has the qualified service
personnel, special tools, and equipment to
perform all service operations in an expert
manner. Service Manuals are available which
include detailed service information for your
vehicle. Refer to these Service Manuals before
attempting any procedure yourself.
NOTE:Intentional tampering with emissions control
systems may void your warranty and could result in
civil penalties being assessed against you.
ENGINE OIL
Engine Oil Selection
Use only the manufacturer's recommended fluid Úpage 299.
American Petroleum Institute (API)
Approved Engine Oil
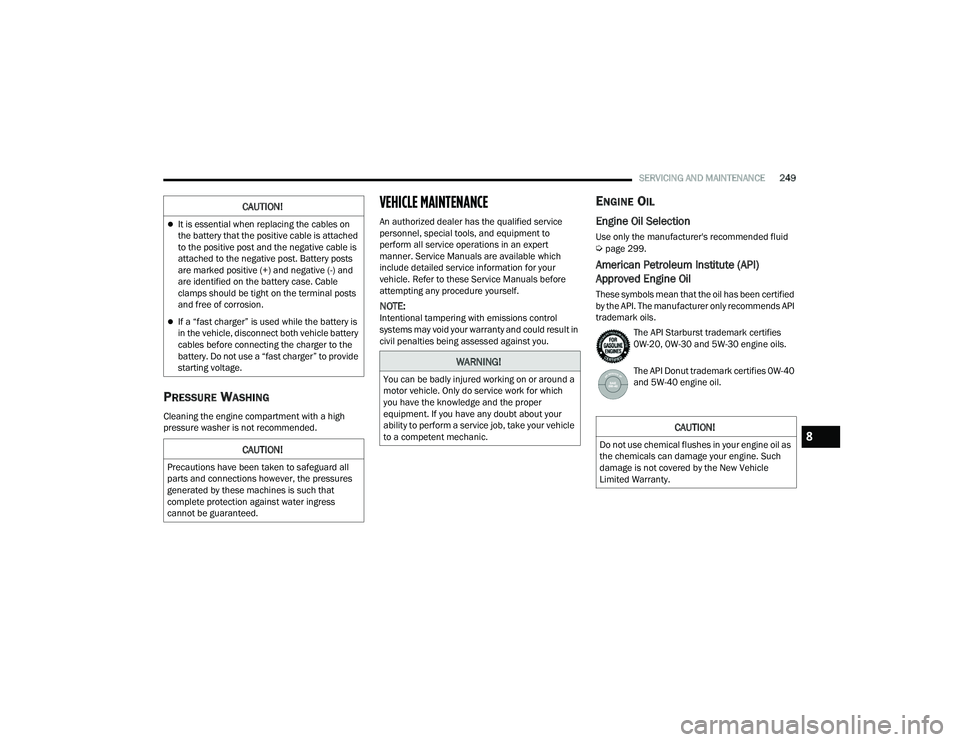
These symbols mean that the oil has been certified
by the API. The manufacturer only recommends API
trademark oils.
The API Starburst trademark certifies
0W-20, 0W-30 and 5W-30 engine oils.
The API Donut trademark certifies 0W-40
and 5W-40 engine oil.
CAUTION!
It is essential when replacing the cables on
the battery that the positive cable is attached
to the positive post and the negative cable is
attached to the negative post. Battery posts
are marked positive (+) and negative (-) and
are identified on the battery case. Cable
clamps should be tight on the terminal posts
and free of corrosion.
If a “fast charger” is used while the battery is
in the vehicle, disconnect both vehicle battery
cables before connecting the charger to the
battery. Do not use a “fast charger” to provide
starting voltage.
CAUTION!
Precautions have been taken to safeguard all
parts and connections however, the pressures
generated by these machines is such that
complete protection against water ingress
cannot be guaranteed.
WARNING!
You can be badly injured working on or around a
motor vehicle. Only do service work for which
you have the knowledge and the proper
equipment. If you have any doubt about your
ability to perform a service job, take your vehicle
to a competent mechanic.
CAUTION!
Do not use chemical flushes in your engine oil as
the chemicals can damage your engine. Such
damage is not covered by the New Vehicle
Limited Warranty.8
22_RUVG_OM_EN_USC_t.book Page 249
Page 252 of 316
250SERVICING AND MAINTENANCE
Synthetic Engine Oils
Your engine was designed for synthetic engine oils,
only use synthetic API approved engine oils.
Synthetic engine oils which do not have both the
correct API trademark and the correct SAE viscosity
grade numbers should not be used.
Materials Added To Engine Oil
The manufacturer strongly recommends against
the addition of any additives (other than leak
detection dyes) to the engine oil. Engine oil is an
engineered product and its performance may be
impaired by supplemental additives.
Disposing Of Used Engine Oil And Oil
Filters
Care should be taken in disposing of used engine
oil and oil filters from your vehicle. Used oil and oil
filters, indiscriminately discarded, can present a
problem to the environment. Contact an
authorized dealer, service station or governmental
agency for advice on how and where used oil and
oil filters can be safely discarded in your area.
ENGINE OIL FILTER
The engine oil filter should be replaced with a new
filter at every engine oil change.
Engine Oil Filter Selection
A full-flow type disposable oil filter should be used
for replacement. The quality of replacement filters
varies considerably. Only high quality Mopar®
certified filters should be used.
ENGINE AIR CLEANER FILTER
For the proper maintenance intervals Úpage 244.Engine Air Cleaner Filter Selection
The quality of replacement filters varies
considerably. Only high quality Mopar® certified
filters should be used.
ACCESSORY DRIVE BELT INSPECTION
WARNING!
The air induction system (air cleaner, hoses,
etc.) can provide a measure of protection in the
case of engine backfire. Do not remove the air
induction system (air cleaner, hoses, etc.) unless
such removal is necessary for repair or
maintenance. Make sure that no one is near the
engine compartment before starting the vehicle
with the air induction system (air cleaner, hoses,
etc.) removed. Failure to do so can result in
serious personal injury.
WARNING!
Do not attempt to inspect an accessory drive
belt with vehicle running.
When working near the radiator cooling fan,
disconnect the fan motor lead. The fan is
temperature controlled and can start at any
time regardless of ignition mode. You could be
injured by the moving fan blades.
You can be badly injured working on or around
a motor vehicle. Only do service work for which
you have the knowledge and the proper equip
-
ment. If you have any doubt about your ability
to perform a service job, take your vehicle to a
competent mechanic.
22_RUVG_OM_EN_USC_t.book Page 250