power steering CHRYSLER VOYAGER 2022 Owners Manual
[x] Cancel search | Manufacturer: CHRYSLER, Model Year: 2022, Model line: VOYAGER, Model: CHRYSLER VOYAGER 2022Pages: 316, PDF Size: 17.41 MB
Page 4 of 316
2
INTRODUCTION
SYMBOLS KEY ...........................................................8
VEHICLE MODIFICATIONS/ALTERATIONS .............8
SYMBOL GLOSSARY.................................................8
GETTING TO KNOW YOUR VEHICLE
KEYS ........................................................................ 12 Key Fob .............................................................12
SENTRY KEY ........................................................... 15
IGNITION SWITCH .................................................. 15
Keyless Enter ‘n Go™ Ignition .........................15
REMOTE START — IF EQUIPPED .......................... 17
How To Use Remote Start ................................17
To Exit Remote Start Mode ..............................18
Remote Start Front Defrost Activation —
If Equipped........................................................18
Remote Start Comfort Systems —
If Equipped........................................................18
Remote Start Windshield Wiper De-Icer
Activation — If Equipped ..................................19
Remote Start Cancel Message ........................19
VEHICLE SECURITY SYSTEM — IF EQUIPPED ..... 19
To Arm The System .........................................19
To Disarm The System .....................................19
Rearming Of The System .................................20 DOORS .....................................................................20
Manual Door Locks — If Equipped ..................20
Power Door Locks — If Equipped.....................21
Keyless Enter ‘n Go™ — Passive Entry............21
Automatic Unlock Doors On Exit —
If Equipped........................................................24
Manual Sliding Side Door ................................24
Power Sliding Side Door —
If Equipped........................................................24
Child Protection Door Lock System —
Rear Doors ........................................................25
STEERING WHEEL ..................................................26
Tilt/Telescoping Steering Column ...................26
Heated Steering Wheel —
If Equipped........................................................27
SEATS ......................................................................27
Manual Adjustment (Front Seats) —
If Equipped........................................................28
Manual Adjustment (Rear Seats) ....................29
Power Adjustment (Front Seats) —
If Equipped........................................................41
Heated Seats ...................................................43
Adjustable Armrest (Front Seats) —
If Equipped........................................................43
Head Restraints ...............................................44
UCONNECT VOICE RECOGNITION .........................47
Introducing Voice Recognition.........................47
Basic Voice Commands ...................................47
Get Started .......................................................47
Additional Information .....................................48 MIRRORS ................................................................ 48
Inside Rearview Mirror..................................... 48
Illuminated Vanity Mirrors —
If Equipped ...................................................... 48
Outside Mirrors ................................................ 49
Conversation Mirror ......................................... 49
Power Mirrors — If Equipped .......................... 49
Outside Mirrors Folding Feature ..................... 50
UNIVERSAL GARAGE DOOR OPENER
(HOMELINK®) — IF EQUIPPED ............................. 50
Before You Begin Programming
HomeLink® ...................................................... 50
Erasing All The HomeLink® Channels ............ 50
Identifying Whether You Have A Rolling
Code Or Non-Rolling Code Device ................... 51
Programming HomeLink® To A Garage
Door Opener ..................................................... 51
Programming HomeLink® To A
Miscellaneous Device ...................................... 52
Reprogramming A Single HomeLink®
Button ............................................................... 52
Canadian/Gate Operator Programming ......... 52
Security ............................................................. 53
Troubleshooting Tips........................................ 53
22_RUVG_OM_EN_USC_t.book Page 2
Page 6 of 316
4
STARTING AND OPERATING
STARTING THE ENGINE ....................................... 104
Normal Starting ............................................. 104
AutoPark ........................................................ 105Cold Weather Operation
(Below –22°F Or −30°C) ............................ 107
After Starting — Warming Up The Engine..... 107
If Engine Fails To Start ................................. 107To Turn Off The Engine Using ENGINE
START/STOP Button ...................................... 108
ENGINE BLOCK HEATER — IF EQUIPPED .......... 108
ENGINE BREAK-IN RECOMMENDATIONS ......... 108
PARKING BRAKE ................................................. 109
Electric Park Brake (EPB) ............................. 109
AUTOMATIC TRANSMISSION.............................. 111
Ignition Park Interlock ................................... 112Brake/Transmission Shift Interlock (BTSI)
System ........................................................... 1139-Speed Automatic Transmission ............... 113
Gear Ranges .................................................. 113
ACTIVE NOISE CANCELLATION .......................... 116
POWER STEERING ............................................... 116 STOP/START SYSTEM — IF EQUIPPED ............. 117
Autostop Mode .............................................. 117
Possible Reasons The Engine Does Not
Autostop......................................................... 117
To Start The Engine While In Auto
Stop/Start ...................................................... 118
To Manually Turn Off The
Stop/Start System......................................... 118
To Manually Turn On The Stop/Start
System ........................................................... 119
System Malfunction ...................................... 119
CRUISE CONTROL SYSTEMS —
IF EQUIPPED ........................................................ 119
Cruise Control ................................................ 119
PARKSENSE REAR PARK ASSIST —
IF EQUIPPED ....................................................... 121
ParkSense Sensors ....................................... 122
ParkSense Warning Display ......................... 122
ParkSense Display ........................................ 122Enabling And Disabling ParkSense .............. 125Service The ParkSense Rear Park
Assist System ................................................ 125Cleaning The ParkSense System ................. 125
ParkSense System Usage Precautions........ 125
PARKVIEW REAR BACK UP CAMERA............... 126
REFUELING THE VEHICLE ................................... 127
VEHICLE LOADING .............................................. 128 Certification Label ......................................... 128 TRAILER TOWING ................................................ 129
Common Towing Definitions......................... 130
Trailer Hitch Classification............................ 131
Trailer Towing Weights
(Maximum Trailer Weight Ratings)............... 132
Vehicle Loading Chart ................................... 132
Trailer And Tongue Weight .......................... 134
Towing Requirements .................................. 134Towing Tips ................................................... 136
RECREATIONAL TOWING
(BEHIND MOTORHOME) ...................................... 137
Towing This Vehicle Behind Another
Vehicle ........................................................... 137
DRIVING TIPS ....................................................... 138
Driving On Slippery Surfaces ........................ 138Driving Through Water .................................. 138
MULTIMEDIA
UCONNECT SYSTEMS .......................................... 140
CYBERSECURITY .................................................. 140
UCONNECT SETTINGS ......................................... 141
Customer Programmable Features ............. 141
RADIO OPERATION AND MOBILE PHONES...... 157
Regulatory And Safety Information .............. 157
22_RUVG_OM_EN_USC_t.book Page 4
Page 11 of 316
9
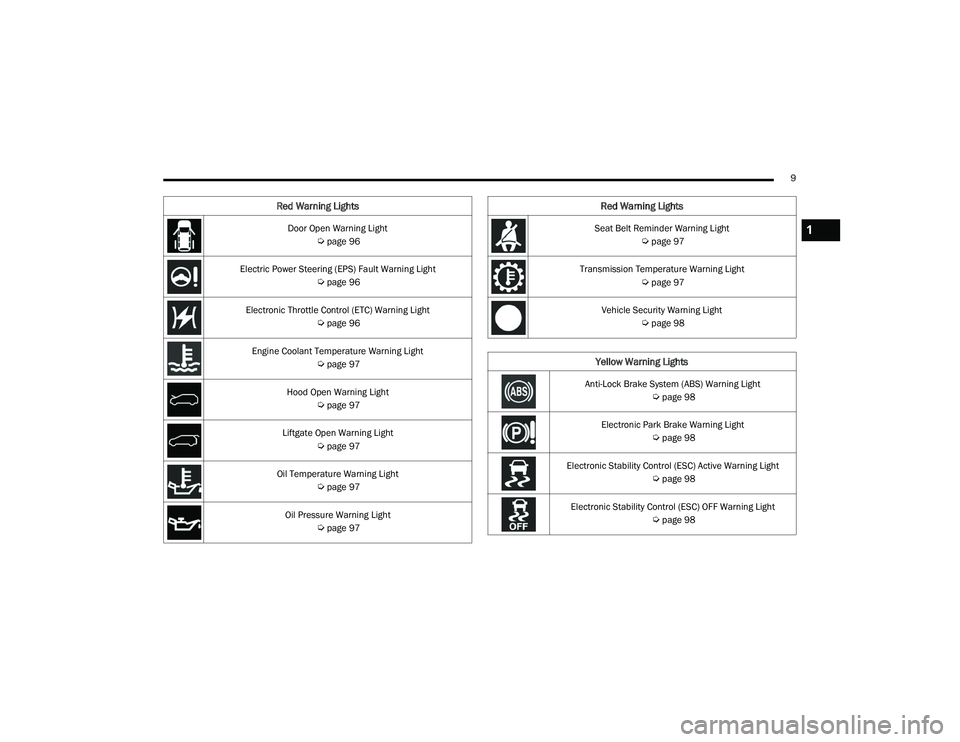
Door Open Warning Light
Úpage 96
Electric Power Steering (EPS) Fault Warning Light
Úpage 96
Electronic Throttle Control (ETC) Warning Light
Úpage 96
Engine Coolant Temperature Warning Light
Úpage 97
Hood Open Warning Light
Úpage 97
Liftgate Open Warning Light
Úpage 97
Oil Temperature Warning Light
Úpage 97
Oil Pressure Warning Light
Úpage 97
Red Warning Lights
Seat Belt Reminder Warning Light
Úpage 97
Transmission Temperature Warning Light
Úpage 97
Vehicle Security Warning Light
Úpage 98
Yellow Warning Lights
Anti-Lock Brake System (ABS) Warning Light
Úpage 98
Electronic Park Brake Warning Light
Úpage 98
Electronic Stability Control (ESC) Active Warning Light
Úpage 98
Electronic Stability Control (ESC) OFF Warning Light
Úpage 98
Red Warning Lights
1
22_RUVG_OM_EN_USC_t.book Page 9
Page 28 of 316
26GETTING TO KNOW YOUR VEHICLE
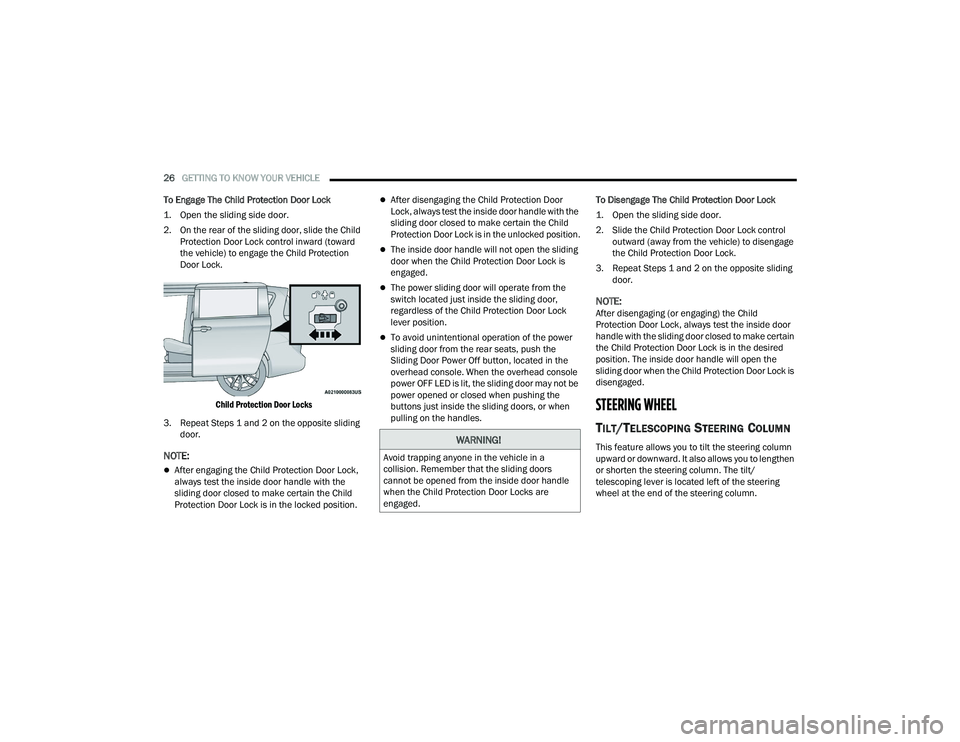
To Engage The Child Protection Door Lock
1. Open the sliding side door.
2. On the rear of the sliding door, slide the Child Protection Door Lock control inward (toward
the vehicle) to engage the Child Protection
Door Lock.
Child Protection Door Locks
3. Repeat Steps 1 and 2 on the opposite sliding door.
NOTE:
After engaging the Child Protection Door Lock,
always test the inside door handle with the
sliding door closed to make certain the Child
Protection Door Lock is in the locked position.
After disengaging the Child Protection Door
Lock, always test the inside door handle with the
sliding door closed to make certain the Child
Protection Door Lock is in the unlocked position.
The inside door handle will not open the sliding
door when the Child Protection Door Lock is
engaged.
The power sliding door will operate from the
switch located just inside the sliding door,
regardless of the Child Protection Door Lock
lever position.
To avoid unintentional operation of the power
sliding door from the rear seats, push the
Sliding Door Power Off button, located in the
overhead console. When the overhead console
power OFF LED is lit, the sliding door may not be
power opened or closed when pushing the
buttons just inside the sliding doors, or when
pulling on the handles. To Disengage The Child Protection Door Lock
1. Open the sliding side door.
2. Slide the Child Protection Door Lock control
outward (away from the vehicle) to disengage
the Child Protection Door Lock.
3. Repeat Steps 1 and 2 on the opposite sliding door.
NOTE:After disengaging (or engaging) the Child
Protection Door Lock, always test the inside door
handle with the sliding door closed to make certain
the Child Protection Door Lock is in the desired
position. The inside door handle will open the
sliding door when the Child Protection Door Lock is
disengaged.
STEERING WHEEL
TILT/TELESCOPING STEERING COLUMN
This feature allows you to tilt the steering column
upward or downward. It also allows you to lengthen
or shorten the steering column. The tilt/
telescoping lever is located left of the steering
wheel at the end of the steering column.WARNING!
Avoid trapping anyone in the vehicle in a
collision. Remember that the sliding doors
cannot be opened from the inside door handle
when the Child Protection Door Locks are
engaged.
22_RUVG_OM_EN_USC_t.book Page 26
Page 98 of 316
96GETTING TO KNOW YOUR INSTRUMENT PANEL
Vehicles equipped with the Anti-Lock Brake System
(ABS) are also equipped with Electronic Brake
Force Distribution (EBD). In the event of an EBD
failure, the Brake Warning Light will turn on along
with the ABS Light. Immediate repair to the ABS
system is required.
Operation of the Brake Warning Light can be
checked by turning the ignition switch from the OFF
position to the ON/RUN position. The light should
illuminate for approximately two seconds. The light
should then turn off unless the parking brake is
applied or a brake fault is detected. If the light does
not illuminate, have the light inspected by an
authorized dealer.
The light also will turn on when the parking brake
is applied with the ignition switch in the ON/RUN
position.
NOTE:This light shows only that the parking brake is
applied. It does not show the degree of brake appli -
cation.
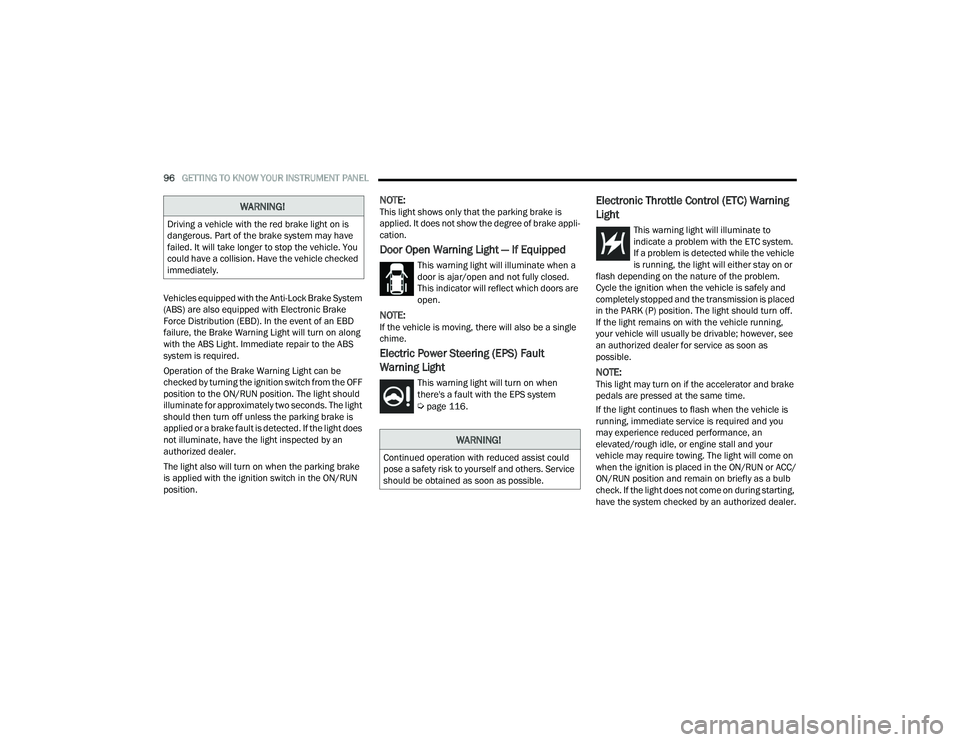
Door Open Warning Light — If Equipped
This warning light will illuminate when a
door is ajar/open and not fully closed.
This indicator will reflect which doors are
open.
NOTE:If the vehicle is moving, there will also be a single
chime.
Electric Power Steering (EPS) Fault
Warning Light
This warning light will turn on when
there's a fault with the EPS system
Úpage 116.
Electronic Throttle Control (ETC) Warning
Light
This warning light will illuminate to
indicate a problem with the ETC system.
If a problem is detected while the vehicle
is running, the light will either stay on or
flash depending on the nature of the problem.
Cycle the ignition when the vehicle is safely and
completely stopped and the transmission is placed
in the PARK (P) position. The light should turn off.
If the light remains on with the vehicle running,
your vehicle will usually be drivable; however, see
an authorized dealer for service as soon as
possible.
NOTE:This light may turn on if the accelerator and brake
pedals are pressed at the same time.
If the light continues to flash when the vehicle is
running, immediate service is required and you
may experience reduced performance, an
elevated/rough idle, or engine stall and your
vehicle may require towing. The light will come on
when the ignition is placed in the ON/RUN or ACC/
ON/RUN position and remain on briefly as a bulb
check. If the light does not come on during starting,
have the system checked by an authorized dealer.
WARNING!
Driving a vehicle with the red brake light on is
dangerous. Part of the brake system may have
failed. It will take longer to stop the vehicle. You
could have a collision. Have the vehicle checked
immediately.
WARNING!
Continued operation with reduced assist could
pose a safety risk to yourself and others. Service
should be obtained as soon as possible.
22_RUVG_OM_EN_USC_t.book Page 96
Page 118 of 316
116STARTING AND OPERATING
In the event of a momentary problem, the
transmission can be reset to regain all forward
gears by performing the following steps:
1. Stop the vehicle.
2. Shift the transmission into PARK, if possible. If not, shift the transmission to NEUTRAL.
3. Push and hold the ignition switch until the engine turns off.
4. Wait approximately 30 seconds.
5. Restart the engine.
6. Shift into the desired gear range. If the problem is no longer detected, the
transmission will return to normal operation.
NOTE:Even if the transmission can be reset, we
recommend that you visit an authorized dealer at
your earliest possible convenience. An authorized
dealer has diagnostic equipment to assess the
condition of your transmission. If the transmission
cannot be reset, authorized dealer service is
required.
Torque Converter Clutch
A feature designed to improve fuel economy has
been included in the automatic transmission on
your vehicle. A clutch within the torque converter
engages automatically at calibrated speeds. This
may result in a slightly different feeling or response
during normal operation in the upper gears. When
the vehicle speed drops or during some
accelerations, the clutch automatically
disengages.
NOTE:The torque converter clutch will not engage until
the engine and/or transmission is warm (usually
after 1 to 3 miles [2 to 5 km] of driving). Because
the engine speed is higher when the torque
converter clutch is not engaged, it may seem as if
the transmission is not shifting properly when the
vehicle is cold. This is normal. The torque converter
clutch will function normally once the powertrain is
sufficiently warm.
ACTIVE NOISE CANCELLATION
Your vehicle is equipped with an Active Noise
Cancellation system. This system is designed to
address exhaust and engine noise. The system
relies on four microphones embedded in the
headliner, which monitor exhaust and engine
noise, and assists an onboard frequency
generator, which creates counteracting sound
waves in the audio system’s speakers. This helps
keep the vehicle quiet at idle and during drive.
POWER STEERING
The electric power steering system will provide
increased vehicle response and ease of
maneuverability. The power steering system
adapts to different driving conditions.
WARNING!
Continued operation with reduced assist could
pose a safety risk to yourself and others. Service
should be obtained as soon as possible.
22_RUVG_OM_EN_USC_t.book Page 116
Page 119 of 316
STARTING AND OPERATING117
If the Steering icon is displayed and the “POWER
STEERING SYSTEM OVER TEMP” message is
displayed on the instrument cluster screen, this
indicates an over temperature condition in the
power steering system. Once driving conditions are
safe, pull over and let the vehicle idle for a few
moments until the icon and message turn off
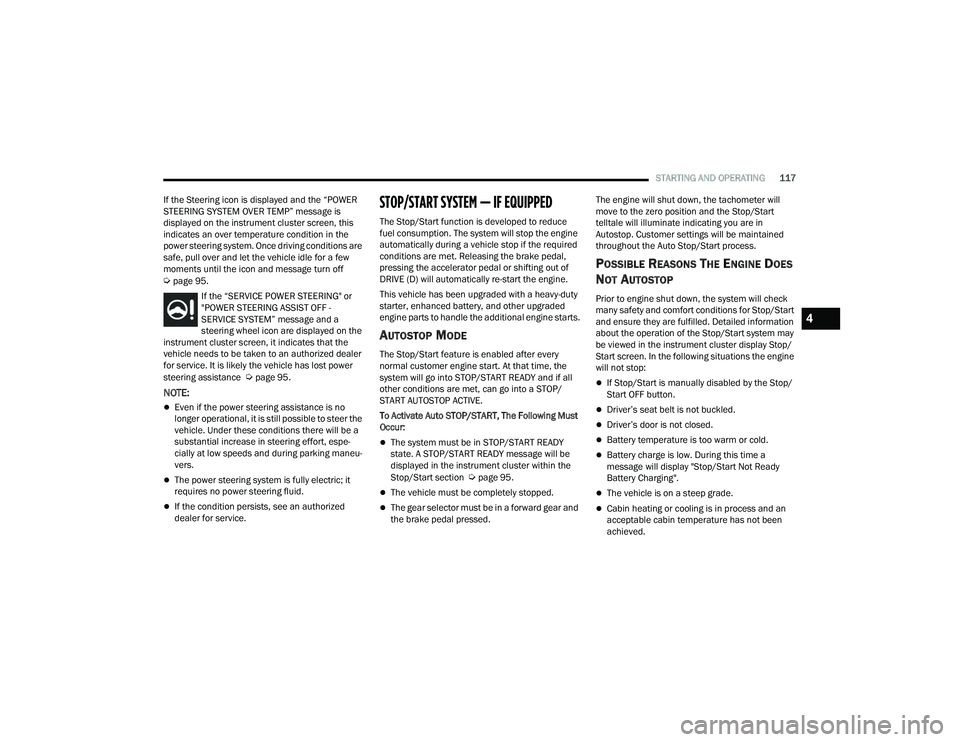
Úpage 95. If the “SERVICE POWER STEERING" or
"POWER STEERING ASSIST OFF -
SERVICE SYSTEM” message and a
steering wheel icon are displayed on the
instrument cluster screen, it indicates that the
vehicle needs to be taken to an authorized dealer
for service. It is likely the vehicle has lost power
steering assistance
Úpage 95.
NOTE:
Even if the power steering assistance is no
longer operational, it is still possible to steer the
vehicle. Under these conditions there will be a
substantial increase in steering effort, espe -
cially at low speeds and during parking maneu -
vers.
The power steering system is fully electric; it
requires no power steering fluid.
If the condition persists, see an authorized
dealer for service.
STOP/START SYSTEM — IF EQUIPPED
The Stop/Start function is developed to reduce
fuel consumption. The system will stop the engine
automatically during a vehicle stop if the required
conditions are met. Releasing the brake pedal,
pressing the accelerator pedal or shifting out of
DRIVE (D) will automatically re-start the engine.
This vehicle has been upgraded with a heavy-duty
starter, enhanced battery, and other upgraded
engine parts to handle the additional engine starts.
AUTOSTOP MODE
The Stop/Start feature is enabled after every
normal customer engine start. At that time, the
system will go into STOP/START READY and if all
other conditions are met, can go into a STOP/
START AUTOSTOP ACTIVE.
To Activate Auto STOP/START, The Following Must
Occur:
The system must be in STOP/START READY
state. A STOP/START READY message will be
displayed in the instrument cluster within the
Stop/Start section
Úpage 95.
The vehicle must be completely stopped.
The gear selector must be in a forward gear and
the brake pedal pressed. The engine will shut down, the tachometer will
move to the zero position and the Stop/Start
telltale will illuminate indicating you are in
Autostop. Customer settings will be maintained
throughout the Auto Stop/Start process.
POSSIBLE REASONS THE ENGINE DOES
N
OT AUTOSTOP
Prior to engine shut down, the system will check
many safety and comfort conditions for Stop/Start
and ensure they are fulfilled. Detailed information
about the operation of the Stop/Start system may
be viewed in the instrument cluster display Stop/
Start screen. In the following situations the engine
will not stop:
If Stop/Start is manually disabled by the Stop/
Start OFF button.
Driver’s seat belt is not buckled.
Driver’s door is not closed.
Battery temperature is too warm or cold.
Battery charge is low. During this time a
message will display "Stop/Start Not Ready
Battery Charging".
The vehicle is on a steep grade.
Cabin heating or cooling is in process and an
acceptable cabin temperature has not been
achieved.
4
22_RUVG_OM_EN_USC_t.book Page 117
Page 155 of 316
MULTIMEDIA153
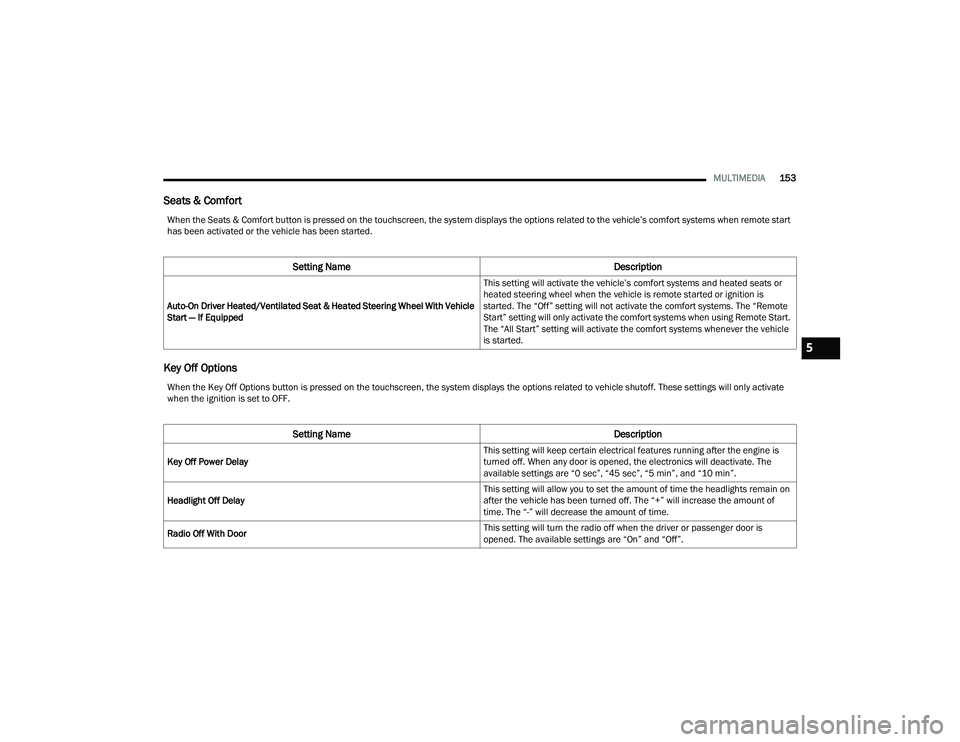
Seats & Comfort
Key Off Options
When the Seats & Comfort button is pressed on the touchscreen, the system displays the options related to the vehicle’s comfort systems when remote start
has been activated or the vehicle has been started.
Setting Name Description
Auto-On Driver Heated/Ventilated Seat & Heated Steering Wheel With Vehicle
Start — If Equipped This setting will activate the vehicle’s comfort systems and heated seats or
heated steering wheel when the vehicle is remote started or ignition is
started. The “Off” setting will not activate the comfort systems. The “Remote
Start” setting will only activate the comfort systems when using Remote Start.
The “All Start” setting will activate the comfort systems whenever the vehicle
is started.
When the Key Off Options button is pressed on the touchscreen, the system displays the options related to vehicle shutoff. These settings will only activate
when the ignition is set to OFF.
Setting Name
Description
Key Off Power Delay This setting will keep certain electrical features running after the engine is
turned off. When any door is opened, the electronics will deactivate. The
available settings are “0 sec”, “45 sec”, “5 min”, and “10 min”.
Headlight Off Delay This setting will allow you to set the amount of time the headlights remain on
after the vehicle has been turned off. The “+” will increase the amount of
time. The “-” will decrease the amount of time.
Radio Off With Door This setting will turn the radio off when the driver or passenger door is
opened. The available settings are “On” and “Off”.
5
22_RUVG_OM_EN_USC_t.book Page 153
Page 162 of 316
160SAFETY
Dynamic Steering Torque (DST)
DST is a feature of the ESC and Electric Power
Steering (EPS) modules that provides torque at the
steering wheel for certain driving conditions in
which the ESC module is detecting vehicle
instability. The torque that the steering wheel
receives is only meant to help the driver realize
optimal steering behavior in order to reach/
maintain vehicle stability. The only notification the
driver receives that the feature is active is the
torque applied to the steering wheel.
NOTE:The DST feature is only meant to help the driver
realize the correct course of action through small
torques on the steering wheel, which means the
effectiveness of the DST feature is highly
dependent on the driver’s sensitivity and overall
reaction to the applied torque. It is very important
to realize that this feature will not steer the vehicle,
meaning the driver is still responsible for steering
the vehicle.
Electronic Brake Force Distribution (EBD)
The EBD function manages the distribution of the
braking torque between the front and rear axles by
limiting braking pressure to the rear axle. This is
done to prevent overslip of the rear wheels to avoid
vehicle instability, and to prevent the rear axle from
entering the Anti-Lock Brake System (ABS) before
the front axle.
Electronic Roll Mitigation (ERM)
ERM anticipates the potential for wheel lift by
monitoring the driver’s steering wheel input and
the speed of the vehicle. When ERM determines
that the rate of change of the steering wheel angle
and vehicle’s speed are sufficient to potentially
cause wheel lift, it then applies the appropriate
brake and may also reduce engine power to lessen
the chance that wheel lift will occur. ERM can only
reduce the chance of wheel lift occurring during
severe or evasive driving maneuvers; it cannot
prevent wheel lift due to other factors, such as
road conditions, leaving the roadway, striking
objects or other vehicles.
Electronic Stability Control (ESC)
ESC enhances directional control and stability of
the vehicle under various driving conditions. ESC
corrects for oversteering or understeering of the
vehicle by applying the brake of the appropriate
wheel(s) to assist in counteracting the above
conditions. Engine power may also be reduced to
help the vehicle maintain the desired path.
Oversteer — when the vehicle is turning more
than appropriate for the steering wheel position.
Understeer — when the vehicle is turning less
than appropriate for the steering wheel position.
ESC uses sensors in the vehicle to determine the
vehicle path intended by the driver and compares
it to the actual path of the vehicle. When the actual
path does not match the intended path, ESC
applies the brake of the appropriate wheel to
assist in counteracting the oversteer or understeer
condition.
WARNING!
Many factors, such as vehicle loading, road
conditions and driving conditions, influence the
chance that wheel lift or rollover may occur. ERM
cannot prevent all wheel lift or rollovers,
especially those that involve leaving the roadway
or striking objects or other vehicles. The
capabilities of an ERM-equipped vehicle must
never be exploited in a reckless or dangerous
manner which could jeopardize the user's safety
or the safety of others.
22_RUVG_OM_EN_USC_t.book Page 160
Page 186 of 316
184SAFETY
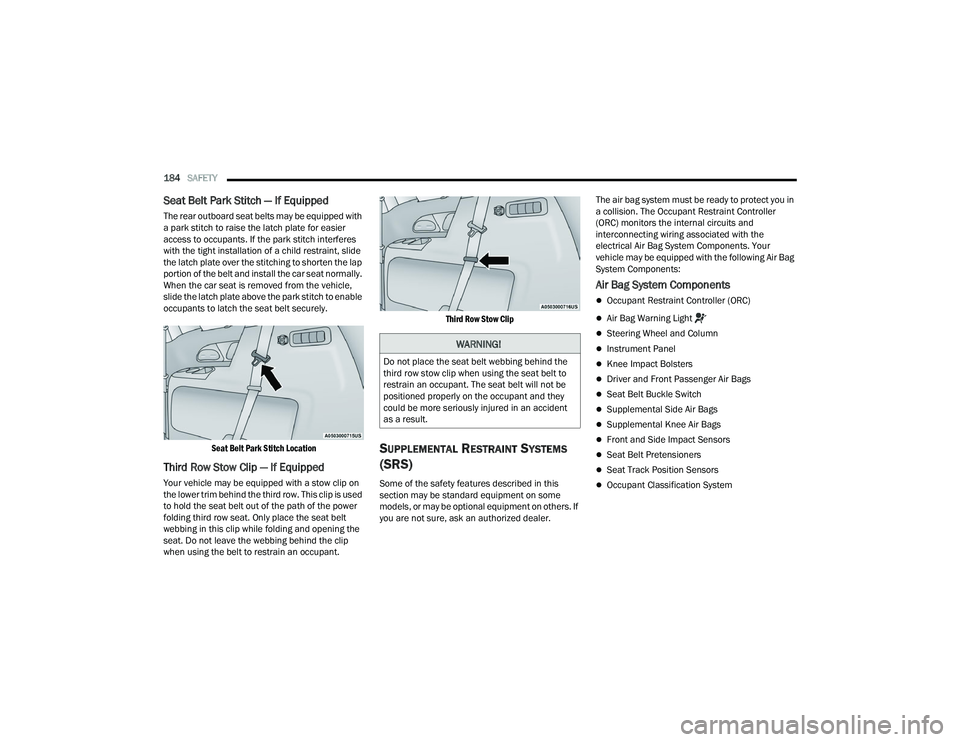
Seat Belt Park Stitch — If Equipped
The rear outboard seat belts may be equipped with
a park stitch to raise the latch plate for easier
access to occupants. If the park stitch interferes
with the tight installation of a child restraint, slide
the latch plate over the stitching to shorten the lap
portion of the belt and install the car seat normally.
When the car seat is removed from the vehicle,
slide the latch plate above the park stitch to enable
occupants to latch the seat belt securely.
Seat Belt Park Stitch Location
Third Row Stow Clip — If Equipped
Your vehicle may be equipped with a stow clip on
the lower trim behind the third row. This clip is used
to hold the seat belt out of the path of the power
folding third row seat. Only place the seat belt
webbing in this clip while folding and opening the
seat. Do not leave the webbing behind the clip
when using the belt to restrain an occupant.
Third Row Stow Clip
SUPPLEMENTAL RESTRAINT SYSTEMS
(SRS)
Some of the safety features described in this
section may be standard equipment on some
models, or may be optional equipment on others. If
you are not sure, ask an authorized dealer. The air bag system must be ready to protect you in
a collision. The Occupant Restraint Controller
(ORC) monitors the internal circuits and
interconnecting wiring associated with the
electrical Air Bag System Components. Your
vehicle may be equipped with the following Air Bag
System Components:
Air Bag System Components
Occupant Restraint Controller (ORC)
Air Bag Warning Light
Steering Wheel and Column
Instrument Panel
Knee Impact Bolsters
Driver and Front Passenger Air Bags
Seat Belt Buckle Switch
Supplemental Side Air Bags
Supplemental Knee Air Bags
Front and Side Impact Sensors
Seat Belt Pretensioners
Seat Track Position Sensors
Occupant Classification System
WARNING!
Do not place the seat belt webbing behind the
third row stow clip when using the seat belt to
restrain an occupant. The seat belt will not be
positioned properly on the occupant and they
could be more seriously injured in an accident
as a result.
22_RUVG_OM_EN_USC_t.book Page 184