jump start CITROEN AMI 2021 Handbook (in English)
[x] Cancel search | Manufacturer: CITROEN, Model Year: 2021, Model line: AMI, Model: CITROEN AMI 2021Pages: 44, PDF Size: 1.67 MB
Page 32 of 44

30
In the event of a breakdown
Take used remote control batteries and
vehicle batteries to a special collection point.
Protect your eyes and face before
handling the battery.
All operations on the battery must be carried
out in a well ventilated area and away from
naked flames and sources of sparks, to avoid
any risk of explosion or fire.
Wash your hands afterwards.
Flat 12 V battery
It is no longer possible to start the motor
or recharge the traction battery.
Before working on the 12 V battery
Switch off the ignition, apply the parking
brake, check that the instrument panel is off
and that the charging cable is not connected.
Recharging the 12 V battery
Do not recharge the battery without first
disconnecting the terminals and removing the
battery.
Do not disconnect the battery terminals while
the
READY
indicator lamp is lit, or while the
vehicle is charging.
Jump-starting another vehicle
Do not use the 12 V battery to jump-start
another vehicle or to charge another vehicle's
battery
.
Symbols
No sparks or naked flames, no smoking.
Always protect your eyes. Explosive gases can cause blindness and injury.
Keep the vehicle's battery out of the reach
of children.
The vehicle's battery contains sulphuric acid which can make you go blind or
cause severe burns.
For more information, refer to the
handbook.
Explosive gases can be present close to
the battery.
Removing/Refitting
Removing rear bumper
► Remove the number plate lamp prior to
starting.
For more information on the Number plate
lamp, refer to the corresponding section.
►
Pass the lamp's suspended wiring loom
behind the bumper.
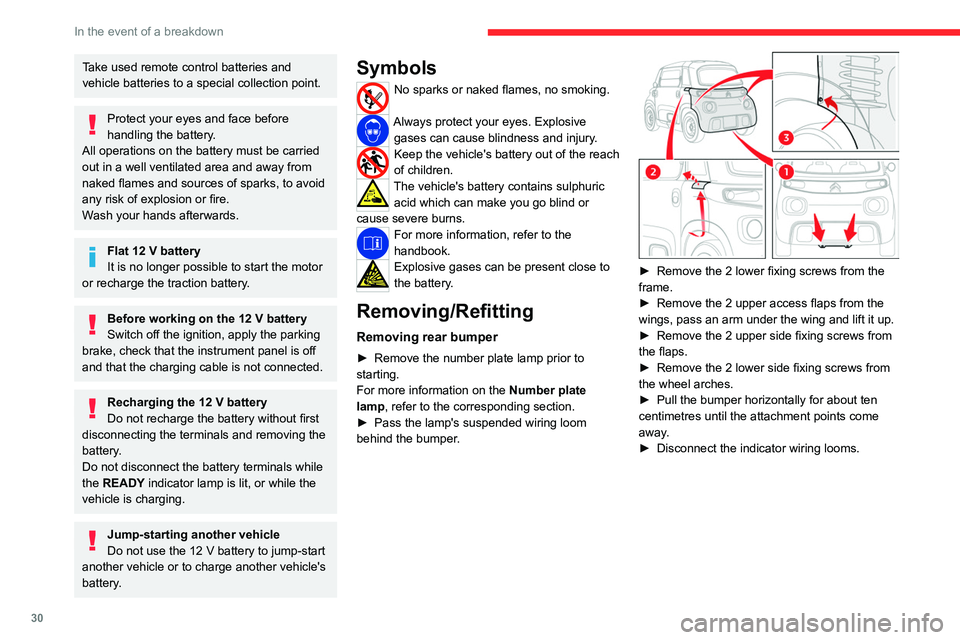
► Remove the 2 lower fixing screws from the
frame.
►
Remove the 2 upper access flaps from the
wings, pass an arm under the wing and lift it up.
►
Remove the 2 upper side fixing screws from
the flaps.
►
Remove the 2 lower side fixing screws from
the wheel arches.
►
Pull the bumper horizontally for about ten
centimetres until the attachment points come
away.
►
Disconnect the indicator wiring looms.
Page 33 of 44

31
In the event of a breakdown
8Removing the battery
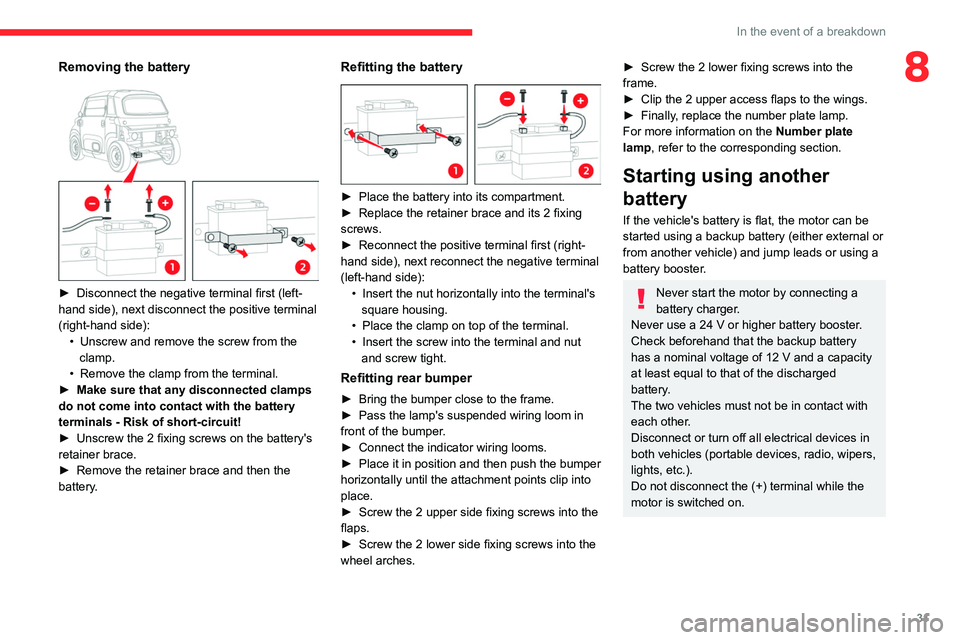
► Disconnect the negative terminal first (left-
hand side), next disconnect the positive terminal
(right-hand side): •
Unscrew and remove the screw from the
clamp.
•
Remove the clamp from the terminal.
► Make sure that any disconnected clamps
do not come into contact with the battery
terminals - Risk of short-circuit!
►
Unscrew the 2 fixing screws on the battery's
retainer brace.
►
Remove the retainer brace and then the
battery.
Refitting the battery
► Place the battery into its compartment.
► Replace the retainer brace and its 2 fixing
screws.
►
Reconnect the positive terminal first (right-
hand side), next reconnect the negative terminal
(left-hand side): •
Insert the nut horizontally into the terminal's
square housing.
•
Place the clamp on top of the terminal.
• Insert the screw into the terminal and nut
and screw tight.
Refitting rear bumper
► Bring the bumper close to the frame.
► Pass the lamp's suspended wiring loom in
front of the bumper.
►
Connect the indicator wiring looms.
► Place it in position and then push the bumper
horizontally until the attachment points clip into
place.
►
Screw the 2 upper side fixing screws into the
flaps.
►
Screw the 2 lower side fixing screws into the
wheel arches.
► Screw the 2 lower fixing screws into the
frame.
►
Clip the 2 upper access flaps to the wings.
► Finally, replace the number plate lamp.
For more information on the Number plate
lamp
, refer to the corresponding section.
Starting using another
battery
If the vehicle's battery is flat, the motor can be
started using a backup battery (either external or
from another vehicle) and jump leads or using a
battery booster.
Never start the motor by connecting a
battery charger.
Never use a 24
V or higher battery booster
.
Check beforehand that the backup battery
has a nominal voltage of 12
V and a capacity
at least equal to that of the discharged
battery
.
The two vehicles must not be in contact with
each other.
Disconnect or turn off all electrical devices in
both vehicles (portable devices, radio, wipers,
lights, etc.).
Do not disconnect the (+) terminal while the
motor is switched on.
Page 34 of 44

32
In the event of a breakdown
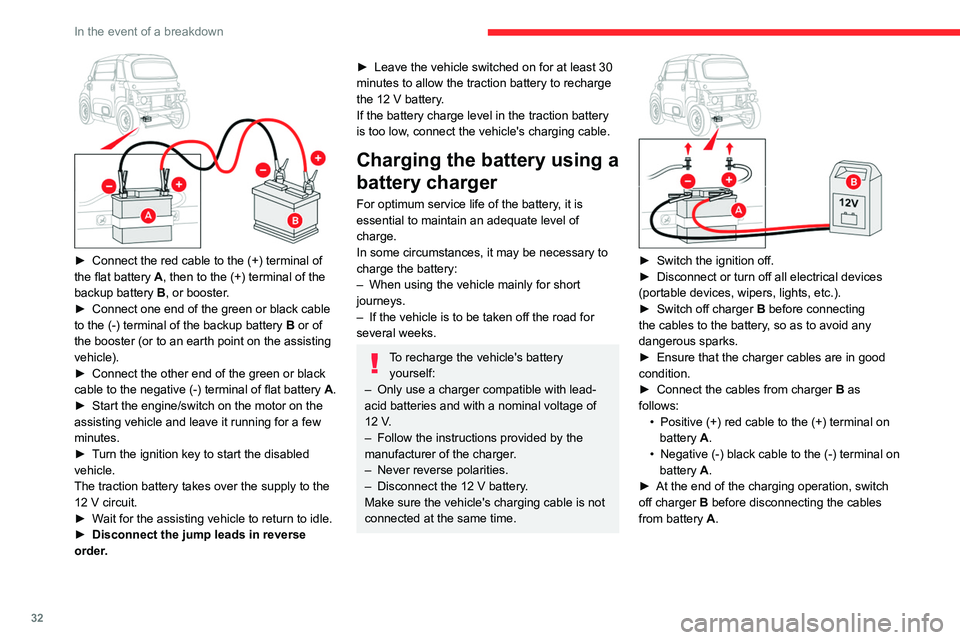
► Connect the red cable to the (+) terminal of
the flat battery A , then to the (+) terminal of the
backup battery B, or booster.
►
Connect one end of the green or black cable
to the (-) terminal of the backup battery B
or of
the booster (or to an earth point on the assisting
vehicle).
►
Connect the other end of the green or black
cable to the negative (-) terminal of flat battery A.
►
Start the engine/switch on the motor on the
assisting vehicle and leave it running for a few
minutes.
►
Turn the ignition key to start the disabled
vehicle.
The traction battery takes over the supply to the
12
V circuit.
► Wait for the assisting vehicle to return to idle.
► Disconnect the jump leads in reverse
order.
► Leave the vehicle switched on for at least 30
minutes to allow the traction battery to recharge
the 12
V battery
.
If the battery charge level in the traction battery
is too low, connect the vehicle's charging cable.
Charging the battery using a
battery charger
For optimum service life of the battery, it is
essential to maintain an adequate level of
charge.
In some circumstances, it may be necessary to
charge the battery:
–
When using the vehicle mainly for short
journeys.
–
If the vehicle is to be taken off the road for
several weeks.
To recharge the vehicle's battery yourself:
–
Only use a charger compatible with lead-
acid batteries and with a nominal voltage of
12
V
.
–
Follow the instructions provided by the
manufacturer of the charger.
–
Never reverse polarities.
– Disconnect the 12 V battery
.
Make sure the vehicle's charging cable is not
connected at the same time.
► Switch the ignition off.
► Disconnect or turn off all electrical devices
(portable devices, wipers, lights, etc.).
►
Switch off charger B before connecting
the cables to the battery
, so as to avoid any
dangerous sparks.
►
Ensure that the charger cables are in good
condition.
►
Connect the cables from charger B as
follows: •
Positive (+) red cable to the (+) terminal on
battery A
.
•
Negative (-) black cable to the (-) terminal on
battery A
.
►
At the end of the charging operation, switch
off charger B before disconnecting the cables
from battery
A.