number CITROEN AMI 2021 Handbook (in English)
[x] Cancel search | Manufacturer: CITROEN, Model Year: 2021, Model line: AMI, Model: CITROEN AMI 2021Pages: 44, PDF Size: 1.67 MB
Page 15 of 44
13
Lighting and visibility
4Exterior lighting
When the ignition is switched on, all the lights
come on (sidelamps, dipped beam headlamps
and number plate lamps).
When the ignition is switched off, all the lights
go out.
In some weather conditions (e.g. low
temperature or humidity), misting on the
internal surface of the glass of the headlamps
and rear lamps is normal, and will disappear
after the lamps have been on for a few
minutes.
Never look too closely at the light beam
of LED lamps/headlamps: risk of serious
eye injury!
Direction indicators
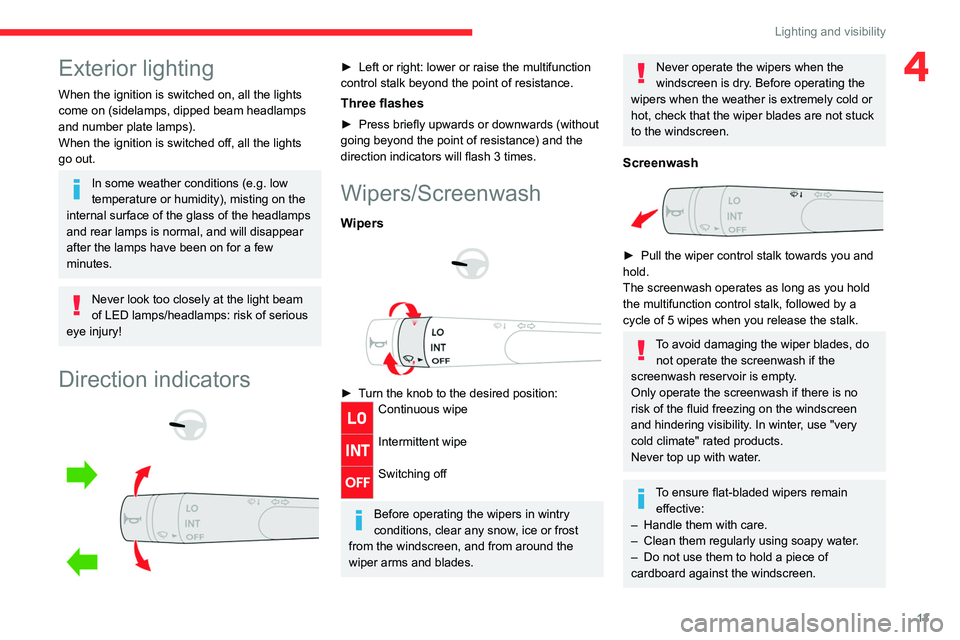
► Left or right: lower or raise the multifunction
control stalk beyond the point of resistance.
Three flashes
► Press briefly upwards or downwards (without
going beyond the point of resistance) and the
direction indicators will flash 3 times.
Wipers/Screenwash
Wipers
► Turn the knob to the desired position:Continuous wipe
Intermittent wipe
Switching off
Before operating the wipers in wintry
conditions, clear any snow, ice or frost
from the windscreen, and from around the
wiper arms and blades.
Never operate the wipers when the
windscreen is dry. Before operating the
wipers when the weather is extremely cold or
hot, check that the wiper blades are not stuck
to the windscreen.
Screenwash
► Pull the wiper control stalk towards you and
hold.
The screenwash operates as long as you hold
the multifunction control stalk, followed by a
cycle of 5 wipes when you release the stalk.
To avoid damaging the wiper blades, do not operate the screenwash if the
screenwash reservoir is empty.
Only operate the screenwash if there is no
risk of the fluid freezing on the windscreen
and hindering visibility. In winter, use "very
cold climate" rated products.
Never top up with water.
To ensure flat-bladed wipers remain effective:
–
Handle them with care.
– Clean them regularly using soapy water.
– Do not use them to hold a piece of
cardboard against the windscreen.
Page 29 of 44

27
In the event of a breakdown
8Changing a wheel
The vehicle is not equipped with on-board tools,
such as a jack or wheel brace.
In the event of a flat tyre, call a dealer or
qualified workshop.
To have winter tyres fitted or the wheels
changed, consult a dealer or qualified workshop.
Changing a bulb
Cleaning
The headlamps have polycarbonate
lenses with a protective coating:
–
Do not clean them with a dry or abrasive
cloth, nor with detergent or solvent
products.
–
Use a sponge and soapy water or a pH
neutral product.
–
When using a jet of water to clean off
persistent marks, do not keep the jet directed
towards the headlamps, lamps or their
edges for too long, so as not to damage their
protective coating and seals.
Light-emitting diodes (LEDs)
Do not touch LED headlamps/lamps.
To replace this type of bulb, you must consult
a dealer or qualified workshop.
Direction indicators
Rapid flashing of the indicator lamp for a
direction indicator
(left or right) indicates that
one of the bulbs on the corresponding side
has failed.
Front lamps
1. Direction indicators
2. Sidelamps
3. Dipped beam headlamps
Rear lamps
1.Direction indicators
2. Sidelamps
3. Brake lamps
4. Number plate lamp
Page 30 of 44
28
In the event of a breakdown
Number plate lamp
Removing
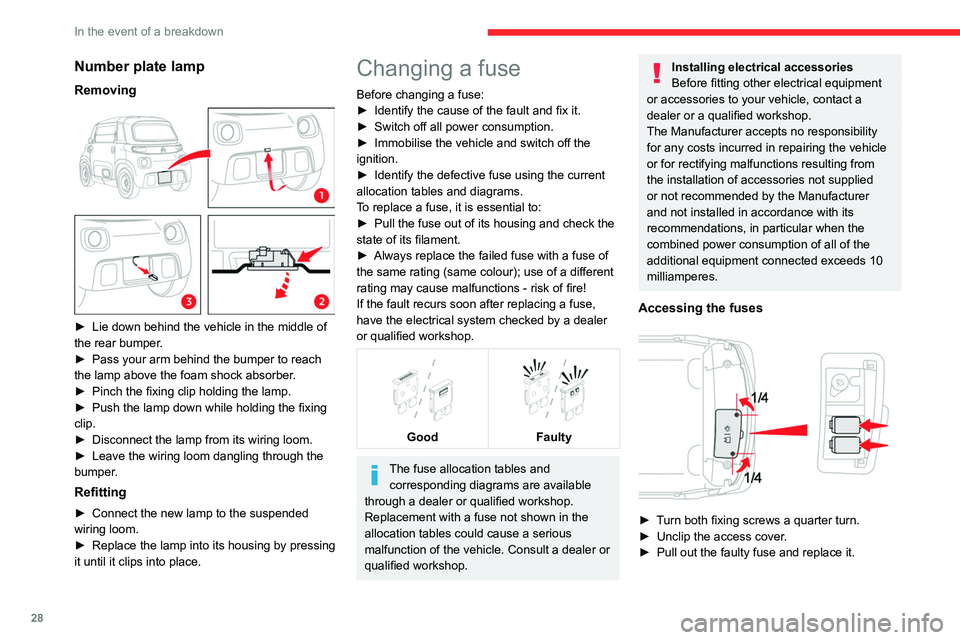
► Lie down behind the vehicle in the middle of
the rear bumper.
►
Pass your arm behind the bumper to reach
the lamp above the foam shock absorber.
►
Pinch the fixing clip holding the lamp.
► Push the lamp down while holding the fixing
clip.
►
Disconnect the lamp from its wiring loom.
► Leave the wiring loom dangling through the
bumper.
Refitting
► Connect the new lamp to the suspended
wiring loom.
►
Replace the lamp into its housing by pressing
it until it clips into place.
Changing a fuse
Before changing a fuse:
► Identify the cause of the fault and fix it.
► Switch off all power consumption.
► Immobilise the vehicle and switch off the
ignition.
►
Identify the defective fuse using the current
allocation tables and diagrams.
To replace a fuse, it is essential to:
►
Pull the fuse out of its housing and check the
state of its filament.
►
Always replace the failed fuse with a fuse of
the same rating (same colour); use of a different
rating may cause malfunctions - risk of fire!
If the fault recurs soon after replacing a fuse,
have the electrical system checked by a dealer
or qualified workshop.
Good
Faulty
The fuse allocation tables and corresponding diagrams are available
through a dealer or qualified workshop.
Replacement with a fuse not shown in the
allocation tables could cause a serious
malfunction of the vehicle. Consult a dealer or
qualified workshop.
Installing electrical accessories
Before fitting other electrical equipment
or accessories to your vehicle, contact a
dealer or a qualified workshop.
The Manufacturer accepts no responsibility
for any costs incurred in repairing the vehicle
or for rectifying malfunctions resulting from
the installation of accessories not supplied
or not recommended by the Manufacturer
and not installed in accordance with its
recommendations, in particular when the
combined power consumption of all of the
additional equipment connected exceeds 10
milliamperes.
Accessing the fuses
► Turn both fixing screws a quarter turn.
► Unclip the access cover.
► Pull out the faulty fuse and replace it.
Page 31 of 44
29
In the event of a breakdown
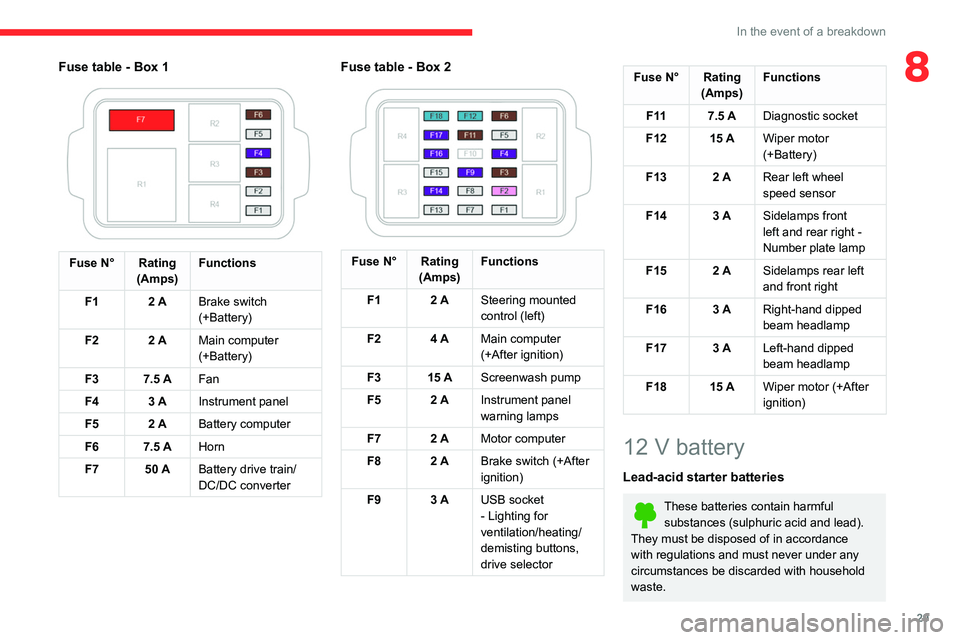
8Fuse table - Box 1
Fuse N° Rating(Amps)Functions
F1 2 ABrake switch
(+Battery)
F2 2 AMain computer
(+Battery)
F3 7.5 AFan
F4 3 AInstrument panel
F5 2 ABattery computer
F6 7.5 AHorn
F7 50 ABattery drive train/
DC/DC converter
Fuse table - Box 2
Fuse N° Rating
(Amps)Functions
F1 2 ASteering mounted
control (left)
F2 4 AMain computer
(+After ignition)
F3 15 AScreenwash pump
F5 2 AInstrument panel
warning lamps
F7 2 AMotor computer
F8 2 ABrake switch (+After
ignition)
F9 3 AUSB socket
- Lighting for
ventilation/heating/
demisting buttons,
drive selector
Fuse N° Rating
(Amps)Functions
F 11 7.5 ADiagnostic socket
F12 15 AWiper motor
(+Battery)
F13 2 ARear left wheel
speed sensor
F14 3 ASidelamps front
left and rear right -
Number plate lamp
F15 2 ASidelamps rear left
and front right
F16 3 ARight-hand dipped
beam headlamp
F17 3 ALeft-hand dipped
beam headlamp
F18 15 AWiper motor (+After
ignition)
12 V battery
Lead-acid starter batteries
These batteries contain harmful
substances (sulphuric acid and lead).
They must be disposed of in accordance
with regulations and must never under any
circumstances be discarded with household
waste.
Page 32 of 44
30
In the event of a breakdown
Take used remote control batteries and
vehicle batteries to a special collection point.
Protect your eyes and face before
handling the battery.
All operations on the battery must be carried
out in a well ventilated area and away from
naked flames and sources of sparks, to avoid
any risk of explosion or fire.
Wash your hands afterwards.
Flat 12 V battery
It is no longer possible to start the motor
or recharge the traction battery.
Before working on the 12 V battery
Switch off the ignition, apply the parking
brake, check that the instrument panel is off
and that the charging cable is not connected.
Recharging the 12 V battery
Do not recharge the battery without first
disconnecting the terminals and removing the
battery.
Do not disconnect the battery terminals while
the
READY
indicator lamp is lit, or while the
vehicle is charging.
Jump-starting another vehicle
Do not use the 12 V battery to jump-start
another vehicle or to charge another vehicle's
battery
.
Symbols
No sparks or naked flames, no smoking.
Always protect your eyes. Explosive gases can cause blindness and injury.
Keep the vehicle's battery out of the reach
of children.
The vehicle's battery contains sulphuric acid which can make you go blind or
cause severe burns.
For more information, refer to the
handbook.
Explosive gases can be present close to
the battery.
Removing/Refitting
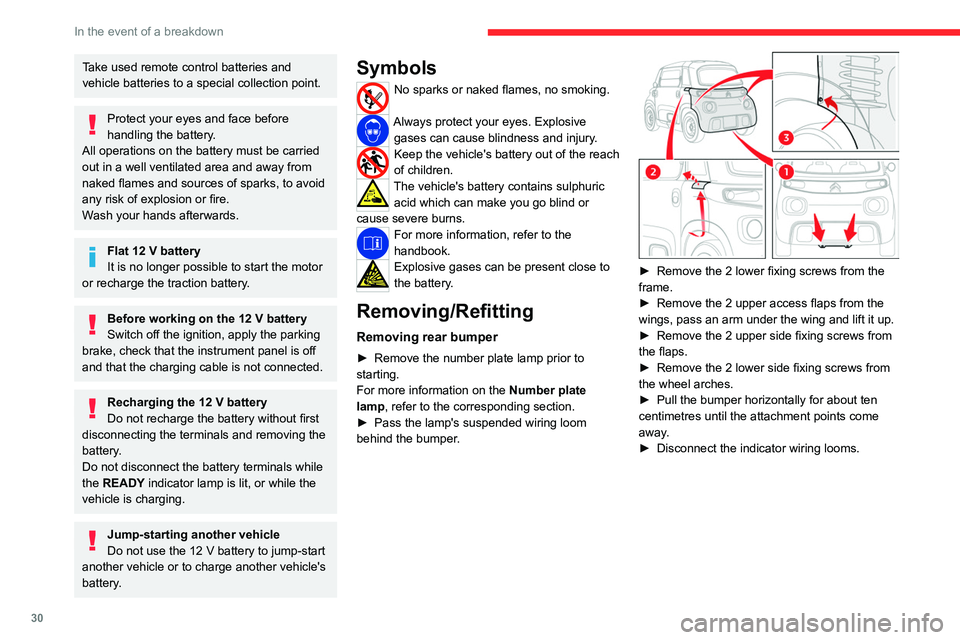
Removing rear bumper
► Remove the number plate lamp prior to
starting.
For more information on the Number plate
lamp, refer to the corresponding section.
►
Pass the lamp's suspended wiring loom
behind the bumper.
► Remove the 2 lower fixing screws from the
frame.
►
Remove the 2 upper access flaps from the
wings, pass an arm under the wing and lift it up.
►
Remove the 2 upper side fixing screws from
the flaps.
►
Remove the 2 lower side fixing screws from
the wheel arches.
►
Pull the bumper horizontally for about ten
centimetres until the attachment points come
away.
►
Disconnect the indicator wiring looms.
Page 33 of 44
31
In the event of a breakdown
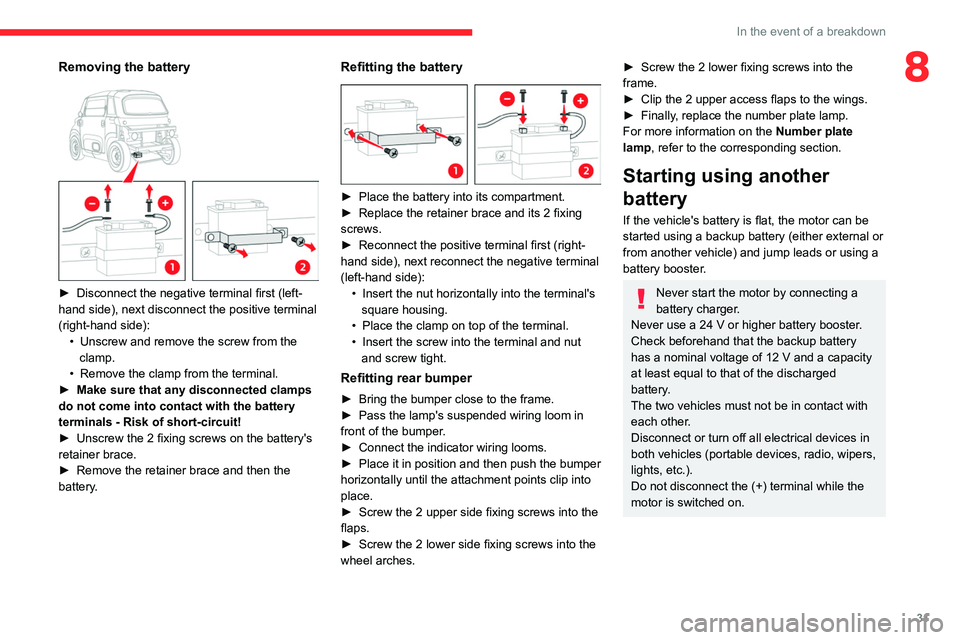
8Removing the battery
► Disconnect the negative terminal first (left-
hand side), next disconnect the positive terminal
(right-hand side): •
Unscrew and remove the screw from the
clamp.
•
Remove the clamp from the terminal.
► Make sure that any disconnected clamps
do not come into contact with the battery
terminals - Risk of short-circuit!
►
Unscrew the 2 fixing screws on the battery's
retainer brace.
►
Remove the retainer brace and then the
battery.
Refitting the battery
► Place the battery into its compartment.
► Replace the retainer brace and its 2 fixing
screws.
►
Reconnect the positive terminal first (right-
hand side), next reconnect the negative terminal
(left-hand side): •
Insert the nut horizontally into the terminal's
square housing.
•
Place the clamp on top of the terminal.
• Insert the screw into the terminal and nut
and screw tight.
Refitting rear bumper
► Bring the bumper close to the frame.
► Pass the lamp's suspended wiring loom in
front of the bumper.
►
Connect the indicator wiring looms.
► Place it in position and then push the bumper
horizontally until the attachment points clip into
place.
►
Screw the 2 upper side fixing screws into the
flaps.
►
Screw the 2 lower side fixing screws into the
wheel arches.
► Screw the 2 lower fixing screws into the
frame.
►
Clip the 2 upper access flaps to the wings.
► Finally, replace the number plate lamp.
For more information on the Number plate
lamp
, refer to the corresponding section.
Starting using another
battery
If the vehicle's battery is flat, the motor can be
started using a backup battery (either external or
from another vehicle) and jump leads or using a
battery booster.
Never start the motor by connecting a
battery charger.
Never use a 24
V or higher battery booster
.
Check beforehand that the backup battery
has a nominal voltage of 12
V and a capacity
at least equal to that of the discharged
battery
.
The two vehicles must not be in contact with
each other.
Disconnect or turn off all electrical devices in
both vehicles (portable devices, radio, wipers,
lights, etc.).
Do not disconnect the (+) terminal while the
motor is switched on.
Page 37 of 44
35
Technical data
9
Identification markings
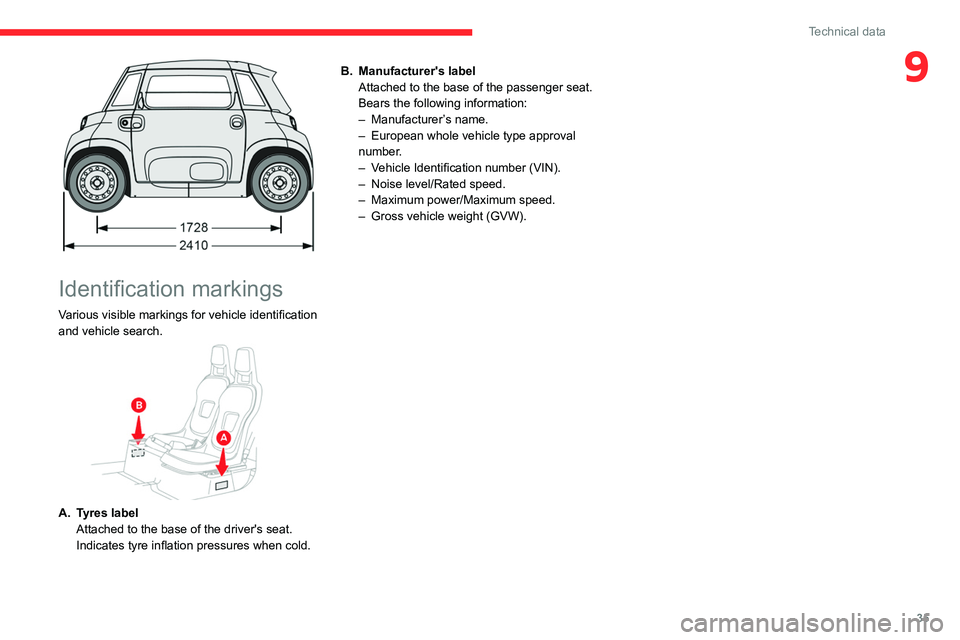
Various visible markings for vehicle identification
and vehicle search.
A. Tyres label
Attached to the base of the driver's seat.
Indicates tyre inflation pressures when cold. B. Manufacturer's label
Attached to the base of the passenger seat.
Bears the following information:
–
Manufacturer’
s name.
–
European whole vehicle type approval
number.
–
Vehicle Identification number (VIN).
– Noise level/Rated speed.
– Maximum power/Maximum speed.
– Gross vehicle weight (GVW).
Page 39 of 44
37
Alphabetical index
M
Mains socket (domestic network) 22
Maintenance (advice) 25
Maintenance, routine 5, 15, 23–24
Markings, identification 35
Mirrors, door
10
Mobility
, electric
3, 18
Motor
, electric
23, 34
Multifunction control 13, 15
N
Number plate lamps 28
O
On-board tools 27
Opening the doors 9
Opening the windows 9
P
Pads, brake 24
Parking brake 18, 24
Port, USB
11
Pressures, tyres
25, 35
Protecting children 16–17
R
Range 5, 7
Recharging the battery 32
Recharging the traction battery 21–22
Recovery of the vehicle 33
Regenerative braking (deceleration
by engine braking)
19
Removing the battery 30
Removing the front bumper 23
Removing the rear bumper 30
Replacing bulbs 27
Replacing fuses 28
Reservoir
, screenwash
24
S
Safety (advice) 3, 15
Screen, monochrome 6
Screenwash 13
Screenwash fluid 24
Seat belts
15
Selector
, drive
19
Serial number
, vehicle
35
Servicing 15, 24–25
Smartphone 11
Starting/Stopping the vehicle 19
Starting using another battery 31
Stickers, customising ~ Stickers,
expressive
25–26
Storage
11
Suspension 25
T
Tables of fuses 28
T echnical data 34
Thermal comfort equipment 5
T
otal distance recorder
7
T
owing eye
33
T
raction battery
3, 21, 34
T
raction battery charge
7, 21–22
T
yres
25, 27, 35
V
Ventilation 10
W
Warning and indicator lamps 6
W arnings and indicators 6
W
ashing (advice)
26
W
eights
1
1, 34
Windows
9
Wiper blades (changing) 14
Wipers
13