stop start CITROEN AMI 2021 Handbook (in English)
[x] Cancel search | Manufacturer: CITROEN, Model Year: 2021, Model line: AMI, Model: CITROEN AMI 2021Pages: 44, PDF Size: 1.67 MB
Page 4 of 44
2
Contents
■
Overview
■
Eco-driving
1Dashboard instrumentsInstrument panel with monochrome display screen 6
Warning and indicator lamps 6
Charge level 7
Distance recorder 7
2AccessDoors 9
Windows 9
3Ease of use and comfortDriver's seat 10
Door mirrors 10
Ventilation/Heating/Demisting 10
Interior fittings 11
Available accessories 12
4Lighting and visibilityExterior lighting 13
Direction indicators 13
Wipers/Screenwash 13
Changing a wiper blade 14
5SafetySafety - General recommendations 15
Hazard warning lamps 15
Horn 15
Seat belts 15
Child seats 16
6DrivingDriving recommendations 18
Parking brake 18
Drive selector 19
Starting/Stopping the vehicle 19
7Practical informationCharging the traction battery 21
Electric motor 23
Checking levels 23
Checks 24
Free-wheeling 25
Advice on care and maintenance 25
8In the event of a breakdownChanging a wheel 27
Changing a bulb 27
Changing a fuse 28
12 V battery 29
Towing the vehicle 33
9Technical dataElectric motor 34
Dimensions 34
Identification markings 35
■
Alphabetical index
Page 6 of 44
4
Overview
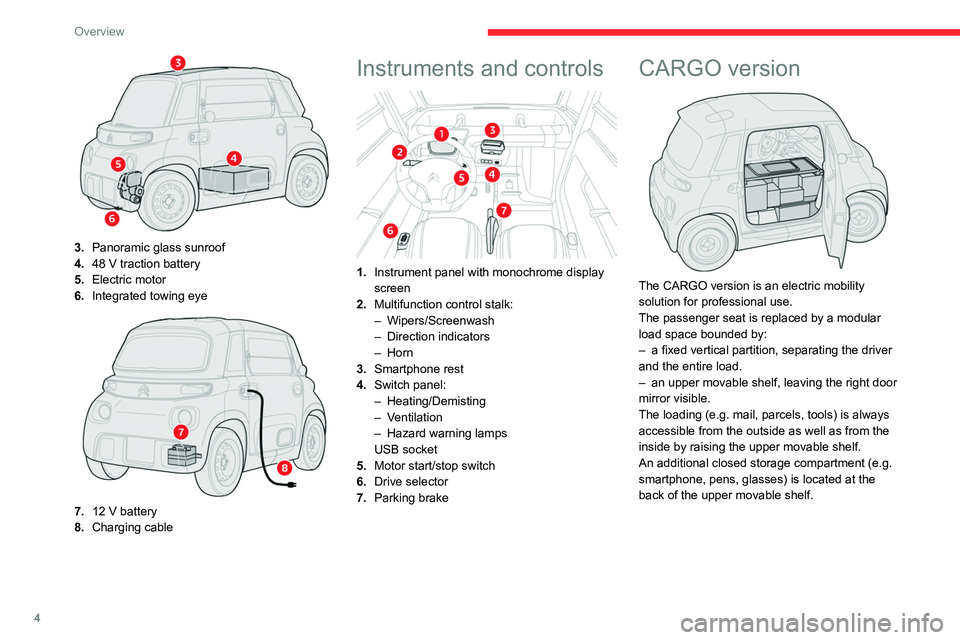
3.Panoramic glass sunroof
4. 48 V traction battery
5. Electric motor
6. Integrated towing eye
7.12 V battery
8. Charging cable
Instruments and controls
1.Instrument panel with monochrome display
screen
2. Multifunction control stalk:
–
Wipers/Screenwash
– Direction indicators
– Horn
3. Smartphone rest
4. Switch panel:
–
Heating/Demisting
– V
entilation
–
Hazard warning lamps
USB socket
5. Motor start/stop switch
6. Drive selector
7. Parking brake
CARGO version
The CARGO version is an electric mobility
solution for professional use.
The passenger seat is replaced by a modular
load space bounded by:
–
a fixed vertical partition, separating the driver
and the entire load.
–
an upper movable shelf, leaving the right door
mirror visible.
The loading (e.g. mail, parcels, tools) is always
accessible from the outside as well as from the
inside by raising the upper movable shelf.
An additional closed storage compartment (e.g.
smartphone, pens, glasses) is located at the
back of the upper movable shelf.
Page 8 of 44
6
Dashboard instruments
Instrument panel with
monochrome display
screen
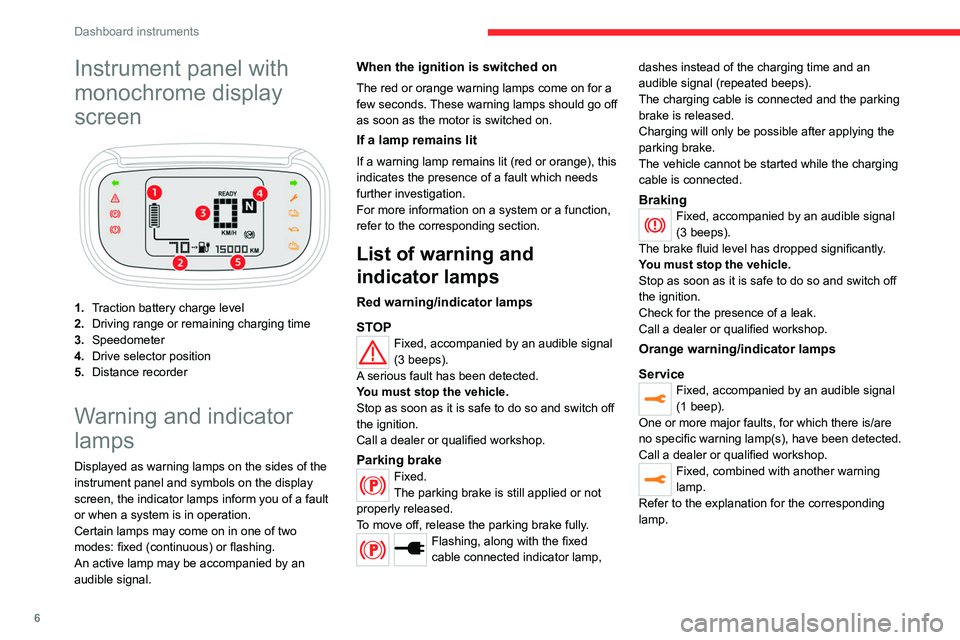
1.Traction battery charge level
2. Driving range or remaining charging time
3. Speedometer
4. Drive selector position
5. Distance recorder
Warning and indicator
lamps
Displayed as warning lamps on the sides of the
instrument panel and symbols on the display
screen, the indicator lamps inform you of a fault
or when a system is in operation.
Certain lamps may come on in one of two
modes: fixed (continuous) or flashing.
An active lamp may be accompanied by an
audible signal.
When the ignition is switched on
The red or orange warning lamps come on for a
few seconds. These warning lamps should go off
as soon as the motor is switched on.
If a lamp remains lit
If a warning lamp remains lit (red or orange), this
indicates the presence of a fault which needs
further investigation.
For more information on a system or a function,
refer to the corresponding section.
List of warning and
indicator lamps
Red warning/indicator lamps
STOP
Fixed, accompanied by an audible signal
(3 beeps).
A serious fault has been detected.
You must stop the vehicle.
Stop as soon as it is safe to do so and switch off
the ignition.
Call a dealer or qualified workshop.
Parking brakeFixed.
The parking brake is still applied or not
properly released.
To move off, release the parking brake fully.
Flashing, along with the fixed
cable connected indicator lamp, dashes instead of the charging time and an
audible signal (repeated beeps).
The charging cable is connected and the parking
brake is released.
Charging will only be possible after applying the
parking brake.
The vehicle cannot be started while the charging
cable is connected.
BrakingFixed, accompanied by an audible signal
(3 beeps).
The brake fluid level has dropped significantly.
You must stop the vehicle.
Stop as soon as it is safe to do so and switch off
the ignition.
Check for the presence of a leak.
Call a dealer or qualified workshop.
Orange warning/indicator lamps
Service
Fixed, accompanied by an audible signal
(1 beep).
One or more major faults, for which there is/are
no specific warning lamp(s), have been detected.
Call a dealer or qualified workshop.
Fixed, combined with another warning
lamp.
Refer to the explanation for the corresponding
lamp.
Page 20 of 44
18
Driving
Driving recommendations
General information
► Observe the driving regulations and remain
vigilant whatever the traffic conditions.
►
Monitor your environment and keep your
hands on the wheel to be able to react to
anything that may happen any time.
►
Drive smoothly, anticipate the need for
braking and maintain a longer safety distance,
especially in bad weather
.
►
Stop the vehicle to carry out operations that
require close attention (such as adjustments).
Never drive with the parking brake
applied . Risk of overheating and
damaging the braking system!
Never leave a vehicle running unattended.
If the driver must leave the vehicle, the
parking brake must be applied and N mode
selected using the drive selector.
On flooded roads
We strongly advise against driving on flooded
roads, as this could seriously damage your
vehicle's motor and electrical systems.
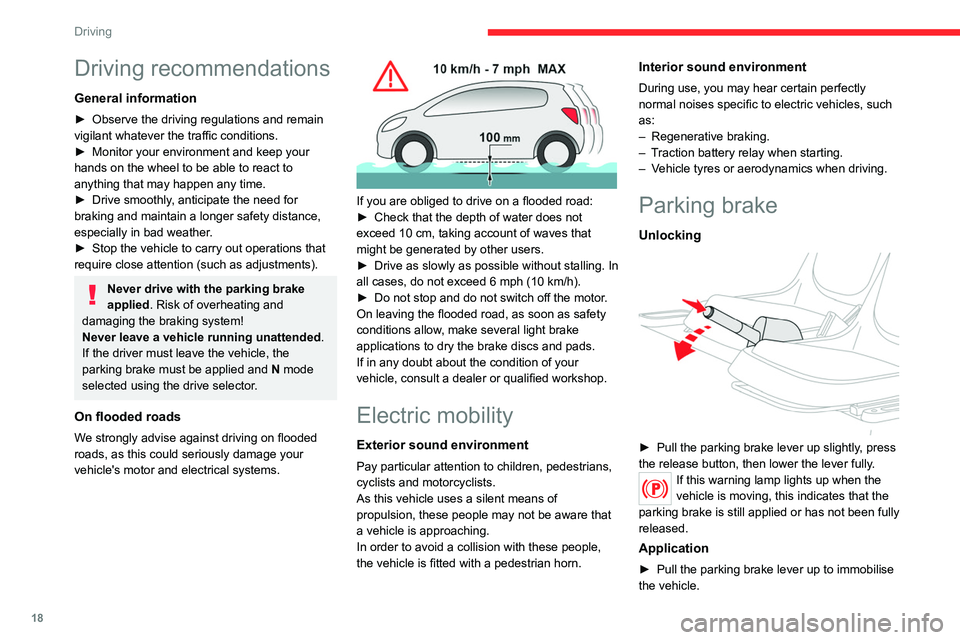
If you are obliged to drive on a flooded road:
► Check that the depth of water does not
exceed 10 cm, taking account of waves that
might be generated by other users.
►
Drive as slowly as possible without stalling. In
all cases, do not exceed 6 mph (10 km/h).
► Do not stop and do not switch off the motor.
On leaving the flooded road, as soon as safety
conditions allow
, make several light brake
applications to dry the brake discs and pads.
If in any doubt about the condition of your
vehicle, consult a dealer or qualified workshop.
Electric mobility
Exterior sound environment
Pay particular attention to children, pedestrians,
cyclists and motorcyclists.
As this vehicle uses a silent means of
propulsion, these people may not be aware that
a vehicle is approaching.
In order to avoid a collision with these people,
the vehicle is fitted with a pedestrian horn.
Interior sound environment
During use, you may hear certain perfectly
normal noises specific to electric vehicles, such
as:
–
Regenerative braking.
– Traction battery relay when starting.
– Vehicle tyres or aerodynamics when driving.
Parking brake
Unlocking
► Pull the parking brake lever up slightly, press
the release button, then lower the lever fully .
If this warning lamp lights up when the
vehicle is moving, this indicates that the
parking brake is still applied or has not been fully
released.
Application
► Pull the parking brake lever up to immobilise
the vehicle.
Page 21 of 44
19
Driving
6When parking on a slope, turn the
wheels against the kerb and/or place a
chock behind one of the wheels, apply the
parking brake and switch off the ignition.
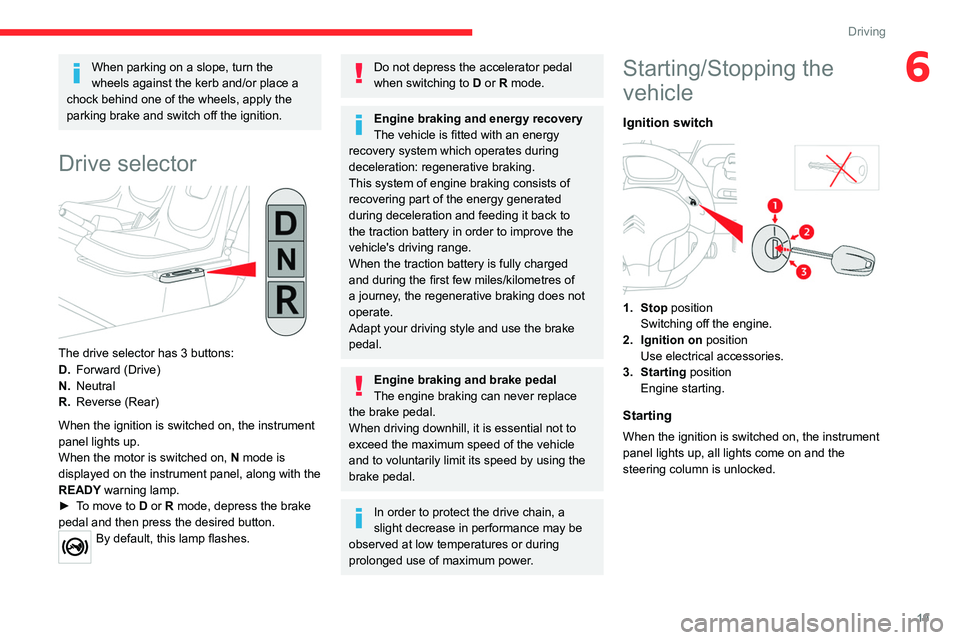
Drive selector
The drive selector has 3 buttons:
D. Forward (Drive)
N. Neutral
R. Reverse (Rear)
When the ignition is switched on, the instrument
panel lights up.
When the motor is switched on, N mode is
displayed on the instrument panel, along with the
READY warning lamp.
►
To move to
D or R mode, depress the brake
pedal and then press the desired button.
By default, this lamp flashes.
Do not depress the accelerator pedal
when switching to D or R mode.
Engine braking and energy recovery
The vehicle is fitted with an energy
recovery system which operates during
deceleration: regenerative braking.
This system of engine braking consists of
recovering part of the energy generated
during deceleration and feeding it back to
the traction battery in order to improve the
vehicle's driving range.
When the traction battery is fully charged
and during the first few miles/kilometres of
a journey, the regenerative braking does not
operate.
Adapt your driving style and use the brake
pedal.
Engine braking and brake pedal
The engine braking can never replace
the brake pedal.
When driving downhill, it is essential not to
exceed the maximum speed of the vehicle
and to voluntarily limit its speed by using the
brake pedal.
In order to protect the drive chain, a
slight decrease in performance may be
observed at low temperatures or during
prolonged use of maximum power.
Starting/Stopping the
vehicle
Ignition switch
1. Stop position Switching off the engine.
2. Ignition on position
Use electrical accessories.
3. Starting position Engine starting.
Starting
When the ignition is switched on, the instrument
panel lights up, all lights come on and the
steering column is unlocked.
Page 23 of 44
21
Practical information
Charging the traction
battery
Principle
The traction battery stores the energy needed
to operate the electric motor and the vehicle's
electrical cabin components. It is discharged
during use, and must therefore be regularly
recharged. There is no need to wait for the
traction battery to fall to its reserve level before
recharging.
The traction battery's driving range varies
according to the conditions of use: speed, driving
style, heating, load carried and road surface.
The traction battery's driving range can also
vary depending on whether the age of its
components.
Like any equipment with a lithium-ion battery,
the vehicle incorporates a protection mode to
optimise the durability of its traction battery.
Depending on the charge level and temperature
of its traction battery, power may be limited to
protect the battery cells.
This protection mode affects the maximum
speed of the vehicle at low charge level (< 20%)
and at low or high battery temperature (<
+5°C
or > +45°C).
The relief of the road, such as climbing a steep
slope, also affects the maximum speed that the
vehicle can reach.
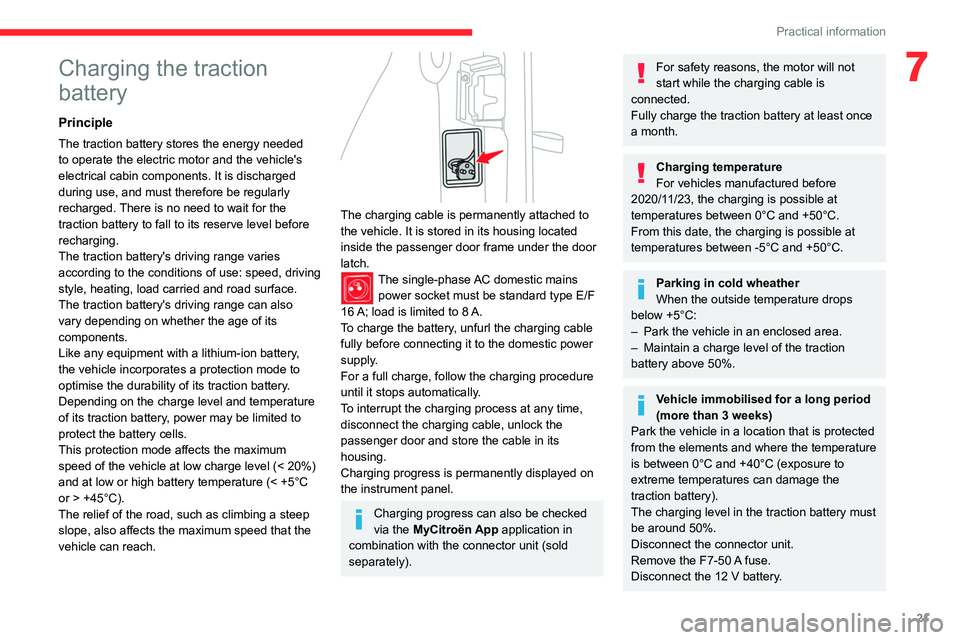
The charging cable is permanently attached to
the vehicle. It is stored in its housing located
inside the passenger door frame under the door
latch.
The single-phase AC domestic mains power socket must be standard type E/F
16
A; load is limited to 8 A.
To charge the battery, unfurl the charging cable
fully before connecting it to the domestic power
supply
.
For a full charge, follow the charging procedure
until it stops automatically.
To interrupt the charging process at any time,
disconnect the charging cable, unlock the
passenger door and store the cable in its
housing.
Charging progress is permanently displayed on
the instrument panel.
Charging progress can also be checked
via the MyCitroën App application in
combination with the connector unit (sold
separately).
For safety reasons, the motor will not
start while the charging cable is
connected.
Fully charge the traction battery at least once
a month.
Charging temperature
For vehicles manufactured before
2020/11/23, the charging is possible at
temperatures between 0°C and +50°C.
From this date, the charging is possible at
temperatures between -5°C and +50°C.
Parking in cold wheather
When the outside temperature drops
below +5°C:
–
Park the vehicle in an enclosed area.
–Maintain a charge level of the traction
battery above 50%.
Vehicle immobilised for a long period
(more than 3 weeks)
Park the vehicle in a location that is protected
from the elements and where the temperature
is between 0°C and +40°C (exposure to
extreme temperatures can damage the
traction battery).
The charging level in the traction battery must
be around 50%.
Disconnect the connector unit.
Remove the F7-50
A fuse.
Disconnect the 12 V battery.
7
Page 24 of 44
22
Practical information
Important recommendations
Power socket
Have a professional check that the
electrical system to be used complies with
applicable standards and is compatible with
the vehicle.
Always use a correctly earthed power socket,
protected by a 30
mA
residual current device.
Always use a power socket that is protected
by a circuit-breaker appropriate for the
electrical circuit’s current rating.
Charging cable
Incorrect use of this charging cable may
result in fire, property damage and serious
injury or death by electrocution!
Never use the charging cable if it is defective
or damaged in any way (corrosion, cuts).
Never attempt to repair or open the charging
cable.
If the charging cable is defective, consult
a dealer or qualified workshop to obtain a
replacement.
Never use the charging cable with an
extension cable, a multi-plug socket, a
conversion adaptor or in a damaged power
socket.
Never immerse the charging cable in water.
Never attempt to move the vehicle using the
charging cable.
Plugging in/Unplugging
Never plug the cable into the wall socket
(or unplug it) with wet hands.
Immediately stop charging if the charging
cable or wall socket become too hot to touch.
Do not expose it to flammable vapours - Risk
of electrical arcing or sparks!
After connecting the charging cable, check
that the instrument panel switches on,
otherwise disconnect and reconnect the
charging cable.
Charging will not start if the parking brake is
not applied.
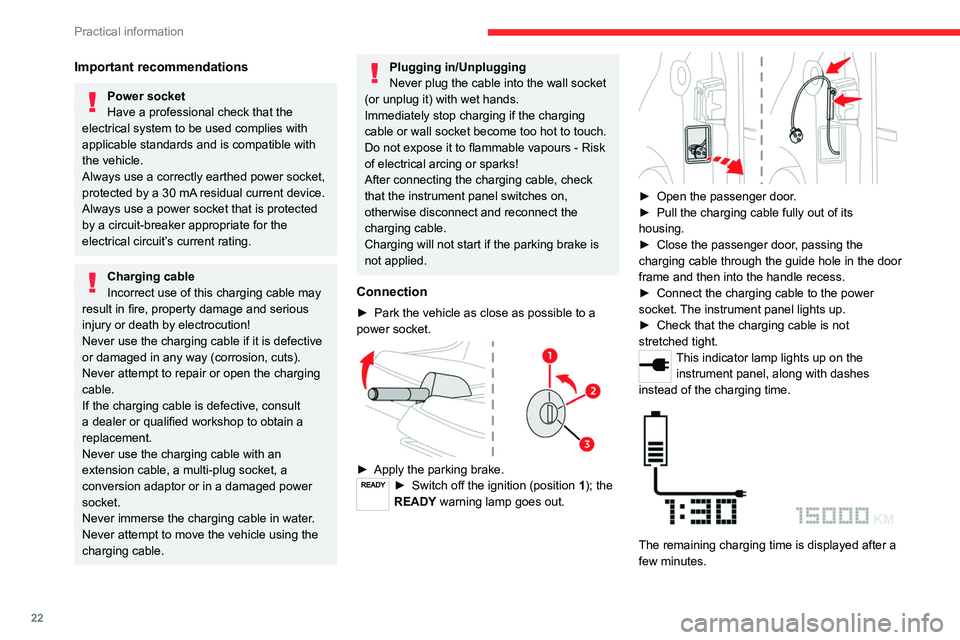
Connection
► Park the vehicle as close as possible to a
power socket.
► Apply the parking brake.► Switch off the ignition (position 1); the
READY warning lamp goes out.
► Open the passenger door.
► Pull the charging cable fully out of its
housing.
►
Close the passenger door, passing the
charging
cable through the guide hole in the door
frame and then into the handle recess.
►
Connect the charging cable to the power
socket. The instrument panel lights up.
►
Check that the charging cable is not
stretched tight.
This indicator lamp lights up on the instrument panel, along with dashes
instead of the charging time.
The remaining charging time is displayed after a
few minutes.
Page 39 of 44
37
Alphabetical index
M
Mains socket (domestic network) 22
Maintenance (advice) 25
Maintenance, routine 5, 15, 23–24
Markings, identification 35
Mirrors, door
10
Mobility
, electric
3, 18
Motor
, electric
23, 34
Multifunction control 13, 15
N
Number plate lamps 28
O
On-board tools 27
Opening the doors 9
Opening the windows 9
P
Pads, brake 24
Parking brake 18, 24
Port, USB
11
Pressures, tyres
25, 35
Protecting children 16–17
R
Range 5, 7
Recharging the battery 32
Recharging the traction battery 21–22
Recovery of the vehicle 33
Regenerative braking (deceleration
by engine braking)
19
Removing the battery 30
Removing the front bumper 23
Removing the rear bumper 30
Replacing bulbs 27
Replacing fuses 28
Reservoir
, screenwash
24
S
Safety (advice) 3, 15
Screen, monochrome 6
Screenwash 13
Screenwash fluid 24
Seat belts
15
Selector
, drive
19
Serial number
, vehicle
35
Servicing 15, 24–25
Smartphone 11
Starting/Stopping the vehicle 19
Starting using another battery 31
Stickers, customising ~ Stickers,
expressive
25–26
Storage
11
Suspension 25
T
Tables of fuses 28
T echnical data 34
Thermal comfort equipment 5
T
otal distance recorder
7
T
owing eye
33
T
raction battery
3, 21, 34
T
raction battery charge
7, 21–22
T
yres
25, 27, 35
V
Ventilation 10
W
Warning and indicator lamps 6
W arnings and indicators 6
W
ashing (advice)
26
W
eights
1
1, 34
Windows
9
Wiper blades (changing) 14
Wipers
13