CITROEN AMI 2022 User Guide
Manufacturer: CITROEN, Model Year: 2022, Model line: AMI, Model: CITROEN AMI 2022Pages: 44, PDF Size: 1.45 MB
Page 11 of 44

9
Access
2Doors
The vehicle has two doors which open in
opposite directions.
Do not open the door when moving.
From outside
► Turn the access key to the right/left in the
door lock to unlock/lock it.
► Press the door lock to partially open the door.
After unlocking a door, do not turn the key to the left as you risk being trapped
in the vehicle when the door is closed again.
From inside
► To open the driver's door, pull strap 1 at the
end of the dashboard.
►
To open the passenger door
, pull strap 2 to
the right of the passenger seat.
►
To close the door
, pull strap 3 in the middle
of the door.
Windows
Each window has two parts:
– A fixed upper section.
– A moveable lower section.
To open:
► Press the locking handle to release the
window.
►
Lift the window until it stops to keep it fully
open.
Take care when opening the window - there is a risk of it unlocking and
lowering while driving, if it is not properly
locked in the stopped position or on a very
uneven road surface.
To close:
►
Pull the window to unlock it from the outside.
► Lower the window fully until it locks in place.
► Press against the window to check that it is
locked.
Take care when closing a window - you risk trapping your fingers!
Page 12 of 44

10
Ease of use and comfort
Driver's seat
Longitudinal adjustment
► Lift the bar and slide the seat forwards or
backwards.
►
Release the bar to lock the seat in position on
one of the notches.
The passenger seat does not slide.
Door mirrors
The door mirrors are adjusted and folded
manually.
►
Move the door mirror in four directions in
order to obtain the best visibility.
Ventilation/Heating/
Demisting
The air circulating inside the passenger
compartment comes in from outside through an
opening at the base of the windscreen.
The controls are located on the central control
bar on the dashboard.
To ensure good air flow, be sure not to block the air inlet and extractors.
Ventilation
► Press this button to turn ventilation on/
off (confirmed by warning lamp lighting
up/going out).
Heating/Demisting
► Press this button to turn Heating/
Demisting on/off (confirmed by warning
lamp lighting up/going out).
The ventilation also turns on/off.
The demisting system reduces misting on the windscreen. If the side windows
are misted up, wipe them with a clean, soft
cloth.
Page 13 of 44
11
Ease of use and comfort
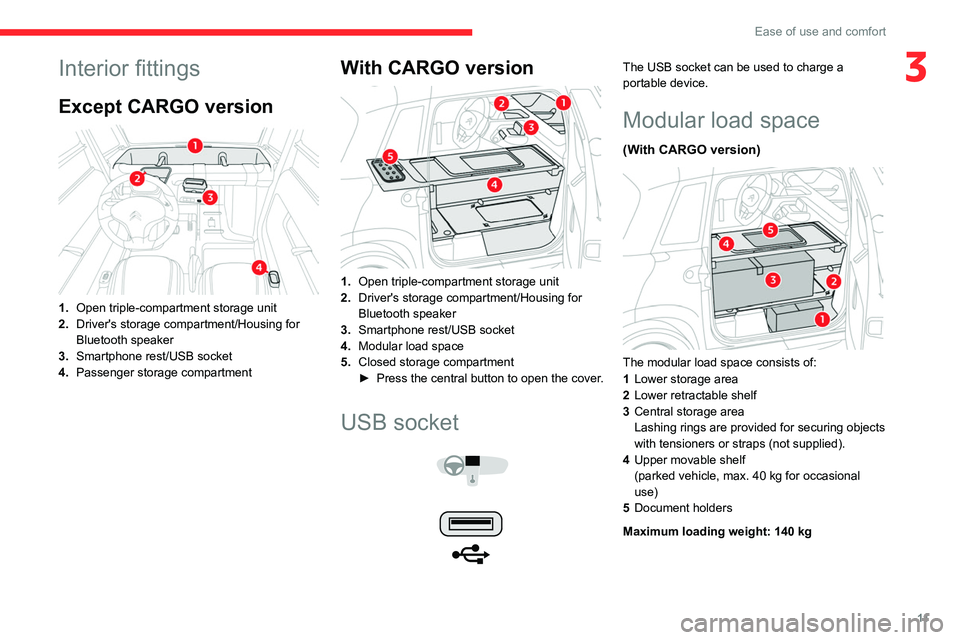
3Interior fittings
Except CARGO version
1.Open triple-compartment storage unit
2. Driver's storage compartment/Housing for
Bluetooth speaker
3. Smartphone rest/USB socket
4. Passenger storage compartment
With CARGO version
1.Open triple-compartment storage unit
2. Driver's storage compartment/Housing for
Bluetooth speaker
3. Smartphone rest/USB socket
4. Modular load space
5. Closed storage compartment
►
Press the
central button to open the cover.
USB socket
The USB socket can be used to charge a
portable device.
Modular load space
(With CARGO version)
The modular load space consists of:
1 Lower storage area
2 Lower retractable shelf
3 Central storage area
Lashing rings are provided for securing objects
with tensioners or straps (not supplied).
4 Upper movable shelf
(parked vehicle, max. 40
kg for occasional
use)
5 Document holders
Maximum loading weight: 140
kg
Page 14 of 44
12
Ease of use and comfort
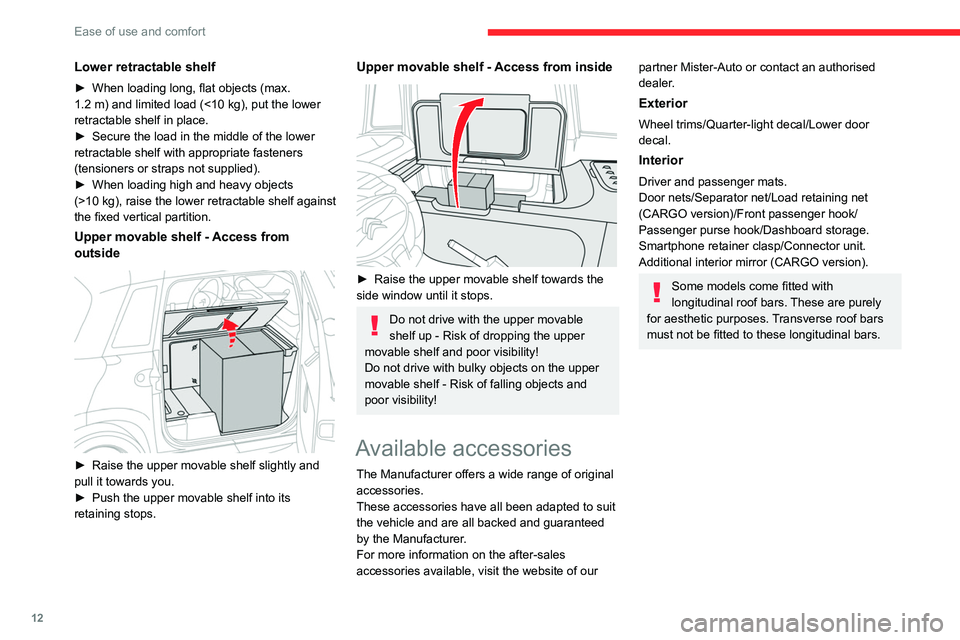
Lower retractable shelf
► When loading long, flat objects (max.
1.2 m) and limited load (<10 kg), put the lower
retractable shelf in place.
►
Secure the load in the middle of the lower
retractable shelf with appropriate fasteners
(tensioners or straps not supplied).
►
When loading high and heavy objects
(>10 kg), raise the lower retractable shelf against
the fixed vertical partition.
Upper movable shelf - Access from
outside
► Raise the upper movable shelf slightly and
pull it towards you.
►
Push the upper movable shelf into its
retaining stops.
Upper movable shelf - Access from inside
► Raise the upper movable shelf towards the
side window until it stops.
Do not drive with the upper movable
shelf up - Risk of dropping the upper
movable shelf and poor visibility!
Do not drive with bulky objects on the upper
movable shelf
- Risk of falling objects and
poor visibility!
Available accessories
The Manufacturer offers a wide range of original
accessories.
These accessories have all been adapted to suit
the vehicle and are all backed and guaranteed
by the Manufacturer.
For more information on the after-sales
accessories available, visit the website of our
partner Mister-Auto or contact an authorised
dealer.
Exterior
Wheel trims/Quarter-light decal/Lower door
decal.
Interior
Driver and passenger mats.
Door nets/Separator net/Load retaining net
(CARGO version)/Front passenger hook/
Passenger purse hook/Dashboard storage.
Smartphone retainer clasp/Connector unit.
Additional interior mirror (CARGO version).
Some models come fitted with
longitudinal roof bars. These are purely
for aesthetic purposes. Transverse roof bars
must not be fitted to these longitudinal bars.
Page 15 of 44

13
Lighting and visibility
4Exterior lighting
When the ignition is switched on, all the lights
come on (sidelamps, dipped beam headlamps
and number plate lamps).
When the ignition is switched off, all the lights
go out.
In some weather conditions (e.g. low
temperature or humidity), misting on the
internal surface of the glass of the headlamps
and rear lamps is normal, and will disappear
after the lamps have been on for a few
minutes.
Never look too closely at the light beam
of LED lamps/headlamps: risk of serious
eye injury!
Direction indicators
► Left or right: lower or raise the multifunction
control stalk beyond the point of resistance.
Three flashes
► Press briefly upwards or downwards (without
going beyond the point of resistance) and the
direction indicators will flash 3 times.
Wipers/Screenwash
Wipers
► Turn the knob to the desired position:Continuous wipe
Intermittent wipe
Switching off
Before operating the wipers in wintry
conditions, clear any snow, ice or frost
from the windscreen, and from around the
wiper arms and blades.
Never operate the wipers when the
windscreen is dry. Before operating the
wipers when the weather is extremely cold or
hot, check that the wiper blades are not stuck
to the windscreen.
Screenwash
► Pull the wiper control stalk towards you and
hold.
The screenwash operates as long as you hold
the multifunction control stalk, followed by a
cycle of 5 wipes when you release the stalk.
To avoid damaging the wiper blades, do not operate the screenwash if the
screenwash reservoir is empty.
Only operate the screenwash if there is no
risk of the fluid freezing on the windscreen
and hindering visibility. In winter, use "very
cold climate" rated products.
Never top up with water.
To ensure flat-bladed wipers remain effective:
–
Handle them with care.
– Clean them regularly using soapy water.
– Do not use them to hold a piece of
cardboard against the windscreen.
Page 16 of 44

14
Lighting and visibility
– Replace them at the first signs of wear.
Changing a wiper blade
Removing/refitting
Take care not to hold the arms at the jet locations.
Do not touch the wiper blades. Risk of
irreparable damage.
Do not release them while moving them. Risk
of damaging the windscreen!
►
Clean the windscreen using screenwash
fluid.
►
Grasp the wiper blade by its rigid part and
pull it towards you as far as it will go.
►
While keeping the wiper arm raised, unclip
the worn blade and remove it.
►
While keeping the wiper arm raised, install
the new blade and clip it into place.
►
Lower the arm carefully and support it until it
reaches the windscreen.
Page 17 of 44
15
Safety
5Safety - General
recommendations
Do not remove the labels attached in
different places on your vehicle. They
include safety warnings as well as
identification information for the vehicle.
For any work on your vehicle, use a
qualified workshop that has the technical
information, skills and equipment required, all
of which a dealer or qualified workshop is
able to provide.
Depending on national regulations,
certain safety equipment may be
mandatory: high visibility safety vests,
warning triangles, breathalysers, spare bulbs,
spare fuses, fire extinguisher, first aid kit, etc.
Installing equipment and accessories
Fitting electrical equipment or
accessories not approved by the
Manufacturer may cause excessive power
consumption and faults in your vehicle's
electrical system. Contact a dealer or
qualified workshop for information on the
range of approved accessories.
Any modification or adaptation not intended or
authorised by the Manufacturer or carried out
without meeting the technical requirements
defined by the Manufacturer will result in the
suspension of the commercial warranty.
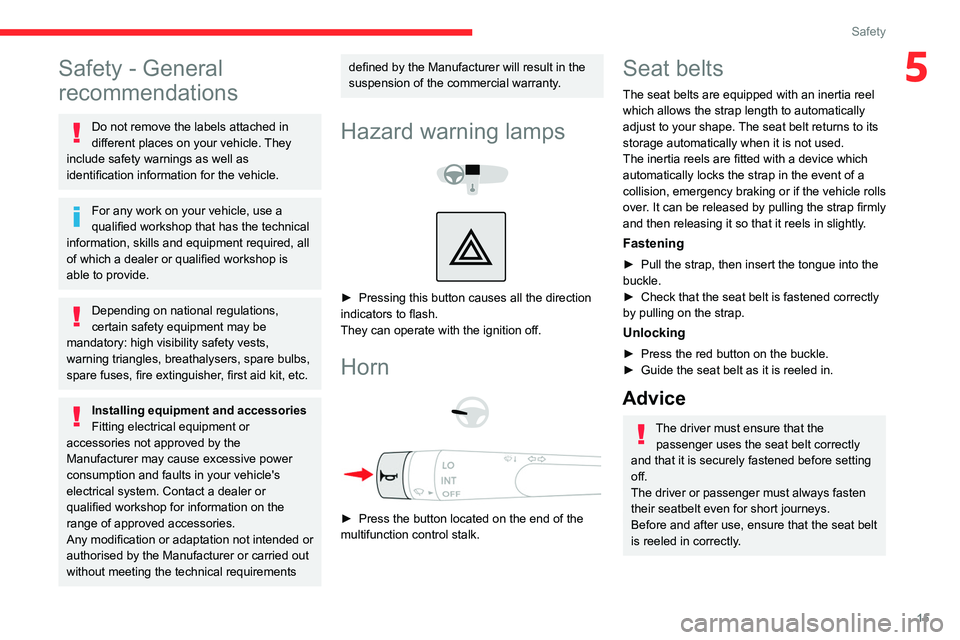
Hazard warning lamps
► Pressing this button causes all the direction
indicators to flash.
They can operate with the ignition off.
Horn
► Press the button located on the end of the
multifunction control stalk.
Seat belts
The seat belts are equipped with an inertia reel
which allows the strap length to automatically
adjust to your shape. The seat belt returns to its
storage automatically when it is not used.
The inertia reels are fitted with a device which
automatically locks the strap in the event of a
collision, emergency braking or if the vehicle rolls
over. It can be released by pulling the strap firmly
and then releasing it so that it reels in slightly.
Fastening
► Pull the strap, then insert the tongue into the
buckle.
►
Check that the seat belt is fastened correctly
by pulling on the strap.
Unlocking
► Press the red button on the buckle.
► Guide the seat belt as it is reeled in.
Advice
The driver must ensure that the passenger uses the seat belt correctly
and that it is securely fastened before setting
off.
The driver or passenger must always fasten
their seatbelt even for short journeys.
Before and after use, ensure that the seat belt
is reeled in correctly.
Page 18 of 44
16
Safety
Installation
The lower part of the strap must be
positioned as low as possible on the pelvis.
The upper part must be positioned in the
hollow of the shoulder.
In order to be effective, a seat belt must:
–
be tightened as close to the body as
possible.
–
be pulled in front of you with a smooth
movement, checking that it is not twisted.
–
must only be used to secure one person.
– must not show signs of tearing or fraying.
– must not be changed or modified, in order
to avoid affecting its performance.
Recommendations for children
Use a suitable child seat if the passenger
is less than 12 years old or shorter than one
and a half metres.
Make sure that the seat belt is correctly
positioned and tightened.
Never use the same seat belt to secure more
than one child.
Never carry a child on your lap.
For more information on Child seats, refer to
the corresponding section.
Maintenance
Have the seat belts checked regularly by
a dealer or qualified workshop, particularly if
the straps show signs of damage.
Clean the seat belt straps with soapy water or
a textile cleaning product, sold by dealers or
qualified workshops.
Child seats
The regulations on carrying children are specific to each country. Refer to the
legislation in force in your country.
For maximum safety, please observe the
following recommendations:
–
In accordance with European regulations,
all children under the age of 12 or less than
1.5 metres tall must travel in approved child
seats appropriate for their weight , on seats
fitted with a seat belt.
–
Children weighing less than 9 kg must
travel in the "rearward facing" position .
Advice
An incorrectly installed child seat in a
vehicle compromises the child's safety in
the event of an accident.
Ensure that there is no seat belt or seat belt
buckle under the child seat, as this could
destabilise it.
Remember to fasten the seat belts or the
child seat harness keeping the slack relative
to the child's body to a minimum, even for
short journeys.
Check that the seat belt is properly tightened
over the child seat and that it holds the child
seat firmly against the vehicle seat.
For child seats with a support leg, ensure that
the support leg is in firm and steady contact
with the floor.
Installing a booster seat
The chest part of the seat belt must be
positioned on the child's shoulder without
touching the neck.
Ensure that the lap part of the seat belt
passes correctly over the child's thighs.
Use a booster seat with a backrest, equipped
with a belt guide at shoulder level.
As a safety measure, do not leave: – A child alone and unsupervised inside
the vehicle.
–
A child or an animal in a vehicle exposed to
the sun with the windows closed.
–
The keys inside the vehicle.
Page 19 of 44
17
Safety
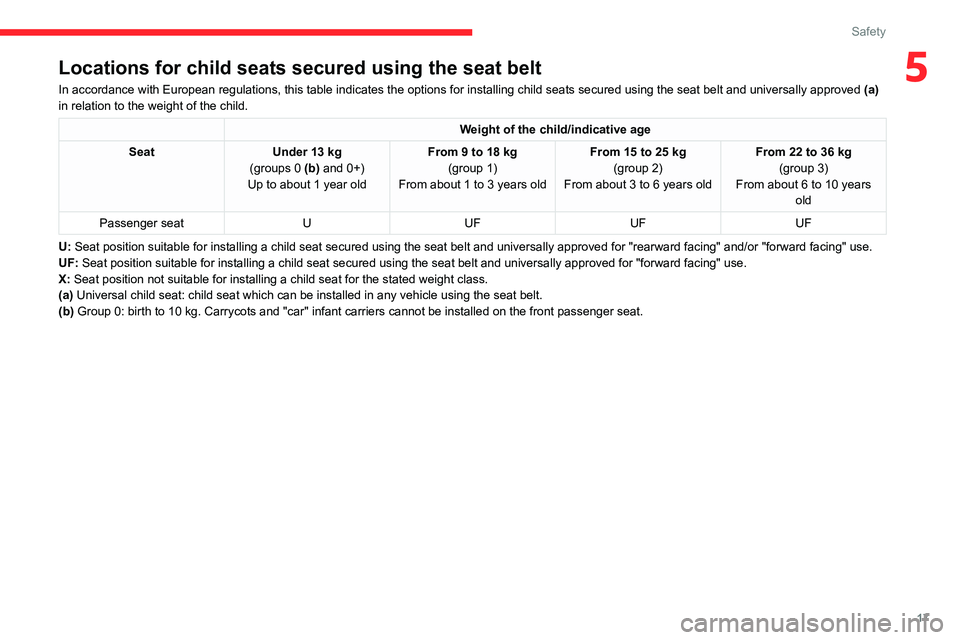
5Locations for child seats secured using the seat belt
In accordance with European regulations, this table indicates the option\
s for installing child seats secured using the seat belt and universally\
approved (a)
in relation to the weight of the child.
Weight of the child/indicative age
Seat Under 13
kg
(groups 0
(b) and 0+)
Up to about 1 year old From 9 to 18
kg
(group 1)
From about 1 to 3 years old From 15 to 25 kg
(group 2)
From about 3 to 6 years old From 22 to 36 kg
(group 3)
From about 6 to 10 years old
Passenger seat UUF UFUF
U:
Seat position suitable for installing a child seat secured using the se\
at belt and universally approved for "rearward facing" and/or "forward f\
acing" use.
UF: Seat position suitable for installing a child seat secured using the se\
at belt and universally approved for "forward facing" use.
X: Seat position not suitable for installing a child seat for the stated w\
eight class.
(a) Universal child seat: child seat which can be installed in any vehicle \
using the seat belt.
(b)
Group 0: birth to 10 kg. Carrycots and "car" infant carriers cannot be installed on the front\
passenger seat.
Page 20 of 44

18
Driving
Driving recommendations
General information
► Observe the driving regulations and remain
vigilant whatever the traffic conditions.
►
Monitor your environment and keep your
hands on the wheel to be able to react to
anything that may happen any time.
►
Drive smoothly, anticipate the need for
braking and maintain a longer safety distance,
especially in bad weather
.
►
Stop the vehicle to carry out operations that
require close attention (such as adjustments).
Never drive with the parking brake
applied . Risk of overheating and
damaging the braking system!
Never leave a vehicle running unattended.
If the driver must leave the vehicle, the
parking brake must be applied and N mode
selected using the drive selector.
On flooded roads
We strongly advise against driving on flooded
roads, as this could seriously damage your
vehicle's motor and electrical systems.
If you are obliged to drive on a flooded road:
► Check that the depth of water does not
exceed 10 cm, taking account of waves that
might be generated by other users.
►
Drive as slowly as possible without stalling. In
all cases, do not exceed 6 mph (10 km/h).
► Do not stop and do not switch off the motor.
On leaving the flooded road, as soon as safety
conditions allow
, make several light brake
applications to dry the brake discs and pads.
If in any doubt about the condition of your
vehicle, consult a dealer or qualified workshop.
Electric mobility
Exterior sound environment
Pay particular attention to children, pedestrians,
cyclists and motorcyclists.
As this vehicle uses a silent means of
propulsion, these people may not be aware that
a vehicle is approaching.
In order to avoid a collision with these people,
the vehicle is fitted with a pedestrian horn.
Interior sound environment
During use, you may hear certain perfectly
normal noises specific to electric vehicles, such
as:
–
Regenerative braking.
– Traction battery relay when starting.
– Vehicle tyres or aerodynamics when driving.
Parking brake
Unlocking
► Pull the parking brake lever up slightly, press
the release button, then lower the lever fully .
If this warning lamp lights up when the
vehicle is moving, this indicates that the
parking brake is still applied or has not been fully
released.
Application
► Pull the parking brake lever up to immobilise
the vehicle.