Screen display Citroen BERLINGO 2014 2.G Owner's Manual
[x] Cancel search | Manufacturer: CITROEN, Model Year: 2014, Model line: BERLINGO, Model: Citroen BERLINGO 2014 2.GPages: 268, PDF Size: 13.39 MB
Page 29 of 268
2
Instruments and controls
27
READY TO GO
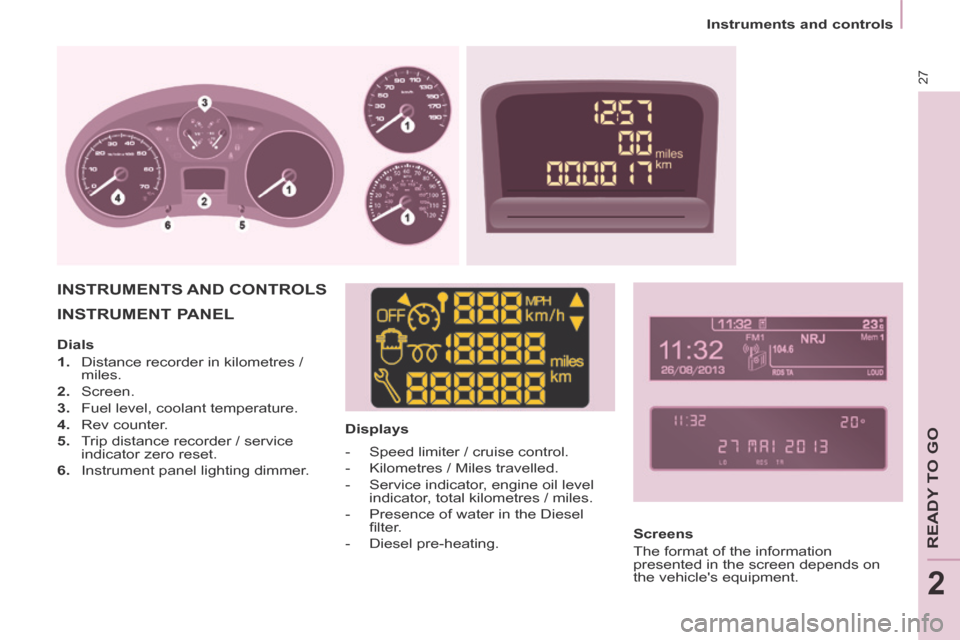
INSTRUMENT PANEL
Displays
INSTRUMENTS AND CONTROLS
Screens
The format of the information
presented in the screen depends on
the vehicle's equipment.
Dials
1. Distance recorder in kilometres /
miles.
2. Screen.
3. Fuel level, coolant temperature.
4. Rev counter.
5. Trip distance recorder / service indicator zero reset.
6. Instrument panel lighting dimmer. - Speed limiter / cruise control.
- Kilometres / Miles travelled.
- Service indicator, engine oil level
indicator, total kilometres / miles.
- Presence of water in the Diesel fi lter.
- Diesel pre-heating.
Page 30 of 268
Instruments and controls
28
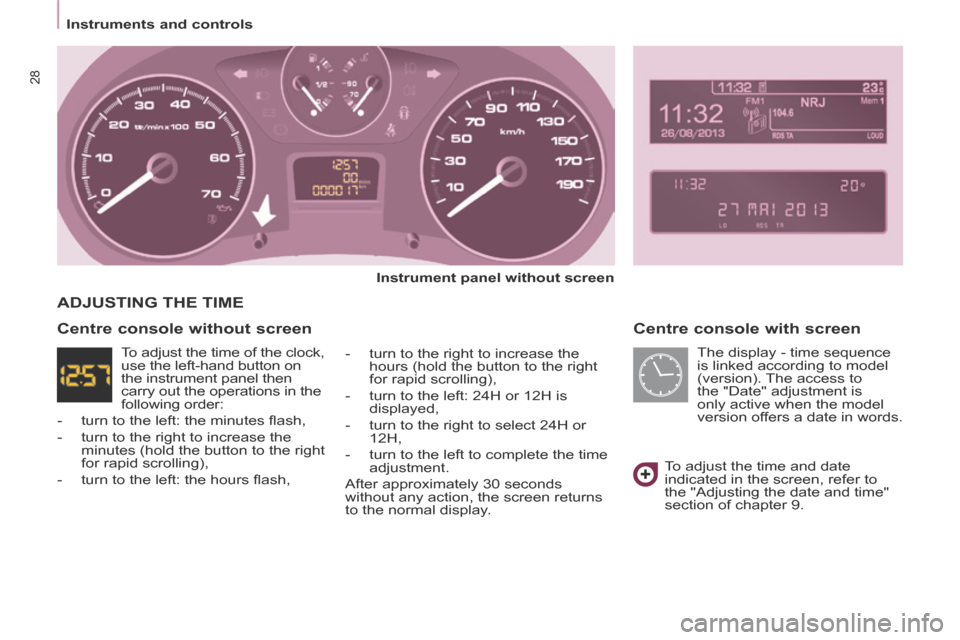
Centre console with screen
Instrument panel without screen
- turn to the right to increase the hours (hold the button to the right
for rapid scrolling),
- turn to the left: 24H or 12H is displayed,
- turn to the right to select 24H or 12H,
- turn to the left to complete the time adjustment.
After approximately 30 seconds
without any action, the screen returns
to the normal display.
ADJUSTING THE TIME
To adjust the time and date
indicated in the screen, refer to
the "Adjusting the date and time"
section of chapter 9.
Centre console without screen
The display - time sequence
is linked according to model
(version). The access to
the "Date" adjustment is
only active when the model
version offers a date in words.
To adjust the time of the clock,
use the left-hand button on
the instrument panel then
carry out the operations in the
following order:
- turn to the left: the minutes fl ash,
- turn to the right to increase the minutes (hold the button to the right
for rapid scrolling),
- turn to the left: the hours fl ash,
Page 32 of 268
Instruments and controls
30 Warning lamp is indicates Solution - action
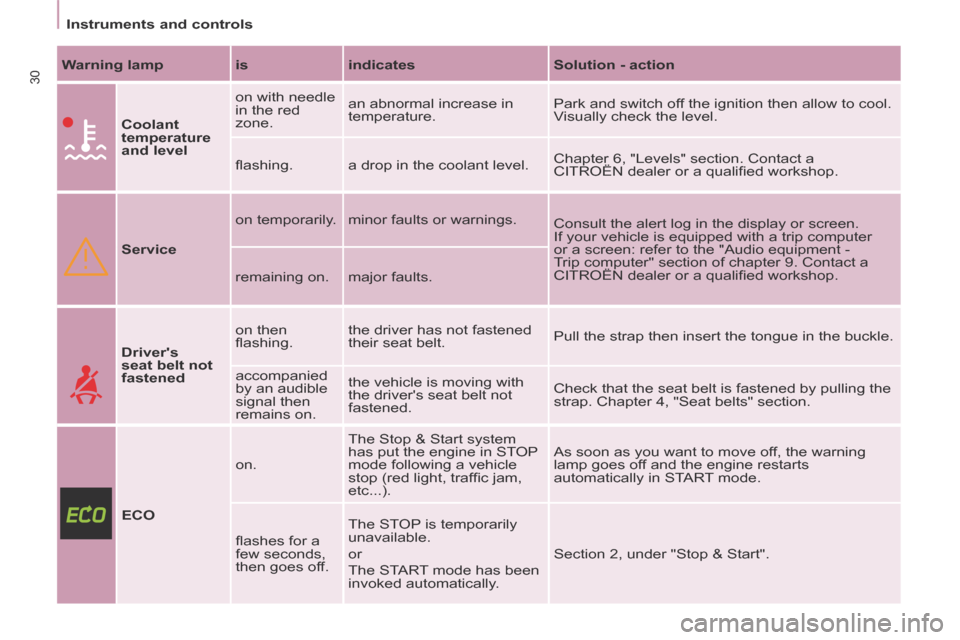
Coolant
temperature
and level on with needle
in the red
zone.
an abnormal increase in
temperature.
Park and switch off the ignition then allow to cool.
Visually check the level.
fl ashing. a drop in the coolant level. Chapter 6, "Levels" section. Contact a
CITROËN dealer or a qualifi ed workshop.
Service on temporarily.
minor faults or warnings.
Consult the alert log in the display or screen.
If your vehicle is equipped with a trip computer
or a screen: refer to the "Audio equipment -
Trip computer" section of chapter 9. Contact a
CITROËN dealer or a qualifi ed workshop.
remaining on. major faults.
Driver's
seat belt not
fastened on then
fl ashing.
the driver has not fastened
their seat belt.
Pull the strap then insert the tongue in the buckle.
accompanied
by an audible
signal then
remains on. the vehicle is moving with
the driver's seat belt not
fastened.
Check that the seat belt is fastened by pulling the
strap. Chapter 4, "Seat belts" section.
ECO on.
The Stop & Start system
has put the engine in STOP
mode following a vehicle
stop (red light, traffi c jam,
etc...). As soon as you want to move off, the warning
lamp goes off and the engine restarts
automatically in START mode.
fl ashes for a
few seconds,
then goes off. The STOP is temporarily
unavailable.
or
The START mode has been
invoked automatically.
Section 2, under "Stop & Start".
Page 34 of 268
+
ABS
Instruments and controls
32 Warning lamp is indicates Solution - action
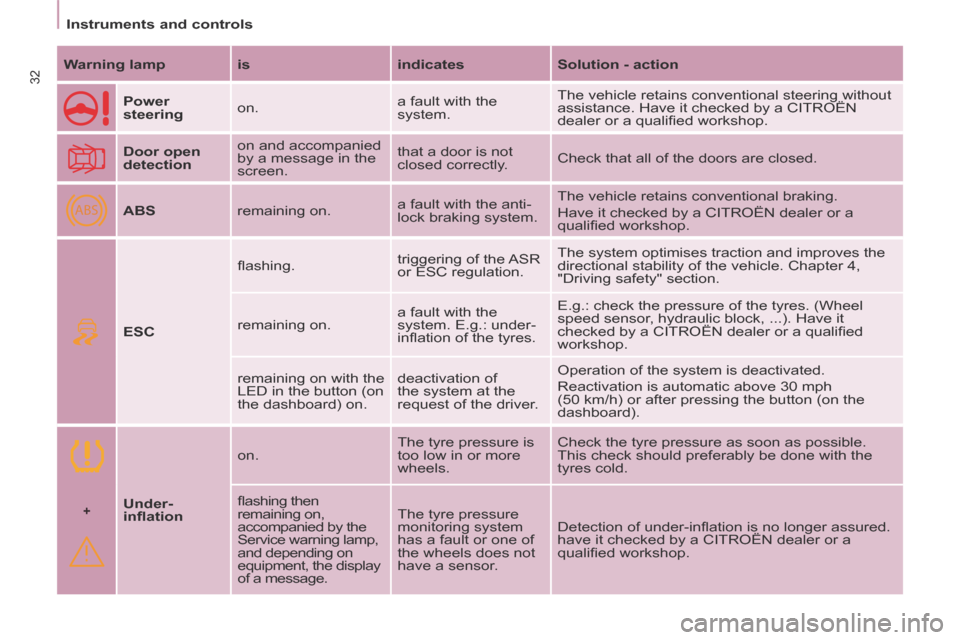
Power
steering on. a fault with the
system. The vehicle retains conventional steering without
assistance. Have it checked by a CITROËN
dealer or a qualifi ed workshop.
Door open
detection on and accompanied
by a message in the
screen. that a door is not
closed correctly.
Check that all of the doors are closed.
ABS remaining on. a fault with the anti-
lock braking system. The vehicle retains conventional braking.
Have it checked by a CITROËN dealer or a
qualifi ed workshop.
ESC fl ashing.
triggering of the ASR
or ESC regulation. The system optimises traction and improves the
directional stability of the vehicle. Chapter 4,
"Driving safety" section.
remaining on. a fault with the
system. E.g.: under-
infl ation of the tyres. E.g.: check the pressure of the tyres. (Wheel
speed sensor, hydraulic block, ...). Have it
checked by a CITROËN dealer or a qualifi ed
workshop.
remaining on with the
LED in the button (on
the dashboard) on. deactivation of
the system at the
request of the driver. Operation of the system is deactivated.
Reactivation is automatic above 30 mph
(50 km/h) or after pressing the button (on the
dashboard).
Under-
infl ation on.
The tyre pressure is
too low in or more
wheels. Check the tyre pressure as soon as possible.
This check should preferably be done with the
tyres cold.
fl ashing then
remaining on,
accompanied by the
Service warning lamp,
and depending on
equipment, the display
of a message. The tyre pressure
monitoring system
has a fault or one of
the wheels does not
have a sensor.
Detection of under-infl ation is no longer assured.
have it checked by a CITROËN dealer or a
qualifi ed workshop.
Page 40 of 268
Instruments and controls
38
SERVICE INDICATOR
This programmes service intervals
according to the use of the vehicle. More than 1 000 miles/km before the
next service is due
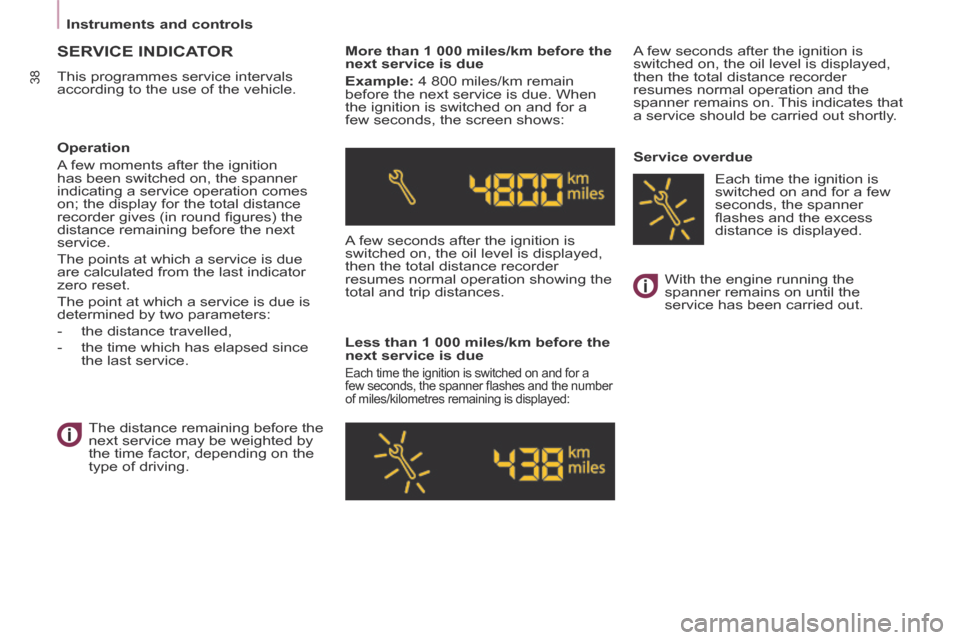
Example: 4 800 miles/km remain
before the next service is due. When
the ignition is switched on and for a
few seconds, the screen shows:
A few seconds after the ignition is
switched on, the oil level is displayed,
then the total distance recorder
resumes normal operation showing the
total and trip distances.
Less than 1 000 miles/km before the
next service is due
Each time the ignition is switched on and for a
few seconds, the spanner fl ashes and the number
of miles/kilometres remaining is displayed:
A few seconds after the ignition is
switched on, the oil level is displayed,
then the total distance recorder
resumes normal operation and the
spanner remains on. This indicates that
a service should be carried out shortly.
Service overdue
Operation
A few moments after the ignition
has been switched on, the spanner
indicating a service operation comes
on; the display for the total distance
recorder gives (in round fi gures) the
distance remaining before the next
service.
The points at which a service is due
are calculated from the last indicator
zero reset.
The point at which a service is due is
determined by two parameters:
- the distance travelled,
- the time which has elapsed since
the last service.
The distance remaining before the
next service may be weighted by
the time factor, depending on the
type of driving. With the engine running the
spanner remains on until the
service has been carried out.
Each time the ignition is
switched on and for a few
seconds, the spanner
fl ashes and the excess
distance is displayed.
Page 41 of 268
2
Instruments and controls
39
READY TO GO
Trip recorder zero reset button
After this operation, if you wish to
disconnect the battery, lock the
vehicle and wait for at least fi ve
minutes, otherwise the zero re-set will
not be registered.
Zero re-set
Your CITROËN dealer or a qualifi ed
workshop carries out this operation
after each service.
However, if you carry out the service
yourself, the re-set procedure is as
follows:
- switch off the ignition,
- press and hold the trip recorder reset button,
- switch on the ignition.
The display begins a countdown.
When the display shows "=0" , release
the button; the spanner disappears.
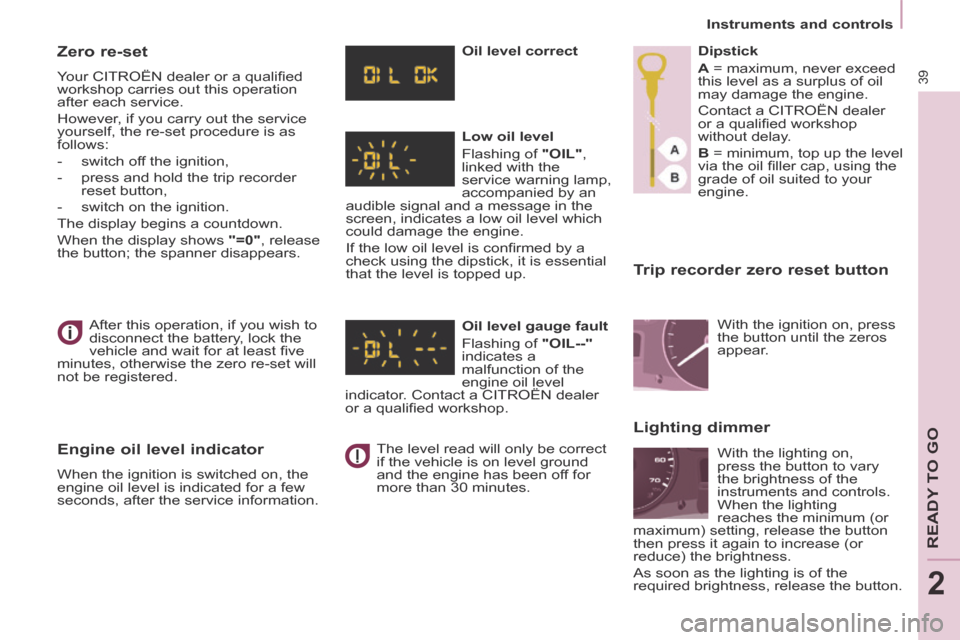
Engine oil level indicator
When the ignition is switched on, the
engine oil level is indicated for a few
seconds, after the service information. Oil level correct
Low oil level
Flashing of
"OIL" ,
linked with the
service warning lamp,
accompanied by an
audible signal and a message in the
screen, indicates a low oil level which
could damage the engine.
If the low oil level is confi rmed by a
check using the dipstick, it is essential
that the level is topped up.
Oil level gauge fault
Flashing of "OIL--"
indicates a
malfunction of the
engine oil level
indicator. Contact a CITROËN dealer
or a qualifi ed workshop.
The level read will only be correct
if the vehicle is on level ground
and the engine has been off for
more than 30 minutes. Dipstick
A = maximum, never exceed
this level as a surplus of oil
may damage the engine.
Contact a CITROËN dealer
or a qualifi ed workshop
without delay.
B = minimum, top up the level
via the oil fi ller cap, using the
grade of oil suited to your
engine.
Lighting dimmer
With the ignition on, press
the button until the zeros
appear.
With the lighting on,
press the button to vary
the brightness of the
instruments and controls.
When the lighting
reaches the minimum (or
maximum) setting, release the button
then press it again to increase (or
reduce) the brightness.
As soon as the lighting is of the
required brightness, release the button.
Page 47 of 268
2
Stop & Start
45
READY TO GO
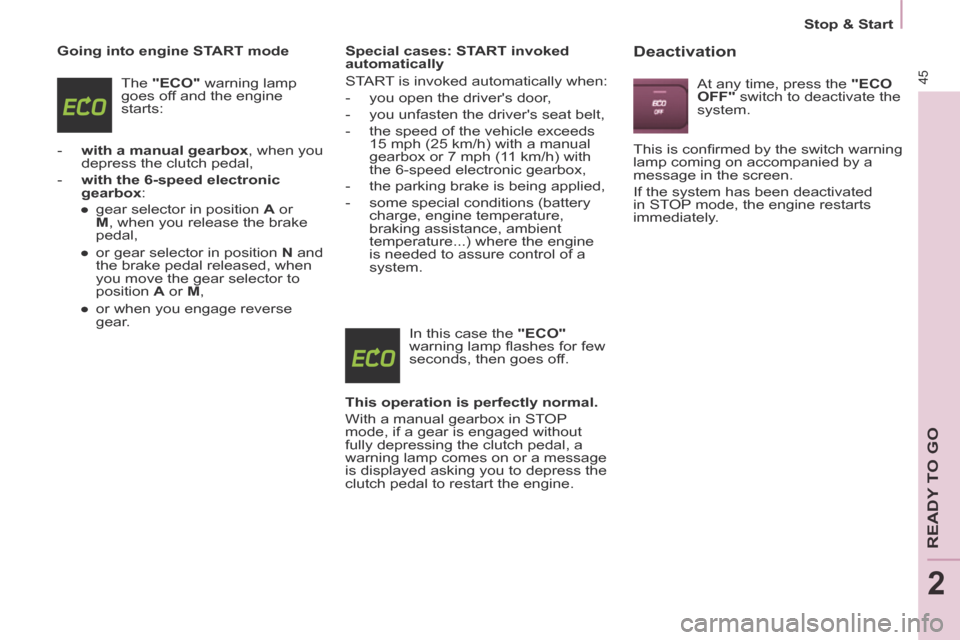
Going into engine START mode The "ECO" warning lamp
goes off and the engine
starts:
- with a manual gearbox , when you depress the clutch pedal,
- with the 6-speed electronic gearbox :
● gear selector in position A or
M , when you release the brake
pedal,
● or gear selector in position N and
the brake pedal released, when
you move the gear selector to
position A or M ,
● or when you engage reverse gear. Special cases: START invoked
automatically
START is invoked automatically when:
- you open the driver's door,
- you unfasten the driver's seat belt,
- the speed of the vehicle exceeds
15 mph (25 km/h) with a manual
gearbox or 7 mph (11 km/h) with
the 6-speed electronic gearbox,
- the parking brake is being applied,
- some special conditions (battery charge, engine temperature,
braking assistance, ambient
temperature...) where the engine
is needed to assure control of a
system.
In this case the "ECO"
warning lamp fl ashes for few
seconds, then goes off.
This operation is perfectly normal.
With a manual gearbox in STOP
mode, if a gear is engaged without
fully depressing the clutch pedal, a
warning lamp comes on or a message
is displayed asking you to depress the
clutch pedal to restart the engine. Deactivation
At any time, press the "ECO
OFF" switch to deactivate the
system.
This is confi rmed by the switch warning
lamp coming on accompanied by a
message in the screen.
If the system has been deactivated
in STOP mode, the engine restarts
immediately.
Page 64 of 268
Ventilation
62
Good practice
For maximum cooling or heating of the
passenger compartment, it is possible
to exceed the value 15 by turning until
LO is displayed or the value 27 by
turning until HI is displayed.
On entering the vehicle, the inside
temperature may be much colder (or
warmer) than is comfortable. There is
no advantage in changing the value
displayed in order to quickly reach the
level of comfort required. The system
will use its maximum performance to
reach the comfort value set.
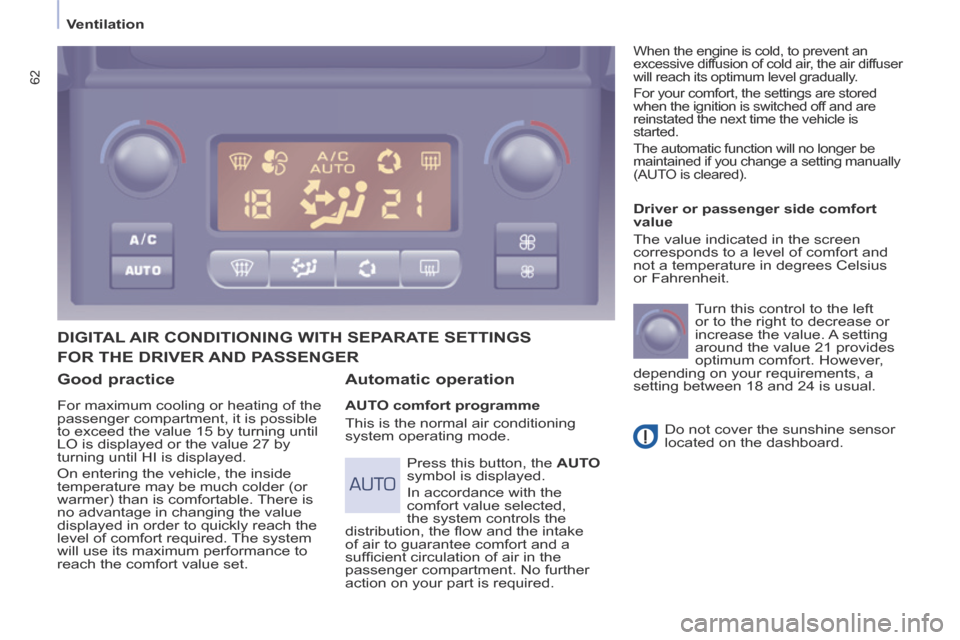
DIGITAL AIR CONDITIONING WITH SEPARATE SETTINGS
Automatic operation
AUTO comfort programme
This is the normal air conditioning
system operating mode. Driver or passenger side comfort
value
The value indicated in the screen
corresponds to a level of comfort and
not a temperature in degrees Celsius
or Fahrenheit.
Turn this control to the left
or to the right to decrease or
increase the value. A setting
around the value 21 provides
optimum comfort. However,
depending on your requirements, a
setting between 18 and 24 is usual.
Do not cover the sunshine sensor
located on the dashboard.
Press this button, the AUTO
symbol is displayed.
In accordance with the
comfort value selected,
the system controls the
distribution, the fl ow and the intake
of air to guarantee comfort and a
suffi cient circulation of air in the
passenger compartment. No further
action on your part is required.
When the engine is cold, to prevent an
excessive diffusion of cold air, the air diffuser
will reach its optimum level gradually.
For your comfort, the settings are stored
when the ignition is switched off and are
reinstated the next time the vehicle is
started.
The automatic function will no longer be
maintained if you change a setting manually
(AUTO is cleared).
FOR THE DRIVER AND PASSENGER
Page 65 of 268
Ventilation
63
EASE OF U
SE and
COMFORT
3
Manual operation
You can, according to your
requirements, make a different selection
from that offered by the system by
changing a setting. The other functions
will still be controlled automatically.
Pressing the AUTO button restores fully
automatic operation.
Air distribution
Pressing this button several
times in succession directs
the air fl ow towards:
- the windscreen,
- the windscreen and footwells,
- the footwells,
- the side vents, central vents and footwells,
- the side vents and central vents. Air fl ow
Press the
small fan button to
reduce the fl ow or the large
fan button to increase the
fl ow.
On the display, the blades of the fan fi ll
when the fl ow is increased.
Switching the air
conditioning On / Off
Press this button, the A/C
symbol is displayed and the
air conditioning is activated.
Deactivating the system
Press the air fl ow
small fan
button until the fan symbol
disappears from the display.
This action deactivates all
of the system's functions, with the
exception of the air recirculation and
rear screen demisting (if fi tted on your
vehicle). Your comfort setting is no
longer maintained and is switched off. Intake of exterior air /
Recirculation of interior air
Press this button to
recirculate the interior air.
The recirculation symbol is
displayed.
Pressing the large fan
button or the AUTO button
reactivates the system with
the values set before it was
deactivated. Recirculation prevents exterior
odours and smoke from entering
the passenger compartment. Avoid
prolonged operation in interior
air recirculation mode (risk of
condensation, odour and humidity).
Pressing this button again activates the
intake of exterior air.
Pressing this button again switches off
the air conditioning.
The ventilation outlet, located
in the glove box, diffuses cool
air (if the air conditioning is
on) regardless of the reference
temperature requested in the
passenger compartment and
regardless of the exterior temperature.
For your comfort, do not deactivate the
system for long periods.
Page 106 of 268

104
Parking sensors
The audible and/or visual rear parking
sensor system consists of four
proximity sensors, installed in the
rear bumper. The sensors detect any
obstacle which enters the fi eld: person,
vehicle, tree, fence, behind the vehicle
during the manoeuvre.
Certain objects detected at the
beginning of the manoeuvre will no
longer be detected at the end of the
manoeuvre due to the blind spots
between and below the sensors.
Examples: stake, roadworks cone or
pavement post.
Engage reverse gear
REAR PARKING SENSORS
Display in the screen
Stop the assistance
Change to neutral.
An audible signal confi rms the
activation of the system by engaging
reverse gear.
The proximity information is indicated
by an audible signal which becomes
more rapid as the vehicle approaches
the obstacle. When the distance
between the rear of the vehicle and
the obstacle is less than approximately
thirty centimetres, the audible signal
becomes continuous.