light Citroen BERLINGO MULTISPACE RHD 2014.5 2.G User Guide
[x] Cancel search | Manufacturer: CITROEN, Model Year: 2014.5, Model line: BERLINGO MULTISPACE RHD, Model: Citroen BERLINGO MULTISPACE RHD 2014.5 2.GPages: 276, PDF Size: 12.15 MB
Page 38 of 276
Berlingo_2_VP_en_Chap03_Pret-a-partir_ed02-2014
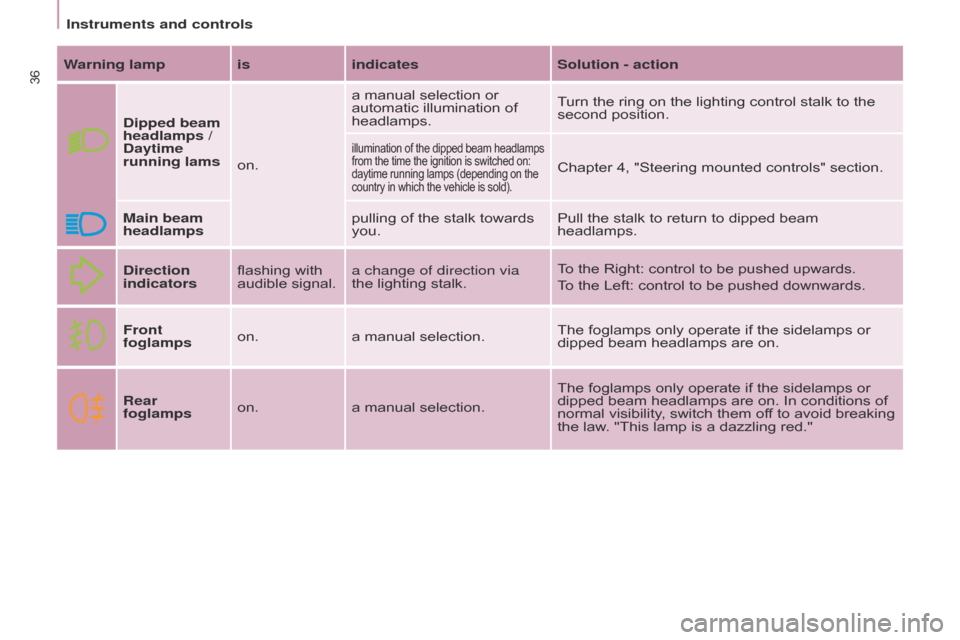
36Warning lamp isindicatesSolution - action
d
ipped beam
headlamps /
d
aytime
running lams on.a
manual selection or
automatic
illumination of
headlamps.T
urn the ring on the lighting control stalk to the
second
position.
illumination of the dipped beam headlamps from
the time the ignition is switched on: daytime
running lamps (depending on the
country
in which the vehicle is sold).
Chapter 4, "Steering mounted controls" section.
Main beam
headlamps pullin
g
of
the
stalk
towards
you. Pull
the stalk to return to dipped beam
headlamps.
d
irection
indicators flashing
with
audible
signal. a change of direction via
the
lighting
stalk. To
the Right: control to be pushed upwards.
To
the Left: control to be pushed downwards.
Front
foglamps on.
a
manual
selection. The
foglamps only operate if the sidelamps or
dipped
beam headlamps are on.
r
ear
foglamps on.
a
manual
selection. The
foglamps only operate if the sidelamps or
dipped
beam headlamps are on. In conditions of
normal
visibility, switch them off to avoid breaking
the
law. "This lamp is a dazzling red."
Instruments and controls
Page 44 of 276

Berlingo_2_VP_en_Chap03_Pret-a-partir_ed02-2014
42
trip recorder zero reset button
after this operation, if you wish
to disconnect the battery, lock
the vehicle and wait for at least
five minutes,
otherwise the zero re-set
will
not be registered.
Engine oil level indicator
depending on your vehicle's engine,
when the ignition is switched on, the
engine oil level is indicated for a few
seconds,
after the service information. Oil level correct
Low oil level
Flashing of "OIL",
linked
with the
service
warning lamp,
accompanied
by an
audible
signal and a message in the
screen, indicates a low oil level which
could
damage the engine.
If the low oil level is confirmed by a
check
using the dipstick, it is essential
that
the level is topped up.
Oil level gauge fault
Flashing of "OIL--"
indicates
a
malfunction of the engine oil level
indicator. Contact
a
CITROËN dealer or a qualified
workshop.
The level read will only be correct
if the vehicle is on level ground
and the engine has been of
f for
more
than 30 minutes.
d
ipstick
A = maximum, never exceed
this level as a surplus of oil
may
damage the engine.
Contact a CITR o Ë n dealer
or a qualified workshop
without
delay.
B
=
minimum,
top
up
the
level
via
the oil filler cap, using the
grade of oil suited to your
engine.
Lighting dimmer
With the ignition on, press
the button until the zeros
appear.
With the lighting on,
press the button to vary
the brightness of the
instruments
and controls.
When the lighting
reaches
the minimum (or
maximum)
setting, release the button
then press it again to increase (or
reduce)
the
brightness.
a
s soon as the lighting is of the
required
brightness, release the button.
Zero re-set
Your CITROËN dealer or a qualified workshop carries out this operation
after
each service.
However, if you carry out the service
yourself, the re-set procedure is as
follows:
-
switch of
f the ignition,
-
press and hold the trip recorder
reset button,
-
switch
on the ignition.
The
display begins a countdown.
When the display shows "=0", release
the
button; the spanner disappears.
Instruments and controls
Page 45 of 276
Berlingo_2_VP_en_Chap03_Pret-a-partir_ed02-2014
43
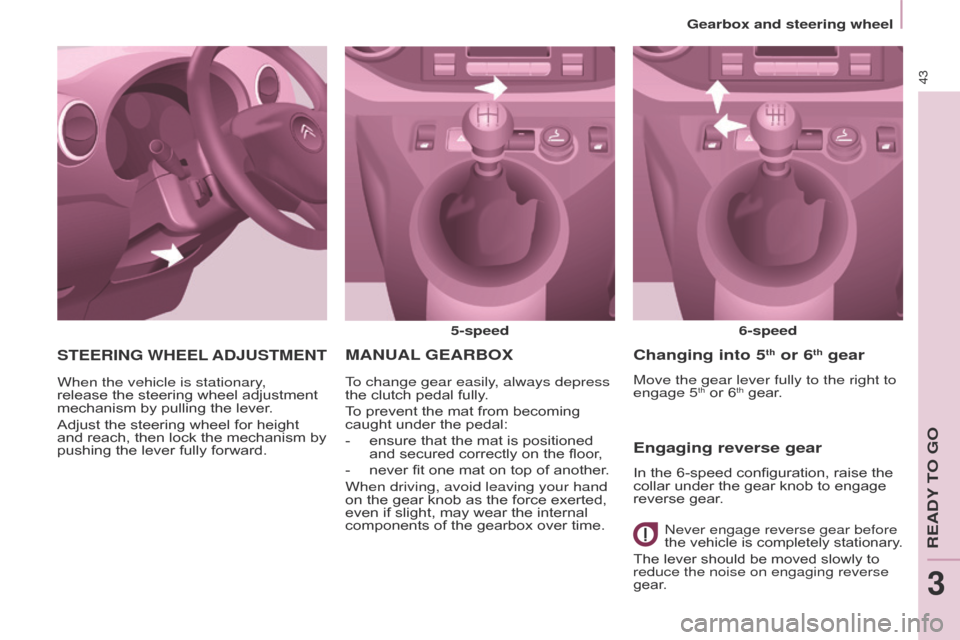
MAnuAL GEA r BOX
5-speed
6-speed
To change gear easily, always depress
the
clutch
pedal fully.
To
prevent
the
mat from becoming
caught
under
the pedal:
-
ensure
that
the mat is positioned
and
secured correctly on the floor,
-
never
fit
one mat on top of another.
When driving, avoid leaving your hand
on
the
gear
knob as the force exerted,
even
if
slight,
may wear the internal
components
of
the gearbox over time.
changing into 5th or 6th gear
Move the gear lever fully to the right to
engage 5th or 6th gear.
Engaging reverse gear
In the 6-speed configuration, raise the collar under the gear knob to engage
reverse
gear.
never engage reverse gear before
the vehicle is completely stationary .
The
lever should be moved slowly to
reduce the noise on engaging reverse
gear
.
StEErInG WHEEL AdJuStMEnt
When the vehicle is stationary,
release the steering wheel adjustment
mechanism
by pulling the lever.
Adjust
the steering wheel for height
and
reach, then lock the mechanism by
pushing
the lever fully forward.
Gearbox and steering wheel
REadY To Go
3
Page 49 of 276

Berlingo_2_VP_en_Chap03_Pret-a-partir_ed02-2014
47
StOP & StArt
The Stop & Start system puts the engine
temporarily on standby - STOP mode
- during stops in the traffic (red
lights,
traffic jams, or other...).
The
engine
restarts automatically - START
mode
- as soon as you want to move
of
f.
The
restart takes place instantly,
quickly
and silently.
Perfect for urban use, the Stop & Start
system
reduces fuel consumption and
exhaust
emissions as well as the noise
level
when stationary.
Operation
Going into engine StOP mode
The "E c O" warning lamp
comes
on in the instrument
panel and the engine goes
into
standby:
-
with a manual gearbox
, at speeds
below
12 mph (20 km/h), when you
put the gear lever into neutral and
release the clutch pedal,
-
with the 6-speed electronic gear
control gearbox
, at a speed below
5
mph (8 km/h), when you press
the
brake pedal or put the gear
lever into position
n .If
your vehicle is fitted with the system,
a
time counter calculates the sum of
the
periods in STOP
mode during a
journey
. It rests itself to zero every time
the
ignition is switched on with the key.
With the automatic gearbox
system,
for your comfort during
parking
manoeuvres, STOP
mode
is not available for a few seconds after
coming
out of reverse gear.
STOP
mode does not affect the
functionality of the vehicle, such as
braking,
power steering, for example.
n
ever refuel with the engine in
STOP
mode; you must switch off the
ignition with the key.Special cases: S t
OP
mode
unavailable
STOP
mode is not invoked when:
-
the driver's door is open,
-
the driver's seat belt is not
fastened,
-
the vehicle has not exceeded
6 mph
(10 km/h) since the last
engine
start using the key,
-
the
engine is needed to maintain
a
comfortable temperature in the
passenger
compartment,
-
demisting
is on,
-
some
special conditions (battery
charge,
engine temperature,
braking
assistance, ambient
temperature...)
where the engine
is needed to assure control of a
system.
In this case, the
"E c O"
warning
lamp flashes for a
few
seconds, then goes off.
t
his operation is perfectly normal.
Stop & Start
REadY To Go
3
Page 54 of 276

52
Berlingo_2_VP_en_Chap04_Ergonomie_ed02-2014
dIrEctIOn IndIcAtOr S
"Motorway" function
Press
the control up or down to flash
the corresponding direction indicator
three
times.
LIGHtInG cOntrOL
Left: downwards passing the point of resistance.
r
ight: upwards passing the
point
of resistance.
Front and rear lighting
Lighting off
Automatic
illumination of
headlamps
SidelampsDipped
beam (green)
Main
beam (blue)
d
ipped beam/main beam
change
Pull
the
stalk fully towards you.
Lighting-on audible warning
o
n switching off the ignition, all of the
lamps
turn off, except dipped beam if
automatic
guide-me-home lighting has
been
activated.
To activate the lighting control, turn
ring A to the lighting off position "0"
then
to
the selection of your choice.
o
n opening the driver's door, there is
an audible warning if you have left the
lighting
on.
Checking
by
means
of
the
indicator
lamps
in
the
instrument
panel is described in the
"Instruments
and
controls"
section
of
chapter
3.
direction indicators
Selection is by turning ring A.
Steering mounted controls
Page 55 of 276
53
Berlingo_2_VP_en_Chap04_Ergonomie_ed02-2014
LEd dAYtIME runnInG LAMPS
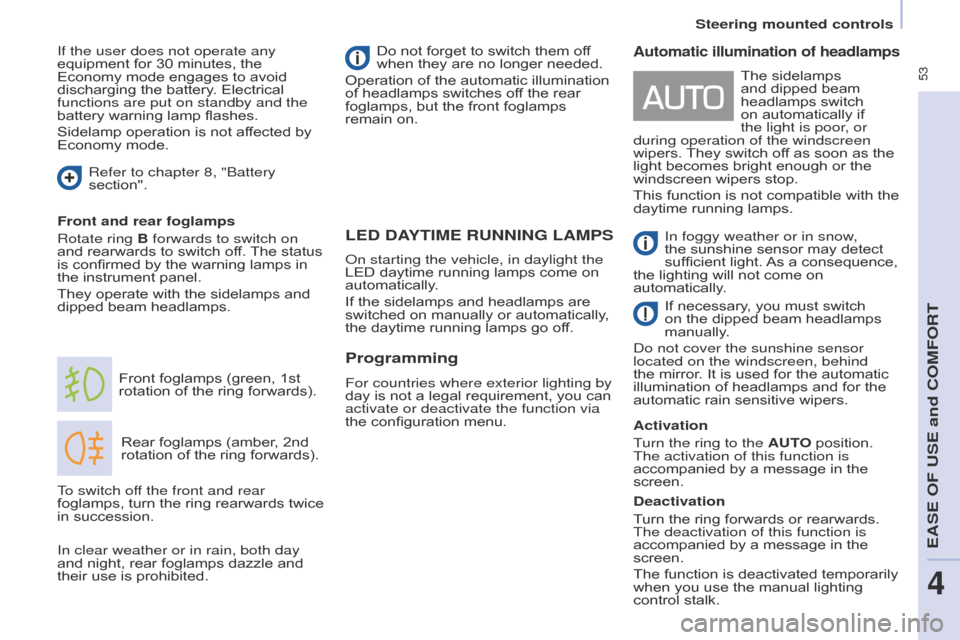
Rear foglamps (amber, 2nd rotation of the ring forwards).
Front
foglamps (green, 1st
rotation
of the ring forwards).
Front and rear foglamps
Rotate ring B forwards to switch on
and
rearwards to switch off.
The
status
is
confirmed by the warning lamps in
the
instrument panel.
They
operate with the sidelamps and
dipped
beam headlamps. Do not forget to switch them off
when
they are no longer needed.
Operation of the automatic illumination
of
headlamps switches off the rear
foglamps,
but the front foglamps
remain
on.
To switch off the front and rear
foglamps, turn the ring rearwards twice
in
succession.
Automatic illumination of headlamps
In foggy weather or in snow,
the sunshine sensor may detect
sufficient
light.
As
a consequence,
the
lighting will not come on
automatically
.
If
necessary, you must switch
on
the dipped beam headlamps
manually
.
d
o not cover the sunshine sensor
located on the windscreen, behind
the
mirror. It is used for the automatic
illu
mination of headlamps and for the
automatic
rain sensitive wipers.
Activation
Turn the ring to the A
ut
O
position.
The activation of this function is
accompanied
by a message in the
screen.
d
eactivation
Turn
the ring forwards or rearwards.
The deactivation of this function is
accompanied
by a message in the
screen.
The
function is deactivated temporarily
when
you use the manual lighting
control
stalk. The
sidelamps
and
dipped beam
headlamps
switch
on
automatically if
the light is poor
, or
during operation of the windscreen
wipers.
They
switch off as soon as the
light
becomes bright enough or the
windscreen
wipers stop.
This
function is not compatible with the
daytime
running lamps.
o
n starting the vehicle, in daylight the
LED
daytime
running
lamps
come
on
automatically
.
If
the
sidelamps
and
headlamps
are
switched
on
manually
or
automatically,
the
daytime
running
lamps
go
off.
Programming
For countries where exterior lighting by
day is not a legal requirement, you can
activate or deactivate the function via
the
configuration menu.
If the user does not operate any
equipment
for
30
minutes,
the
Economy
mode
engages
to
avoid
discharging
the
battery.
Electrical
functions are put on standby and the
battery
warning
lamp
flashes.
Sidelamp
operation
is
not
affected
by
Economy
mode.
In clear weather or in rain, both day
and
night,
rear
foglamps
dazzle
and
their
use
is
prohibited.
Refer to chapter 8, "Battery
section".
Steering mounted controls
EaSE oF USE and CoMFoRT
4
Page 56 of 276

54
Berlingo_2_VP_en_Chap04_Ergonomie_ed02-2014
If the sunshine sensor
does not function correctly,
the lighting comes on
accompanied
by the service
warning
lamp, an audible
signal
and a message in the screen.
Contact a CITR
o Ë n dealer or a
qualified
workshop.
Guide-me-home lighting
Keeping the dipped beam headlamps on temporarily with the ignition off,
makes
the driver's exit easier when the
light
is poor.
HEAdLAMP BEAM
depending on the load in your vehicle,
the beam setting must be adjusted.
0 -
No
load.
1 -
Partial
load.
2 -
A
verage load.
3 -
Maximum
authorised load.
Manual operation
-
With
the
ignition
off,
"flash"
the
headlamps
within
one
minute
after
switching
off
the
ignition.
The
guide-me-home
lighting
switches
of
f
automatically
after
a
set
time.
Automatic operation
Refer to chapter 10, "Screen
menu
map"
section. Initial setting is position 0.
a
ctivate the function via the
vehicle
configuration
menu. Programming
The
system
is
activated
or
deactivated
in
the
vehicle
configuration
menu.
The
system
is
activated
by
default.
Switching off
The
system
does
not
operate:
-
below a certain angle of rotation of
the steering wheel,
-
above
25
mph
(40
km/h),
-
when
reverse
gear
is
engaged.
Switching on
This
function
starts:
-
when the corresponding direction
indicator is switched on,
or
-
from
a
certain
angle
of
rotation
of
the
steering
wheel.
With
dipped
or
main
beam
headlamps,
this
function
makes
use
of
the
beam
from
a
front
foglamp
to
illuminate
the
inside of a bend, when the vehicle
speed
is
below
25
mph
(approximately
40
km/h)
(urban
driving,
winding
road,
intersections,
parking
manouevres...).
cornering lighting
travelling abroad
If using your vehicle in a country
that drives on the other side of the
road,
the headlamps must be adjusted
to
avoid dazzling on-coming drivers.
Contact a CITR
o Ë n dealer or a
qualified
workshop.
Steering mounted controls
Page 85 of 276
Berlingo_2_VP_en_Chap04_Ergonomie_ed02-2014
83
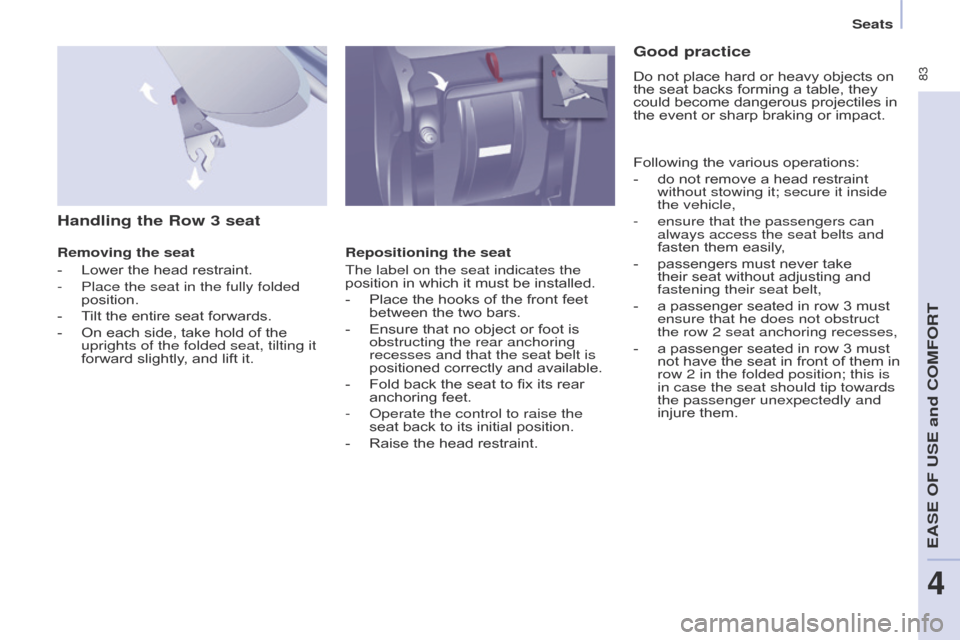
Handling the row 3 seat
removing the seat
-
Lower
the head restraint.
-
Place the seat in the fully folded
position.
-
T
ilt the entire seat forwards.
-
On
each side, take hold of the
uprights of the folded seat, tilting it
forward
slightly, and lift it.r epositioning the seat
The label on the seat indicates the
position
in which it must be installed.
-
Place
the hooks of the front feet
between
the two bars.
-
Ensure
that no object or foot is
obstructing the rear anchoring
recesses and that the seat belt is
positioned
correctly and available.
-
Fold
back the seat to fix its rear
anchoring
feet.
-
o perate the control to raise the
seat
back to its initial position.
-
Raise
the head restraint.
Good practice
Do not place hard or heavy objects on the seat backs forming a table, they
could
become dangerous projectiles in
the
event or sharp braking or impact.
Following
the various operations:
-
do
not remove a head restraint
without stowing it; secure it inside
the vehicle,
-
ensure that the passengers can
always access the seat belts and
fasten
them easily,
-
passengers
must never take
their
seat without adjusting and
fastening their seat belt,
-
a
passenger seated in row 3 must
ensure that he does not obstruct
the row 2 seat anchoring recesses,
-
a
passenger seated in row 3 must
not
have the seat in front of them in
row 2 in the folded position; this is
in case the seat should tip towards
the passenger unexpectedly and
injure
them.
Seats
EaSE oF USE and CoMFoRT
4
Page 91 of 276

Berlingo_2_VP_en_Chap04_Ergonomie_ed02-2014
89
SEAtI n G A r EA FI tt I n GS
Floor boxes
Two boxes are available, located under
the rear passenger footwells.
To
open them, slide your fingers into
the
recess and lift the lid.
Aircraft style tables
To put the table in place, pull it
upwards and fold it down.
a
s a safety precaution, above a high
pressure, the table is designed to
unhook.
To
put it back in place, with the table
vertical, engage one side then the
other
, forcing slightly.
Do
not place hard or heavy objects
on
the table.
They
could become
dangerous
projectiles in the event of
sharp
braking or impact.
A
bag hook is provided on the side of
each
table.
Side blinds
Side blinds may be available on the sliding side doors.
Pull the side blind by the tab to install it.
To avoid damaging the blind when opening the door, check that the tab is
hooked
securely.
a
lways guide the blind slowly
using the tab, both when raising
and
when lowering.
Practical information
EASE OF uSE and cOMFOrt
4
Page 111 of 276
ABS
ABS
109
Berlingo_2_VP_en_Chap05_Securite_ed02-2014
AntI-LOcK BrAKInG SYStEM
(ABS - EBF d )
The ABS and EBFD (electronic brake force
distribution) systems improve the
stability
and manoeuvrability of your
vehicle
on braking, in particular on
poor
or slippery surfaces.
The
ABS
prevents locking of the
wheels, the EBF
d provides control of
the
braking pressure wheel by wheel.If
this warning lamp comes on,
accompanied by an
audible
signal and a message
in the screen, it indicates a
malfunction
of the
ABS
which
could result in a loss of control of the
vehicle
on braking.
If
this warning lamp comes
on,
together with the brake
and
STOP
warning lamps,
accompanied
by an audible
signal
and a message in the
screen,
it indicates a malfunction of
the
electronic brake force distribution
which could result in a loss of control of
the
vehicle on braking.
EMErGEncY BrAKInG
ASSIS t
A
nc E SYS t EM (EBA)
In an emergency, this system enables the optimum braking pressure to be
reached
more quickly, press the pedal
firmly
without releasing it.
It is triggered by the speed at which the
brake
pedal is activated.
This
alters the resistance of the brake
pedal
under your foot.
To prolong the operation of the
emergency
braking assistance system:
keep
your foot on the brake pedal.
Good practice
The anti-lock braking system comes into operation automatically when
there
is a risk of wheel lock. It does not
reduce
the braking distance.
o
n very slippery surfaces (ice, oil,
etc...)
the
ABS
may increase the
braking
distance. When braking in
an
emergency, do not hesitate to
press
the brake pedal firmly, without
releasing the pressure, even on a
slippery surface, you will then be able
to
continue to manoeuvre the vehicle
to
avoid an obstacle.
Normal
operation of the
ABS
may be
felt
by slight vibration of the brake
pedal.
When changing wheels (tyres
and
rims), ensure that these are
recommended
by CITROËN. Stop as soon as it is safe to do so.
In both cases, contact a CITR
o Ë n
dealer
or a qualified workshop.
driving safely
SaFETY
5