roof Citroen BERLINGO MULTISPACE RHD 2015 2.G User Guide
[x] Cancel search | Manufacturer: CITROEN, Model Year: 2015, Model line: BERLINGO MULTISPACE RHD, Model: Citroen BERLINGO MULTISPACE RHD 2015 2.GPages: 276, PDF Size: 12.21 MB
Page 93 of 276

Berlingo_2_VP_en_Chap04_Ergonomie_ed02-2014
91
From insideFrom outside
rear box
This roof box can be accessed from the
rear seats and the boot.
From
the rear seats, slide the flaps to
open.
Vents
a 3-position control allows you to
adjust the air flow through the vents.
The
vents are also fitted with a scented
air
freshener.
From
the
boot,
place
your
thumb
on
the recess then pull the handle to
open.
Open
carefully
to
prevent
objects
stored
in
this
interior
roof
box
from
fallin
g
out.
The
maximum
authorised
load
is
10
kg.
Practical information
EASE OF uSE and cOMFOrt
4
Page 94 of 276

Berlingo_2_VP_en_Chap04_Ergonomie_ed02-2014
92
ScEntEd AIr FrESHEnEr
The scented air freshener diffuses
a fragrance in the passenger
compartment from the roof console
vents.
Adjusting the flow
Turn the chromed button to adjust the diffusion:
-
to the left to decrease,
-
to
the right to increase.
To
stop the diffusion, turn the chromed
button
fully to the left.
removing the scented air
freshener
- Press the button down while turning
it a quarter of a turn to the left to
the
stop.
-
Remove
the scented air freshener
from
the roof console.
-
Replace
the cartridge.
Practical information
Page 95 of 276

Berlingo_2_VP_en_Chap04_Ergonomie_ed02-2014
93
replacing a cartridge
The scented air freshener refill consists of a cartridge B and its sealing case c .
-
Remove
the protective film d .
-
Place the head of the cartridge
B
on the button A of the scented air
freshener.
-
T
urn it a quarter of a turn to lock it
on
the button and remove the case.
-
Insert the scented air freshener in
its
location.
You can change the cartridges at any
time
and store cartridges which have
already been started in their original
case.
The scented air freshener button
A is
independent
of the cartridge.
The cartridges are supplied without the
button A.
Inserting the scented air
freshener
After fitting or changing the cartridge:
-
Put
the scented air freshener back
in
place in its location.
-
T
urn it a quarter of a turn to the
right.
Good practice
as a safety precaution, only use the
cartridges provided for this purpose.
Do
not dismantle the cartridges.
k
eep the cartridge sealing cases
which
are used as packaging when the
cartridges
are not in use.
Never
try to refill the cartridges
with fragrances other than those
recommended
by the CITROËN
network.
k
eep out of reach of children and
animals.
A
void contact with the skin
and
eyes. If swallowed, consult a
doctor
and show him the packaging or
product
label.
The scented air freshener button A can
only
be
fixed
on
the
multifunction
roof
console
with
a
cartridge.
Therefore, always retain button A and
a
cartridge.
The
cartridges
are
available
from
CITROËN
dealers.
Practical information
EASE OF uSE and cOMFOrt
4
Page 96 of 276

Berlingo_2_VP_en_Chap04_Ergonomie_ed02-2014
94
MOdutOP rOOF BA r S
The maximum authorised weight on each
roof bar is 35 kg. In
all cases, the load must rest on
the non-slip bands provided for this
purpose
and must not touch the roof or
the
glazing of the roof.
r
ecommendations for loading
the roof
This procedure requires the use of
a spanner supplied with the tools for
changing
a wheel.
These two longitudinal Modutop roof
bars can be removed.
Chapter 9, "Changing a wheel" section.
-
Open
the protective covers.
-
Slacken
the four screws using the
spanner
and remove them.
-
T
urn the bars 90° placing the
hollow
parts towards the front.
-
Refit
the the 4 screws and tighten
them
using the spanner.
-
Close
the protective covers.
-
Use the strap passages
A only to
secure
the load firmly.
Practical information
Page 97 of 276

Berlingo_2_VP_en_Chap04_Ergonomie_ed02-2014
95
rOOF BArS
If you install transverse bars on these bars, refer to the weight values\
indicated
by the manufacturer but do not exceed 75 Kg.
Practical information
EASE OF uSE and cOMFOrt
4
Page 102 of 276

Berlingo_2_VP_en_Chap04_Ergonomie_ed02-2014
100
Storage flaps
Raise the corresponding flap.next to the boot sill, the recess is
intended to receive the roller tube
containing
the load space cover.
Seat belts
Ensure that the centre seat belt has
reeled in correctly to its strengthener
on the roof.
Prevent
the row 3 seat belt buckles
from
knocking by raising them as close
as possible to the anchorages in the
roof.
The
seat belt buckle attachment rings
on
each side of the boot must not be
used
to retain loads.
Practical information
Page 117 of 276

Berlingo_2_VP_en_Chap05_Securite_ed02-2014
11 5
rear seat belts
(7 seat version)
In row 2
The
three seats are fitted with three-
point
inertia reel seat belts.
When folding the side seats or the
seat
backs to the table position, avoid
trapping the strap of the centre seat
belt.
When handling the side seats
(removing/installin
g) or when
accessing
row 3, avoid hooking the
centre
seat belt.
Ensure that the centre seat belt is
rolled up correctly in its strengthener
on
the roof. In row 3
The
two seats are fitted with three-
point inertia reel seat belts.d
o not attach the seat belts to the
stowing
rings marked with a red cross,
represented
on the label.
Take
care to hook the seat belts
correctly on the rings provided for this
purpose.The row 3 seat belts which are not in
use can be stored to clear the load
space
and make use of the load space cover
easier.
Hook the snap hook in the location provided
on the rear pillar trim.
Seat belts
SaFETY
5
Page 139 of 276

Berlingo_2_VP_en_Chap06_Accessoire_ed02-2014
137
OtHEr AccESSOrIES
These accessories and parts, having
been tested and approved for reliability
and safety, are all adapted to your
vehicle.
A
wide range of recommended
accessories and genuine parts is
available.
a further range is also available,
structured
around comfort, leisure and
maintenance:
Anti-theft
alarm, window etching, first
aid
kit, high visibility vest, front and
rear
parking sensors, warning triangle,
security
bolts for alloy wheels, ...
Seat
covers compatible with airbags
for the front seats, bench seat, rubber
mats,
carpet
mats,
snow
chains,
blinds,
tailgate
bicycle carrier, ...
To
prevent the mat from becoming
caught
under the pedals:
-
ensure
that the mat and its fixings
are positioned correctly
,
-
never
fit one mat on top of another.Audio
equipment, hands-free kit,
speakers,
CD changer, satellite navigation
system, USB box, V ideo kit, ...
Regardless
of the audio and telematic
equipment
offered on the market, the
technical constraints associated with
the
fitting of equipment of these product
groups
mean that the special features
of
the equipment and its compatibility
with the capacities of your vehicle's
standard
equipment must be taken into
account.
Please ask a CITROËN dealer
for
more information before fitting such
equipment.
Maximum weights on bars
-
T
ransverse bars on longitudinal
bars:
75 Kg (these bars are not
compatible
with the Modutop roof).Installing radiocommunication
transmitters
You are advised to contact a CITR
o Ë n
dealer before installing accessory
radiocommunication
transmitters with
external
aerial on your vehicle.
The
CITROËN dealer network
will
inform you of the specification
(frequency
band, maximum output
power
, aerial position, specific
conditions of installation) of the
transmitters
which can be fitted, in
accordance with the Motor V
ehicle
Electromagnetic
Compatibility
Directive
(2004/104/EC).
Front
mud flaps, rear mud flaps,
15/17 inch
alloy wheels, wheelarch
trim,
leather steering wheel, ...
Screenwash, interior and exterior
cleaning
and maintenance products,
spare
bulbs, ...
Equipment
AccESSOrIES
6
Page 162 of 276

Berlingo_2_VP_en_Chap08_aide-rapide_ed02-2014
160
1. Parking the vehicle
- The occupants must get out of the vehicle
and wait in a safe location.
-
If
possible, park the vehicle on
level, stable and non-slippery
ground.
-
Apply
the parking brake, switch
of
f the ignition and engage first or
reverse
gear. -
Place a chock under the wheel diagonally opposite the one to be
changed.
cHAnGInG A WHEEL
2. t
ools
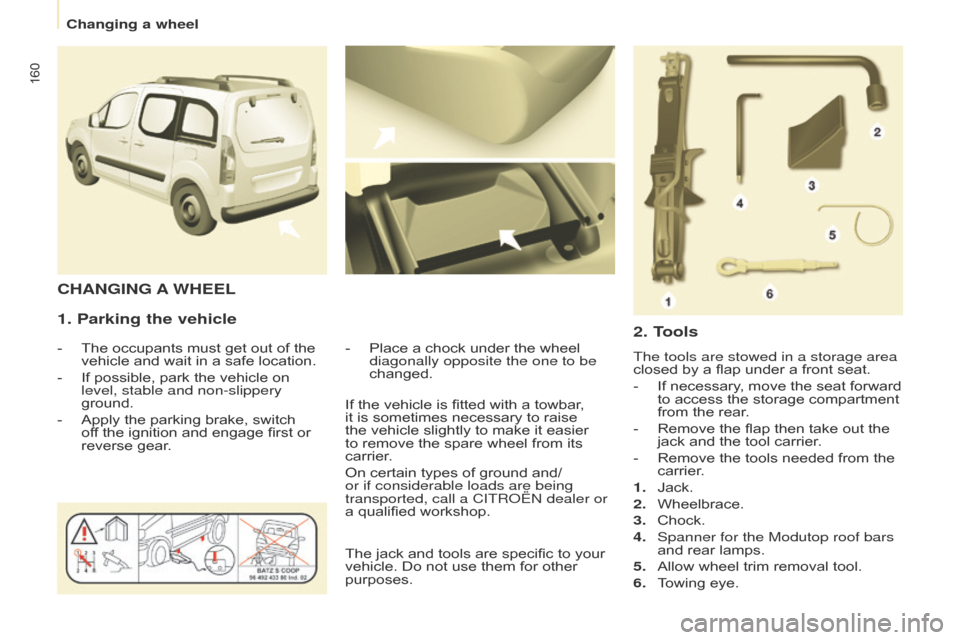
The tools are stowed in a storage area
closed by a flap under a front seat.
-
If
necessary, move the seat forward
to
access the storage compartment
from
the rear.
-
Remove
the flap then take out the
jack
and the tool carrier.
-
Remove
the tools needed from the
carrier
.
1.
Jack.
2.
Wheelbrace.
3.
Chock.
4.
Spanner for the Modutop roof bars
and
rear lamps.
5.
Allow
wheel trim removal tool.
6.
T
owing eye.
If
the
vehicle
is
fitted
with
a
towbar,
it
is
sometimes
necessary
to
raise
the
vehicle
slightly
to
make
it
easier
to
remove
the
spare
wheel
from
its
carrier
.
On
certain
types
of
ground
and/
or if considerable loads are being
transported, call a CITR
o
Ë
n
dealer or
a
qualified
workshop.
The
jack
and
tools
are
specific
to
your
vehicle.
Do
not
use
them
for
other
purposes.
Changing a wheel
Page 176 of 276

Berlingo_2_VP_en_Chap08_aide-rapide_ed02-2014
174
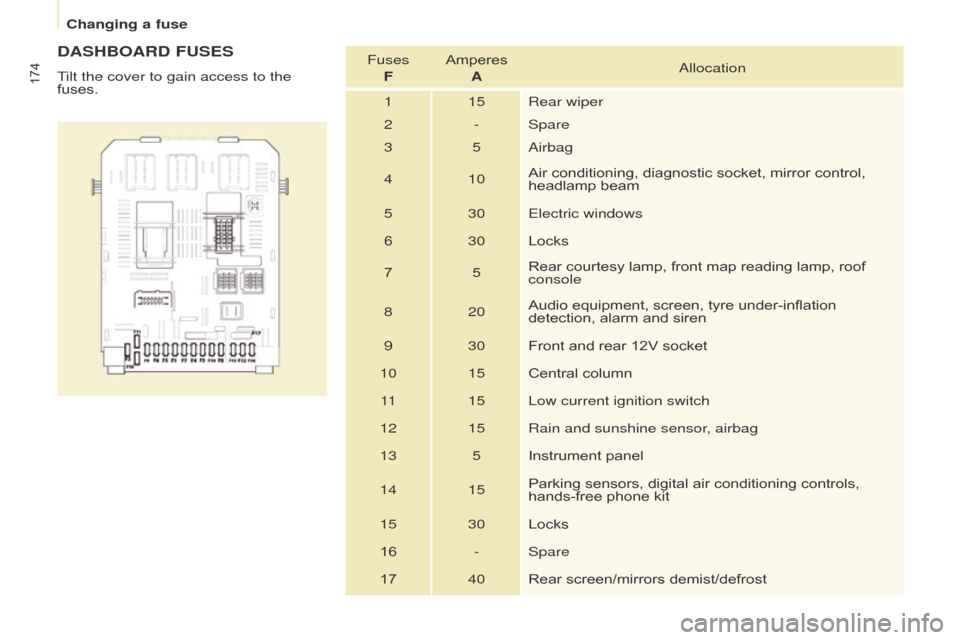
dASHBOArd FuSES
Tilt the cover to gain access to the
fuses.Fuses
F Amperes Aa
llocation
1 15 Rear wiper
2 - Spare
3 5
a
irbag
4 10 Air
conditioning, diagnostic socket, mirror control,
headlamp
beam
5 30 Electric windows
6 30Locks
7 5Rear
courtesy lamp, front map reading lamp, roof
console
8 20 Audio
equipment, screen, tyre under-inflation
detection,
alarm and siren
9 30Front
and rear 12V socket
10 15 Central
column
11 15 Low current ignition switch
12 15 Rain and sunshine sensor, airbag
13 5 Instrument
panel
14 15 Parking
sensors, digital air conditioning controls,
hands-free
phone kit
15 30 Locks
16 - Spare
17 40Rear
screen/mirrors demist/defrost
Changing a fuse