light Citroen BERLINGO MULTISPACE RHD 2015.5 2.G Owner's Guide
[x] Cancel search | Manufacturer: CITROEN, Model Year: 2015.5, Model line: BERLINGO MULTISPACE RHD, Model: Citroen BERLINGO MULTISPACE RHD 2015.5 2.GPages: 292, PDF Size: 10.74 MB
Page 165 of 292

163
Berlingo-2-VP_en_Chap07_Verification_ed02-2015
AdBlue® additive
Berlingo-2-VP_en_Chap07_Verification_ed02-2015
BLUEHDI
AND A D B LUE
® ADDITIVE
The technology
adBlue® is the brand name of the solution needed for operation of the
SCR
system. BlueHDi
vehicles have a specific
a dBlue
® additive tank with a capacity
of 17 litres .
It
has
an exterior filler with a blue filler
cap, located to the left of the
d iesel
fuel
filler cap.
Filling of the
a
dBlue
® tank can be done using 5 or 10 litre containers,
1.89
litre
bottles,
or
when at a fuel
fillin
g
station
equipped with a special
a
dBlue
® delivery pump for light vehicles.
The
objective
of
BlueHDi
is
to
reduce
by
up
to
90%
the
emissions
of
NOx
(nitrous oxides) in the air
, using a
system
that
converts
NOx
into
water
vapour and nitrogen in a dedicated
catalytic
converter:
SCR
(Selective
Catalytic
Reduction).
This
objective
meets
the
"Euro"
emissions
standard
adopted
by
the
European
Union
aimed
at
limiting
the
emissions
of
pollutants
from
internal
combustion
engines.
The BlueH
d
i generation of engines
allow
the
"Euro
6"
European
standard
to
be
met,
with
an
extra
tank
to
hold
the
a
dBlue
® fluid for the treatment of exhaust
gases.
This operation can also be carried
out by a CITR
o Ë n dealer or a
qualified
workshop.
Please note that the high delivery
pumps
at some filling stations,
intended only for lorries and coaches,
are not suitable for cars or light
commercial
vehicles.
Never
use these pumps.
CHECKS
7
Page 166 of 292

164
Berlingo-2-VP_en_Chap07_Verification_ed02-2015
AdBlue® additive
Berlingo-2-VP_en_Chap07_Verification_ed02-2015
Good practice
While the quantity of
a
dBlue® in
the
additive
tank
is
sufficient,
no
information
is
displayed.
o
n the other hand, once the additive
level drops to the quantity needed
for
a
range
of
1
500
miles
(2
400
km)
driving, you are warned by dif
ferent
temporary
signals
(warning
lamp,
message,
audible
signal).
As
more
miles
are
covered,
these
signals
intensify
and
the
message
becomes
permanent.
When the
a
dBlue
® tank is empty, restarting
becomes impossible.
It
is
strongly
recommended that you
do not wait for the successive alerts
before topping-up the a
dBlue
® tank, but
do
this
as
soon
as
possible.
Filling the additive tank
For light vehicles, 5 or 10 litre
containers
and
1.89
litre
(1/2
US
gallon)
bottles
are
available
from
CITR
o
Ë
n
dealers, until they are
equipped with
a
dBlue
® delivery pumps.
If
you
want
to
fill
the
AdBlue® tank yourself, ensure that you have a
suitable
filler
pipe,
which
may or may
not be supplied with the additive
container
.
Page 170 of 292

168
Berlingo-2-VP_en_Chap07_Verification_ed02-2015
AdBlue® additive
Berlingo-2-VP_en_Chap07_Verification_ed02-2015
Filling
Ensure that the vehicle is parked on a flat and level surface.
Pour
the contents of the container /
bottle
into the dedicated tank.
After
filling the additive tank, observe
the
following procedure:
-
Switch on the ignition without
starting.
-
W
ait 10 seconds before starting the
engine.
Never
dispose of empty
AdBlue®
containers and bottles in the
household
waste.
Place
them
in
a
special
container
provided
this
purpose
or
take
them
to
your
dealer.
k
eep a dBlue
® out of the reach of
children,
in
its
original container.
n
ever transfer
a
dBlue
® to another
container:
it
would
loose its purity.
Never
dilute
the
additive with water.
n
ever pour the additive into the d iesel
fuel
tank.
Recommendations on storage
never store containers or bottles of a dBlue® in your vehicle.
Freezing of the AdBlue
® additive
a
dBlue® freezes at about -11°C (12.2°F)
and deteriorates above 25°C
(77°F).
It
is
recommended that containers and
bottles be stored in a cool area and
protected
from direct sunlight.
Under these conditions, the additive
can
be
kept for at least a year.
a
dditive that has been frozen can be
used
once it has thawed out in ambient
air
. The
SCR system includes an
a dBlue
® tank heater that ensures operation
of the vehicle in normal
conditions.
In exceptional situations, such as when
the
vehicle
is kept at temperatures
below
-15°C
(5°F) for a long period,
there
may
be an emission fault alert
related to freezing of the a
dBlue
®
additive.
Park
the
vehicle
in
an
area
at
a
more
moderate
temperature
for
a
few
hours
until
the
additive
becomes
a
liquid
again.
The
emissions
warning
lamp
does not
go
off
immediately,
but
does
so
after a
few
miles
of
driving.
Page 174 of 292
172
Berlingo-2-VP_en_Chap08_aide-rapide_ed02-2015Berlingo-2-VP_en_Chap08_aide-rapide_ed02-2015
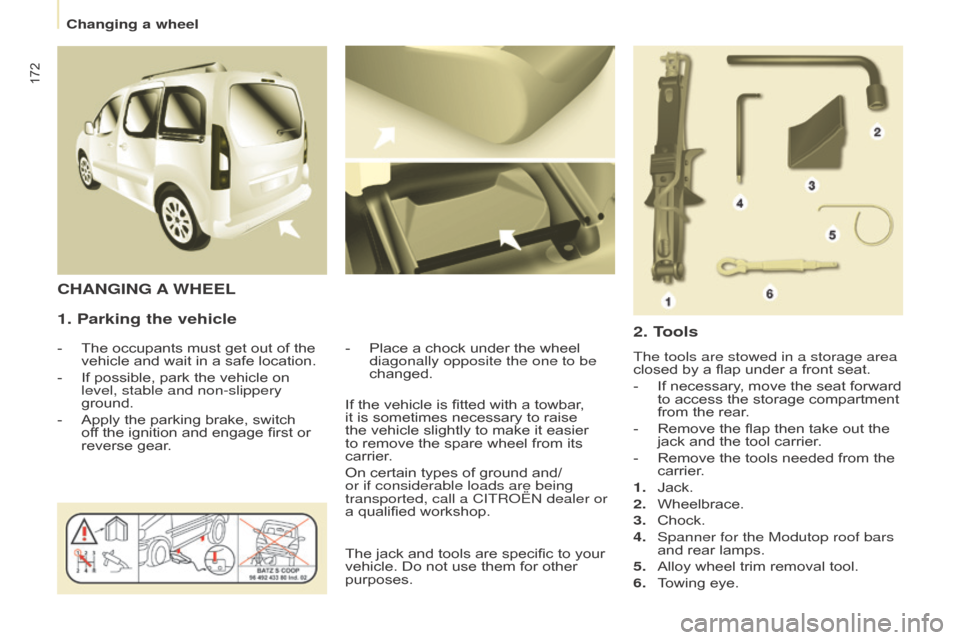
1. Parking the vehicle
- The occupants must get out of the vehicle
and wait in a safe location.
-
If
possible, park the vehicle on
level, stable and non-slippery
ground.
-
Apply
the parking brake, switch
of
f the ignition and engage first or
reverse
gear. -
Place a chock under the wheel diagonally opposite the one to be
changed.
CHANGING A WHEEL
2. T
ools
The tools are stowed in a storage area
closed by a flap under a front seat.
-
If
necessary, move the seat forward
to
access the storage compartment
from
the rear.
-
Remove
the flap then take out the
jack
and the tool carrier.
-
Remove
the tools needed from the
carrier
.
1.
Jack.
2.
Wheelbrace.
3.
Chock.
4.
Spanner for the Modutop roof bars
and
rear lamps.
5.
Alloy
wheel trim removal tool.
6.
T
owing eye.
If
the
vehicle
is
fitted
with
a
towbar,
it
is
sometimes
necessary
to
raise
the
vehicle
slightly
to
make
it
easier
to
remove
the
spare
wheel
from
its
carrier
.
On
certain
types
of
ground
and/
or if considerable loads are being
transported, call a CITR
o
Ë
n
dealer or
a
qualified
workshop.
The
jack
and
tools
are
specific
to
your
vehicle.
Do
not
use
them
for
other
purposes.
Changing a wheel
Page 182 of 292
180
Berlingo-2-VP_en_Chap08_aide-rapide_ed02-2015Berlingo-2-VP_en_Chap08_aide-rapide_ed02-2015
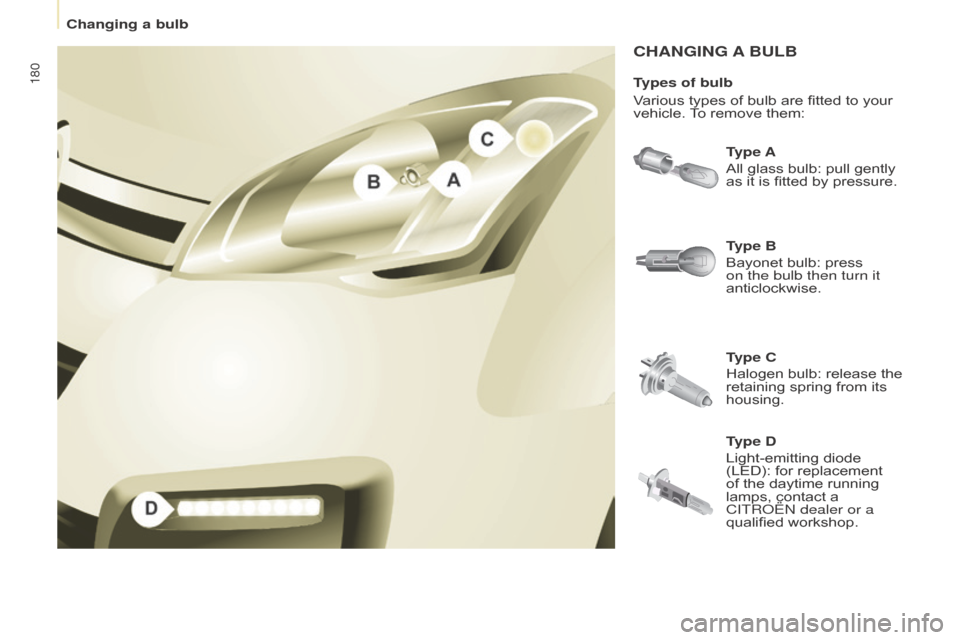
CHANGING A BULB
Type A
All glass bulb: pull gently
as
it is fitted by pressure.
Type C
Halogen
bulb: release the
retaining
spring from its
housing. T
ype B
Bayonet
bulb: press
on the bulb then turn it
anticlockwise.
T
ypes of bulb
Various
types
of bulb are fitted to your
vehicle.
T
o
remove them:
Type D
Light-emitting diode
(LED):
for replacement
of
the daytime running
lamps,
contact a
CITR
o Ë n dealer or a
qualified
workshop.
Changing a bulb
Page 184 of 292
182
Berlingo-2-VP_en_Chap08_aide-rapide_ed02-2015Berlingo-2-VP_en_Chap08_aide-rapide_ed02-2015
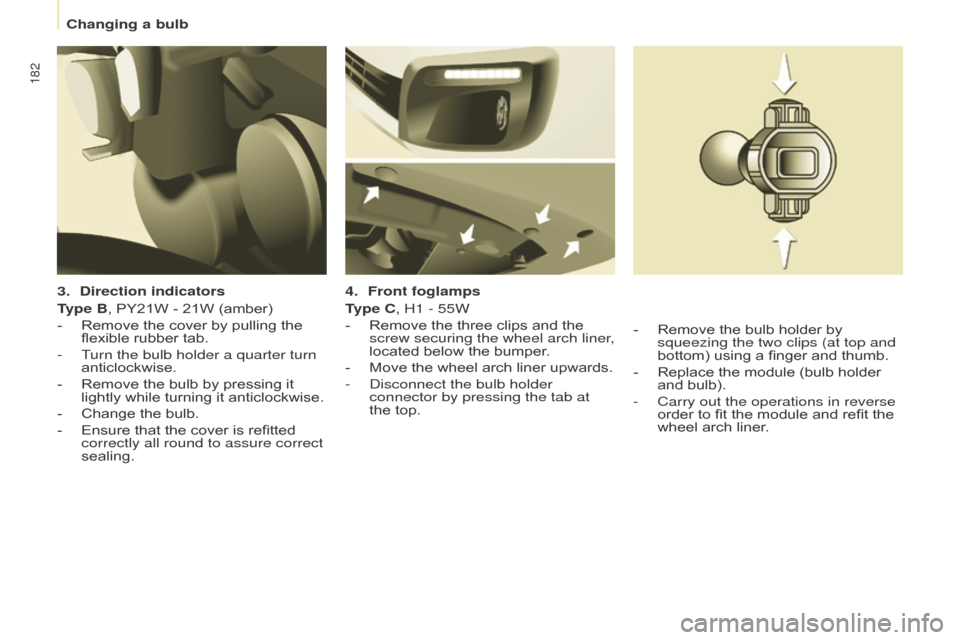
3. Direction indicators
T ype B, PY21W - 21W (amber)
-
Remove
the cover by pulling the
flexible
rubber tab.
-
T
urn the bulb holder a quarter turn
anticlockwise.
-
Remove
the bulb by pressing it
lightly
while turning it anticlockwise.
-
Change
the bulb.
-
Ensure
that the cover is refitted
correctly all round to assure correct
sealing. 4.
Front foglamps
T ype C, H1 - 55W
-
Remove
the three clips and the
screw securing the wheel arch liner
,
located
below the bumper.
-
Move
the wheel arch liner upwards.
-
d isconnect the bulb holder
connector by pressing the tab at
the
top.-
Remove
the bulb holder by
squeezing the two clips (at top and
bottom)
using a finger and thumb.
-
Replace
the module (bulb holder
and
bulb).
-
Carry out the operations in reverse
order
to fit the module and refit the
wheel
arch liner.
Changing a bulb
Page 186 of 292

184
Berlingo-2-VP_en_Chap08_aide-rapide_ed02-2015Berlingo-2-VP_en_Chap08_aide-rapide_ed02-2015
Rear lamps
This procedure requires the use of
the spanner supplied with the tools for
changing a wheel.
When
refitting, take care to
reposition the tabs and the wiring
correctly to avoid trapping the
wiring.
a
fter changing the rear direction
indicator
bulb, the reinitialisation time is
above
2 minutes.
-
Move aside the 4 tabs then extract
the
bulb holder.
-
Remove
the faulty bulb by
pressing it lightly while turning it
anticlockwise.
-
Change
the bulb.
When
removing the lamp unit:
-
with
tailgate, pull the lamp unit
towards the centre of the vehicle,
-
with
hinged doors, pull the lamp
unit
towards you.
For
more
information
on
bulbs,
refer
to
the
"Types
of
bulb".
1.
Brake lamps / sidelamps
T
ype B,
P21/5W
-
21/5W
2.
Direction indicators
T
ype B,
PY21W
-
21W
(amber)
3.
Reversing lamps
T
ype B, P21W - 21W
4.
Foglamps
T
ype B, P21W - 21W
High pressure jet washing When using this type of washing
on stubborn dirt, do not persist on
the
headlamps,
the
other
lamps
and
their
edges
to
avoid
damaging
their
coating
and
seals. Chapter
9, "Changing a wheel"
section.
-
Identify the failed bulb, then open
the
rear doors to 180°.
Chapter
3, "Access" section.
-
Remove
the two fixing bolts using
the
spanner provided.
-
Pull
the lamp unit from the outside.
-
Holding
the lamp, disconnect the
electrical
connector.
Changing a bulb
Page 198 of 292
196
Berlingo-2-VP_en_Chap09_Caract-technique_ed02-2015Berlingo-2-VP_en_Chap09_Caract-technique_ed02-2015
ENGINE CHARACTERISTICS
The engine characteristics (capacity,
maximum power, maximum power
speed, fuel, C
o
2 emissions...) for your vehicle are given in the registration
certificate.
These characteristics correspond
to the values type-approved
on a test bed, under conditions
defined
in
European legislation
(Directive 1999/99/EC).
For
more
information, refer to the
manufacturer's
website or sales
brochure
for
the
model. Contact
a
CITROËN
dealer or a qualified
workshop.
WEIGHTS AND TOWED LOADS
These values, expressed in kg, can be found
on the manufacturer's VIN plate
or
label.
The
maximum weights and towed
loads for your vehicle can be found on
the
vehicle's registration certificate.
The
kerb weight is equal to the weight
without
load + driver (75 kg) + fuel tank
filled
to 90%.
The GTW and towed load values
indicated
are valid up to a maximum
altitude
of 1000 metres.
The
value of
the
towed load mentioned must be
reduced by 10 % for each additional
1000
metres.
With
load transfer, the braked trailer
weight can be increased, on condition
that the equivalent of this load is
removed
from the vehicle so that the
GTW
is not exceeded. High
ambient temperatures
may
result in a reduction in the
performance
of the vehicle in
order
to protect the engine. When the
ambient
temperature is higher than
37 °C,
limit the towed weight.
Towing with a lightly loaded
vehicle can adversely affect road
holding.
Towing
a trailer increases braking
distances.
When
towing, the maximum permitted
speed
is reduced (comply with the
legislation
in force in the country).
The
recommended nose weight is the downward force on the towball
(removable
with or without tools).
GVW: gross vehicle weight, the
maximum
authorised weight.
GTW:
gross train weight, the maximum
weight
for vehicle plus trailer.
The
location of the manufacturer's
plate
is given in chapter 9,
"Identification
markings" section.
In
each country, it is imperative that
the
maximum towed loads authorised
by
local legislation are complied
with.
T
o find out your vehicle's towing
capacities and its gross train weight,
consult
a CITROËN dealer.
Weights
Page 249 of 292
Audio and Telematics
247
Berlingo-2-VP_en_Chap10a_SMEGplus_ed02-2015
As a safety measure and because it requires sustained attention by the
driver,
using a smartphone when
d
riving is prohibited.
All
operations must be done with the
v
ehicle stationary .
As
a safety measure, applications
c
an only be viewed with the vehicle
stationary; display is interrupted once
the
vehicle is moving.
The synchronisation of a
smartphone
allows applications on a
s
martphone that are adapted to the
M
irrorLink
TM technology to be displayed
i
n
the
vehicle's screen.
as
the principles and standards are
constantly
evolving, it is recommended
t
hat
you
update the operating system of
y
our
smartphone.
For
the
list
of eligible smartphones,
c
onnect to the brand's internet website
in
your
country. Please
note:
-
i
f your smartphone is supported, to
m
ake it "MirrorLink
TM" compatible, s
ome
phone
manufacturers
n
evertheless invite you to first
download
a
dedicated application.
When connecting a smartphone to the system, it is recommended that Bl
uetooth
® be started on the smartphone.
Start the application on the
smartphone (optional, depending
o
n the smartphone and operating
s
yste m).
du
ring the procedure, several screen
pages relating to certain functions
are displayed.
ac
cept to start and end the
connection.
Connect a USB cable. The
s
martphone charges when
c
onnected by a USB cable.
Press " MirrorLink
TM" to start
the
application
in
the system.
on
ce connection is established, an
" Applications " page is displayed with the
list of applications already downloaded to
your smartphone and adapted to MirrorLink
TM
technology.
If only one application has been downloaded to
the
smartphone, it starts automatically.
MirrorLinkTM smartphone
connection
Access to the different audio sources remains a
ccessible in the margin of the MirrorLinkTM
display,
using
touch
buttons
in
the
upper
bar.
Access
to
the
menus
for
the
system
is
possible
a
t
any
time
using
the
dedicated
buttons.
If
the
smartphone
is
locked,
c
ommunication
with
the
system
is
only
b
y
USB
cable.
From
the
system,
press
"
Connected
services "
to
display
the
primary
pag
e.
Voice recognition
Press the end of the lighting control stalk to s tart voice recognition of your smartphone via
t
he system.
Voice
recognition requires a compatible
s
martphone connected to the vehicle by
Bl
uetooth.
TECHNOLOGY on BOARD
10
Page 253 of 292
Audio and Telematics
251
Berlingo-2-VP_en_Chap10a_SMEGplus_ed02-2015
As a safety measure and because it requires sustained attention by the
driver,
using a smartphone when
d
riving is prohibited.
All
operations must be done with the
v
ehicle stationary .
As
a safety measure, applications
c
an only be viewed with the vehicle
stationary; display is interrupted once
the
vehicle is moving.
The synchronisation of a
smartphone
allows applications on a
s
martphone that are adapted to the
C
arPlay
® technology to be displayed in
t
he
vehicle's screen.
as
the principles and standards are
constantly
evolving, it is recommended
t
hat
you
update the operating system of
y
our
smartphone.
For
the
list of eligible smartphones,
c
onnect to the brand's internet website
in
your
country.
on c
onnecting the USB cable, the
" Telephone " function changes to
" CarPlay " in the menu carrousel.
Press on " CarPlay" to display the
CarPlay
® inter face.
P
ress on " CarPlay" to display the
CarPlay
® inter face.
C
onnect
a USB cable. The
s
martphone charges when
c
onnected by a USB cable.
Press the end of the lighting control stalk to
s
tart voice recognition of your smartphone via
t
he system.
CarPlay® smartphone
connection
During the procedure, one or more s
creen pages relating to certain
functions
are displayed on connection.
From
the system, press "
Connected
services " to display the primary
pag
e.
Connect the USB cable. The
s
martphone is charged while
c
onnected by the USB cable.
o
r
Voice recognition
TECHNOLOGY on BOARD
10