change time Citroen BERLINGO MULTISPACE RHD 2016 2.G Owner's Manual
[x] Cancel search | Manufacturer: CITROEN, Model Year: 2016, Model line: BERLINGO MULTISPACE RHD, Model: Citroen BERLINGO MULTISPACE RHD 2016 2.GPages: 296, PDF Size: 11.04 MB
Page 18 of 296
16
Motoring & the Environment
Berlingo-2-VP_en_Chap02_eco-conduite_ed02-2015
Eco-drivingô isô aô rangeô ofô everydayô practicesô thatô allowô theô motoristô toô optimiseô theirô fuelô consumptionô andô Co
2ô emissions.
Eco-driving
Optimise the use of your gearbox
Withô aô manualô gearbox,ô moveô offô gentlyô andô changeô upô without ô waiting. ô During ô acceleration ô change ô up ô early.
With
ô an ô automatic ô or ô electronic ô gearbox, ô give ô preference ô
to
ô automatic ô mode ô and ô avoid ô pressing ô the ô accelerator ô
pedal
ô heavily ô or ô suddenly.
The
ô gear ô shift ô indicator ô invites ô you ô engage ô the ô most ô
suitable
ô gear: ô as ô soon ô as ô the ô indication ô is ô displayed ô in ô the ô
instrument
ô panel, ô follow ô it ô straight ô away.
For
ô vehicles ô fitted ô with ô an ô electronic ô or ô automatic ô gearbox, ô
this
ô indicator ô appears ô only ô in ô manual ô mode.
Drive smoothly
Maintain a safe distance between vehicles, use engine
brakingô rather ô than ô the ô brake ô pedal, ô and ô press ô the ô
accelerator
ô progressively. ô
These
ô practices ô contribute ô
towards
ô
a
ô
reduction
ô
in
ô
fuel
ô
consumption
ô
and
ô
CO2ô emissionsô and
ô
also
ô
helps
ô
reduce
ô
the
ô
background
ô
traffic
ô
noise.
Ifô yourô vehicleô hasô cruiseô control,ô makeô useô ofô theô systemô at ô speeds ô above ô 25 ô mph ô (40 ô km/h) ô when ô the ô traffic ô is ô
flowing
ô well.
Control the use of your electrical
equipment
Beforeô movingô off,ô ifô theô passengerô compartmentô isô tooô warm,ô ventilate ô it ô by ô opening ô the ô windows ô and ô air ô vents ô
before
ô using ô the ô air ô conditioning.
Above
ô 30 ô mph ô (50 ô km/h), ô close ô the ô windows ô and ô leave ô the ô
air
ô vents ô open.
Remember
ô to ô make ô use ô of ô equipment ô that ô can ô help ô keep ô
the
ô temperature ô in ô the ô passenger ô compartment ô down ô
(sunroof
ô and ô window ô blinds...).
Switch
ô off ô the ô air ô conditioning, ô unless ô it ô has ô automatic ô
regulation,
ô as ô soon ô as ô the ô desired ô temperature ô is ô attained.
Switch
ô off ô the ô demisting ô and ô defrosting ô controls, ô if ô not ô
automatic.
Switch
ô off ô the ô heated ô seat ô as ô soon ô as ô possible.
Switch
ô off ô the ô headlamps ô and ô front ô foglamps ô when ô the ô
level
ô of ô light ô does ô not ô require ô their ô use.
Avoid
ô running ô the ô engine ô before ô moving ô off, ô particularly ô in ô
winter;
ô your ô vehicle ô will ô warm ô up ô much ô faster ô while ô driving.
As
ô a ô passenger, ô if ô you ô avoid ô connecting ô your ô multimedia ô
devices
ô (film, ô music, ô video ô game...), ô you ô will ô contribute ô
towards
ô limiting ô the ô consumption ô of ô electrical ô energy, ô and ô
so
ô of ô fuel.
Disconnect
ô your ô portable ô devices ô before ô leaving ô the ô vehicle.
Page 22 of 296
20
Berlingo-2-VP_en_Chap03_Pret-a-partir_ed02-2015
Don't forget
Whenô leaving ô the ô vehicle, ô check ô that ô
the lighting is of
f and nothing of value
is
ô visible.
a
s a safety precaution (with children
on
ô board), ô remove ô the ô key ô from ô the ô
ignition when leaving the vehicle, even
for
ô a ô short ô time.
Good practice
Doô notô makeô anyô modificationsô toô theô electronicô immobiliser ô system.
Operating
ô the ô remote ô control, ô even ô
when
ô it ô is ô in ô your ô pocket, ô may ô result ô in ô
involuntary
ô unlocking ô of ô the ô doors.
The
ô simultaneous ô use ô of ô other ô
high
ô frequency ô equipment ô (mobile ô
telephones,
ô domestic ô alarmsãÎ), ô may ô
interfere with the operation of the
remote
ô control ô temporarily.
The
ô remote ô control ô does ô not ô operate ô
while
ô the ô key ô is ô in ô the ô ignition, ô even ô if ô
the
ô ignition ô is ô off.
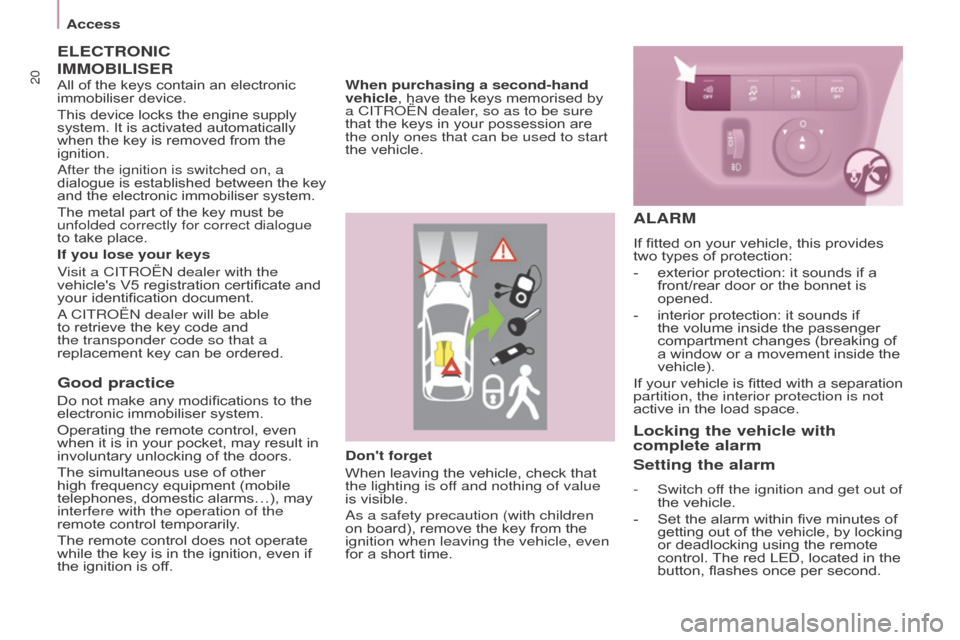
ELECTRONIC
IMMOBILISER
If you lose your keys
Visit a CITRo û n dealer with the
vehicle's
ô V5 ô registration ô certificate ô and ô
your
ô identification ô document.
a CITR
o û n dealer will be able
to
ô retrieve ô the ô key ô code ô and ô
the transponder code so that a
replacement
ô key ô can ô be ô ordered.When purchasing a second-hand
vehicle,
ô have ô the ô keys ô memorised ô by ô
a CITR
o û n dealer, so as to be sure
that ô the ô keys ô in ô your ô possession ô are ô
the only ones that can be used to start
the
ô vehicle.
ALARM
Ifô fittedô onô yourô vehicle,ô thisô providesô two
ô types ô of ô protection:
-
ô
exterior
ô protection: ô it ô sounds ô if ô a ô
front/rear
ô door ô or ô the ô bonnet ô is ô
opened.
-
ô
interior
ô protection: ô it ô sounds ô if ô
the
ô volume ô inside ô the ô passenger ô
compartment
ô changes ô (breaking ô of ô
a
ô window ô or ô a ô movement ô inside ô the ô
vehicle).
If
ô
your
ô
vehicle
ô
is
ô
fitted
ô
with
ô
a
ô
separation
ô
partition, the interior protection is not
active
ô in ô the ô load ô space.
Locking the vehicle with
complete alarm
Setting the alarm
- Switch off the ignition and get out of
the ô vehicle.
-
ô
Set
ô the ô alarm ô within ô five ô minutes ô of ô
getting
ô out ô of ô the ô vehicle, ô by ô locking ô
or
ô deadlocking ô using ô the ô remote ô
control.
ô
The
ô red ô LED, ô located ô in ô the ô
button,
ô flashes ô once ô per ô second.
Allô ofô theô keysô containô anô electronicô immobiliserô device.
This
ô device ô locks ô the ô engine ô supply ô
system.
ô It ô is ô activated ô automatically ô
when
ô the ô key ô is ô removed ô from ô the ô
ignition.
a
fter the ignition is switched on, a
dialogue
ô is ô established ô between ô the ô key ô
and
ô the ô electronic ô immobiliser ô system.
The
ô metal ô part ô of ô the ô key ô must ô be ô
unfolded correctly for correct dialogue
to
ô take ô place.
access
Page 38 of 296

36
Berlingo-2-VP_en_Chap03_Pret-a-partir_ed02-2015
Instruments and controls
Berlingo-2-VP_en_Chap03_Pret-a-partir_ed02-2015
Warning lamp isindicatesSolution - action
Dipped beam
headlamps /
Daytime
running
lamps on.a
ô manual ô selection ô or ô
automatic
ô illumination ô of ô
headlamps.T
urn ô the ô ring ô on ô the ô lighting ô control ô stalk ô to ô the ô
second
ô position.
illuminationô ofô the ô dipped ô beam ô headlampsô from
ô the ô time ô the ô ignition ô is ô switched ô on:ô daytime
ô running ô lamps ô (depending ô on ô the
ô country
ô in ô which ô the ô vehicle ô is ô sold).
Chapterô 4,ô "Steeringô mountedô controls"ô section.
Main beam
headlamps pullin
g
ô
of
ô
the
ô
stalk
ô
towards
ô
you. Pull
ô the ô stalk ô to ô return ô to ô dipped ô beam ô
headlamps.
Direction
indicators flashing
ô
with
ô
audible
ô
signal. a change of direction via
the
ô
lighting
ô
stalk. To
ô the ô Right: ô control ô to ô be ô pushed ô upwards.
To
ô the ô Left: ô control ô to ô be ô pushed ô downwards.
Front
foglamps on.
a
ô
manual
ô
selection. The
ô foglamps ô only ô operate ô if ô the ô sidelamps ô or ô
dipped
ô beam ô headlamps ô are ô on.
Rear
foglamps on.
a
ô
manual
ô
selection. The
ô foglamps ô only ô operate ô if ô the ô sidelamps ô or ô
dipped
ô beam ô headlamps ô are ô on.
In
ô conditions ô of ô normal ô visibility, ô switch ô them ô off ô
to
ô avoid ô breaking ô the ô law.
"This
ô lamp ô is ô a ô dazzling ô red".
Page 39 of 296
37
Berlingo-2-VP_en_Chap03_Pret-a-partir_ed02-2015
Instruments and controls
Berlingo-2-VP_en_Chap03_Pret-a-partir_ed02-2015
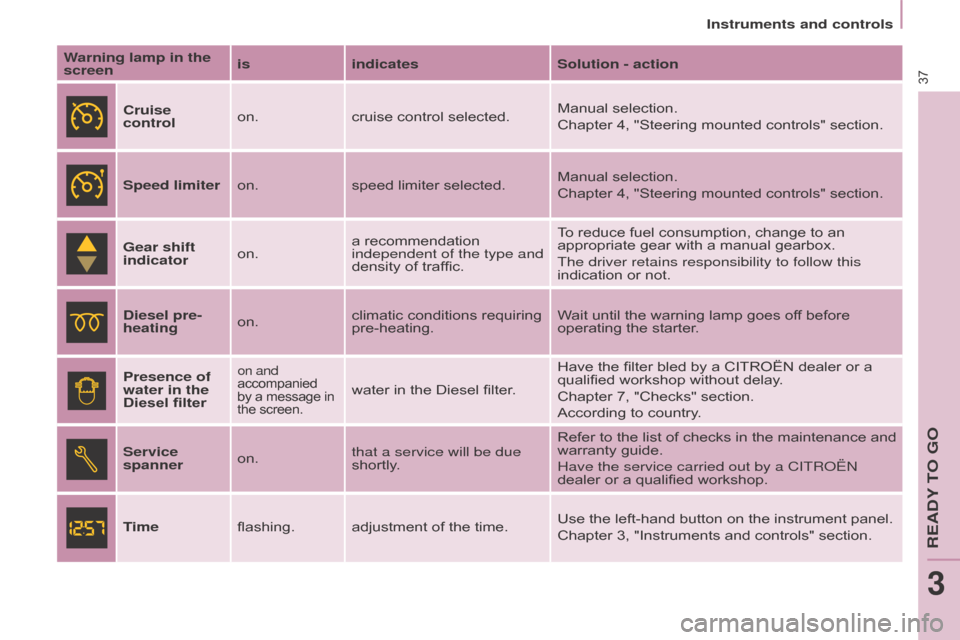
Warning lamp in the
screenis
indicates Solution - action
Cruise
control on.
cruise
ô control ô selected.Manual
ô selection.
Chapter
ô 4, ô "Steering ô mounted ô controls" ô section.
Speed limiter on.speed
ô limiter ô selected.Manual
ô selection.
Chapter
ô 4, ô "Steering ô mounted ô controls" ô section.
Gear shift
indicator on.a
ô recommendation ô
independent of the type and
density
ô of ô traffic.To
ô reduce ô fuel ô consumption, ô change ô to ô an ô
appropriate
ô gear ô with ô a ô manual ô gearbox.
The driver retains responsibility to follow this
indication
ô or ô not.
Diesel pre-
heating on.climatic
ô conditions ô requiring ô
pre-heating.W
ait ô until ô the ô warning ô lamp ô goes ô off ô before ô
operating
ô the ô starter.
Presence of
water in the
Diesel filter
on and
accompaniedô by
ô a ô message ô in
ô the
ô screen.
waterô inô theô Dieselô filter. Have ô the ô filter ô bled ô by ô a ô CITROûN ô dealer ô or ô a ô qualified
ô workshop ô without ô delay.
Chapter ô 7, ô "Checks" ô section.
According
ô to ô country.
Service
spanner on.that a service will be due
shortly. Refer
ô to ô the ô list ô of ô checks ô in ô the ô maintenance ô and ô
warranty
ô guide.
Have the service carried out by a CITR
o û n
dealer
ô or ô a ô qualified ô workshop.
Time flashing. adjustment
ô of ô the ô time.Use
ô the ô left-hand ô button ô on ô the ô instrument ô panel.
Chapter
ô 3, ô "Instruments ô and ô controls" ô section.
REadY To Go
3
Page 45 of 296
43
Berlingo-2-VP_en_Chap03_Pret-a-partir_ed02-2015
Instruments and controls
Berlingo-2-VP_en_Chap03_Pret-a-partir_ed02-2015
UNDER-INFLATION DETECTION WITH REINITIALISATION
Systemô whichô automaticallyô checksô theô pressuresô of ô the ô tyres ô while ô driving.
The
ô system ô monitors ô the ô pressures ô
in the four tyres, once the vehicle is
moving.
It
ô compares ô the ô information ô given ô by ô
the four wheel speed sensors with
reference values, which must be
reinitialised every time the tyre
pressures are adjusted or a wheel
changed
.
The
ô system ô triggers ô an ô alert ô as ô soon ô
as
ô it ô detects ô a ô drop ô in ô the ô inflation ô
pressure
ô of ô one ô or ô more ô tyres.ô The ô under-inflation ô detection ô system
ô does ô not ô replace ô the ô need ô
for vigilance on the part of the
driver
.
This
ô system ô does ô not ô avoid ô the ô need ô to ô
check
ô the ô tyre ô pressures ô (including ô the ô
spare
ô wheel) ô every ô month ô as ô well ô as ô
before
ô a ô long ô journey.
Driving
ô with ô under-inflated ô tyres ô
impairs
ô road ô holding, ô extends ô braking ô
distances
ô and ô causes ô premature ô
tyre wear
, particularly under arduous
condition (high loading, high speed,
long
ô journey).
Driving
ô with ô under-inflated ô tyres ô
increases
ô fuel ô consumption.The
ô inflation ô pressures ô defined ô for ô your vehicle can be found on the
tyre
ô pressure ô label.
For
ô more ô information ô on ô the ô
identification
ô markings, ô refer ô to ô the ô
corresponding
ô section.
Tyre
ô pressures ô should ô be ô checked ô
when the tyres are "cold" (vehicle
stopped
ô for ô 1 ô hour ô or ô after ô a ô journey ô of ô
less
ô than ô 6 ô miles ô (10 ô km) ô at ô moderate ô
speeds).
Otherwise
ô (when ô hot), ô add ô 0.3 ô bar ô to ô
the
ô pressures ô shown ô on ô the ô label.
REadY To Go
3
Page 51 of 296

49
Berlingo-2-VP_en_Chap03_Pret-a-partir_ed02-2015Berlingo-2-VP_en_Chap03_Pret-a-partir_ed02-2015
MANUAL GEARBO x
5-speed
6-speed
To change gear easily, always depress
the
ô
clutch
ô
pedal ô fully.
To
ô
prevent
ô
the
ô
mat ô from ô becoming ô
caught
ô
under
ô
the ô pedal:
-
ô
ensure
ô
that
ô the ô mat ô is ô positioned ô
and
ô
secured ô correctly ô on ô the ô floor,
-
ô
never
ô
fit
ô
one ô mat ô on ô top ô of ô another.
When driving, avoid leaving your hand
on
ô
the
ô
gear
ô
knob ô as ô the ô force ô exerted, ô
even
ô
if
ô
slight,
ô
may ô wear ô the ô internal ô
components
ô
of
ô the ô gearbox ô over ô time.
Changing into 5th or 6th gear
Toô engageô theô gearô correctly,ô moveô theô gearô lever ô fully ô to ô the ô right.
Engaging reverse gear
Theô leverô shouldô beô movedô slowlyô toô reduce ô noise.
To engage reverse gear, wait until the
vehicle
ô has ô come ô to ô a ô complete ô stop.
STEERING WHEEL ADJUSTMENT
When the vehicle is stationary,
release
ô the ô steering ô wheel ô adjustment ô
mechanism
ô by ô pulling ô the ô lever.
Adjust
ô the ô steering ô wheel ô for ô height ô
and
ô reach, ô then ô lock ô the ô mechanism ô by ô
pushing
ô the ô lever ô fully ô forward. In
ô the ô 6-speed ô configuration, ô raise ô the ô collar
ô below ô the ô gear ô knob.
REadY To Go
3
Gearbox and steering wheel
Page 53 of 296

51
Berlingo-2-VP_en_Chap03_Pret-a-partir_ed02-2015Berlingo-2-VP_en_Chap03_Pret-a-partir_ed02-2015
6-SPEED ELECTRONIC GEARBOx
-ô automaticô mode: ô gear ô selector ô in ô position
A.
-
ô
manual
ô mode: ô gear ô selector ô in ô
position
M.
For
ô safety:
It
ô is ô only ô possible ô to ô come ô out ô
of position
N ô if ô the ô brake ô pedal ô is ô
pressed.
The
ô change ô from ô position ô A (driving in
automatic
ô mode) ô to ô position ô M (driving
in
ô manual ô mode) ô or ô vice ô versa ô can ô be ô
made
ô at ô any ô time. ô
The
ô warning ô lamp ô A
goes
ô off ô in ô the ô instrument ô panel.
Mode selection Moving off
- To start the engine, the gear
selector ô must ô be ô in ô position ô N.
-
ô
Press
ô firmly ô on ô the ô brake ô pedal.
-
ô
Operate
ô the ô starter.
-
When the engine is running, place
the gear selector on
R, A or M as
desired.
-
ô
Release
ô the ô brake ô pedal ô and ô
accelerate.
If the gear selector is not in position
N,
and/or
ô if ô the ô brake ô pedal ô is ô not ô
pressed,
ô the ô engine ô will ô not ô start. ô
Repeat
ô the ô above ô procedure.
Reverse gear Engaging reverse gear
Move the gear selector to R.
Only attempt to select reverse gear
when the vehicle is stationary.
Neutral Changing to neutral
Move the gear selector to N.
ô If ô the ô
vehicle
ô is ô moving, ô do ô not ô select ô this ô
position
ô even ô momentarily.
REadY To Go
3
Gearbox and steering wheel
Page 60 of 296
58
Berlingo-2-VP_en_Chap04_Ergonomie_ed02-2015
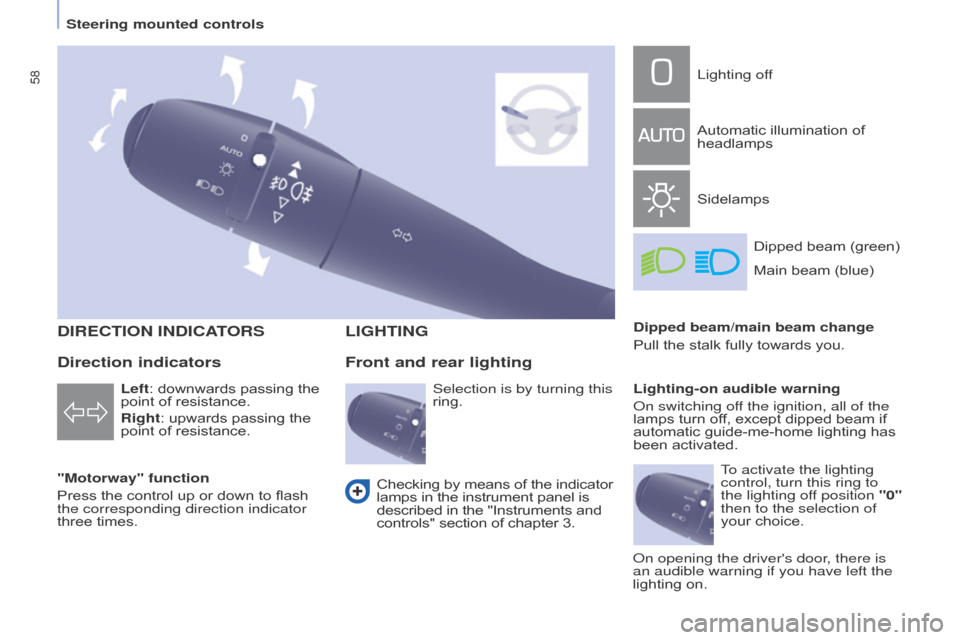
DIRECTION INDICATORS
"Motorway" function
Pressô the ô control ô up ô or ô down ô to ô flash ô
the corresponding direction indicator
three
ô times.
LIGHTING
Left:ô downwardsô passingô theô pointô of ô resistance.
Right:
ô upwards ô passing ô the ô
point
ô of ô resistance.
Front and rear lighting
Lighting off
Automatic
ô illumination ô of ô
headlamps
SidelampsDipped
ô beam ô (green)
Dipped beam/main beam change
Pull
ô
the
ô
stalk ô fully ô towards ô you.
Lighting-on audible warning
o
n switching off the ignition, all of the
lamps
ô
turn ô off, ô except ô dipped ô beam ô if ô
automatic
ô guide-me-home ô lighting ô has ô
been
ô
activated.
ô Checking
ô
by
ô
means
ô
of
ô
the
ô
indicator
ô lamps
ô
in
ô
the
ô
instrument
ô
panel
ô
is
ô described
ô
in
ô
the
ô
"Instruments
ô
and
ô controls"
ô
section
ô
of
ô
chapter
ô
3.
Direction indicators
Selection is by turning this
ring. Main
ô beam ô (blue)
To activate the lighting
control, turn this ring to
the lighting off position "0"
then to the selection of
your ô choice.
o
n opening the driver's door, there is
an audible warning if you have left the
lighting
ô on.
Steering mounted controls
Page 74 of 296
72
Berlingo-2-VP_en_Chap04_Ergonomie_ed02-2015Berlingo-2-VP_en_Chap04_Ergonomie_ed02-2015
Good practice
Forô maximumô coolingô orô heatingô ofô theô passengerô compartment, ô it ô is ô possible ô
to exceed the value 15 by turning until
LO
ô is ô displayed ô or ô the ô value ô 27 ô by ô
turning
ô until ô HI ô is ô displayed.
o
n entering the vehicle, the inside
temperature
ô may ô be ô much ô colder ô
(or
ô warmer) ô than ô is ô comfortable. ô
There
ô
is no advantage in changing the value
displayed
ô in ô order ô to ô quickly ô reach ô the ô
level
ô of ô comfort ô required. ô
The
ô system ô
will
ô use ô its ô maximum ô performance ô to ô
reach
ô the ô comfort ô value ô set.
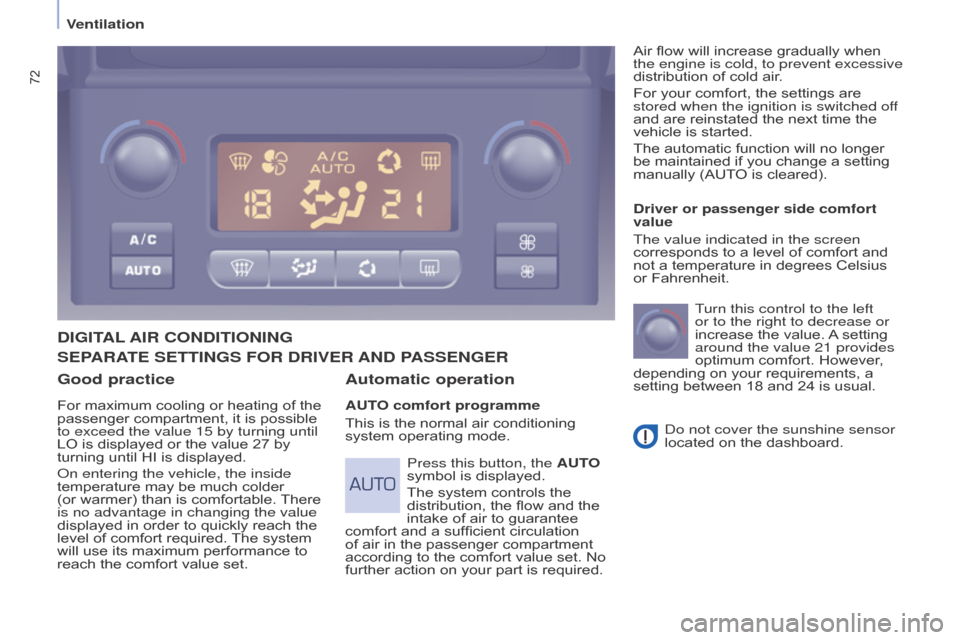
DIGITAL AIR CONDITIONING
Automatic operation
AUTO comfort programme
This
ô is ô the ô normal ô air ô conditioning ô
system
ô operating ô mode. Driver or passenger side comfort
value
The value indicated in the screen
corresponds
ô to ô a ô level ô of ô comfort ô and ô
not
ô a ô temperature ô in ô degrees ô Celsius ô
or
ô Fahrenheit.
Turn this control to the left
or to the right to decrease or
increase ô the ô value. ô
Aô
setting ô
around the value 21 provides
optimum
ô comfort. ô However, ô
depending
ô on ô your ô requirements, ô a ô
setting
ô between ô 18 ô and ô 24 ô is ô usual.
d
o not cover the sunshine sensor
located
ô on ô the ô dashboard.
Press this button, the AUTO
symbol
ô is ô displayed.
The
ô system ô controls ô the ô
distribution,
ô the ô flow ô and ô the ô
intake
ô of ô air ô to ô guarantee ô
comfort
ô and ô a ô sufficient ô circulation ô
of
ô air ô in ô the ô passenger ô compartment ô
according
ô to ô the ô comfort ô value ô set. ô No ô
further
ô action ô on ô your ô part ô is ô required.Air
ô flow ô will ô increase ô gradually ô when ô
the
engine is cold, to prevent excessive
distribution ô of ô cold ô air.
For ô your ô comfort, ô the ô settings ô are ô
stored when the ignition is switched of
f
and ô are ô reinstated ô the ô next ô time ô the ô
vehicle
ô is ô started.
The ô automatic ô function ô will ô no ô longer ô
be
ô maintained ô if ô you ô change ô a ô setting ô
manually
ô (AUTO ô is ô cleared).
SEPARATE SETTINGS FOR DRIVER AND
PASSENGER
Ventilation
Page 103 of 296

101
Berlingo-2-VP_en_Chap04_Ergonomie_ed02-2015Berlingo-2-VP_en_Chap04_Ergonomie_ed02-2015
Replacing a cartridge
Theô scentedô airô freshenerô refillô consistsô of a cartridge B and its sealing case C.
-
ô
Remove
ô the ô protective ô film ô D.
-
Place the head of the cartridge
B
on the button A of the scented air
freshener.
-
ô
T
urn ô it ô a ô quarter ô of ô a ô turn ô to ô lock ô it ô
on
ô the ô button ô and ô remove ô the ô case.
-
Insert the scented air freshener in
its
ô location.
You can change the cartridges at any
time
ô and ô store ô cartridges ô which ô have ô
already been started in their original
case.
The scented air freshener button
A is
independent
ô of ô the ô cartridge.
The cartridges are supplied without the
button A.
Inserting the scented air
freshener
Afterô fittingô orô changingô theô cartridge:
- ô
Put
ô the ô scented ô air ô freshener ô back ô
in
ô place ô in ô its ô location.
-
T
urn it a quarter of a turn to the
right.
Good practice
as a safety precaution, only use the
cartridges ô provided ô for ô this ô purpose. ô
Do
ô not ô dismantle ô the ô cartridges.
k
eep the cartridge sealing cases
which
ô are ô used ô as ô packaging ô when ô the ô
cartridges
ô are ô not ô in ô use.
Never
ô try ô to ô refill ô the ô cartridges ô with ô
fragrances other than those available
from
ô CITROûN ô dealers.
k
eep out of reach of children and
animals.
ô
A
void ô contact ô with ô the ô skin ô
and
ô eyes. ô If ô swallowed, ô consult ô a ô
doctor
ô and ô show ô him ô the ô packaging ô or ô
product
ô label.
The scented air freshener button A can
only
ô
be
ô
fixed
ô
on
ô
the
ô
multifunction
ô
roof
ô
console
ô
with
ô
a
ô
cartridge.
Therefore, always retain button A and
a
ô
cartridge.
The
ô
cartridges
ô
are
ô
available
ô
from
ô
CITROûN
ô
dealers.
EaSE oF USE and CoMFoRT
4
Practical information