headlamp Citroen BERLINGO MULTISPACE RHD 2017 2.G User Guide
[x] Cancel search | Manufacturer: CITROEN, Model Year: 2017, Model line: BERLINGO MULTISPACE RHD, Model: Citroen BERLINGO MULTISPACE RHD 2017 2.GPages: 292, PDF Size: 10.19 MB
Page 184 of 292

182
Berlingo2VP_en_Chap08_Aide-rapide_ed02-2016Berlingo2VP_en_Chap08_Aide-rapide_ed02-2016
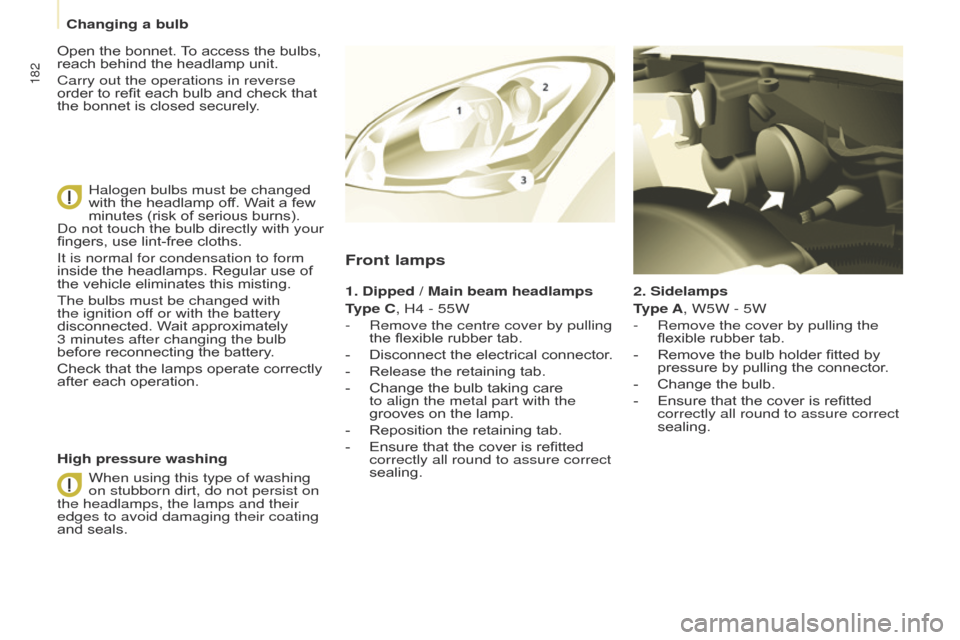
2. Sidelamps
Type A, W5W - 5W
-
Remove the cover by pullin
g the
flexible
rubber tab.
-
Remove
the bulb holder fitted by
pressure
by pulling the connector.
-
Change
the bulb.
-
Ensure
that the cover is refitted
correctly all round to assure correct
sealing.
Front lamps
1. Dipped / Main beam headlamps
T ype C, H4 - 55W
-
Remove the centre cover by pullin
g
the
flexible rubber tab.
-
Disconnect
the electrical connector.
-
Release
the retaining tab.
-
Change
the bulb taking care
to align the metal part with the
grooves
on the lamp.
-
Reposition
the retaining tab.
-
Ensure
that the cover is refitted
correctly all round to assure correct
sealing.
High pressure washing Open
the
bonnet.
T
o
access
the
bulbs,
reach
behind
the
headlamp
unit.
Carry out the operations in reverse
order
to
refit
each
bulb
and
check
that
the
bonnet
is
closed
securely.
Halogen bulbs must be changed
with
the
headlamp
off.
Wait
a
few
minutes
(risk
of
serious
burns).
Do not touch the bulb directly with your
fingers,
use
lint-free
cloths.
It is normal for condensation to form
inside
the
headlamps.
Regular
use
of
the
vehicle
eliminates
this
misting.
The bulbs must be changed with
the ignition off or with the battery
disconnected.
Wait
approximately
3
minutes after changing the bulb
before
reconnecting
the
battery.
Check
that
the
lamps
operate
correctly
after
each
operation.
When using this type of washing
on stubborn dirt, do not persist on
the headlamps, the lamps and their
edges to avoid damaging their coating
and
seals.
Changing a bulb
Page 187 of 292

185
Berlingo2VP_en_Chap08_Aide-rapide_ed02-2016Berlingo2VP_en_Chap08_Aide-rapide_ed02-2016
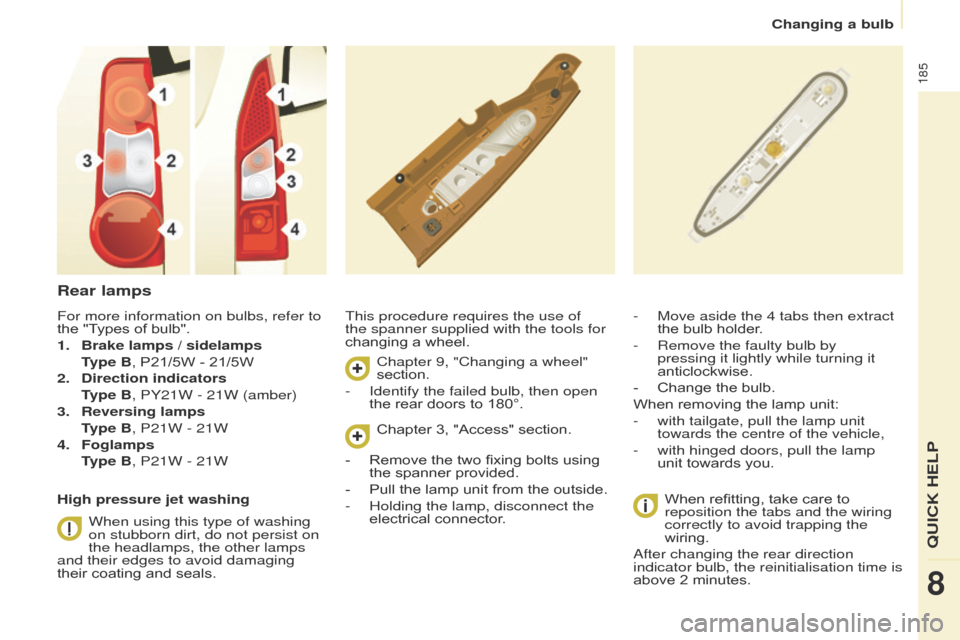
Rear lamps
This procedure requires the use of
the spanner supplied with the tools for
changing a wheel.
When
refitting, take care to
reposition the tabs and the wiring
correctly to avoid trapping the
wiring.
After changing the rear direction
indicator bulb, the reinitialisation time is
above
2 minutes.
-
Move aside the 4 tabs then extract
the
bulb holder.
-
Remove the faulty bulb by
pressing it lightly while turning it
anticlockwise.
-
Change
the bulb.
When
removing the lamp unit:
-
with tailgate, pull the lamp unit
towards the centre of the vehicle,
-
with hinged doors, pull the lamp
unit
towards you.
For more information on bulbs, refer to
the
"Types
of
bulb".
1.
Brake lamps / sidelamps
T
ype B,
P21/5W
-
21/5W
2.
Direction indicators
T
ype B, PY21W - 21W (amber)
3.
Reversing lamps
T
ype B, P21W - 21W
4.
Foglamps
T
ype B, P21W - 21W
High pressure jet washing When using this type of washing
on stubborn dirt, do not persist on
the headlamps, the other lamps
and their edges to avoid damaging
their
coating
and
seals. Chapter 9, "Changing a wheel"
section.
-
Identify the failed bulb, then open
the
rear doors to 180°.
Chapter
3, "Access" section.
-
Remove
the two fixing bolts using
the
spanner provided.
-
Pull
the lamp unit from the outside.
-
Holding the lamp, disconnect the
electrical
connector.
QUICK HELP
8
Changing a bulb
Page 190 of 292

188
Berlingo2VP_en_Chap08_Aide-rapide_ed02-2016Berlingo2VP_en_Chap08_Aide-rapide_ed02-2016
Dashboard fuses
Tilt the cover to gain access to the
fuses.Fuses
F Amperes
A Allocation
1 15 Rear wiper
2 - Not used
3 5 Airbag
4 10 Air
conditioning, diagnostic socket, mirror control,
headlamp beam
5 30 Electric windows
6 30 Locks
7 5Rear courtesy lamp, front map reading lamp, roof
console
8 20 Audio
equipment, screen, tyre under-inflation
detection, alarm and siren
9 30 Front
and rear 12V socket
10 15 Central column 11 15 Low current ignition switch
12 15 Rain and sunshine sensor, airbag
13 5 Instrument panel
14 15 Parking
sensors, digital air conditioning controls,
hands-free
phone kit
15 30 Locks
16 - Not used
17 40Rear
screen/mirrors demist/defrost
Changing a fuse
Page 192 of 292

190
Berlingo2VP_en_Chap08_Aide-rapide_ed02-2016Berlingo2VP_en_Chap08_Aide-rapide_ed02-2016
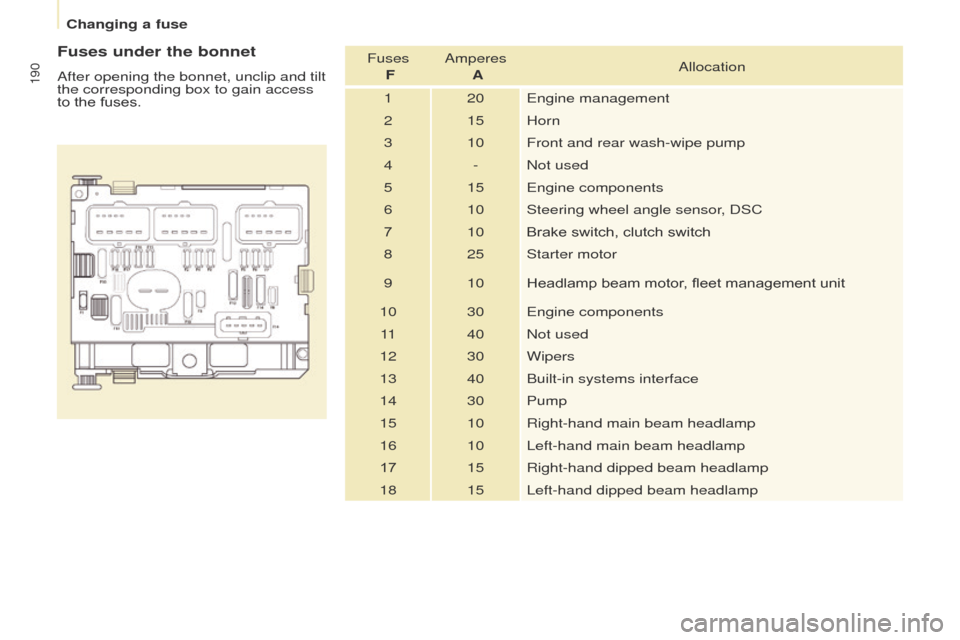
Fuses under the bonnet
After opening the bonnet, unclip and tilt
the corresponding box to gain access
to the fuses. Fuses
F Amperes
A Allocation
1 20 Engine management
2 15 Horn
3 10 Front and rear wash-wipe pump
4 - Not used
5 15 Engine components
6 10 Steering wheel angle sensor, DSC
7 10Brake
switch, clutch switch
8 25 Starter motor
9 10 Headlamp
beam motor, fleet management unit
10 30 Engine components 11 40 Not used
12 30 Wipers
13 40 Built-in systems interface
14 30 Pump
15 10 Right-hand main beam headlamp
16 10 Left-hand main beam headlamp
17 15 Right-hand dipped beam headlamp
18 15 Left-hand dipped beam headlamp
Changing a fuse