lock Citroen BERLINGO RHD 2013 2.G Owner's Guide
[x] Cancel search | Manufacturer: CITROEN, Model Year: 2013, Model line: BERLINGO RHD, Model: Citroen BERLINGO RHD 2013 2.GPages: 236, PDF Size: 7.88 MB
Page 125 of 236
123
QUICK HELP
7
Changing a bulb
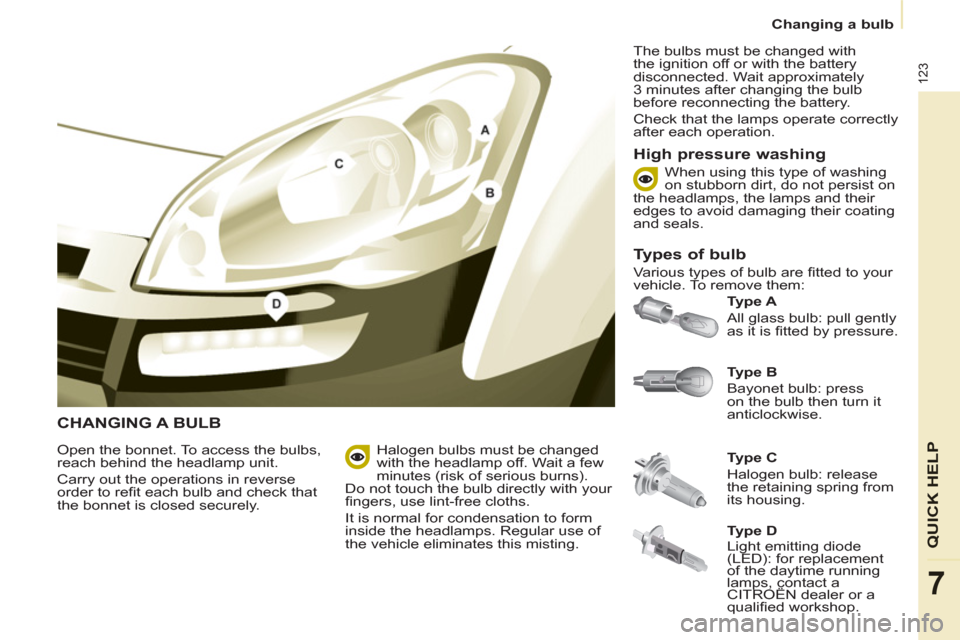
CHANGING A BULB
Ty p e B
Bayonet bulb: press
on the bulb then turn it
anticlockwise.
Ty p e A
All glass bulb: pull gently
as it is fi tted by pressure.
Open the bonnet. To access the bulbs,
reach behind the headlamp unit.
Carry out the operations in reverse
order to refi t each bulb and check that
the bonnet is closed securely.
Ty p e C
Halogen bulb: release
the retaining spring from
its housing.
Halogen bulbs must be changed
with the headlamp off. Wait a few
minutes (risk of serious burns).
Do not touch the bulb directly with your
fi ngers, use lint-free cloths.
It is normal for condensation to form
inside the headlamps. Regular use of
the vehicle eliminates this misting. The bulbs must be changed with
the ignition off or with the battery
disconnected. Wait approximately
3 minutes after changing the bulb
before reconnecting the battery.
Check that the lamps operate correctly
after each operation.
High pressure washing
Types of bulb
Various types of bulb are fi tted to your
vehicle. To remove them: When using this type of washing
on stubborn dirt, do not persist on
the headlamps, the lamps and their
edges to avoid damaging their coating
and seals.
Ty p e D
Light emitting diode
(LED): for replacement
of the daytime running
lamps, contact a
CITROËN dealer or a
qualifi ed workshop.
Page 126 of 236
Changing a bulb
124
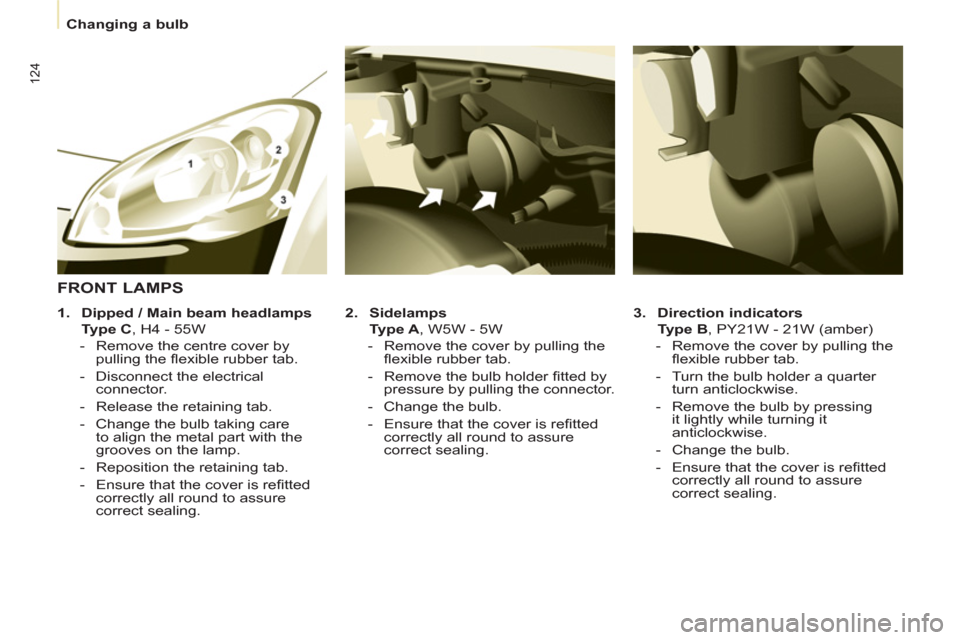
3.
Direction indicators
Type B
, PY21W - 21W (amber)
- Remove the cover by pulling the
fl exible rubber tab.
- Turn the bulb holder a quarter
turn anticlockwise.
- Remove the bulb by pressing
it lightly while turning it
anticlockwise.
- Change the bulb.
- Ensure that the cover is refi tted
correctly all round to assure
correct sealing.
2.
Sidelamps
Ty p e A
, W5W - 5W
- Remove the cover by pulling the
fl exible rubber tab.
- Remove the bulb holder fi tted by
pressure by pulling the connector.
- Change the bulb.
- Ensure that the cover is refi tted
correctly all round to assure
correct sealing.
FRONT LAMPS
1.
Dipped / Main beam headlamps
Type C
, H4 - 55W
- Remove the centre cover by
pulling the fl exible rubber tab.
- Disconnect the electrical
connector.
- Release the retaining tab.
- Change the bulb taking care
to align the metal part with the
grooves on the lamp.
- Reposition the retaining tab.
- Ensure that the cover is refi tted
correctly all round to assure
correct sealing.
Page 128 of 236
Changing a bulb
126
For more information concerning the
bulbs, refer to the "Types of bulb".
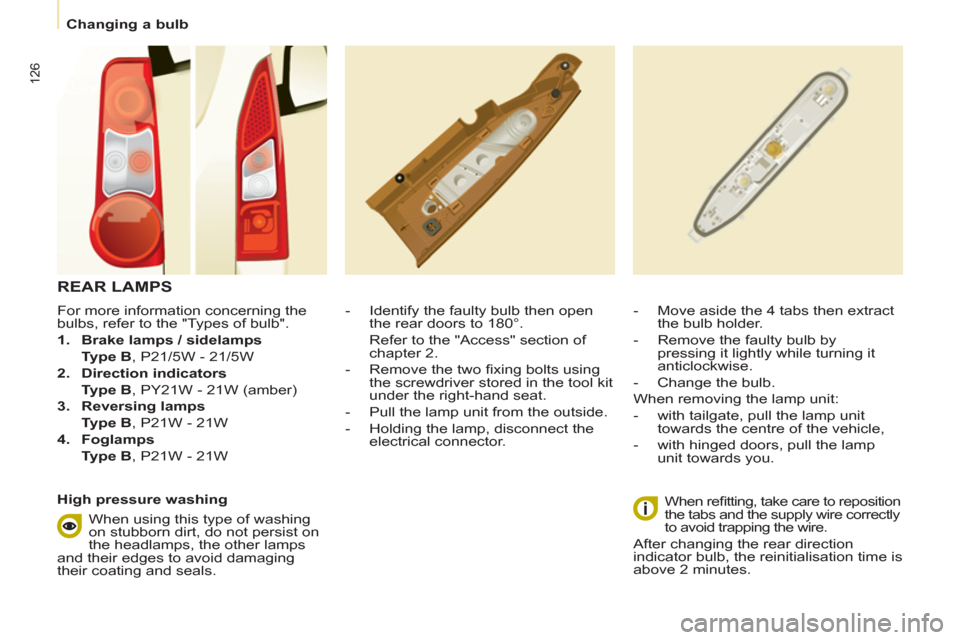
1.
Brake lamps / sidelamps
Type B
, P21/5W - 21/5W
2.
Direction indicators
Type B
, PY21W - 21W (amber)
3.
Reversing lamps
Type B
, P21W - 21W
4.
Foglamps
Type B
, P21W - 21W
- Identify the faulty bulb then open
the rear doors to 180°.
Refer to the "Access" section of
chapter 2.
- Remove the two fi xing bolts using
the screwdriver stored in the tool kit
under the right-hand seat.
- Pull the lamp unit from the outside.
- Holding the lamp, disconnect the
electrical connector.
- Move aside the 4 tabs then extract
the bulb holder.
- Remove the faulty bulb by
pressing it lightly while turning it
anticlockwise.
- Change the bulb.
When removing the lamp unit:
- with tailgate, pull the lamp unit
towards the centre of the vehicle,
- with hinged doors, pull the lamp
unit towards you.
When refi tting, take care to reposition
the tabs and the supply wire correctly
to avoid trapping the wire.
After changing the rear direction
indicator bulb, the reinitialisation time is
above 2 minutes.
REAR LAMPS
High pressure washing
When using this type of washing
on stubborn dirt, do not persist on
the headlamps, the other lamps
and their edges to avoid damaging
their coating and seals.
Page 129 of 236
127
QUICK HEL
P
7
Changing a bulb
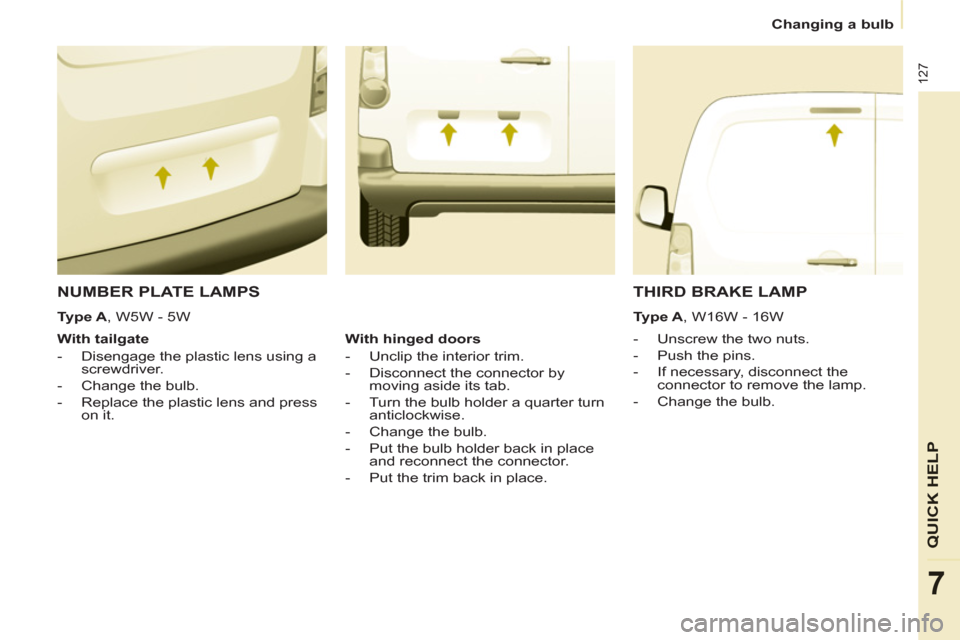
NUMBER PLATE LAMPS
- Unscrew the two nuts.
- Push the pins.
- If necessary, disconnect the
connector to remove the lamp.
- Change the bulb.
With tailgate
- Disengage the plastic lens using a
screwdriver.
- Change the bulb.
- Replace the plastic lens and press
on it.
THIRD BRAKE LAMP
Ty p e A
, W16W - 16W
With hinged doors
- Unclip the interior trim.
- Disconnect the connector by
moving aside its tab.
- Turn the bulb holder a quarter turn
anticlockwise.
- Change the bulb.
- Put the bulb holder back in place
and reconnect the connector.
- Put the trim back in place.
Type A
, W5W - 5W
Page 131 of 236
129
QUICK HEL
P
7
Changing a fuse
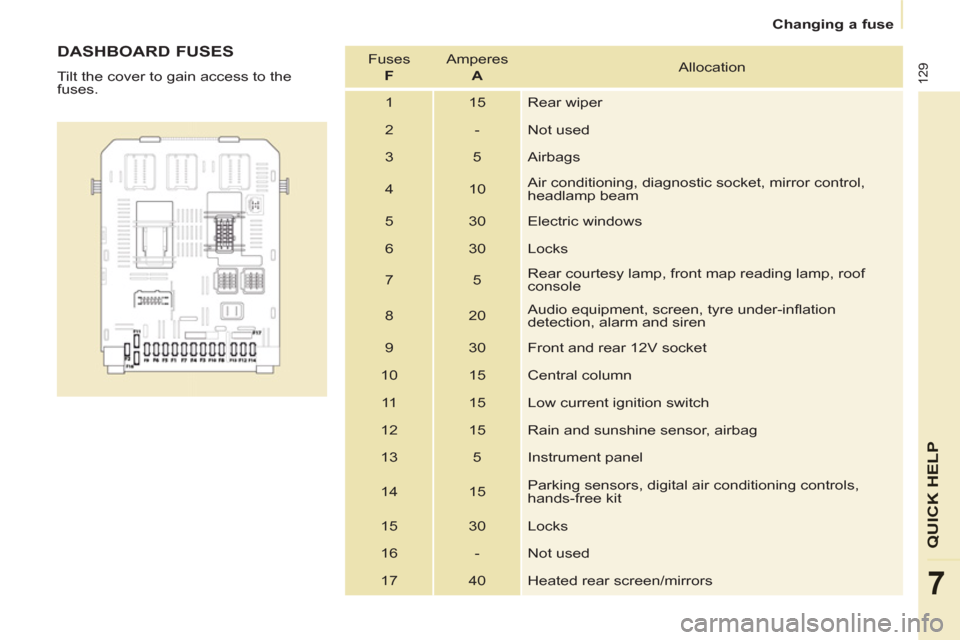
DASHBOARD FUSES
Tilt the cover to gain access to the
fuses. Fuses
F
Amperes
A
Allocation
1 15 Rear wiper
2 - Not used
3 5 Airbags
4 10 Air conditioning, diagnostic socket, mirror control,
headlamp beam
5 30 Electric windows
6 30 Locks
7 5 Rear courtesy lamp, front map reading lamp, roof
console
8 20 Audio equipment, screen, tyre under-infl ation
detection, alarm and siren
9 30 Front and rear 12V socket
10 15 Central column
11 15 Low current ignition switch
12 15 Rain and sunshine sensor, airbag
13 5 Instrument panel
14 15 Parking sensors, digital air conditioning controls,
hands-free kit
15 30 Locks
16 - Not used
17 40 Heated rear screen/mirrors
Page 201 of 236
9.59
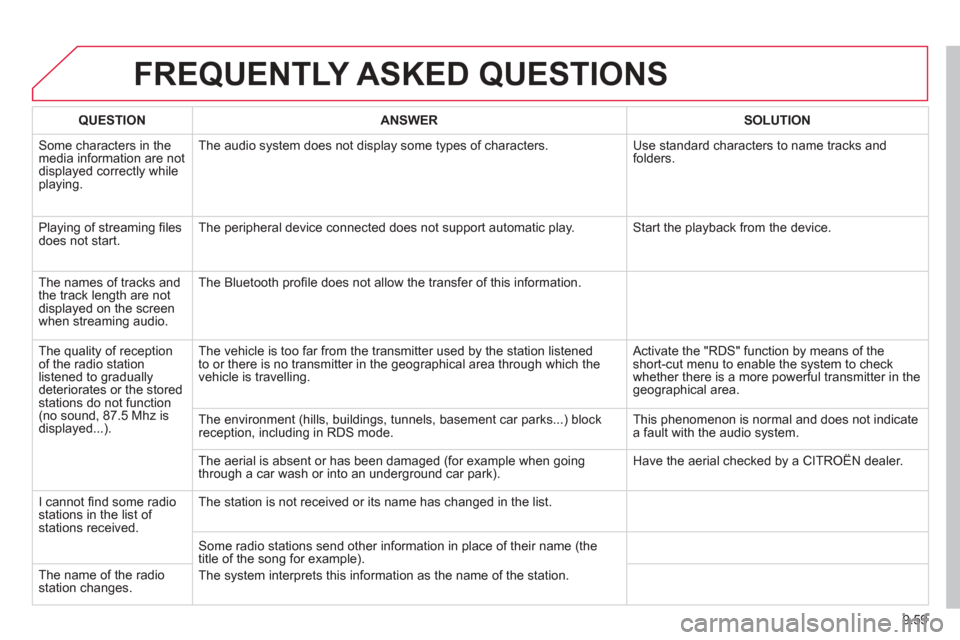
FREQUENTLY ASKED QUESTIONS
QUESTIONANSWERSOLUTION
Some characters in themedia information are not
displayed correctly while playing. The audio s
ystem does not display some types of characters.
Use standard characters to name tracks andfolders.
Pla
ying of streaming fi lesdoes not start. The peripheral device connected does not support automatic play. Start the playback from the device.
Th
e names of tracks and
the track length are not
displayed on the screen
when streaming audio. The Bluetooth
profi
le does not allow the transfer of this information.
The qualit
y of receptionof the radio station
listened to graduallydeteriorates or the stored stations do not function(no sound, 87.5 Mhz is
displayed...). The vehicle is too
far from the transmitter used by the station listened
to or there is no transmitter in the geographical area through which the
vehicle is travelling.
Activate the "RDS" function by means of theshort-cut menu to enable the system to check
whether there is a more powerful transmitter in thegeographical area.
The environment
(hills, buildings, tunnels, basement car parks...) block reception, including in RDS mode. This phenomenon is normal and does not indicate
a fault with the audio system.
The aerial is absent or has been dama
ged (for example when goingthrough a car wash or into an underground car park). Have the aerial checked by a CITROËN dealer.
I
cannot fi nd some radiostations in the list of stations received. The station is not received or its name has chan
ged in the list.
Some radio stations send other information in place of their name (the
title of the song for example).
The s
ystem interprets this information as the name of the station.
The name of the radio station changes.
Page 209 of 236
9.67
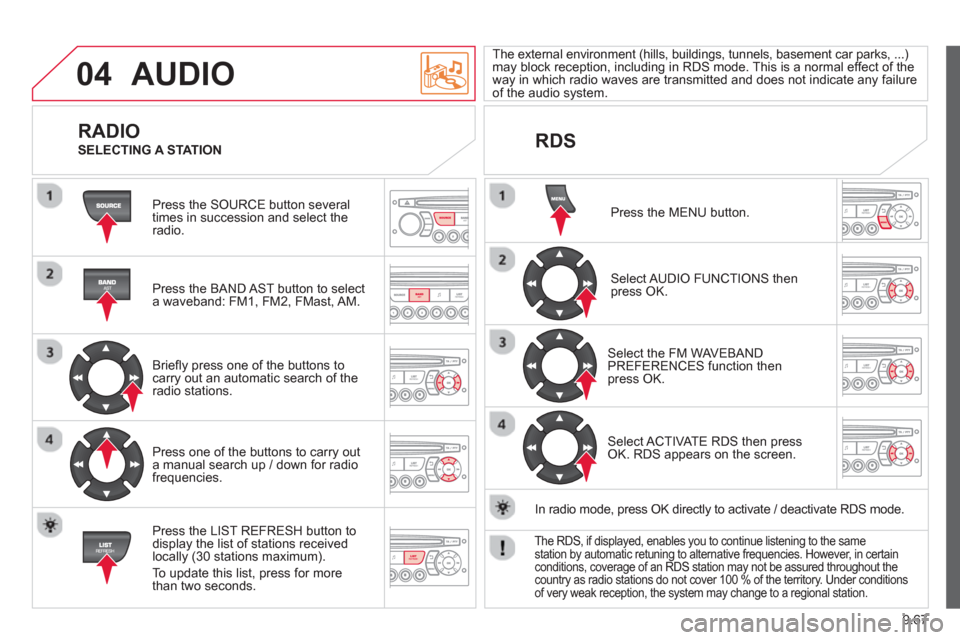
04 AUDIO
Press the SOURCE button several
times in succession and select theradio.
Press the BAND A
ST button to select
a waveband: FM1, FM2, FMast, AM.
Briefl
y press one of the buttons tocarry out an automatic search of theradio stations.
Press one o
f the buttons to carry out
a manual search up / down for radiofrequencies.
Press the LI
ST REFRESH button to
display the list of stations received
locally (30 stations maximum).
To update this list, press for more
t
han two seconds.
The external environment
(hills, buildings, tunnels, basement car parks, ...) may block reception, including in RDS mode. This is a normal effect of the
way in which radio waves are transmitted and does not indicate any failure of the audio system.
RDS RADIO
SELECTING A STATION
Press the MENU button.
Select AUDIO FUNCTIONS thenpress OK.
Select the FM WAVEBANDPREFERENCES function thenpress OK.
Select ACTIVATE RDS then pressOK. RDS appears on the screen.
In radio mode, press
OK directly to activate / deactivate RDS mode.
The RDS, if displayed, enables you to continue listening to the samestation by automatic retuning to alternative frequencies. However, in certainconditions, coverage of an RDS station may not be assured throughout thecountry as radio stations do not cover 100 % of the territory. Under conditions
of very weak reception, the system may change to a regional station.
Page 226 of 236
9.84
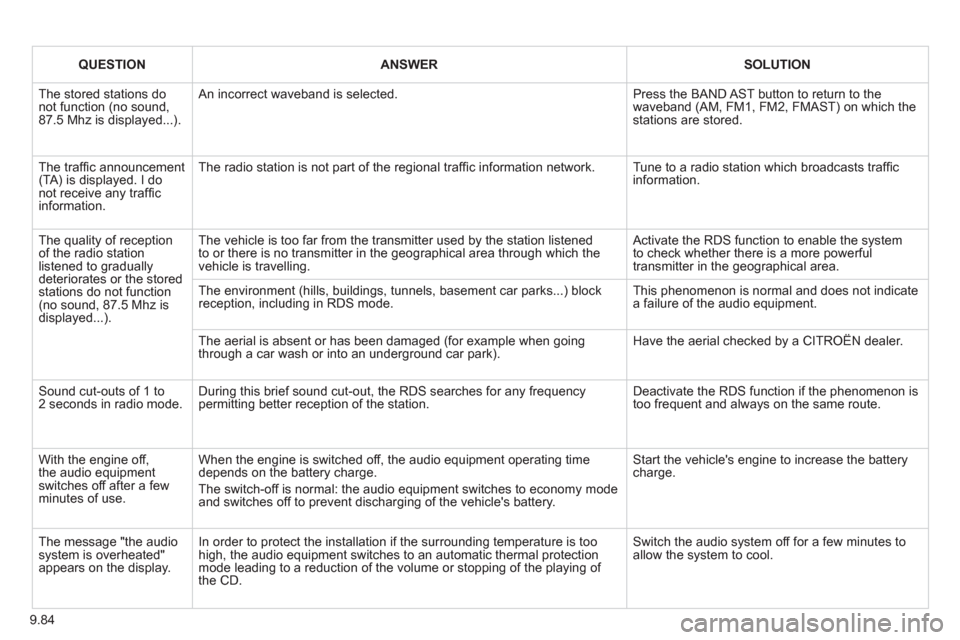
QUESTIONANSWERSOLUTION
The stored stations donot function (no sound, 87.5 Mhz is displayed...).
An incorrect waveband is selected.
Press the BAND AST button to return to the waveband (AM, FM1, FM2, FMAST) on which thestations are stored.
The traffi c announcement(TA) is displayed. I donot receive any traffi c information.
The radio station is not part of the regional traffi c information network.
Tune to a radio station which broadcasts traffi c information.
The quality of receptionof the radio station listened to graduallydeteriorates or the stored stations do not function(no sound, 87.5 Mhz is displayed...).
The vehicle is too far from the transmitter used by the station listenedto or there is no transmitter in the geographical area through which the vehicle is travelling.
Activate the RDS function to enable the system to check whether there is a more powerful transmitter in the geographical area.
The environment (hills, buildings, tunnels, basement car parks...) block reception, including in RDS mode. This phenomenon is normal and does not indicate a failure of the audio equipment.
The aerial is absent or has been damaged (for example when goingthrough a car wash or into an underground car park).
Have the aerial checked by a CITROËN dealer.
Sound cut-outs of 1 to2 seconds in radio mode.During this brief sound cut-out, the RDS searches for any frequency permitting better reception of the station.
Deactivate the RDS function if the phenomenon is too frequent and always on the same route.
With the engine off, the audio equipment switches off after a few minutes of use.
When the engine is switched off, the audio equipment operating timedepends on the battery charge.
The switch-off is normal: the audio equipment switches to economy mode and switches off to prevent discharging of the vehicle's battery.
Start the vehicle's engine to increase the batterycharge.
The message "the audio system is overheated" appears on the display.
In order to protect the installation if the surrounding temperature is toohigh, the audio equipment switches to an automatic thermal protectionmode leading to a reduction of the volume or stopping of the playing of the CD.
Switch the audio system off for a few minutes toallow the system to cool.
Page 227 of 236
141
Exterior
VISUAL SEARCH
10
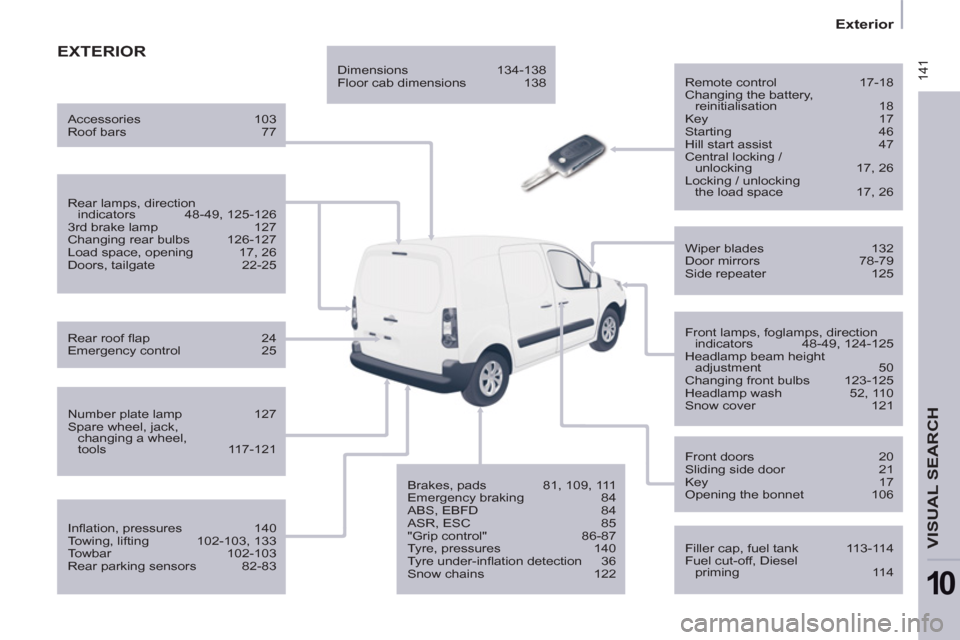
EXTERIOR
Remote control 17-18
Changing the battery,
reinitialisation 18
Key 17
Starting 46
Hill start assist 47
Central locking /
unlocking 17, 26
Locking / unlocking
the load space 17, 26
Filler cap, fuel tank 113-114
Fuel cut-off, Diesel
priming 114
Wiper blades 132
Door mirrors 78-79
Side repeater 125
Front lamps, foglamps, direction
indicators 48-49, 124-125
Headlamp beam height
adjustment 50
Changing front bulbs 123-125
Headlamp wash 52, 110
Snow cover 121
Front doors 20
Sliding side door 21
Key 17
Opening the bonnet 106
Infl ation, pressures 140
Towing, lifting 102-103, 133
Towbar 102-103
Rear parking sensors 82-83
Number plate lamp 127
Spare wheel, jack,
changing a wheel,
tools 117-121
Rear lamps, direction
indicators 48-49, 125-126
3rd brake lamp 127
Changing rear bulbs 126-127
Load space, opening 17, 26
Doors, tailgate 22-25
Accessories 103
Roof bars 77
Rear roof fl ap 24
Emergency control 25
Dimensions 134-138
Floor cab dimensions 138
Brakes, pads 81, 109, 111
Emergency braking 84
ABS, EBFD 84
ASR, ESC 85
"Grip control" 86-87
Tyre, pressures 140
Tyre under-infl ation detection 36
Snow chains 122
Page 229 of 236
143
Instruments and controls
VISUAL SEARCH
10
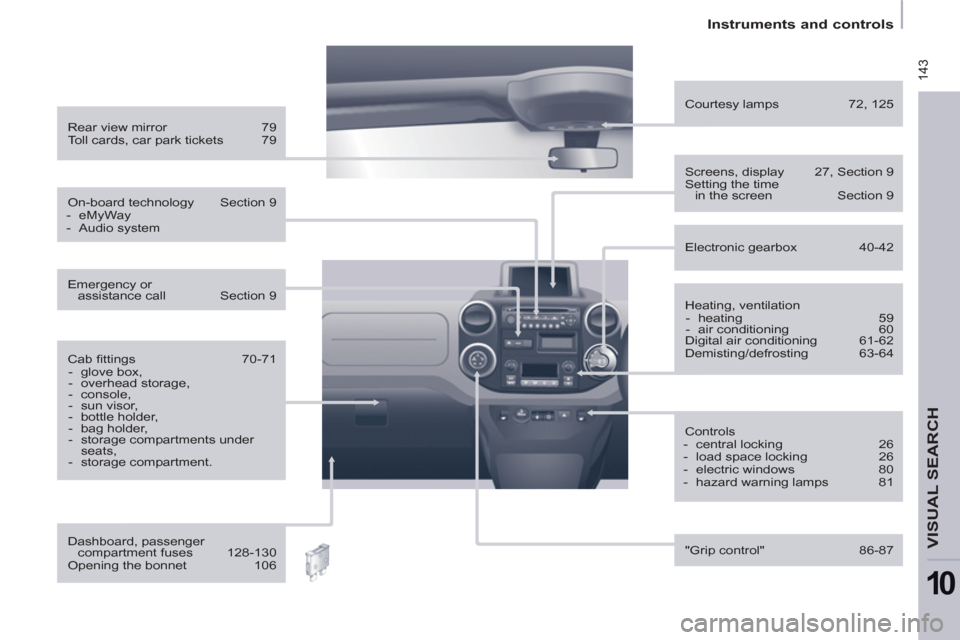
Heating, ventilation
- heating 59
- air conditioning 60
Digital air conditioning 61-62
Demisting/defrosting 63-64
Rear view mirror 79
Toll cards, car park tickets 79
Controls
- central locking 26
- load space locking 26
- electric windows 80
- hazard warning lamps 81
Electronic gearbox 40-42
Cab fi ttings 70-71
- glove box,
- overhead storage,
- console,
- sun visor,
- bottle holder,
- bag holder,
- storage compartments under
seats,
- storage compartment.
Screens, display 27, Section 9
Setting the time
in the screen Section 9
Dashboard, passenger
compartment fuses 128-130
Opening the bonnet 106
On-board technology Section 9
- eMyWay
- Audio system
Emergency or
assistance call Section 9
"Grip control" 86-87
Courtesy lamps 72, 125