Citroen BX HATCHBACK 1991 2.G User Guide
Manufacturer: CITROEN, Model Year: 1991, Model line: BX HATCHBACK, Model: Citroen BX HATCHBACK 1991 2.GPages: 16, PDF Size: 0.47 MB
Page 11 of 16
Downloaded from www.Manualslib.com manuals search engine Weekly checks0•11
Engine oil level
Before you start
4Make sure that your car is on level ground.
4Check the oil level before the car is driven,
or at least 5 minutes after the engine has been
switched off.
The correct oilModern engines place great demands on their
oil. It is very important that the correct oil for
your car is used (See “Lubricants, fluids and
capacities”).
Car Care
l If you have to add oil frequently, you should
check whether you have any oil leaks. Place
some clean paper under the car overnight,
and check for stains in the morning. If there
are no leaks, the engine may be burning oil
(see “Fault Finding”).
lAlways maintain the level between the
upper and lower dipstick marks (see photo 3).
If the level is too low severe engine damage
may occur. Oil seal failure may result if the
engine is overfilled by adding too much oil.
If the oil is checked
immediately after driving the
vehicle, some of the oil will
remain in the upper engine
components, resulting in an inaccurate
reading on the dipstick!
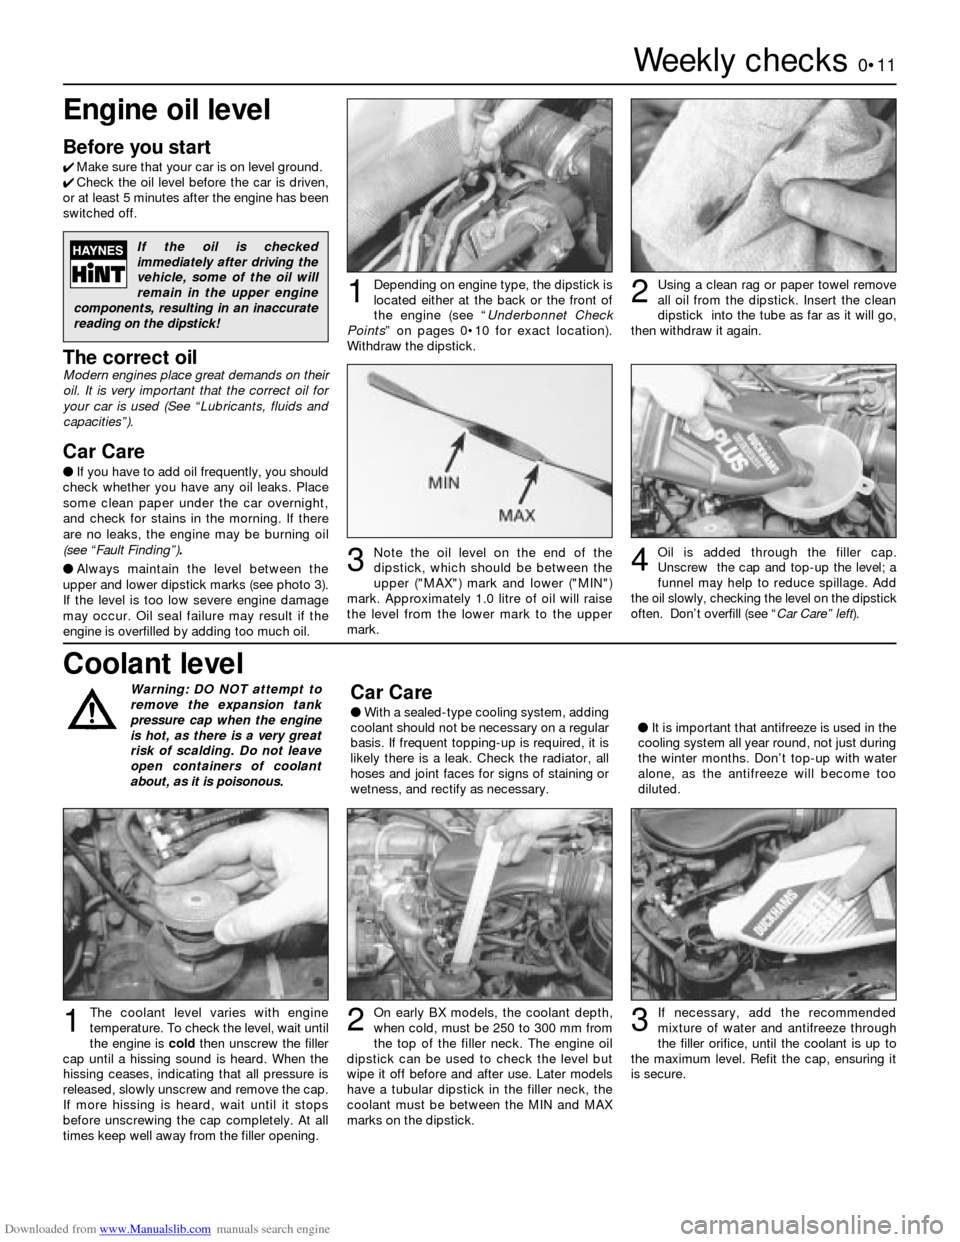
Depending on engine type, the dipstick is
located either at the back or the front of
the engine (see “Underbonnet Check
Points” on pages 0•10 for exact location).
Withdraw the dipstick.Using a clean rag or paper towel remove
all oil from the dipstick. Insert the clean
dipstick into the tube as far as it will go,
then withdraw it again.
Note the oil level on the end of the
dipstick, which should be between the
upper ("MAX") mark and lower ("MIN")
mark. Approximately 1.0 litre of oil will raise
the level from the lower mark to the upper
mark.Oil is added through the filler cap.
Unscrew the cap and top-up the level; a
funnel may help to reduce spillage. Add
the oil slowly, checking the level on the dipstick
often. Don’t overfill (see “Car Care” left).
12
34
Warning: DO NOT attempt to
remove the expansion tank
pressure cap when the engine
is hot, as there is a very great
risk of scalding. Do not leave
open containers of coolant
about, as it is poisonous.Car Care
lWith a sealed-type cooling system, adding
coolant should not be necessary on a regular
basis. If frequent topping-up is required, it is
likely there is a leak. Check the radiator, all
hoses and joint faces for signs of staining or
wetness, and rectify as necessary.lIt is important that antifreeze is used in the
cooling system all year round, not just during
the winter months. Don’t top-up with water
alone, as the antifreeze will become too
diluted.
Coolant level
The coolant level varies with engine
temperature. To check the level, wait until
the engine is cold then unscrew the filler
cap until a hissing sound is heard. When the
hissing ceases, indicating that all pressure is
released, slowly unscrew and remove the cap.
If more hissing is heard, wait until it stops
before unscrewing the cap completely. At all
times keep well away from the filler opening.On early BX models, the coolant depth,
when cold, must be 250 to 300 mm from
the top of the filler neck. The engine oil
dipstick can be used to check the level but
wipe it off before and after use. Later models
have a tubular dipstick in the filler neck, the
coolant must be between the MIN and MAX
marks on the dipstick.If necessary, add the recommended
mixture of water and antifreeze through
the filler orifice, until the coolant is up to
the maximum level. Refit the cap, ensuring it
is secure.123
Page 12 of 16
Downloaded from www.Manualslib.com manuals search engine 0•12Weekly checks
Hydraulic fluid level
Warning:
l Use only LHM mineral
hydraulic fluid in the hydraulic
system of the Citroën BX. The
use of any other fluid will ruin
the rubber rings and seals. LHM
fluid is green in colour. Keep the
fluid, carefully sealed, in its
original container.
Safety First!
lIf the reservoir requires repeated topping-
up, this is an indication of a fluid leak
somewhere in the hydraulic system, which
should be investigated immediately. The
Citroën BX relies on the main hydraulic
reservoir to supply the hydropneumatic
suspension, the braking system and the
power steering (where fitted).
lIf a leak is suspected, the car should not be
driven until the suspension, braking and
steering systems have been checked. Never
take any risks where any of these systems are
concerned.
• Make sure that your car is
on level ground.
• Cleanliness is of great
importance when dealing
with the hydraulic system, so take care
to clean around the reservoir cap
before topping-up. Use only clean LHM
fluid.
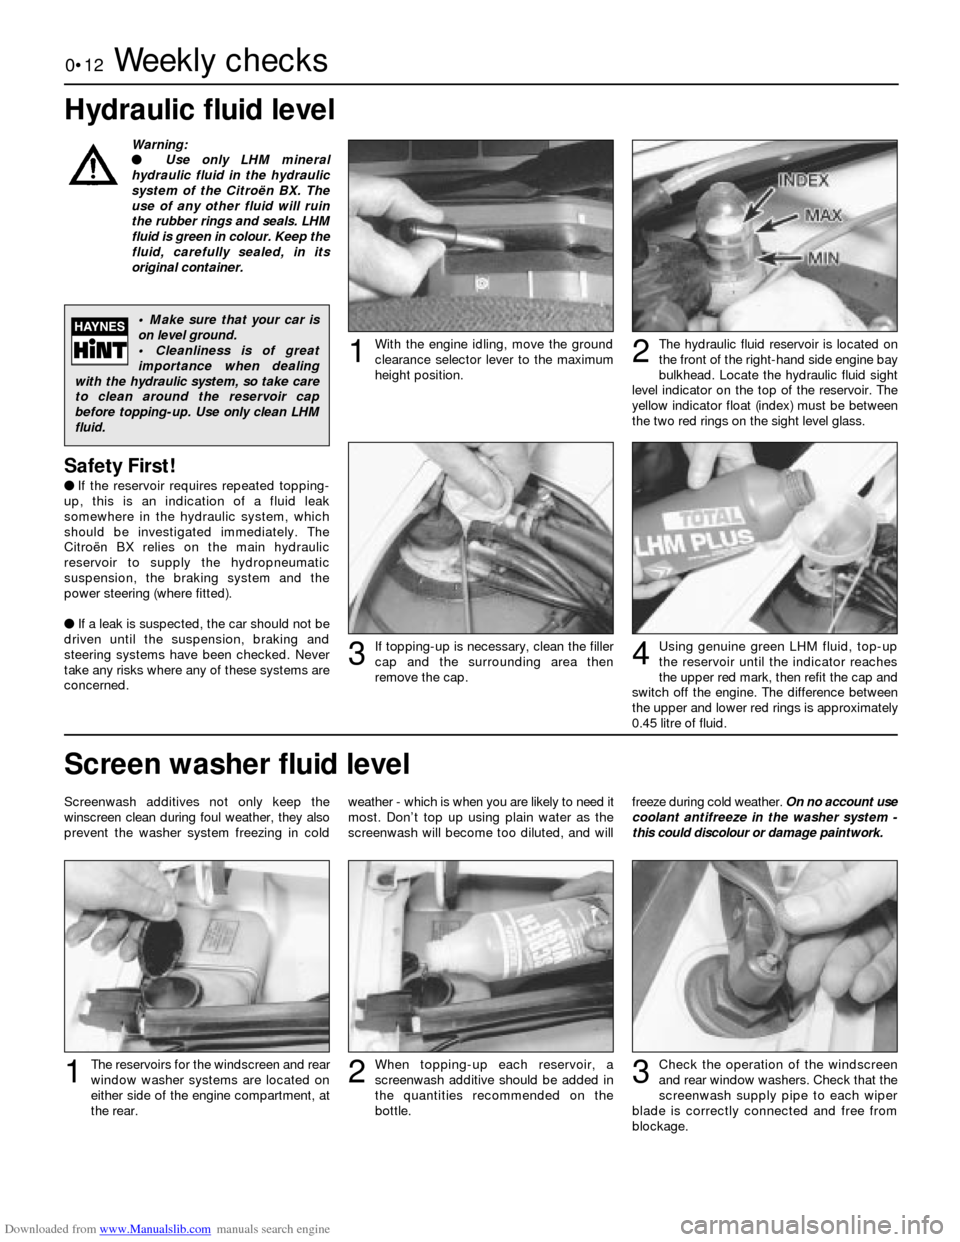
With the engine idling, move the ground
clearance selector lever to the maximum
height position.1The hydraulic fluid reservoir is located on
the front of the right-hand side engine bay
bulkhead. Locate the hydraulic fluid sight
level indicator on the top of the reservoir. The
yellow indicator float (index) must be between
the two red rings on the sight level glass.2
If topping-up is necessary, clean the filler
cap and the surrounding area then
remove the cap.3Using genuine green LHM fluid, top-up
the reservoir until the indicator reaches
the upper red mark, then refit the cap and
switch off the engine. The difference between
the upper and lower red rings is approximately
0.45 litre of fluid.4
Screenwash additives not only keep the
winscreen clean during foul weather, they also
prevent the washer system freezing in coldweather - which is when you are likely to need it
most. Don’t top up using plain water as the
screenwash will become too diluted, and willfreeze during cold weather. On no account use
coolant antifreeze in the washer system -
this could discolour or damage paintwork.
Screen washer fluid level
When topping-up each reservoir, a
screenwash additive should be added in
the quantities recommended on the
bottle.2The reservoirs for the windscreen and rear
window washer systems are located on
either side of the engine compartment, at
the rear.1Check the operation of the windscreen
and rear window washers. Check that the
screenwash supply pipe to each wiper
blade is correctly connected and free from
blockage.3
Page 13 of 16
Downloaded from www.Manualslib.com manuals search engine Weekly checks0•13
Tyre condition and pressure
It is very important that tyres are in good
condition, and at the correct pressure - having
a tyre failure at any speed is highly dangerous.
Tyre wear is influenced by driving style - harsh
braking and acceleration, or fast cornering,
will all produce more rapid tyre wear. As a
general rule, the front tyres wear out faster
than the rears. Interchanging the tyres from
front to rear ("rotating" the tyres) may result in
more even wear. However, if this is
completely effective, you may have the
expense of replacing all four tyres at once!
Remove any nails or stones embedded in the
tread before they penetrate the tyre to cause
deflation. If removal of a nail does reveal thatthe tyre has been punctured, refit the nail so
that its point of penetration is marked. Then
immediately change the wheel, and have the
tyre repaired by a tyre dealer.
Regularly check the tyres for damage in the
form of cuts or bulges, especially in the
sidewalls. Periodically remove the wheels,
and clean any dirt or mud from the inside and
outside surfaces. Examine the wheel rims for
signs of rusting, corrosion or other damage.
Light alloy wheels are easily damaged by
"kerbing" whilst parking; steel wheels may
also become dented or buckled. A new wheel
is very often the only way to overcome severe
damage.New tyres should be balanced when they are
fitted, but it may become necessary to re-
balance them as they wear, or if the balance
weights fitted to the wheel rim should fall off.
Unbalanced tyres will wear more quickly, as
will the steering and suspension components.
Wheel imbalance is normally signified by
vibration, particularly at a certain speed
(typically around 50 mph). If this vibration is
felt only through the steering, then it is likely
that just the front wheels need balancing. If,
however, the vibration is felt through the
whole car, the rear wheels could be out of
balance. Wheel balancing should be carried
out by a tyre dealer or garage.
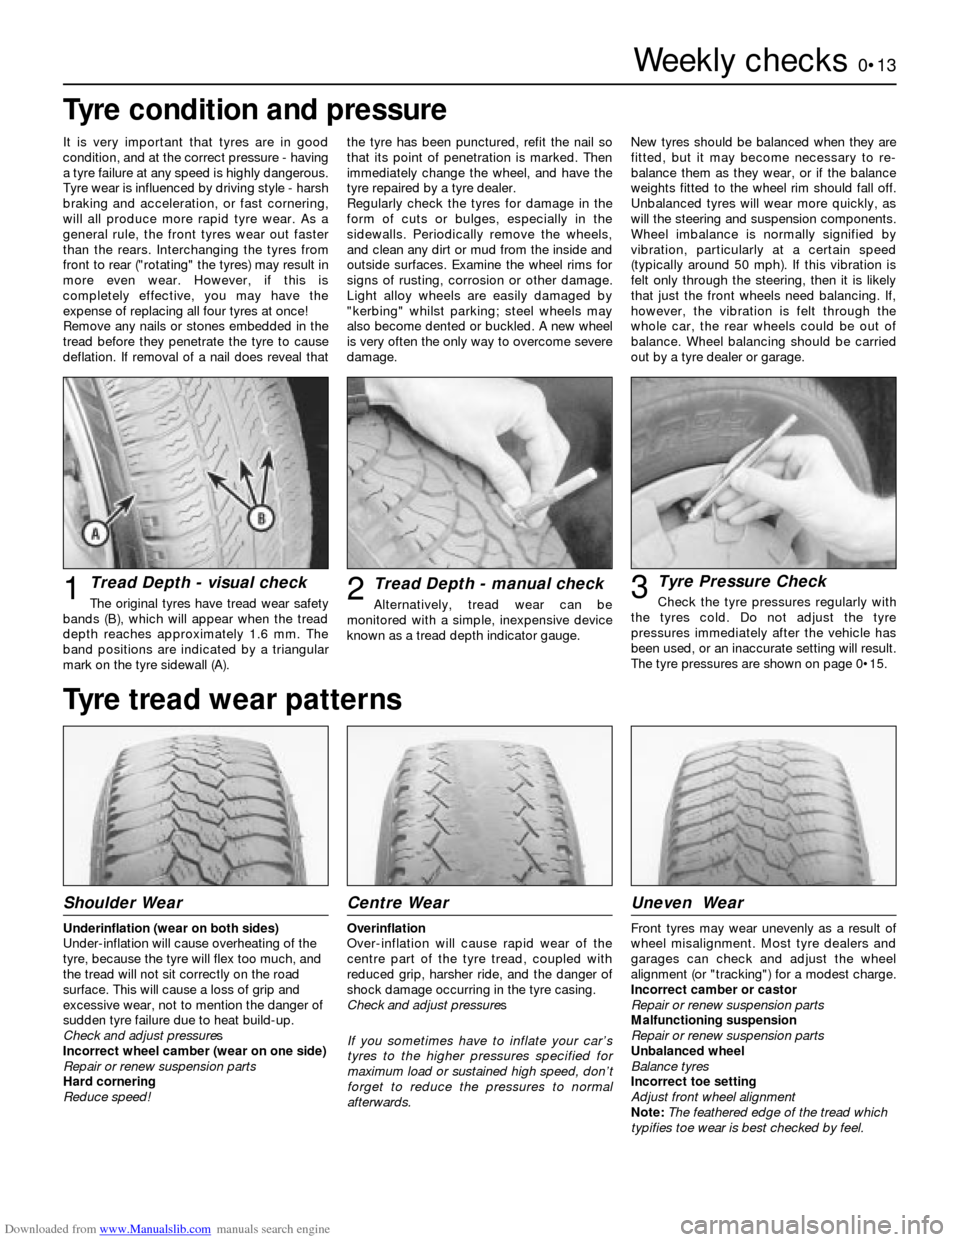
Tread Depth - visual check
The original tyres have tread wear safety
bands (B), which will appear when the tread
depth reaches approximately 1.6 mm. The
band positions are indicated by a triangular
mark on the tyre sidewall (A).1Tread Depth - manual check
Alternatively, tread wear can be
monitored with a simple, inexpensive device
known as a tread depth indicator gauge.2Tyre Pressure Check
Check the tyre pressures regularly with
the tyres cold. Do not adjust the tyre
pressures immediately after the vehicle has
been used, or an inaccurate setting will result.
The tyre pressures are shown on page 0•15.3
Tyre tread wear patterns
Shoulder Wear
Underinflation (wear on both sides)
Under-inflation will cause overheating of the
tyre, because the tyre will flex too much, and
the tread will not sit correctly on the road
surface. This will cause a loss of grip and
excessive wear, not to mention the danger of
sudden tyre failure due to heat build-up.
Check and adjust pressures
Incorrect wheel camber (wear on one side)
Repair or renew suspension parts
Hard cornering
Reduce speed!
Centre Wear
Overinflation
Over-inflation will cause rapid wear of the
centre part of the tyre tread, coupled with
reduced grip, harsher ride, and the danger of
shock damage occurring in the tyre casing.
Check and adjust pressures
If you sometimes have to inflate your car’s
tyres to the higher pressures specified for
maximum load or sustained high speed, don’t
forget to reduce the pressures to normal
afterwards.
Uneven Wear
Front tyres may wear unevenly as a result of
wheel misalignment. Most tyre dealers and
garages can check and adjust the wheel
alignment (or "tracking") for a modest charge.
Incorrect camber or castor
Repair or renew suspension parts
Malfunctioning suspension
Repair or renew suspension parts
Unbalanced wheel
Balance tyres
Incorrect toe setting
Adjust front wheel alignment
Note: The feathered edge of the tread which
typifies toe wear is best checked by feel.
Page 14 of 16
Downloaded from www.Manualslib.com manuals search engine 0•14Weekly checks
Battery
Caution:Before carrying out any work on the
vehicle battery, read the precautions given in
"Safety first" at the start of this manual.
4Make sure that the battery tray is in good
condition, and that the clamp is tight.
Corrosion on the tray, retaining clamp and the
battery itself can be removed with a solution
of water and baking soda. Thoroughly rinse all
cleaned areas with water. Any metal parts
damaged by corrosion should be covered
with a zinc-based primer, then painted.
4Periodically (approximately every three
months), check the charge condition of the
battery as described in Chapter 5A.
4If the battery is flat, and you need to jump
start your vehicle, see Roadside Repairs.
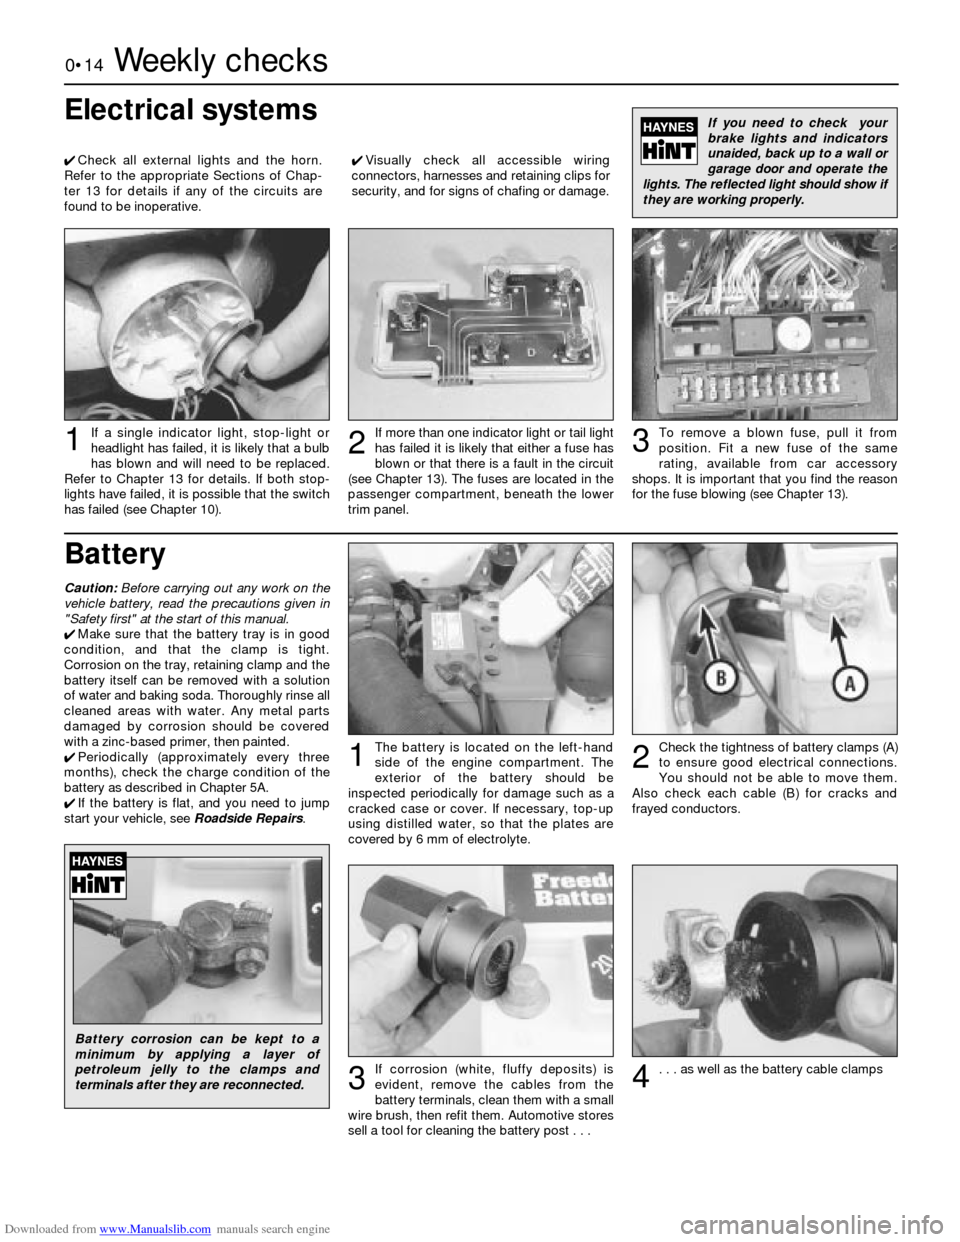
The battery is located on the left-hand
side of the engine compartment. The
exterior of the battery should be
inspected periodically for damage such as a
cracked case or cover. If necessary, top-up
using distilled water, so that the plates are
covered by 6 mm of electrolyte.1Check the tightness of battery clamps (A)
to ensure good electrical connections.
You should not be able to move them.
Also check each cable (B) for cracks and
frayed conductors.2
Battery corrosion can be kept to a
minimum by applying a layer of
petroleum jelly to the clamps and
terminals after they are reconnected.
If corrosion (white, fluffy deposits) is
evident, remove the cables from the
battery terminals, clean them with a small
wire brush, then refit them. Automotive stores
sell a tool for cleaning the battery post . . .3. . . as well as the battery cable clamps4
Electrical systems
4Check all external lights and the horn.
Refer to the appropriate Sections of Chap-
ter 13 for details if any of the circuits are
found to be inoperative.4Visually check all accessible wiring
connectors, harnesses and retaining clips for
security, and for signs of chafing or damage.
If you need to check your
brake lights and indicators
unaided, back up to a wall or
garage door and operate the
lights. The reflected light should show if
they are working properly.
If a single indicator light, stop-light or
headlight has failed, it is likely that a bulb
has blown and will need to be replaced.
Refer to Chapter 13 for details. If both stop-
lights have failed, it is possible that the switch
has failed (see Chapter 10).If more than one indicator light or tail light
has failed it is likely that either a fuse has
blown or that there is a fault in the circuit
(see Chapter 13). The fuses are located in the
passenger compartment, beneath the lower
trim panel.
2
To remove a blown fuse, pull it from
position. Fit a new fuse of the same
rating, available from car accessory
shops. It is important that you find the reason
for the fuse blowing (see Chapter 13).31
Page 15 of 16
Downloaded from www.Manualslib.com manuals search engine Weekly checks and Tyre pressures0•15
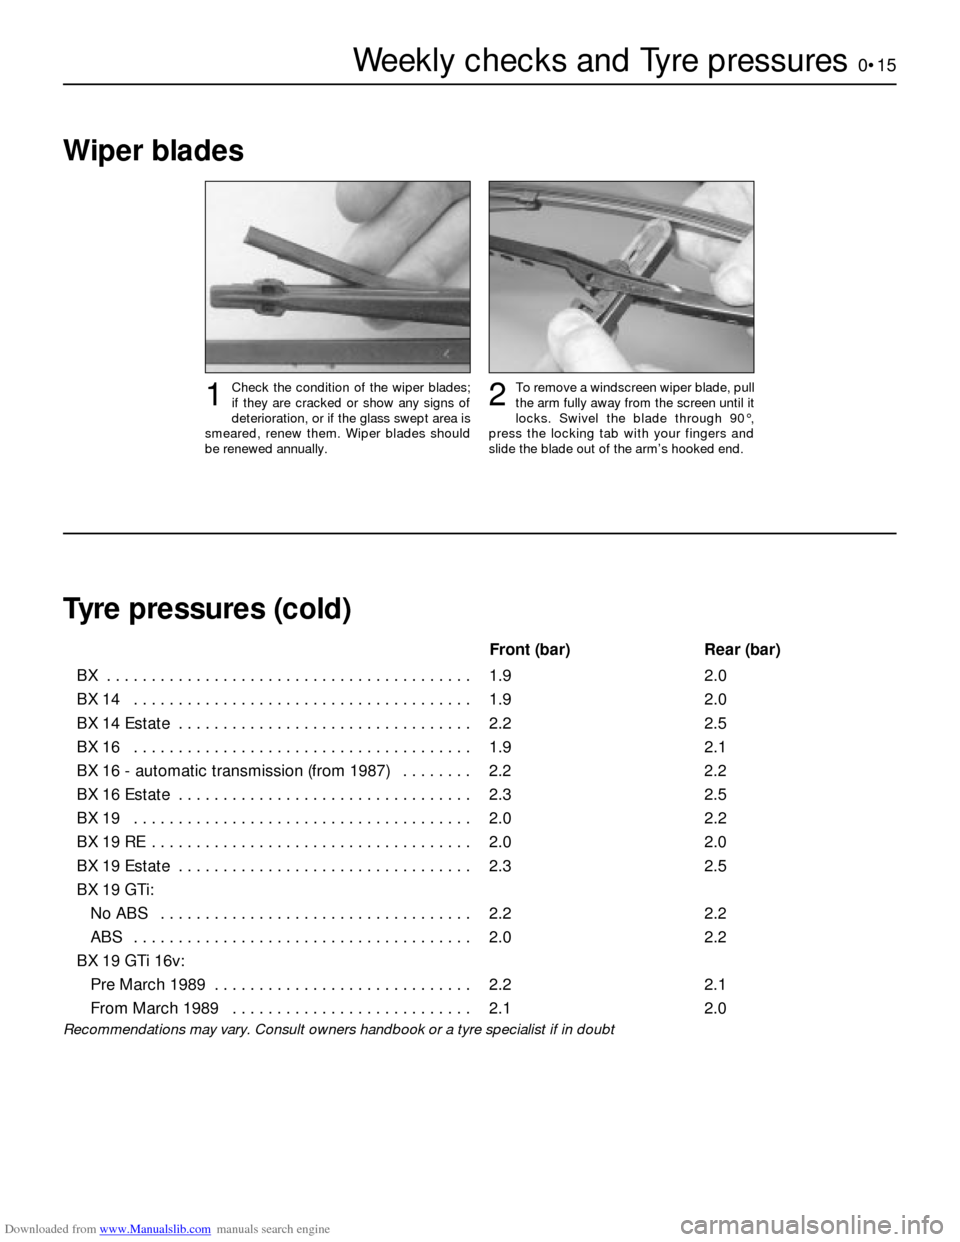
Front (bar) Rear (bar)
BX . . . . . . . . . . . . . . . . . . . . . . . . . . . . . . . . . . . . . . . . . 1.9 2.0
BX 14 . . . . . . . . . . . . . . . . . . . . . . . . . . . . . . . . . . . . . . 1.9 2.0
BX 14 Estate . . . . . . . . . . . . . . . . . . . . . . . . . . . . . . . . . 2.2 2.5
BX 16 . . . . . . . . . . . . . . . . . . . . . . . . . . . . . . . . . . . . . . 1.9 2.1
BX 16 - automatic transmission (from 1987) . . . . . . . . 2.2 2.2
BX 16 Estate . . . . . . . . . . . . . . . . . . . . . . . . . . . . . . . . . 2.3 2.5
BX 19 . . . . . . . . . . . . . . . . . . . . . . . . . . . . . . . . . . . . . . 2.0 2.2
BX 19 RE . . . . . . . . . . . . . . . . . . . . . . . . . . . . . . . . . . . . 2.0 2.0
BX 19 Estate . . . . . . . . . . . . . . . . . . . . . . . . . . . . . . . . . 2.3 2.5
BX 19 GTi:
No ABS . . . . . . . . . . . . . . . . . . . . . . . . . . . . . . . . . . . 2.2 2.2
ABS . . . . . . . . . . . . . . . . . . . . . . . . . . . . . . . . . . . . . . 2.0 2.2
BX 19 GTi 16v:
Pre March 1989 . . . . . . . . . . . . . . . . . . . . . . . . . . . . . 2.2 2.1
From March 1989 . . . . . . . . . . . . . . . . . . . . . . . . . . . 2.1 2.0
Recommendations may vary. Consult owners handbook or a tyre specialist if in doubt
Wiper blades
Check the condition of the wiper blades;
if they are cracked or show any signs of
deterioration, or if the glass swept area is
smeared, renew them. Wiper blades should
be renewed annually.1To remove a windscreen wiper blade, pull
the arm fully away from the screen until it
locks. Swivel the blade through 90°,
press the locking tab with your fingers and
slide the blade out of the arm’s hooked end.2
Tyre pressures (cold)
Page 16 of 16
Downloaded from www.Manualslib.com manuals search engine 0•16Lubricants, fluids and capacities
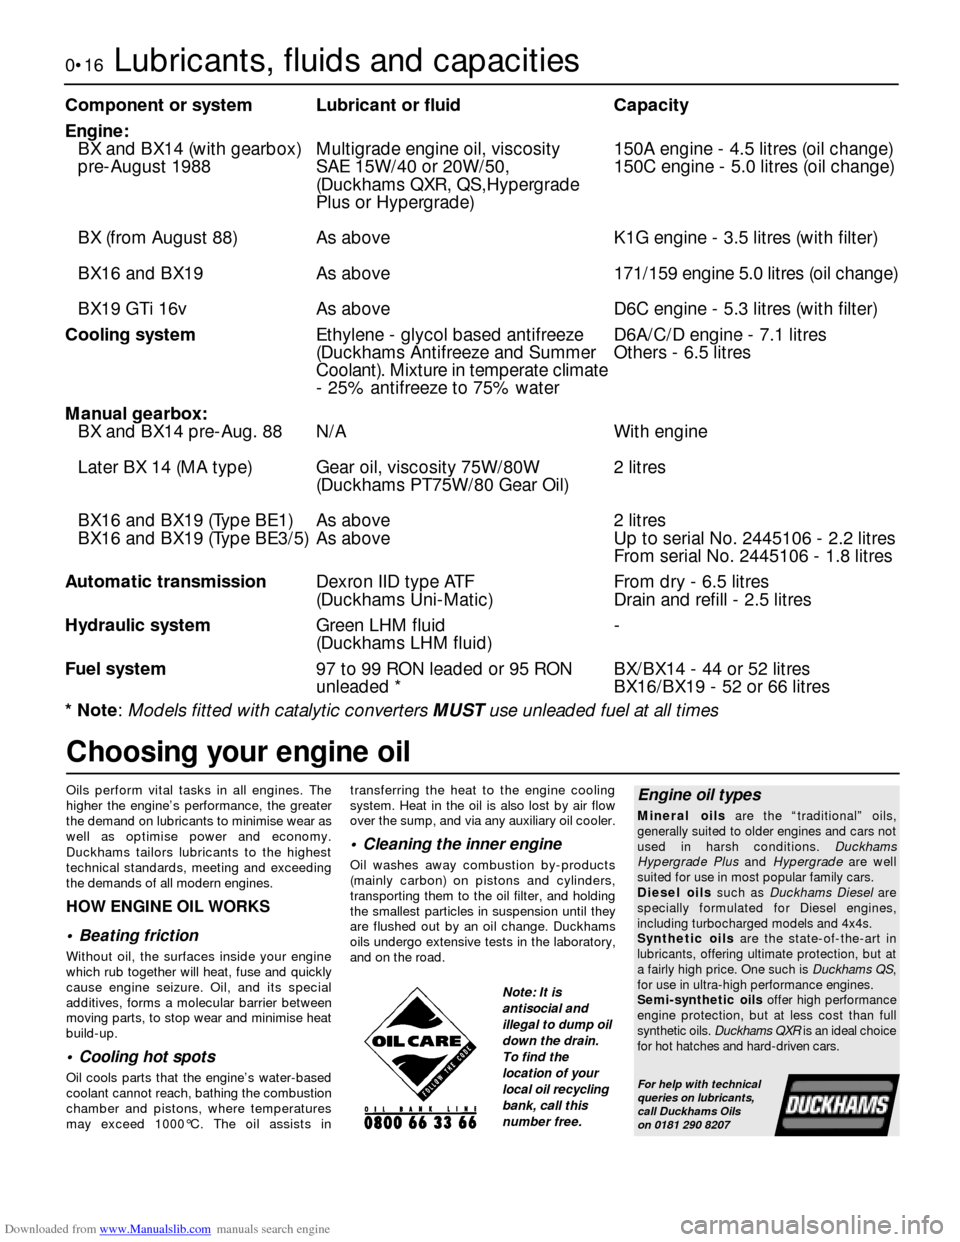
Component or system Lubricant or fluid Capacity
Engine:
BX and BX14 (with gearbox) Multigrade engine oil, viscosity 150A engine - 4.5 litres (oil change)
pre-August 1988 SAE 15W/40 or 20W/50, 150C engine - 5.0 litres (oil change)
(Duckhams QXR, QS,Hypergrade
Plus or Hypergrade)
BX (from August 88) As above K1G engine - 3.5 litres (with filter)
BX16 and BX19 As above171/159 engine 5.0 litres (oil change)
BX19 GTi 16v As above D6C engine - 5.3 litres (with filter)
Cooling systemEthylene - glycol based antifreeze D6A/C/D engine - 7.1 litres
(Duckhams Antifreeze and Summer Others - 6.5 litres
Coolant). Mixture in temperate climate
- 25% antifreeze to 75% water
Manual gearbox:
BX and BX14 pre-Aug. 88 N/A With engine
Later BX 14 (MA type) Gear oil, viscosity 75W/80W 2 litres
(Duckhams PT75W/80 Gear Oil)
BX16 and BX19 (Type BE1) As above 2 litres
BX16 and BX19 (Type BE3/5) As above Up to serial No. 2445106 - 2.2 litres
From serial No. 2445106 - 1.8 litres
Automatic transmissionDexron IID type ATF From dry - 6.5 litres
(Duckhams Uni-Matic) Drain and refill - 2.5 litres
Hydraulic systemGreen LHM fluid -
(Duckhams LHM fluid)
Fuel system97 to 99 RON leaded or 95 RON BX/BX14 - 44 or 52 litres
unleaded * BX16/BX19 - 52 or 66 litres
* Note: Models fitted with catalytic converters MUSTuse unleaded fuel at all times
Oils perform vital tasks in all engines. The
higher the engine’s performance, the greater
the demand on lubricants to minimise wear as
well as optimise power and economy.
Duckhams tailors lubricants to the highest
technical standards, meeting and exceeding
the demands of all modern engines.
HOW ENGINE OIL WORKS
• Beating friction
Without oil, the surfaces inside your engine
which rub together will heat, fuse and quickly
cause engine seizure. Oil, and its special
additives, forms a molecular barrier between
moving parts, to stop wear and minimise heat
build-up.
• Cooling hot spots
Oil cools parts that the engine’s water-based
coolant cannot reach, bathing the combustion
chamber and pistons, where temperatures
may exceed 1000°C. The oil assists intransferring the heat to the engine cooling
system. Heat in the oil is also lost by air flow
over the sump, and via any auxiliary oil cooler.
• Cleaning the inner engine
Oil washes away combustion by-products
(mainly carbon) on pistons and cylinders,
transporting them to the oil filter, and holding
the smallest particles in suspension until they
are flushed out by an oil change. Duckhams
oils undergo extensive tests in the laboratory,
and on the road.
Engine oil types
Mineral oilsare the “traditional” oils,
generally suited to older engines and cars not
used in harsh conditions. Duckhams
Hypergrade Plus and Hypergradeare well
suited for use in most popular family cars.
Diesel oilssuch as Duckhams Dieselare
specially formulated for Diesel engines,
including turbocharged models and 4x4s.
Synthetic oilsare the state-of-the-art in
lubricants, offering ultimate protection, but at
a fairly high price. One such is Duckhams QS,
for use in ultra-high performance engines.
Semi-synthetic oilsoffer high performance
engine protection, but at less cost than full
synthetic oils. Duckhams QXRis an ideal choice
for hot hatches and hard-driven cars.
For help with technical
queries on lubricants,
call Duckhams Oils
on 0181 290 8207
Choosing your engine oil
Note: It is
antisocial and
illegal to dump oil
down the drain.
To find the
location of your
local oil recycling
bank, call this
number free.