low beam CITROEN C-ELYSÉE 2018 Handbook (in English)
[x] Cancel search | Manufacturer: CITROEN, Model Year: 2018, Model line: C-ELYSÉE, Model: CITROEN C-ELYSÉE 2018Pages: 260, PDF Size: 8.4 MB
Page 20 of 260
18
Warning / indicator lampStateCause Action / Observations
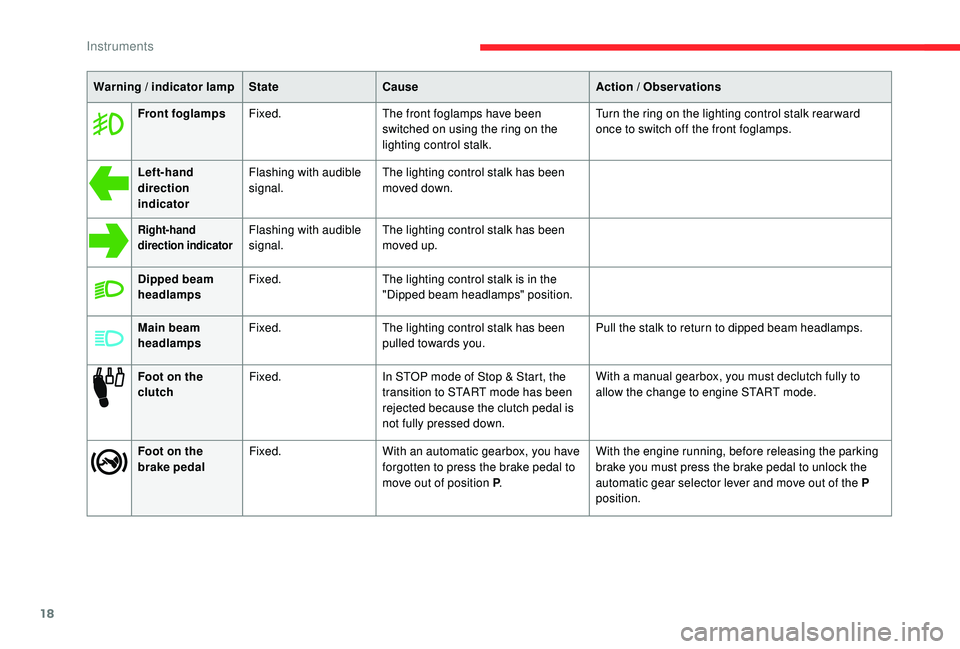
Front foglamps Fixed. The front foglamps have been
switched on using the ring on the
lighting control stalk. Turn the ring on the lighting control stalk rear ward
once to switch off the front foglamps.
Left-hand
direction
indicator Flashing with audible
signal.
The lighting control stalk has been
moved down.
Right-hand
direction indicatorFlashing with audible
signal.The lighting control stalk has been
moved up.
Dipped beam
headlamps Fixed.
The lighting control stalk is in the
"Dipped beam headlamps" position.
Main beam
headlamps Fixed.
The lighting control stalk has been
pulled towards you. Pull the stalk to return to dipped beam headlamps.
Foot on the
clutch Fixed.
In STOP mode of Stop & Start, the
transition to START mode has been
rejected because the clutch pedal is
not fully pressed down. With a manual gearbox, you must declutch fully to
allow the change to engine START mode.
Foot on the
brake pedal Fixed.
With an automatic gearbox, you have
forgotten to press the brake pedal to
move out of position P.With the engine running, before releasing the parking
brake you must press the brake pedal to unlock the
automatic gear selector lever and move out of the P
position.
Instruments
Page 53 of 260

51
Lighting control
In some weather conditions (e.g. low
temperature or humidity), the presence
of misting on the internal sur face of the
glass of the headlamps and rear lamps is
normal; it disappears after the lamps have
been on for a few minutes.
Travelling abroad
The design of the dipped beam headlamps
allows, without modification, driving in a
country that drives on the other side of
the road than the country in which your
vehicle was sold.
Selection ring for main
lighting mode
Lamps off (ignition off) / Daytime
running lamps (engine running).
Sidelamps only.
Dipped or main beam headlamps.
Dipping the headlamps
Pull the lever to switch the lighting
between dipped and main beam
headlamps.
When the lamps are off or only the sidelamps
are on, the driver can switch on the main beam
headlamps (headlamp flash) by pulling and
releasing the stalk.
Display
Turn to align the desired symbol with the mark. Illumination of the corresponding indicator
lamp in the instrument panel confirms that the
lighting selected is on.
Foglamp selection ring
The foglamps operate with the dipped and main
beam headlamps.
Rear foglamp only
F To switch it on, turn the ring for wards.
F
T o switch it off, turn the ring rear wards.
4
Lighting and visibility
Page 55 of 260

53
Manual guide-me-home
lighting
The temporary illumination of the dipped beam
headlamps after the vehicle's ignition has been
switched off makes the driver's exit easier
when the light is poor.
Switching on
F With the ignition off, "flash" the headlamps using the lighting stalk.
F
A f
urther "headlamp flash" switches the
function off.
Switching off
The manual guide-me-home lighting goes off
automatically at the end of a given period of
time.
Automatic guide-me-home
lighting
When the automatic headlamp illumination
function is activated (lighting control stalk in the
" AUTO " position), if the ambient light is poor the
dipped beam headlamps remain on when the
ignition is switched off.
With audio system
The guide-me-home lighting can be
configured in the " Personalisation-
configuration " menu.
With touch screen
The guide-me-home lighting can be
configured in the " Driving / Vehicle "
menu.
Direction indicators
Three flashes
F Press briefly upwards or downwards, without going beyond the point of
resistance; the direction indicators will flash
3
times.
F
L
eft: lower the lighting control stalk passing
the point of resistance.
F
R
ight: raise the lighting control stalk passing
the point of resistance.
4
Lighting and visibility
Page 56 of 260
54
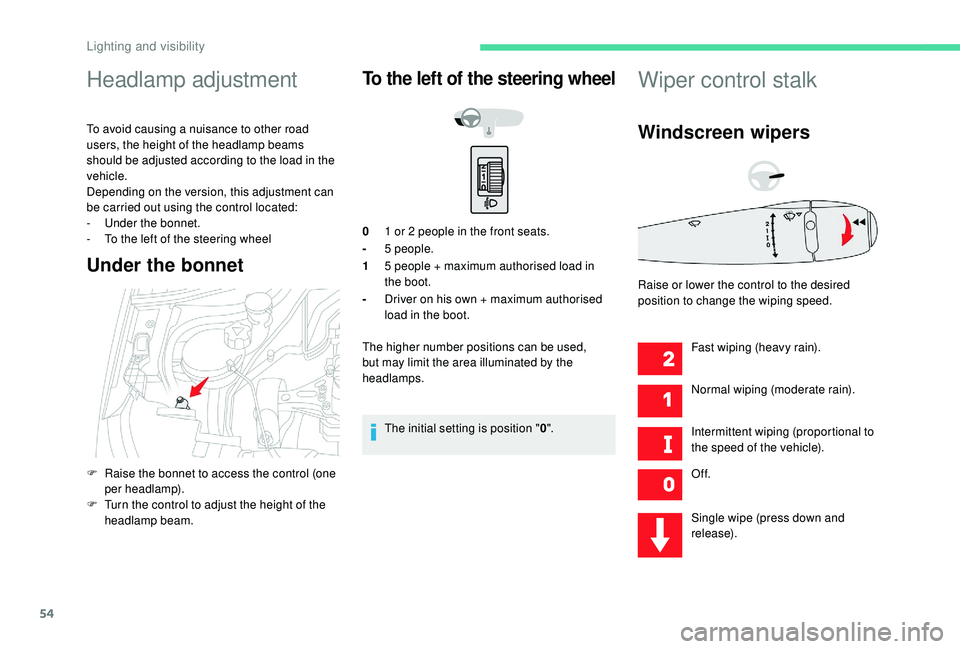
Headlamp adjustment
To avoid causing a nuisance to other road
users, the height of the headlamp beams
should be adjusted according to the load in the
vehicle.
Depending on the version, this adjustment can
be carried out using the control located:
-
U
nder the bonnet.
-
T
o the left of the steering wheel
Under the bonnet
To the left of the steering wheel
01 or 2 people in the front seats.
- 5
people.
1 5
people + maximum authorised load in
the boot.
- Driver on his own + maximum authorised
load in the boot.
The higher number positions can be used,
but may limit the area illuminated by the
headlamps.
The initial setting is position " 0".
Wiper control stalk
Windscreen wipers
Fast wiping (heavy rain).
Normal wiping (moderate rain).
Intermittent wiping (proportional to
the speed of the vehicle).
Of f.
Single wipe (press down and
release).
F
R
aise the bonnet to access the control (one
per headlamp).
F
T
urn the control to adjust the height of the
headlamp beam. Raise or lower the control to the desired
position to change the wiping speed.
Lighting and visibility
Page 85 of 260
83
When you leave the vehicle, keep the key
with you and lock the vehicle.
Key left in the ignition
When opening the driver's door, an alert
message is displayed, accompanied by an
audible signal, to remind you that the key is
still in the ignition switch at position 1
(Stop).
If the key has been left in the ignition switch
at position 2
(Ignition on) , the ignition will
be switched off automatically after one
h o u r.
To switch the ignition back on, turn the key
to position 1
(Stop), then back to position 2
(Ignition on) .
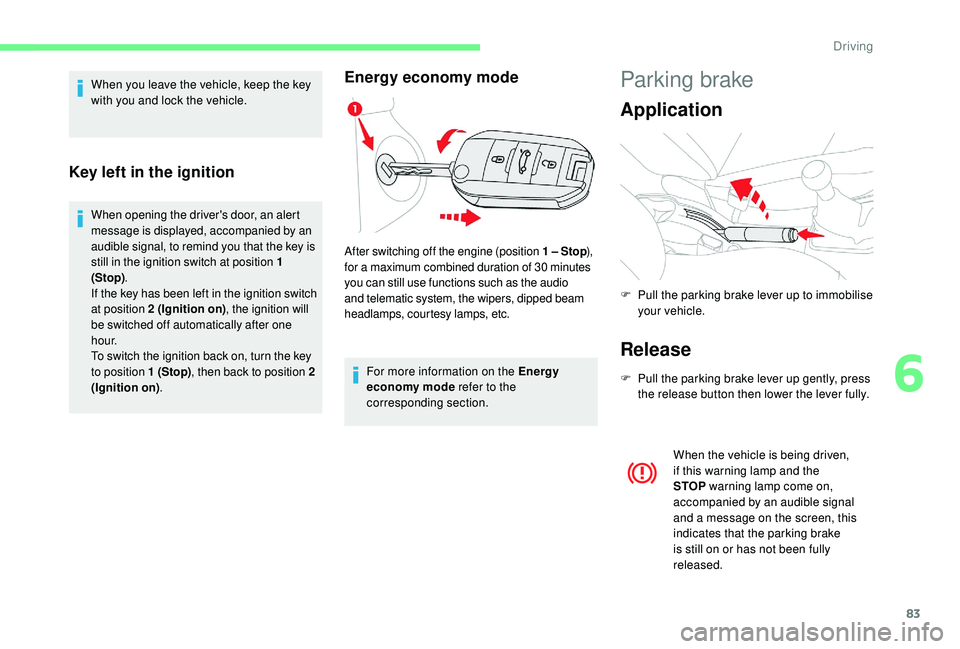
Energy economy mode
For more information on the Energy
economy mode refer to the
corresponding section.
After switching off the engine (position 1 – Stop
),
for a maximum combined duration of 30 minutes
you can still use functions such as the audio
and telematic system, the wipers, dipped beam
headlamps, courtesy lamps, etc.
Parking brake
Application
Release
F Pull the parking brake lever up gently, press the release button then lower the lever fully.
When the vehicle is being driven,
if this warning lamp and the
STOP warning lamp come on,
accompanied by an audible signal
and a message on the screen, this
indicates that the parking brake
is still on or has not been fully
released.
F
P
ull the parking brake lever up to immobilise
your vehicle.
6
Driving
Page 129 of 260
127
In some weather conditions (e.g. low
temperature or humidity), the presence
of misting on the internal sur face of the
glass of the headlamps and rear lamps is
normal; it disappears after the lamps have
been on for a few minutes.
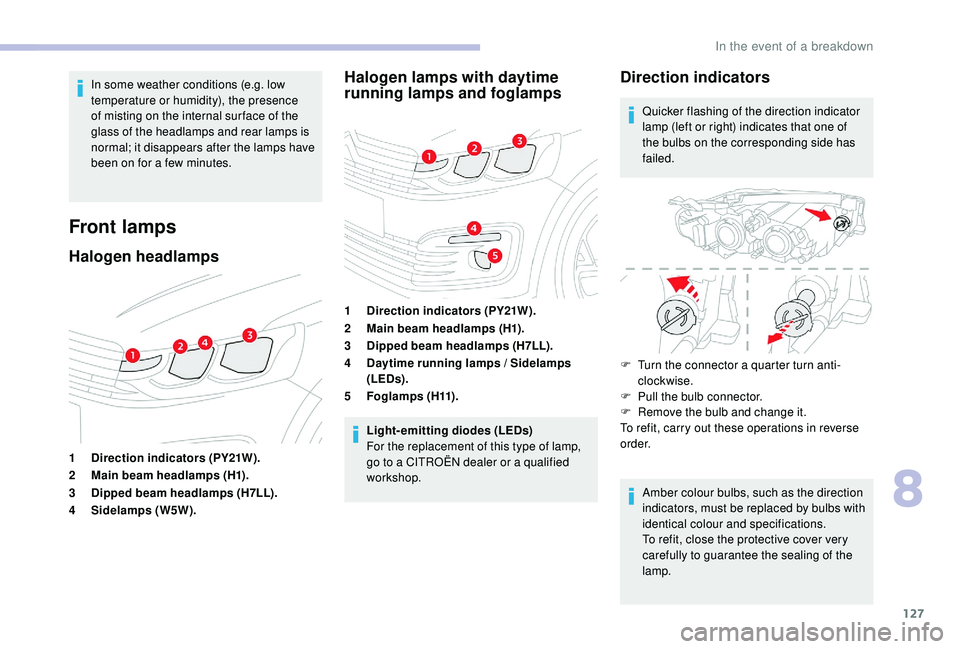
Front lamps
Halogen headlampsHalogen lamps with daytime
running lamps and foglamps
1
Direction indicators (PY21W).
2 Main beam headlamps (H1).
3 Dipped beam headlamps (H7LL).
4 Sidelamps (W5W). 1
Direction indicators (PY21W).
2 Main beam headlamps (H1).
3 Dipped beam headlamps (H7LL).
4 Daytime running lamps / Sidelamps (LEDs).
5 Fo g l a m p s ( H11) .
Light-emitting diodes (LEDs)
For the replacement of this type of lamp,
go to a CITROËN dealer or a qualified
workshop.
Direction indicators
Quicker flashing of the direction indicator
lamp (left or right) indicates that one of
the bulbs on the corresponding side has
failed.
F
T
urn the connector a quarter turn anti-
clockwise.
F
P
ull the bulb connector.
F
R
emove the bulb and change it.
To refit, carry out these operations in reverse
o r d e r.
Amber colour bulbs, such as the direction
indicators, must be replaced by bulbs with
identical colour and specifications.
To refit, close the protective cover very
carefully to guarantee the sealing of the
lamp.
8
In the event of a breakdown
Page 137 of 260
135
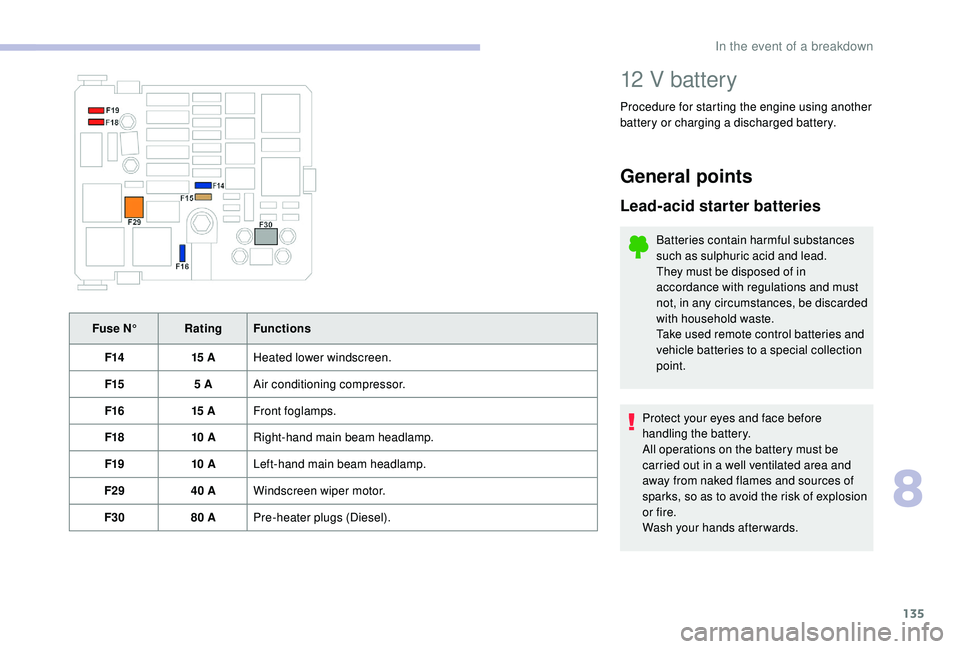
Fuse N°Rating Functions
F14 15
AHeated lower windscreen.
F15 5
AAir conditioning compressor.
F16 15
AFront foglamps.
F18 10
ARight-hand main beam headlamp.
F19 10
ALeft-hand main beam headlamp.
F29 40
AWindscreen wiper motor.
F30 80
APre-heater plugs (Diesel).
12 V battery
Procedure for starting the engine using another
battery or charging a discharged battery.
General points
Lead-acid starter batteries
Batteries contain harmful substances
such as sulphuric acid and lead.
They must be disposed of in
accordance with regulations and must
not, in any circumstances, be discarded
with household waste.
Take used remote control batteries and
vehicle batteries to a special collection
point.
Protect your eyes and face before
handling the battery.
All operations on the battery must be
carried out in a well ventilated area and
away from naked flames and sources of
sparks, so as to avoid the risk of explosion
or fire.
Wash your hands afterwards.
8
In the event of a breakdown