ESP CITROEN C-ELYSÉE 2023 Owners Manual
[x] Cancel search | Manufacturer: CITROEN, Model Year: 2023, Model line: C-ELYSÉE, Model: CITROEN C-ELYSÉE 2023Pages: 180, PDF Size: 4.77 MB
Page 2 of 180
Access to the Handbook
ONLINE
View or download the handbook at the following
address:
http://service.citroen.com/ACddb/Scan this QR Code for direct access.
This symbol indicates the latest
information available.
Select:
–
the language,
–
the vehicle and body style,
–
the issue period of the handbook corresponding to
the date of 1st registration of the vehicle.
MOBILE
Install the MyCitro\353n App application (content
004400590044004C004F00440045004F0048000300521089004C00510048000C0011
Also available in the
Scan MyCitro\353n application.
Page 9 of 180
7
Dashboard instruments
1Instrument panel
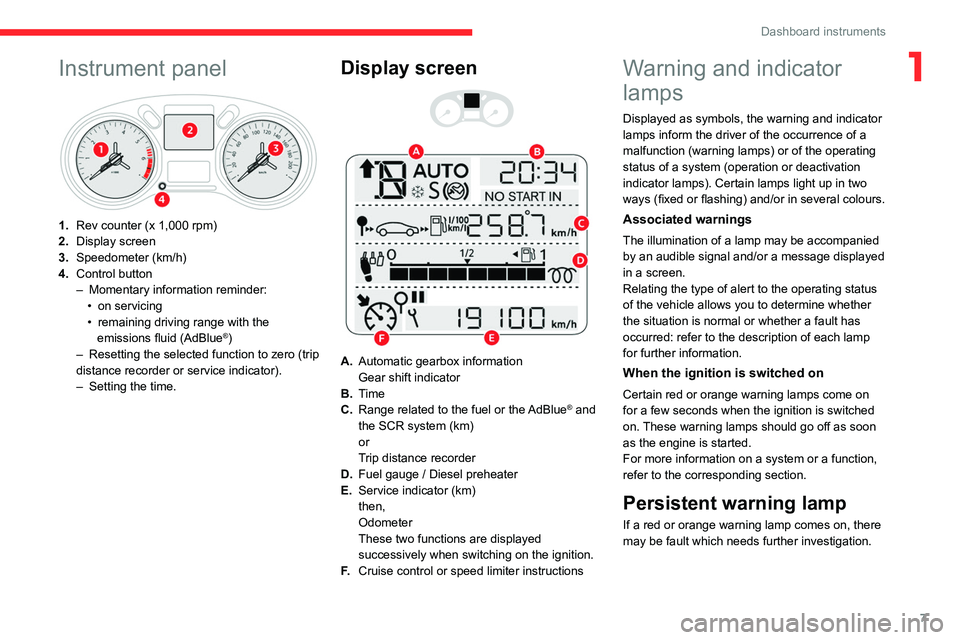
1.Rev counter (x 1,000 rpm)
2. Display screen
3. Speedometer (km/h)
4. Control button
–
Momentary information reminder:
•
on servicing
•
remaining driving range with the
emissions fluid (AdBlue®)
–
Resetting the selected function to zero (trip
distance recorder or service indicator).
–
Setting the time.
Display screen
A. Automatic gearbox information
Gear shift indicator
B. Time
C. Range related to the fuel or the AdBlue
® and
the SCR system (km)
or
Trip distance recorder
D. Fuel gauge / Diesel preheater
E. Service indicator (km)
then,
Odometer
These two functions are displayed
successively when switching on the ignition.
F. Cruise control or speed limiter instructions
Warning and indicator
lamps
Displayed as symbols, the warning and indicator
lamps inform the driver of the occurrence of a
malfunction (warning lamps) or of the operating
status of a system (operation or deactivation
indicator lamps). Certain lamps light up in two
ways (fixed or flashing) and/or in several colours.
Associated warnings
The illumination of a lamp may be accompanied
by an audible signal and/or a message displayed
in a screen.
Relating the type of alert to the operating status
of the vehicle allows you to determine whether
the situation is normal or whether a fault has
occurred: refer to the description of each lamp
for further information.
When the ignition is switched on
Certain red or orange warning lamps come on
for a few seconds when the ignition is switched
on. These warning lamps should go off as soon
as the engine is started.
For more information on a system or a function,
refer to the corresponding section.
Persistent warning lamp
If a red or orange warning lamp comes on, there
may be fault which needs further investigation.
Page 11 of 180

9
Dashboard instruments
1Never drive until completely empty, as
this could damage the emissions control and
injection systems.
Engine self-diagnostic systemFlashing.
The engine management system has a
fault.
There is a risk that the catalytic converter will be
destroyed.
You must carry out (2).
Fixed.
The emissions control system has a fault.
The warning lamp should go off when the engine
is started.
Carry out (3) without delay.
Engine preheating (Diesel)Temporarily on (up to approximately 30 seconds in
severe weather conditions).
When switching on the ignition, if the weather
conditions and the engine temperature make it
necessary.
Wait until the warning lamp goes off before
starting.
When the warning lamp goes off, starting will
occur immediately if you press and hold:
–
the clutch pedal with a manual gearbox.
–
the brake pedal with an automatic gearbox.
If the engine does not start, make the engine
starting request again, while keeping your foot
on the pedal.
Under-inflationFixed, accompanied by an audible signal
and a message.
The pressure in one or more tyres is too low.
Check the pressure of the tyres as soon as
possible.
Reinitialise the detection system after adjusting
the pressure.
Under-inflation warning lamp
flashing then fixed and Service
warning lamp fixed.
The tyre pressure monitoring system is faulty.
Under-inflation detection is no longer monitored.
Check the tyre pressures as soon as possible
and carry out (3).
Anti-lock braking system (ABS)Fixed.
The anti-lock braking system has a fault.
The vehicle retains conventional braking.
Drive carefully at moderate speed, then carry
out (3).
Airbags
Fixed.
One of the airbags or seat belt
pyrotechnic pretensioners is faulty.
Carry out (3).
Front passenger airbag (ON)Fixed.
The front passenger airbag is activated.
The control is set to the "ON" position. In this case, do not install a "rearward facing"
child seat on the front passenger seat - risk
of serious injury!
Front passenger airbag (OFF)Fixed.
The front passenger airbag is deactivated.
The control is set to the “OFF ” position.
A "rearward facing" child seat can be installed,
unless there is a fault with the airbags (Airbags
warning lamp on).
Dynamic stability control (DSC)/Anti-slip
regulation (ASR)
Flashing.
DSC/ASR system regulation is activated
in the event of a loss of grip or trajectory.
Fixed.
The DSC/ASR system has a fault.
The indicator lamp in the corresponding button
is off.
Carry out (3).
Fixed.
The system is deactivated.
The DSC/ASR system is reactivated
automatically when the vehicle is started, and at
speeds above approximately 31 mph (50
km/h).
At speeds below 31
mph (50 km/h), it can be
reactivated manually.
Hill start assistFixed.
The system has a fault.
Carry out (3).
Page 14 of 180
12
Dashboard instruments
Following this operation, if you wish to
disconnect the battery, lock the vehicle
and wait at least five minutes for the zero
reset to be taken into account.
Reminder of the servicing information
You can access the servicing information at any
time.
►
Press the trip distance recorder reset button.
The servicing
information is displayed for a few
seconds, then disappears.
AdBlue® range indicators (BlueHDi)
The Diesel BlueHDi engines are equipped with
a system that associates the SCR (Selective
Catalytic Reduction) emissions control system
and the Diesel particle filter (DPF) for the
treatment of exhaust gases. They cannot
function without AdBlue
® fluid.
When the level of AdBlue® falls below the
reserve level (between 1,500 and 0 miles (2,400
and 0
km)), a warning lamp lights up when
the ignition is switched on and an estimate
of the distance that can be travelled before
engine starting is prevented is displayed in the
instrument panel.
The engine starting prevention system required by regulations is activated
automatically once the AdBlue
® tank is empty.
It is then no longer possible to start the
engine until the minimum level of AdBlue
® has
been topped up.
Actions required related to a lack of
AdBlue®
The following warning lamps light up when the
quantity of AdBlue® is below the reserve level:
driving range of 1,500 miles (2,400 km).
Together with the warning lamps, messages
regularly remind you of the need to top up to
avoid engine starting being prevented. Refer to
the Warning and indicator lamps section for
details of the messages displayed.
For more information on AdBlue®
(BlueHDi) and in particular on topping
up, refer to the corresponding section.
With BlueHDi engines
Warning/ indicator
lamps on Action Remaining
range
Top up. Between 1,500 miles
and 500
miles (2,400
km and 800
km)
Top up as
soon as
possible.Between
500 miles
and 62
miles (800
km and
100
km)
Warning/indicator
lamps on Action Remaining
range
A top-up is
vital, there is
a risk that the
engine will
be prevented
from starting.Between 62
miles and 0
miles (100
km and 0
km)
To be able
to restart the
engine, add at
least 10
litres
of AdBlue
® to
the tank. 0 miles (km)
Taking into account of top-up
Top-up detection may not be
instantaneous after addition. It may take a few
minutes of driving before the top-up detection
is effective.
Page 16 of 180
14
Dashboard instruments
Setting the date and time
With instrument panel
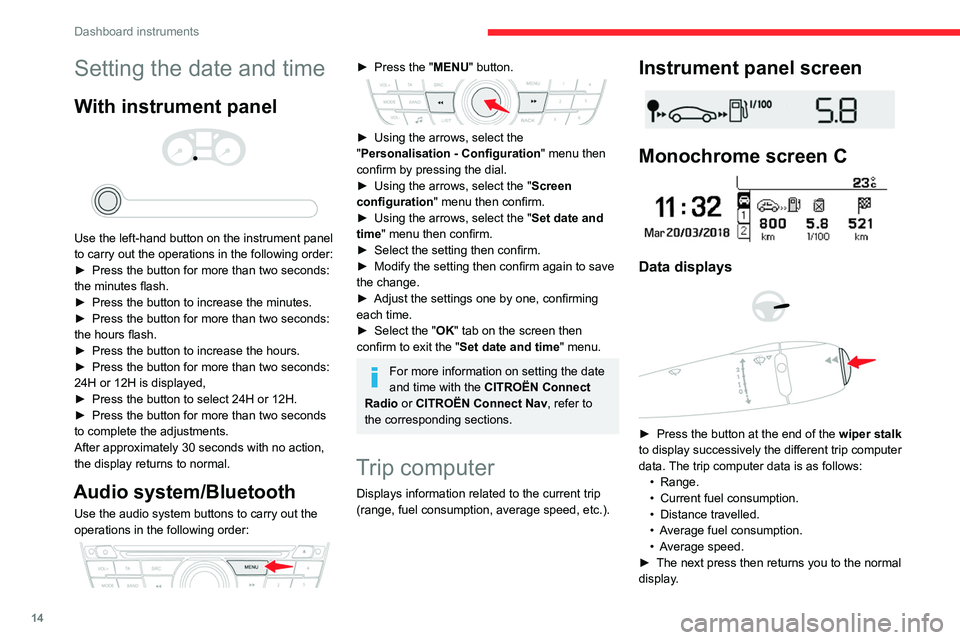
Use the left-hand button on the instrument panel
to carry out the operations in the following order:
►
Press the button for more than two seconds:
the minutes flash.
►
Press the button to increase the minutes.
►
Press the button for more than two seconds:
the hours flash.
►
Press the button to increase the hours.
►
Press the button for more than two seconds:
24H or 12H is displayed,
►
Press the button to select 24H or 12H.
►
Press the button for more than two seconds
to complete the adjustments.
After approximately 30 seconds with no action,
the display returns to normal.
Audio system/Bluetooth
Use the audio system buttons to carry out the
operations in the following order:
► Press the " MENU" button.
► Using the arrows, select the
" Personalisation - Configuration " menu then
confirm by pressing the dial.
►
Using the arrows, select the " Screen
configuration " menu then confirm.
►
Using the arrows, select the " Set date and
time
" menu then confirm.
►
Select the setting then confirm.
►
Modify the setting then confirm again to save
the change.
►
Adjust the settings one by one, confirming
each time.
►
Select the "
OK" tab on the screen then
confirm to exit the "Set date and time" menu.
For more information on setting the date
and time with the CITROËN Connect
Radio or CITROËN Connect Nav, refer to
the corresponding sections.
Trip computer
Displays information related to the current trip
(range, fuel consumption, average speed, etc.).
Instrument panel screen
Monochrome screen C
Data displays
► Press the button at the end of the wiper stalk
to display successively the different trip computer
data. The trip computer data is as follows: •
Range.
•
Current fuel consumption.
•
Distance travelled.
•
A
verage fuel consumption.
•
A
verage speed.
►
The next press then returns you to the normal
display
.
Page 19 of 180

17
Access
2Remote control / Key
Remote control function
The remote control can be used to perform
the following remote functions (depending on
version):
–
Unlocking/Locking the vehicle.
–
Unlocking and partial opening of the boot.
–
Activating/Deactivating the alarm.
–
Locating the vehicle.
–
Activating the vehicle’
s electronic immobiliser.
The remote control includes a conventional key
that allows the central unlocking/locking of the
vehicle using the door lock, as well as starting
and switching off the engine.
Back-up procedures allow the vehicle to be
locked/unlocked in the event of a failure of the
remote control, the central locking, the battery,
etc. For more information on the Back-up
procedures, refer to the corresponding section.
Built-in key
Using the remote control built-in key, you can
perform the following operations (depending on
version):
–
Unlocking/Locking the vehicle.
–
Activation/Deactivation of the manual child
lock.
–
Activation/Deactivation of the front passenger
airbag.
–
Back-up Unlocking/Locking of the doors.
–
Switching on the ignition and starting/switching
off the engine.
Unfolding / Folding the key
► Press this button to unfold or fold the key .
The remote control may be damaged if
you do not press the button.
Once the built-in key is ejected, always
keep it with you to be able to carry out
the corresponding back-up procedures.
Unlocking the vehicle
Complete unlocking is activated by default.With the audio system, the setting for
complete or selective boot unlocking is
made in the Personalisation-Configuration
menu.
With the touch screen, selective
unlocking can be configured from
the Driving/Vehicle menu.
Complete unlocking
► Press the unlocking button.
Selective unlocking
Driver's door
► Press the unlocking button.
►
Press it
again to unlock the other doors and
the boot.
Complete or selective unlocking, and alarm
deactivation (depending on version), is confirmed
by the flashing of the direction indicators.
Unlocking and partial opening of the
boot
► Press this button for more than one
second to unlock the boot. The boot
opens slightly.
This action unlocks the vehicle first.
Page 21 of 180
19
Access
2Automatic (anti-intrusion security)
The doors and boot lock automatically while
driving (speed above 6 mph (10
km/h)).
To deactivate/reactivate this function (activated
by default):
►
Press the button until an audible signal is
heard and/or a message appears on the screen.
Back-up procedures
Lost keys, remote control
Go to a CITROËN dealer with the vehicle's
registration certificate, your personal
identification documents and if possible, the label
bearing the key code.
The CITROËN dealer will be able to retrieve the
key code and the transponder code, enabling a
new key to be ordered.
Complete unlocking/locking
of the vehicle with the key
Use this procedure in the following situations:
– Remote control battery discharged.
–
Remote control malfunction.
–
V
ehicle battery discharged.
–
V
ehicle in an area subject to strong
electromagnetic interference.
In the first case, change the remote control
battery.
In the second case, reinitialise the remote
control.
Refer to the corresponding sections.
Driver's door
Insert the key in the door lock to lock or unlock
the door.
Passenger doors
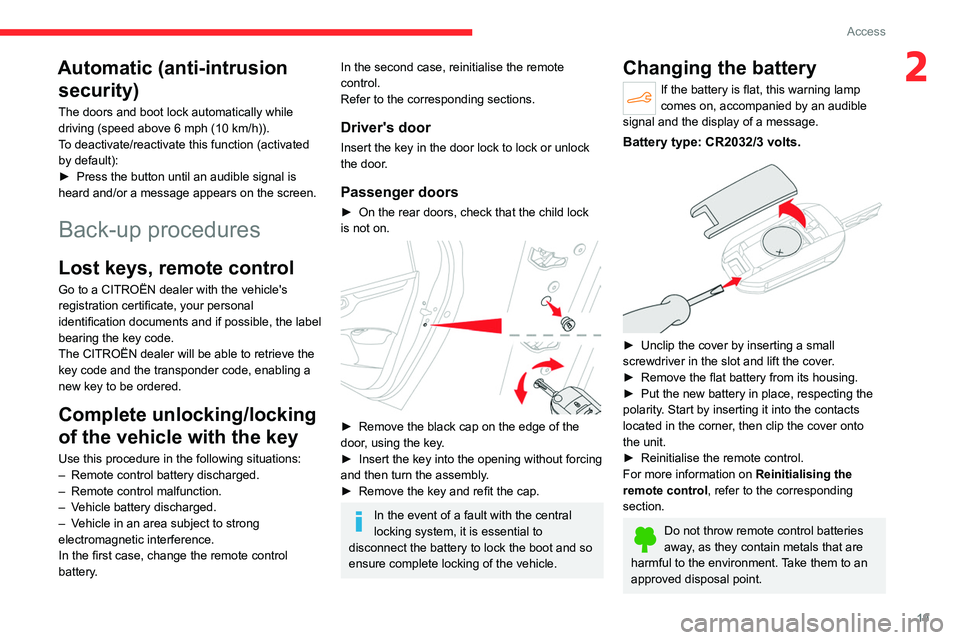
► On the rear doors, check that the child lock
is not on.
► Remove the black cap on the edge of the
door , using the key.
►
Insert the key into the opening without forcing
and then turn the assembly
.
►
Remove the key and refit the cap.
In the event of a fault with the central
locking system, it is essential to
disconnect the battery to lock the boot and so
ensure complete locking of the vehicle.
Changing the battery
If the battery is flat, this warning lamp
comes on, accompanied by an audible
signal and the display of a message.
Battery type: CR2032/3 volts.
► Unclip the cover by inserting a small
screwdriver in the slot and lift the cover .
►
Remove the flat battery from its housing.
►
Put the new battery in place, respecting the
polarity
. Start by inserting it into the contacts
located in the corner, then clip the cover onto
the unit.
►
Reinitialise the remote control.
For more information on Reinitialising the
remote control
, refer to the corresponding
section.
Do not throw remote control batteries
away, as they contain metals that are
harmful to the environment. Take them to an
approved disposal point.
Page 22 of 180
20
Access
This equipment contains a button type battery.
Do not swallow the battery. Risk of chemical
burns!
Swallowing the battery can cause serious
internal burning in only 2 hours and can be
fatal.
If batteries have been swallowed or inserted
into a part of the body, seek immediate
medical advice.
Keep new and used batteries out of the reach
of children.
If the battery compartment does not close
properly, stop using the product and keep it
out of the reach of children.
Risk of explosion if the battery is
replaced with an incorrect type!
Replace the battery with the same type.
Risk of explosion or leaking of
inflammable liquid or gas!
Do not use in/store in/place in an environment
where the temperature is extremely high or
where the pressure is extremely low due to
very high altitude.
Do not try to burn, crush or cut a used battery.
Reinitialising the remote
control
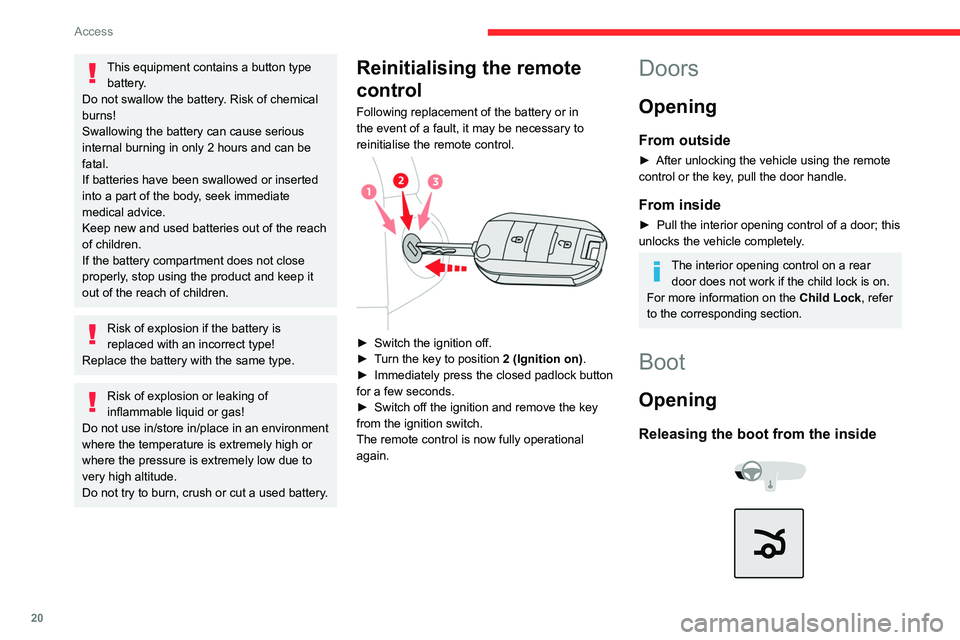
Following replacement of the battery or in
the event of a fault, it may be necessary to
reinitialise the remote control.
► Switch the ignition off.
► T urn the key to position 2 (Ignition on) .
►
Immediately press the closed padlock button
for a few seconds.
►
Switch off the ignition and remove the key
from the ignition switch.
The remote control is now fully operational
again.
Doors
Opening
From outside
► After unlocking the vehicle using the remote
control or the key , pull the door handle.
From inside
► Pull the interior opening control of a door; this
unlocks the vehicle completely .
The interior opening control on a rear door does not work if the child lock is on.
For more information on the Child Lock, refer
to the corresponding section.
Boot
Opening
Releasing the boot from the inside
Page 24 of 180
22
Access
The alarm is deactivated: the indicator lamp goes off.
Triggering of the alarm
This is indicated by sounding of the siren and
flashing of the direction indicators for thirty
seconds.
When the vehicle is unlocked using the
remote control, rapid flashing of the
indicator lamp informs you that the alarm was
triggered during your absence. Upon ignition,
this flashing stops immediately.
Locking the vehicle without
activating the alarm
► Lock the vehicle using the key .
Failure of the remote control
To deactivate the monitoring functions:
►
Unlock the vehicle using the key .
►
Open the door; this sets off the alarm.
►
Switch on the ignition; this stops the alarm.
Malfunction
When the ignition is switched on, the fixed
lighting of the red indicator lamp in the button
indicates a system malfunction.
Have it checked by a CITROËN dealer or a
qualified workshop.
Electric windows
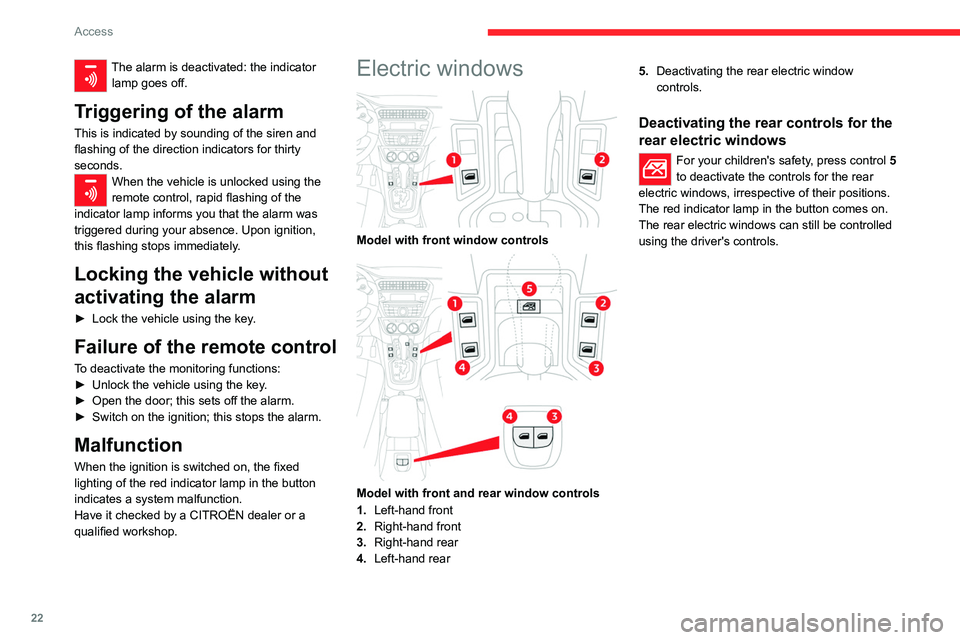
Model with front window controls
Model with front and rear window controls
1. Left-hand front
2. Right-hand front
3. Right-hand rear
4. Left-hand rear 5.
Deactivating the rear electric window
controls.
Deactivating the rear controls for the
rear electric windows
For your children's safety, press control 5
to deactivate the controls for the rear
electric windows, irrespective of their positions.
The red indicator lamp in the button comes on.
The rear electric windows can still be controlled
using the driver's controls.
Page 25 of 180
23
Ease of use and comfort
3Correct driving position
For safety reasons, adjustments must
only be made when the vehicle is
stationary.
Before taking to the road and to make the most
of the ergonomic layout of the instruments and
controls, carry out these adjustments in the
following order:
–
head restraint height.
–
seat backrest angle.
–
seat cushion height.
–
longitudinal seat position.
–
steering wheel height.
–
rear view mirror and door mirrors.
Once these adjustments have been
made, check that the instrument panel
can be viewed correctly from your driving
position.
Front head restraints
Adjusting the height
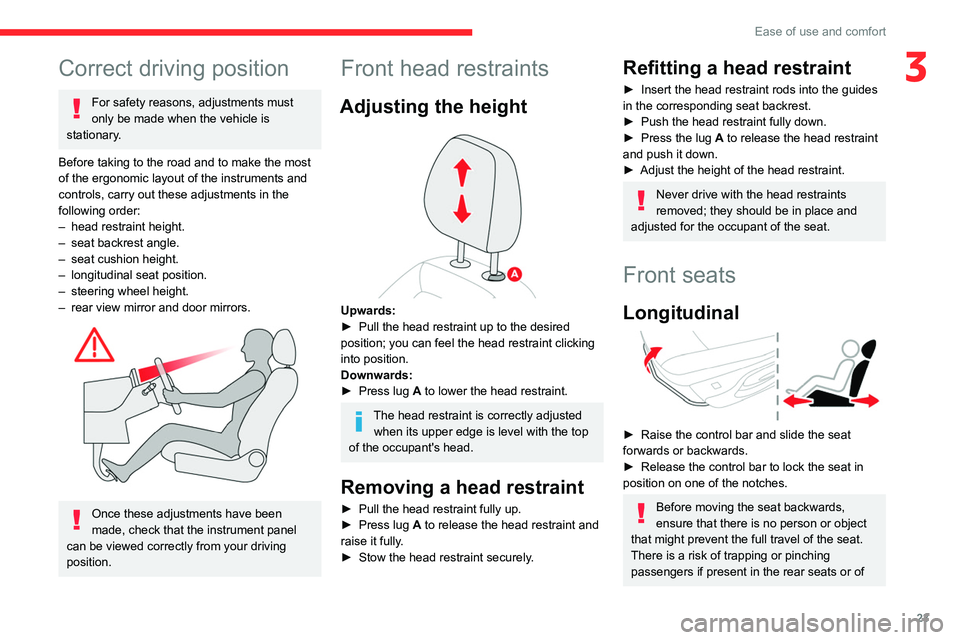
Upwards:
► Pull the head restraint up to the desired
position; you can feel the head restraint clicking
into position.
Downwards:
►
Press lug
A to lower the head restraint.
The head restraint is correctly adjusted when its upper edge is level with the top
of the occupant's head.
Removing a head restraint
► Pull the head restraint fully up.
► Press lug A to release the head restraint and
raise it fully.
►
Stow the head restraint securely
.
Refitting a head restraint
► Insert the head restraint rods into the guides
in the corresponding seat backrest.
►
Push the head restraint fully down.
►
Press the lug
A to release the head restraint
and push it down.
►
Adjust the height of the head restraint.
Never drive with the head restraints
removed; they should be in place and
adjusted for the occupant of the seat.
Front seats
Longitudinal
► Raise the control bar and slide the seat
forwards or backwards.
►
Release the control bar to lock the seat in
position on one of the notches.
Before moving the seat backwards,
ensure that there is no person or object
that might prevent the full travel of the seat.
There is a risk of trapping or pinching
passengers if present in the rear seats or of