wipers CITROEN C-ELYSÉE 2023 Owners Manual
[x] Cancel search | Manufacturer: CITROEN, Model Year: 2023, Model line: C-ELYSÉE, Model: CITROEN C-ELYSÉE 2023Pages: 180, PDF Size: 4.77 MB
Page 37 of 180

35
Lighting and visibility
4Headlamp beam height
adjustment
To avoid causing a nuisance to other road users,
the height of the headlamp beams should be
adjusted according to the load in the vehicle.
0. (Initial adjustment) Driver only or driver + front passenger
-. Driver + front passenger + rear passengers
1. Driver + front passenger + rear passengers +
load in the boot
-. Driver + front passenger + rear passengers +
load in the boot
2. Driver only + maximum authorised load in
the boot
Wiper control stalk
Before operating the wipers in wintry
conditions, clear any snow, ice or frost
from the windscreen and around the wiper
arms and blades.
Do not operate the wipers on a dry
windscreen. In extremely hot or cold
weather, check that the wiper blades are not
stuck to the windscreen before operating the
wipers.
After using an automatic car wash, you may temporarily notice abnormal noises
and poorer wiping performance.
You do not
need to replace the wiper blades.
Front wipers
Raise or lower the control to the desired position
to change the wiping speed.
Fast wiping (heavy rain).
Normal wiping (moderate rain).
Intermittent wiping (proportional to the
speed of the vehicle).
Off.
Single wipe (press down and release).
Windscreen wash
► Pull the wiper control stalk towards you and
hold.
The screenwash then the windscreen wipers
operate for a pre-determined time.
The screenwash jets are not adjustable. Do not handle them (risk of damage).
To avoid damaging the wiper blades, do not operate the screenwash if the
screenwash reservoir is empty.
Only operate the screenwash if there is no
risk of the fluid freezing on the windscreen
and hindering visibility. During the winter
period, use "very cold climate" rated products.
Never top up with water.
Special position of the
windscreen wipers
This maintenance position is used while cleaning
or replacing the wiper blades. It can also be
Page 95 of 180

93
In the event of a breakdown
8► Release the bonnet by pulling the internal
release lever , then the external safety catch.
►
Raise the bonnet.
(+)
Positive terminal with a quick-release
terminal.
(-) Negative terminal.
As the battery's negative terminal is not
accessible, a remote earth point is located on
the engine.
Starting using another battery
If the vehicle's battery is flat, the engine can be
started using a backup battery (either external or
from another vehicle) and jump leads or using a
battery booster.
Never start the engine by connecting a
battery charger.
Never use a 24
V or higher battery booster.
Check beforehand that the backup battery
has a nominal voltage of 12
V and a capacity
at least equal to that of the discharged
battery.
The two vehicles must not be in contact with
each other.
Switch off all electricity-consuming equipment
on both vehicles (audio system, wipers,
lighting, etc.).
Make sure that the jump leads are well away
from the engine’s moving parts (fan, belt,
etc.).
Do not disconnect the (+) terminal while the
engine is running.
► Lift the plastic cover on the (+) terminal, if the
vehicle has one.
►
Connect the red cable to the (+) terminal of
flat battery
A (at the metal elbow), then to the
(+) terminal of the backup battery
B or of the
booster.
►
Connect one end of the green or black cable
to the (-) terminal of the backup battery
B or of
the booster (or to an earth point on the assisting
vehicle).
►
Connect the other end of the green or black
cable to the earth point
C
.
►
Start the engine on the assisting vehicle and
leave it running for a few minutes.
►
Operate the starter on the broken down
vehicle and let the engine run.
If the engine does not start immediately
, switch
off the ignition and wait a few moments before
trying again.
►
W
ait for it to return to idle.
►
Disconnect the jump leads in reverse order.
► Refit the plastic cover to the (+) terminal, if
the vehicle has one.
►
Allow the engine to run for at least
30
minutes, with the vehicle stationary, so that
the battery reaches an adequate state of charge.
Driving immediately without having
reached a sufficient level of charge may
affect some of the vehicle's functions (e.g.
Stop & Start).
Charging the battery using a battery
charger
For optimum service life of the battery, it is
essential to maintain an adequate state of
charge.
In some circumstances, it may be necessary to
charge the battery:
–
When using the vehicle mainly for short
journeys.
–
If the vehicle is to be taken off the road for
several weeks.
Contact a CITROËN dealer or a qualified
workshop.
To charge the vehicle's battery yourself, use only a charger compatible with
lead-acid batteries with a nominal voltage of
12
V.
Follow the instructions provided by the
manufacturer of the charger.
Never reverse polarities.
Page 96 of 180

94
In the event of a breakdown
It is not necessary to disconnect the
battery.
►
Switch the ignition off.
►
Switch off all electrical consumers (audio
system, lighting, wipers, etc.).
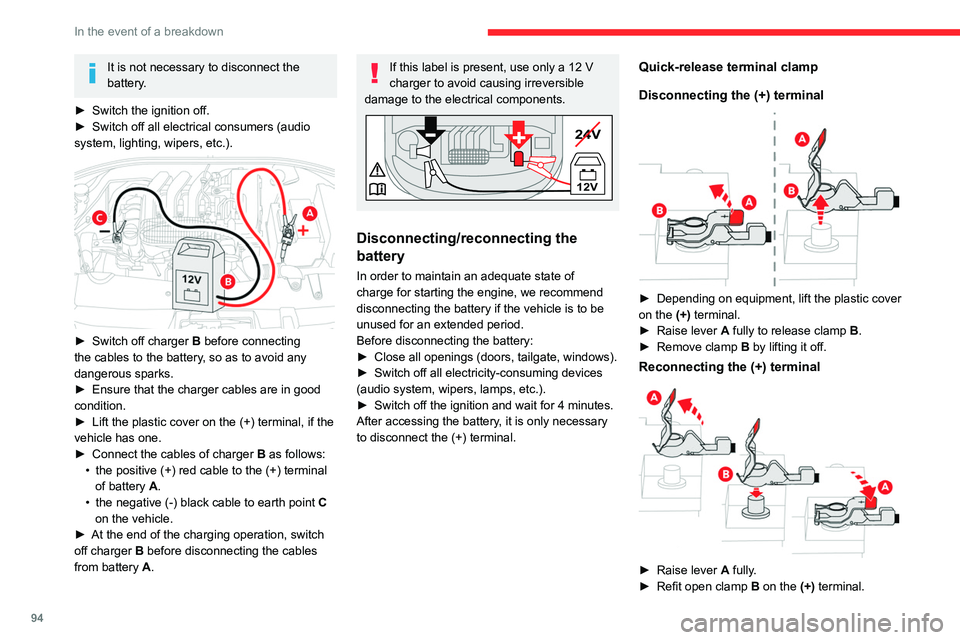
► Switch off charger B before connecting
the cables to the battery, so as to avoid any
dangerous sparks.
►
Ensure that the charger cables are in good
condition.
►
Lift the plastic cover on the (+) terminal, if the
vehicle has one.
►
Connect the cables of charger B
as follows:
•
the positive (+) red cable to the (+) terminal
of battery
A.
•
the negative (-) black cable to earth point C
on the vehicle.
►
At the end of the charging operation, switch
off charger B
before disconnecting the cables
from battery A.
If this label is present, use only a 12 V
charger to avoid causing irreversible
damage to the electrical components.
24V
12V
+
Disconnecting/reconnecting the
battery
In order to maintain an adequate state of
charge for starting the engine, we recommend
disconnecting the battery if the vehicle is to be
unused for an extended period.
Before disconnecting the battery:
►
Close all openings (doors, tailgate, windows).
►
Switch off all electricity-consuming devices
(audio system, wipers, lamps, etc.).
►
Switch off the ignition and wait for 4
minutes.
After accessing the battery, it is only necessary
to disconnect the (+) terminal.
Quick-release terminal clamp
Disconnecting the (+) terminal
► Depending on equipment, lift the plastic cover
on the (+) terminal.
►
Raise lever
A
fully to release clamp
B
.
►
Remove clamp
B
by lifting it off.
Reconnecting the (+) terminal
► Raise lever A fully.
► Refit open clamp B on the (+) terminal.
Page 155 of 180

153
Alphabetical index
Control stalk, lighting 33
Control stalk, wipers
35
Courtesy lamps
32
Cruise control
64–66
D
DAB (Digital Audio Broadcasting) -
Digital radio
117, 138–139
Date (setting)
14, 123, 145
Daytime running lamps
34, 88
Deactivating the passenger airbag
42, 45
Defrosting
26–27, 29
Defrosting, front
29
Defrosting, lower windscreen
29
Defrosting, rear screen
29–30
Demisting
26–27
Demisting, front
29
Demisting, rear
30
Dimensions
100
Dipstick
77
Direction indicators (turn signals)
34, 88, 90
Doors
20
Driving
51–52
Driving aids (recommendations)
62
Driving economically
6
Dynamic stability control (DSC)
38–39
E
EBFD 38
Eco-driving (advice)
6
Electric windows
22
Electronic brake force distribution (EBFD)
38
Emergency braking assistance (EBA)
38
Emergency warning lamps
37, 83
Emissions control system, SCR
70
Energy economy (mode)
73
Energy economy mode
73
Engine compartment
76–77
Engine, Diesel
69, 77, 83, 99
Engine, petrol
76, 98
Engines
97–99
Environment
6, 19
ESC (electronic stability control)
38
F
Filling the AdBlue® tank 72, 79
Filling the fuel tank
69–70
Filter, air
79
Filter, oil
79
Filter, particle
78–79
Filter, passenger compartment
26, 79
Fitting a wheel
85–86
Fitting roof bars
75
Fittings, interior
30
Flap, fuel filler
69–70
Flashing indicators
34, 88
Fluid, brake 78
Fluid, engine coolant
78
Foglamp, rear
33, 90
Foglamps, front
33, 90
Folding the rear seats
24
Frequency (radio)
138
Fuel
6, 69
Fuel consumption
6
Fuel level, low
69
Fuel (tank)
69–70
Fuses
91
G
Gauge, fuel 69
Gearbox, automatic
55–57, 80, 92
Gearbox, manual
55, 80
Gear lever, automatic gearbox
57
Gear lever, manual gearbox
55
Gear shift indicator
58
Glove box
30
G.P.S.
132
H
Hazard warning lamps 37, 83
Headlamps (adjustment)
35
Headlamps, dipped beam
88–89
Headlamps, halogen
88
Headlamps, main beam
88–89
Page 158 of 180

156
Alphabetical index
Stay, engine bonnet 76
Steering mounted controls,
audio
102, 113, 126
Steering wheel (adjustment)
25
Stickers, customising
82
Stopping the vehicle
53–54, 57
Stop & Start
16, 27, 29, 58–60, 69, 75, 79, 95
Storage
30–31
Sunshine sensor
26
Sun visor
30
Switch, ignition
53–54
Synchronising the remote control
20
T
Tables of engines 98–99
Tank, fuel
69–70
Technical data
98–99
Telephone
107, 120–121, 140–143
Third brake lamp
91
Time (setting)
14, 122, 145
TMC (Traffic info)
132
Tools
83, 84
Topping-up AdBlue®
72
Top Tether (fixing)
47
Total distance recorder
13
Towbar
74
Towed loads
97
Towing
95–96
Towing another vehicle
96
Towing the vehicle
95–96
Traction control (ASR) 38–39
Traffic information (TA)
103
Traffic information (TMC)
132
Trailer
74, 98–99
Trajectory control systems
38
Triangle, warning
83
Trip computer
14–16
Tyres
80, 101
Tyre under-inflation detection
60–62
U
Under-inflation (detection) 60
Unlocking
17
Unlocking from the inside
18
Unlocking the boot
17
Unlocking the doors
18–19
Updating the date
123, 145
Updating the time
122, 145
USB
104, 117–118, 139
V
Vehicle data recording and privacy 149
Ventilation
26–29
Voice commands
128–130
W
Warning and indicator lamps 7
Warning lamp, driver's
seat belt not fastened
40
Warning lamps
7
Warning lamp, seat belts
40
Warnings and indicators
7–8
Washing
63
Washing (advice)
81–82
Weights
97
Wheel, spare
80, 83–85
Windscreen, bottom of heated
29
Windscreen, heated
29
Wiper blades (changing)
35–36
Wipers
35