change wheel CITROEN C-ZERO 2017 Handbook (in English)
[x] Cancel search | Manufacturer: CITROEN, Model Year: 2017, Model line: C-ZERO, Model: CITROEN C-ZERO 2017Pages: 174, PDF Size: 4.15 MB
Page 26 of 174

24
This function gives an estimate of the number
of miles (km) that your vehicle can still cover,
based on the recent conditions of use (driving
style, use of heating, air conditioning...).
Range indicator
When the remaining range falls to a
low level, "- - -" is displayed in the
instrument panel.
The range can be displayed in miles or
kilometres.
To change the units, refer to the
"Distance recorder" section.
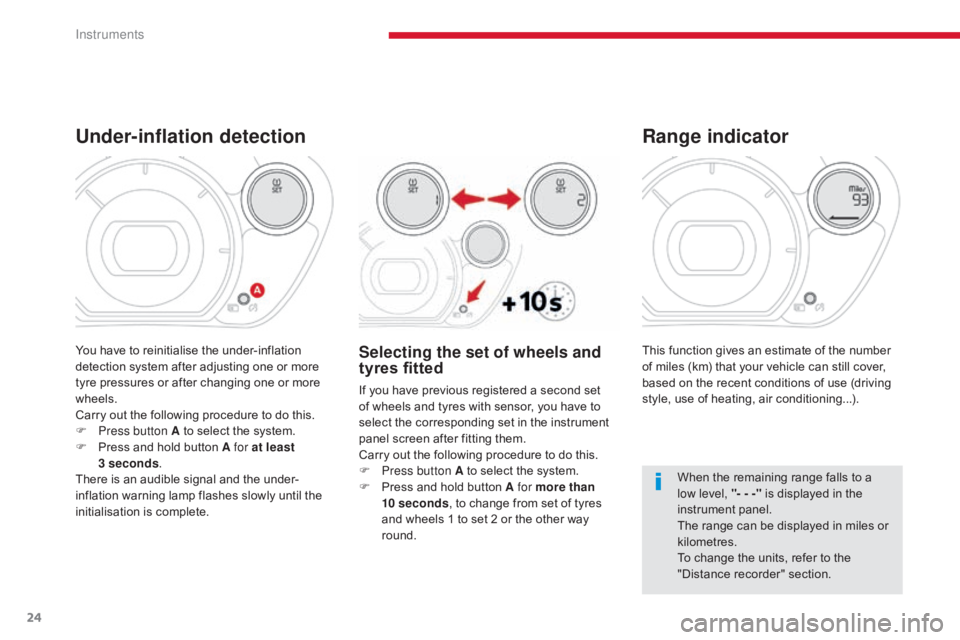
Under-inflation detection
Selecting the set of wheels and
tyres fitted
If you have previous registered a second set
of wheels and tyres with sensor, you have to
select the corresponding set in the instrument
panel screen after fitting them.
Carry out the following procedure to do this.
F
P
ress button A to select the system.
F
P
ress and hold button A for more than
10
seconds , to change from set of tyres
and wheels 1 to set 2 or the other way
round.
You have to reinitialise the under-inflation
detection system after adjusting one or more
tyre pressures or after changing one or more
wheels.
Carry out the following procedure to do this.
F
P
ress button A to select the system.
F
P
ress and hold button A for at least
3
seconds .
There is an audible signal and the under-
inflation warning lamp flashes slowly until the
initialisation is complete.
Instruments
Page 94 of 174

92
Under-inflation detection
System which continuously and automatically
checks the pressures of the four tyres after
switching on the ignition.
A pressure sensor is located in the valve of
each tyre.
The system triggers an alert if a drop in
pressure is detected in one or more tyres,
compared to the reference pressure registered
in the system. This reference pressure must be
reinitialised every time the tyre pressures are
adjusted or a wheel changed.
The system operates on condition that sensor
identifiers have first been memorised in the
system by a CITROËN dealer or a qualified
workshop.
You can memorise two sets of tyres (for
example: wheels with "standard" tyres and
wheels with "winter" tyres).The tyre under-inflation detection
system is an aid to driving which does
not replace the need for vigilance on
the part of the driver. This system does not avoid the need to
check the tyre pressures monthly and
before a long journey.
Driving with under-inflated tyres
adversely affects road holding,
extends braking distances and causes
premature tyre wear, particularly under
arduous conditions (vehicle loaded,
high speed, long journey).
Driving with under-inflated tyres
increases fuel consumption. The tyre pressures for your vehicle can
be found on the tyre pressure label.
For more information on the
Identification markings
, refer to the
corresponding section.
The tyre pressures must be checked
with the tyres "cold" (vehicle stopped
for 1 hour or after driving for less then
6 miles (10 km) at moderate speed).
Other wise, add 0.3 bar to the values
indicated on the label.
Driving
Page 97 of 174

95
Managing sets of wheels
and tyres
Selection of the other set of wheels and tyres is
done via the instrument panel screen, with the
ignition on and the vehicle stationary.
After fitting the new set of wheels and
tyres, you should check and adjust the
tyre pressures to the values specified
on the tyre pressure label.
For more information on the
Identification markings , refer to the
corresponding section. The system automatically reinitialises
the reference pressure based on the
pressure in the new set (the under-
inflation detection warning lamp flashes
during the operation).
If you have had a second set of wheels and
tyres registered by a CITROËN dealer or a
qualified workshop, every time you change the
set of wheels (fitting a set of winter tyres, for
example), you must select the set you have just
fitted in the configuration menu.
F
P
ress button A to select the function.
F
P
ress and hold button A button for more
than 10 seconds to change successively
from set of wheels and tyres 1 to set of
wheels and tyres 2 or the other way round.
6
Driving
Page 123 of 174

121
Spare wheel
Tools required
- A jack: for lifting the vehicle.
- A w heelbrace: for removing and refitting
the wheel bolts.
-
A h
andle: for operating the jack.
These tools are not supplied with your vehicle.Parking the vehicle
Immobilise the vehicle where it does not
block traffic: the ground must be level,
stable and not slippery.
Apply the parking brake, switch off the
ignition and put the drive selector in
position P to lock the wheels.
If necessary, place a chock under the
wheel diagonally opposite the wheel to
be changed.
You must ensure that the occupants get
out of the vehicle and wait where they
are safe.
Never go underneath a vehicle raised
using a jack; use an axle stand.
Wheel with wheel trim
When removing the wheel , first
remove the wheel trim using the
wheelbrace, by pulling at the valve hole.
When refitting the wheel , refit the
wheel trim starting by aligning the valve
hole with the valve, and then press on
the edge of the trim with the palm of
your hand.
8
In the event of a breakdown
Page 124 of 174

122
F Extend the jack until its head comes into contact with the jacking point A or B used. The vehicle's contact sur face A or B must be engaged with the central part of the head of the jack.
F
R
aise the vehicle until there is sufficient space between the wheel and the ground.
F
S
lacken the bolts using the wheelbrace.
F
P
osition the foot of the jack on the ground
and ensure that it is directly below the
front
A or rear B jacking point provided on
the underbody, whichever is closest to the
wheel to be changed.
Removing a wheel
In the event of a breakdown
Page 132 of 174

130
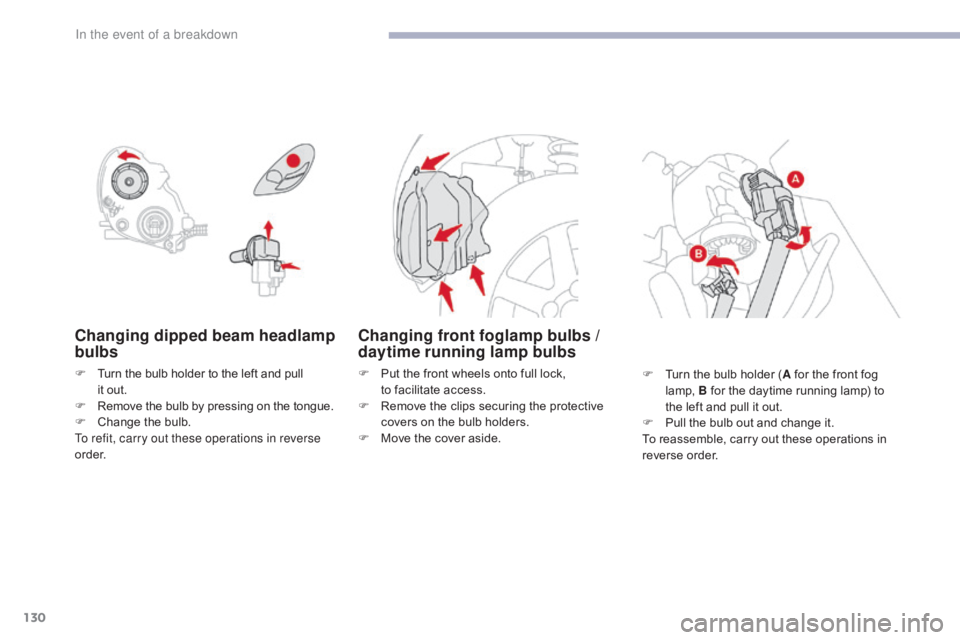
Changing dipped beam headlamp
bulbs
F Turn the bulb holder to the left and pull it out.
F
R
emove the bulb by pressing on the tongue.
F
C
hange the bulb.
To refit, carry out these operations in reverse
o r d e r.
Changing front foglamp bulbs /
d aytime running lamp bulbs
F Put the front wheels onto full lock,
to facilitate access.
F
R
emove the clips securing the protective
covers on the bulb holders.
F
M
ove the cover aside. F
T urn the bulb holder (A for the front fog
lamp, B for the daytime running lamp) to
the left and pull it out.
F
P
ull the bulb out and change it.
To reassemble, carry out these operations in
reverse order.
In the event of a breakdown